Ansible自动化运维之Playbook实战
文章目录
- Playbook简介
- playbook语法
- playbook的构成
- 修改vim编辑
- playbook文件的编写说明以及举例
- 编写说明
- 执行playbook
- 给prod组的节点安装并开启httpd服务
- 修改httpd的端口(定义触发器)
- 将http加入防火墙列表中
- template模块
- 修改apache端口
- 获取系统信息
Playbook简介
- Playbook与ad-hoc相比,是一种完全不同的运用。
- playbook是一种简单的配置管理系统与多机器部署系统的基础,且非常适合于复杂应用的部署。
- playbook中可以编排有序的执行过程,甚至于做到在多组机器间,来回有序的执行特别指定的步骤,并且可以同步或异步的发起任务。
- 使用playbook可以方便的重用这些代码,可以移植到不同的机器上面。
- playbook才是ansible真正强大之处。
playbook语法
playbook由YMAL语言编写,以下为playbook常用到的YMAL格式:
- 文件的第一行应该以"- - -"三个连字符开始,表明YMAL文件的开始。
- 在同一行中,#之后的内容表示注释,类似于shell,python和ruby。
- YMAL中的列表元素以”-”开头然后紧跟着一个空格,同一个列表中的元素应该保持相同的缩进。
- 一个字典是由一个简单的 键: 值 的形式组成(这个冒号后面必须是一个空格):
---
# 一位职工的记录
name: Example Developer
job: Developer
skill: Elite
- 字典也可以使用缩进形式来表示
---
# 一位职工的记录
{name: Example Developer, job: Developer, skill: Elite}
playbook的构成
Playbook主要有以下四部分构成:
- target section:定义将要执行playbook的远程主机组
- variable section:定义playbook运行时需要使用的变量
- task section:定义将要在远程主机上执行的任务列表
- handler section:定义task执行完成以后需要调用的任务
而Playbook对应的目录层有五个,分别如下:
一般所需的目录层有:(视情况可变化)
- vars 变量层
- tasks 任务层
- handlers 触发条件
- files 文件
- template 模板
修改vim编辑
yaml文件的格式对空格是很敏感的,一般需要顶格书写,段落划分为两个空格,为了方便我们编写.yml文件,我们可以作如下设置实现在vim一次tab两个空格:
- 在devops用户家目录下新建隐藏文件:
vim .vimrc   #编辑文件内容如下:
autocmd FileType yaml setlocal ai ts=2 sw=2 et   文件类型yaml
playbook文件的编写说明以及举例
编写说明
- 主机与用户
---
 - hosts: server2       #指定主机组,可以是一个或多个组,逗号分隔。
  remote_user: root                #指定远程主机执行的用户名
---
 - hosts: webservers
  remote_user: root
  become: yes                		#切换用户运行
  become_user: mysql          	#指定sudo用户为mysql
- Tasks列表
Play的主体部分是task列表,task列表中的各任务按次序逐个在hosts中指定的主机上执行,即在所有主机上完成第一个任务后再开始第二个任务。如果一个host执行task失败,整个tasks都会回滚。
每一个task必须有一个名称name,这样在运行playbook时,从其输出的任务执行信息中可以很好的辨别出是属于哪一个task的。
tasks:
   - name: install apache		#定义任务名

定义一个task,常见的格式:”module: options” 例如:yum: name=httpd
tasks:
    - name: "安装apache软件"
      yum: name=httpd state=present	#调用yum模块
也可以写成以下格式:
    - name: "启动apache服务"
      service:
        name=httpd
        state=started
- Ansible的自带模块中,command模块和shell模块无需使用key=value格式:
tasks:
  - name: disable selinux
    command: /sbin/setenforce 0
使用 command 和 shell 时,我们需要关心返回码信息:
tasks:
   - name: run this command and ignore the result
   shell: /usr/bin/somecommand
   ignore_errors: True	   #返回值如果不为0,就会报错,tasks停止
执行playbook
ansible-playbook apache.yml
ansible-playbook apache.yml --syntax-check    #检查yaml文件的语法是否正确
ansible-playbook apache.yml --list-task       #检查tasks任务
ansible-playbook apache.yml --list-hosts      #检查生效的主机
ansible-playbook a.yml --start-at-task="启动apache服务"     						#指定从某个task开始运行
给prod组的节点安装并开启httpd服务
- 编辑配置文件。
[devops@server1 ansible]$ vim ~/ansible/playbook.yml
---
- hosts: prod
  tasks:
    - name: install httpd    #安装服务
      yum:
        name: httpd
        state: present

    - name: start httpd    #开启服务
      service:
        name: httpd
        state: started
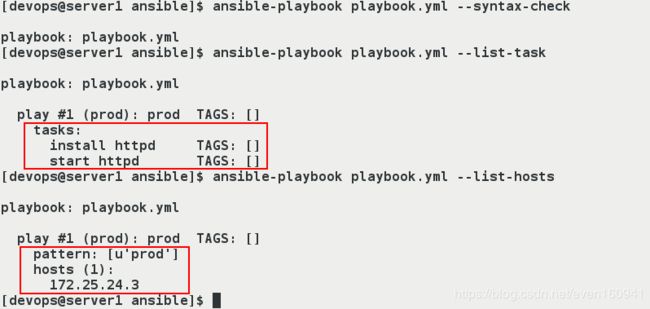
- 对我们编辑的yaml文件进行语法检测。
[devops@server1 ansible]$ ansible-playbook playbook.yml --syntax-check   #检测yaml文件的语法是否正确
[devops@server1 ansible]$ ansible-playbook playbook.yml --list-task   #检测tasks任务
[devops@server1 ansible]$ ansible-playbook playbook.yml --list-hosts  #检测生效的主机
ansible-playbook a.yml --start-at-task="启动apache服务"     #指定从某个task开始运行
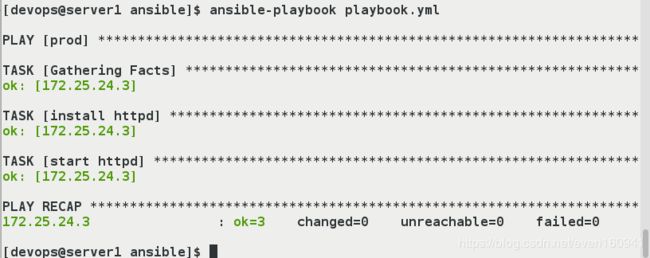
- 执行playbook中的内容。
[devops@server1 ansible]$ ansible-playbook playbook.yml
- 在server3测试:
[root@server3 ~]# rpm -q --scripts httpd   #查看安装过程以及安装前后所执行的所有脚本
[root@server3 ~]# rpm -qi httpd   #-q查询 -i安装
修改httpd的端口(定义触发器)
Handlers: 在发生改变时执行的操作
- 新建目录files,拷贝文件到此目录。
[devops@server1 ansible]$ ls
ansible.cfg  inventory  playbook.yml
[devops@server1 ansible]$ mkdir files
[devops@server1 ansible]$ cd files/
[devops@server1 files]$ scp server3:/etc/httpd/conf/httpd.conf .
- 修改apache默认监听的端口为8080方便我们看到实验现象。
[devops@server1 ansible]$ vim files/httpd.conf
 42 Listen 8080
- 编辑playbook.yml文件,在上一个例子的基础上新加入copy,handlers触发器等模块。
---
 - hosts: prod
  tasks:
    - name: install httpd
      yum:
        name: httpd
        state: present

    - name: configure httpd   #配置apache,拷贝本机的httpd.conf文件到prod组中主机的指定位置
      copy:
        src: files/httpd.conf
        dest: /etc/httpd/conf/httpd.conf
        owner: root    #文件所有人,所有组,权限。
        group: root
        mode: 644
      notify: restart httpd    #修改完后调用触发器重启服务。

    - name: start httpd
      service:
        name: httpd
        state: started

  handlers:     #定义重启服务的触发器,name和上面notify的内容一致才生效。
    - name: restart httpd
      service:
        name: httpd
        state: restarted
- 对.yml文件进行语法检测并执行。
[devops@server1 ansible]$ ansible-playbook playbook.yml --syntax-check
[devops@server1 ansible]$ ansible-playbook playbook.yml
- 在server3查看配置文件以及端口。
[root@server3 ~]# vim /etc/httpd/conf/httpd.conf
[root@server3 ~]# netstat -antlp
注意:做完实验记得将端口改回80。
将http加入防火墙列表中
- 对server1的localhost也实现免密。
[root@server2 ~]# cd /home/devops/
[root@server2 devops]# cd .ssh/
[root@server2 .ssh]# ls
authorized_keys

[devops@server1 ~]$ cd .ssh/
[devops@server1 .ssh]$ ls
id_rsa  id_rsa.pub  known_hosts
[devops@server1 .ssh]$ cp id_rsa.pub authorized_keys
[devops@server1 .ssh]$ ll
- 查看firewalld模块的说明手册。
[devops@server1 ansible]$ ansible-doc firewalld
- 编辑apache默认的发布页面,并在上一个实验的基础上修改.yml文件,这里的文件在一个实验的基础上加入了firewalld模块,以及新添加了本机做测试。
[devops@server1 ansible]$ echo liuhaoran > files/index.html   #文件内容:刘昊然
[devops@server1 ansible]$ vim playbook.yml
---
 - hosts: webserver    #针对的组为webserver(包含server2,3)
  tasks:
    - name: install httpd
      yum:
        name: httpd
        state: present

    - name: copy index.html
      copy:
        src: files/index.html
        dest: /var/www/html/index.html    #将本机的index.html文件copy到远程主机

    - name: configure httpd
      copy:
        src: files/httpd.conf
        dest: /etc/httpd/conf/httpd.conf
        owner: root
        group: root
        mode: 644
      notify: restart httpd

    - name: start httpd and firewalld
      service:
        name: "{{ item }}"     #写一个循环,开启httpd和firewalld两个服务。
        state: started
      loop:
        - httpd
        - firewalld

    - name: configure firewalld    #配置防火墙
      firewalld:
        service: http     #允许的服务有http
        permanent: yes   #永久加入列表
        immediate: yes   #立即生效
        state: enabled

  handlers:
    - name: restart httpd
      service:
        name: httpd
        state: restarted

 - hosts: localhost
  become: no    #不切换
  tasks:
    - name: test httpd
      uri:
        url: http://172.25.24.3
        status_code: 200     #返回状态码200ok
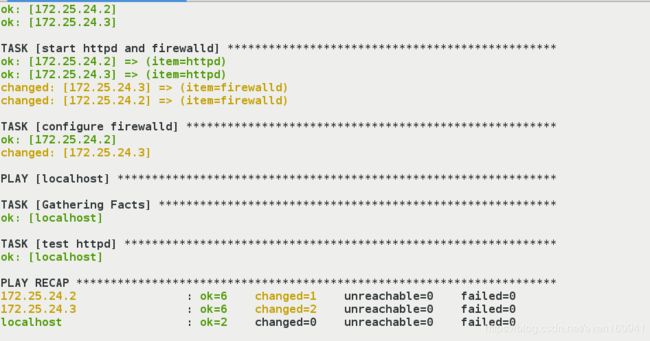
- 进行语法检测,并执行。
[devops@server1 ansible]$ ansible-playbook playbook.yml --syntax-check
[devops@server1 ansible]$ ansible-playbook playbook.yml
- 在server1本机测试,可以看到在防火墙开启的时候访问依然ok:
[devops@server1 ansible]$ curl server3
liuhaoran
[devops@server1 ansible]$ curl server2
liuhaoran
template模块
Template生成目标文件,copy无法对配置文件进行修改。
- 定义变量
[webservers]
server2 http_ip=172.25.0.2
- 在模板文件中引用变量
vim httpd.conf.j2
Listen {{ http_ip }}:{{ httpd_port }}
修改apache端口
- 查看模版template的帮助文档。
[devops@server1 ansible]$ ansible-doc template
- 新建模版目录template,拷贝并重命名文件为httpd.cond.j2。
[devops@server1 ansible]$ mkdir template
[devops@server1 ansible]$ cd template/
[devops@server1 template]$ cp ../files/httpd.conf .
[devops@server1 template]$ mv httpd.conf httpd.conf.j2
- 编辑模版文件
httpd.conf.j2,修改端口为变量的形式。
[devops@server1 template]$ vim httpd.conf.j2
 42 Listen {{ http_port }}
- 编辑.yml文件,修改上面实验中拷贝配置文件的模块copy为template模块,并定义变量http_port为80。
---
 - hosts: webserver
  vars:
    http_port: 80
  tasks:
    - name: install httpd
      yum:
        name: httpd
        state: present

    - name: copy index.html
      copy:
        src: files/index.html
        dest: /var/www/html/index.html

    - name: configure httpd
      template:    #template模块
        src: template/httpd.conf.j2   #注意路径
        dest: /etc/httpd/conf/httpd.conf
        owner: root
        group: root
        mode: 644
      notify: restart httpd

    - name: start httpd and firewalld
      service:
        name: "{{ item }}"
        state: started
      loop:
        - httpd
        - firewalld

    - name: configure firewalld
      firewalld:
        service: http
        permanent: yes
        immediate: yes
        state: enabled

  handlers:
    - name: restart httpd
      service:
        name: httpd
        state: restarted

 - hosts: localhost
  become: no
  tasks:
    - name: test httpd
      uri:
        url: http://172.25.24.3
        status_code: 200
- 查看server2和3apahce的配置文件,可以看到apashe端口都改为了80。
[root@server2 .ssh]# vim /etc/httpd/conf/httpd.conf
[root@server2 .ssh]# netstat -antlp

[root@server3 ~]# vim /etc/httpd/conf/httpd.conf
[root@server3 ~]# netstat -antlp
- 我们为了效果更加明显,在刚才的基础上继续修改:
修改模版文件,引入两个变量,主机ip和端口:
[devops@server1 ansible]$ vim template/httpd.conf.j2
 42 Listen {{ http_host}}:{{ http_port }}
- 编辑inventory文件,将ip这个变量直接赋值写入其中:
[devops@server1 ansible]$ vim inventory
localhost
[test]
server2 http_host=172.25.24.2

[prod]
server3 http_host=172.25.24.3

[webserver:children]
test
prod
- 在这里.yml文件不做修改,执行
[devops@server1 ansible]$ ansible-playbook playbook.yml。 - 分别查看server2和server3的apache配置文件,可以看到为我们定义的形式,主机ip:端口
[root@server2 .ssh]# vim /etc/httpd/conf/httpd.conf
[root@server3 ~]# vim /etc/httpd/conf/httpd.conf
获取系统信息
- 查看test组中主机预留的保留字
[devops@server1 ansible]$ ansible test -m setup #查看test组中主机预留的保留字
- 按照ansible的doc说明编辑模版文件
[devops@server1 ansible]$ vim template/file.j2
主机名: {{ ansible_facts['hostname'] }}
主机IP: {{ ansible_facts['default_ipv4']['address'] }}
主机DNS: {{ ansible_facts['dns']['nameservers'][-1] }}    #取索引
boot分区: {{ ansible_facts['devices']['vda']['partitions']['vda1']['size'] }}
内核: {{ ansible_facts['kernel'] }}
内存空闲: {{ ansible_facts['memfree_mb'] }}
- 编辑.yml文件。
[devops@server1 ansible]$ vim file.yml
---
 - hosts: all    #所有主机
  tasks:
    - name: create file
      template:
        src: template/file.j2
        dest: /mnt/file    #采集到目标主机的/mnt/file文件中
- 编辑inventory文件,即采集server2和server3主机的信息。
[devops@server1 ansible]$ vim inventory
[test]
server2 http_host=172.25.24.2

[prod]
server3 http_host=172.25.24.3

[webserver:children]
test
prod
- 执行。
[devops@server1 ansible]$ ansible-playbook file.yml


