阿里云GPU服务器ubuntu18.04 cuda9.2 cudnn7.1环境 python3 tensorflow1.8编译和whl安装
目录
- 参考链接和傻瓜安装
- 1.CUDA9.2 和驱动的安装
- 2.CUDNN7.1的安装
- 3.NCCL 2.2.13的安装
- 4.安装依赖
- 5.配置TensorFlow源
- 6.编译tensorflow
参考链接和傻瓜安装
参考链接
https://www.pytorials.com/how-to-install-tensorflow-gpu-with-cuda-9-2-for-python-on-ubuntu
我自己编译花了大概5个小时,反正是贼麻烦,如果不想自己编译的话,可以去我的云盘下载,里面有编译需要的文件,也可以直接下载whl文件进行安装。这篇博客本身是记录我自己的安装过程和解决办法的,如果嫌弃内容过于繁琐可以看我云盘内的文档。NVIDIA是驱动程序,cuda是cuda
链接: 云盘.
密码:ffjv
// 安装命令,我编译的时候配置的是python3,如果使用python2可能无法成功
pip3 install tensorflow*.whl
1.CUDA9.2 和驱动的安装
这个安装就是一个坑,我试了很多办法都没成功,最后还是直接使用安装包直接安装才成功的,反正成功的那一刻我是懵逼的。大写的狗头。先上一张cuda对应表

- 使用阿里云gpu服务器中的gpu预安装,发现阿里云中公共镜像ubuntu18.04 cuda最低支持的是10.0版本。所以当我选择ubuntu16.04时,支持的cuda确实有很多,但当我选择完一系列的配置之后发现它好像是根据自己选择的驱动版本进行安装的cuda,例如

当我选择Driver440.64时进入服务器中显示的cuda10.2,也不知道为什么。cuda9.2没装上 - 使用一个空白的ubuntu18.04系统,自己安装cuda9.2。看了很多博客,大多数说先安装驱动再安装cuda,行吧,我照做了。我去官网查看了一下系统要求,你们也可以去找自己对应的cuda要求,记得Kernel* 系统内核才是最重要的。如果系统内核和他的不匹配,安装驱动会报错。但是催的紧,我也没时间去弄内核的问题,所以就放弃了。如果你们想试试,当弄完内核匹配后可以参考这篇链接安装完成,再安装cuda9.2 安装时,不安装驱动。应该就大功告成了。ubuntu命令学习时刻到了。
//查看内核列表
sudo dpkg --get-selections |grep linux-image
//查看当前使用的内核
uname -r
// 升级/安装内核
sudo apt-get install linux-image-4.4.0-75-generic
//删除内核tip:删除当前版本重启会使用低一级的已安装内核,如果是最后一个内核版本删除之后重启会进入BIOS界面
sudo apt-get remove linux-image-4.4.0-75-generic
- 由于时间催的紧我也没仔细弄驱动内核的问题。之前不是说先装驱动么,我决定不听了,先装cuda,使用它内部的自己选择的驱动进行安装。竟然成功了。泪流满面。
1.安装驱动装备工作,ubuntu自带的nouveau驱动会影响cuda安装,不当操作会导致黑屏和登陆循环。终端运行
lsmod | grep nouveau
//如果有输出
cd /etc/modprobe.d
sudo touch blacklist-nouveau.conf
sudo gedit blacklist-nouveau.conf
//在打开的文件中输入
blacklist nouveau
options nouveau modeset=0
	保存退出
	2.安装cuda_9.2.148_396.37_linux.run
sh cuda_9.2.148_396.37_linux.run
3.设置环境
sudo vi /etc/profile
export PATH=/usr/local/cuda-9.2/bin:$PATH
export LD_LIBRARY_PATH=/usr/local/cuda-9.2/lib64$LD_LIBRARY_PATH
//重启
reboot
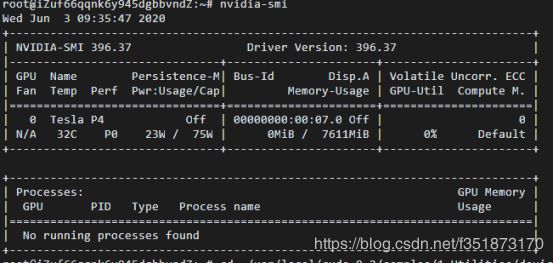
4.显卡驱动查询
Nvidia-smi
2.CUDNN7.1的安装
tar -xf cudnn-9.2-linux-x64-v7.1.tgz
//下面这一整行都是命令,不知道为什么会变暗 这是将cudnn中的文件复制到cuda9.2中
sudo cp -R cuda/include/*  /usr/local/cuda-9.2/include
//下面这一整行都是命令,不知道为什么会变暗
sudo cp -R cuda/lib64/* /usr/local/cuda-9.2/lib64
3.NCCL 2.2.13的安装
英伟达多GPU通信库,其实我也不是很清楚为什么要安装这个,感觉好陌生啊,这个我云盘里也有。
tar -xf nccl_2.2.13-1+cuda9.2_x86_64.txz
cd nccl_2.2.13-1+cuda9.2_x86_64
sudo cp -R * /usr/local/cuda-9.2/targets/x86_64-linux/
sudo ldconfig
4.安装依赖
libcupti
sudo apt-get install libcupti-dev
echo 'export LD_LIBRARY_PATH=/usr/local/cuda/extras/CUPTI/lib64:$LD_LIBRARY_PATH' >> ~/.bashrc
sudo apt-get install python3-numpy python3-dev python3-pip python3-wheel
5.配置TensorFlow源
cd ~/
wget https://github.com/bazelbuild/bazel/releases/download/0.14.0/bazel-0.14.0-installer-linux-x86_64.sh
chmod +x bazel-0.14.0-installer-linux-x86_64.sh
./bazel-0.14.0-installer-linux-x86_64.sh --user
echo 'export PATH="$PATH:$HOME/bin"' >> ~/.bashrc
重新加载环境变量
source ~/.bashrc
sudo ldconfig
下载和编译TensorFlow
//这里使用github下载会非常慢,如果你可以当我没说。你可以使用gitte作为跳板。
//https://github.com/tensorflow/tensorflow.git我替换成了我的gitte项目地址
//https://gitee.com/bocai110/tensorflow.git
cd ~/
git clone https://github.com/tensorflow/tensorflow.git
cd tensorflow
git pull
git checkout r1.8
./configure
//Give python path in
Please specify the location of python. [Default is /usr/bin/python]: /usr/bin/python3
//Press enter two times
Do you wish to build TensorFlow with jemalloc as malloc support? [Y/n]: Y
Do you wish to build TensorFlow with Google Cloud Platform support? [Y/n]: Y
Do you wish to build TensorFlow with Hadoop File System support? [Y/n]: Y
Do you wish to build TensorFlow with Amazon S3 File System support? [Y/n]: Y
Do you wish to build TensorFlow with Apache Kafka Platform support? [Y/n]: Y
Do you wish to build TensorFlow with XLA JIT support? [y/N]: N
Do you wish to build TensorFlow with GDR support? [y/N]: N
Do you wish to build TensorFlow with VERBS support? [y/N]: N
Do you wish to build TensorFlow with OpenCL SYCL support? [y/N]: N
Do you wish to build TensorFlow with CUDA support? [y/N]: Y
Please specify the CUDA SDK version you want to use, e.g. 7.0. [Leave empty to default to CUDA 9.0]: 9.2
Please specify the location where CUDA 9.2 toolkit is installed. Refer to README.md for more details. [Default is /usr/local/cuda]: /usr/local/cuda-9.2
Please specify the cuDNN version you want to use. [Leave empty to default to cuDNN 7.0]: 7.1.4
Please specify the location where cuDNN 7 library is installed. Refer to README.md for more details. [Default is /usr/local/cuda-9.2]: /usr/local/cuda-9.2
Do you wish to build TensorFlow with TensorRT support? [y/N]: N
Please specify the NCCL version you want to use. [Leave empty to default to NCCL 1.3]: 2.2
Please specify the location where NCCL 2 library is installed. Refer to README.md for more details. [Default is /usr/local/cuda-9.2]: /usr/local/cuda-9.2/targets/x86_64-linux
//Now we need compute capability which we have noted at step 1 eg. 5.0
Please note that each additional compute capability significantly increases your build time and binary size. [Default is: 5.0] 5.0
Do you want to use clang as CUDA compiler? [y/N]: N
Please specify which gcc should be used by nvcc as the host compiler. [Default is /usr/bin/gcc]: /usr/bin/gcc
Do you wish to build TensorFlow with MPI support? [y/N]: N
Please specify optimization flags to use during compilation when bazel option "--config=opt" is specified [Default is -march=native]: -march=native
Would you like to interactively configure ./WORKSPACE for Android builds? [y/N]:N
6.编译tensorflow
这个部分是时间最长的,我花了五个小时。具体时间看电脑吧,可能我电脑比较辣鸡
//这是一整行代码,双斜杠不是注释!!!!
bazel build --config=opt //tensorflow/tools/pip_package:build_pip_package
五个小时后,我这里显示编译了7千多个文件,生成whl文件
bazel-bin/tensorflow/tools/pip_package/build_pip_package tensorflow_pkg
cd tensorflow_pkg
//安装whl
pip3 install tensorflow*.whl
