Spring/SpringBoot系列之SpringBoot使用CORS解决跨域问题【十五】
说起解决跨域的办法,很多人肯定都知道JSONP,但是JSONP只支持GET请求,而现在都采用RESTFul风格的请求方式,GET/POST/PUT/DELETE都有,使用JSONP就不行了,这时候可以使用CORS来解决跨域问题。
CORS(cross-origin resource sharing),翻译过来就是跨域资源共享。
因为出于安全的考虑,浏览器不允许Ajax调用当前源之外的资源,即浏览器的同源策略。CORS需要浏览器和服务器同时支持。目前,所有主流浏览器都支持该功能,IE浏览器不能低于IE10。在浏览器端, 整个CORS通信过程,都是浏览器自动完成,不需要用户参与。对于开发者来说,CORS通信与同源的AJAX通信没有差别,代码完全一样。浏览器一旦发现AJAX请求跨源,就会自动添加一些附加的头信息,有时还会多出一次附加的请求,用户对这些都不会有感觉。因此,实现CORS通信的关键是服务器。(摘自:https://www.jianshu.com/p/f5a88983f42d)
同源就是协议、IP、端口都一样,任何一个不同,就是不同源,也就是跨域了。还有一点需要注意,跨域不只是前端到后端,两个后端之间也会产生跨域问题。
下面开始实战演练,创建两个SpringBoot项目:
1. 创建项目一
我这里使用idea创建,需要注意的是创建的时候需要勾选spring-boot-starter-web依赖,或者手动添加到pom.xml也行。
然后创建一个controller供项目二调用:
package org.linyf.cors.controller;

import org.springframework.web.bind.annotation.GetMapping;
import org.springframework.web.bind.annotation.RestController;

@RestController
public class CorsController {
    @GetMapping("/helloCors")
    public String hello(){
        return "hello cors!";
    }
}
之后启动项目一。
说明:先演示会产生跨域的情况,所以不进行任何配置。
2. 创建项目二
创建完成后,在resources资源文件目录下的static目录下新建一个index.html页面,内容如下(自己找个jquery文件就行):
<!DOCTYPE html>
<html lang="en">
<head>
    <meta charset="UTF-8">
    <title>Title</title>
    <script src="jquery-1.10.2.js"></script>
</head>
<body>
    <button onclick="getData()">getData</button>

    <script>
        function getData(){
            $.get('http://localhost:8080/helloCors', function (res) {
                alert("res");
            })
        }
    </script>
</body>
</html>
然后在application.yml中配置端口:
server:
  port: 8081
然后启动项目二。启动完成后打开浏览器访问http://localhost:8081/index.html,然后打开控制台:

点击按钮,控制台出现跨域报错:

3. 项目一添加跨域配置
package org.linyf.cors.config;

import org.springframework.context.annotation.Configuration;
import org.springframework.web.servlet.config.annotation.CorsRegistry;
import org.springframework.web.servlet.config.annotation.WebMvcConfigurer;

@Configuration
public class CorsConfig implements WebMvcConfigurer {
    @Override
    public void addCorsMappings(CorsRegistry registry) {
        registry.addMapping("/**")
        		.allowedOrigins("http://localhost:8081")
                .allowedHeaders("*")
                .allowedMethods("*")
                .maxAge(30*1000L);
    }
}
说明:
- addMapping():开启跨域请求处理并指定映射路径,“/**”为拦截所有,默认允许所有的源、所有的头、get/head/post方式和最大时间是30分钟。

- allowedOrigins():允许的源列表;
- allowedHeaders:允许的头列表;

- allowedMethods:允许的请求方式列表,默认允许简单请求方式,GET/HEAD/POST被允许;

- maxAge():可以被客户端缓存的预检请求(也作探测请求)的有效时间,单位是秒,默认30分钟。

此外还可以配置,有兴趣的可以自己了解一下:

然后再点击按钮发起请求测试,成功:

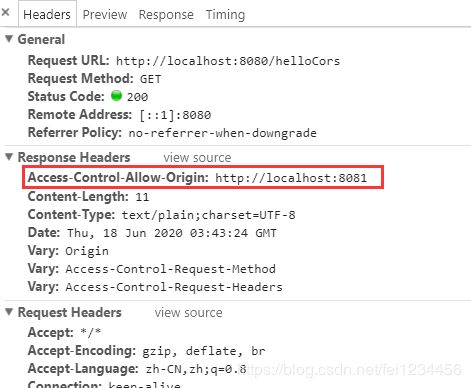
看下请求详细,响应头里有Access-Control-Allow-Origin:http://localhost:8081,就是在项目一里面配置的允许的请求源:

4. 预检请求
CORS把请求分成两类:简单请求和预检请求。
- 简单请求的 HTTP 方法只能是 GET、HEAD 或 POST
- 简单请求的 HTTP 头只能是 Accept/Accept-Language/Conent-Language/Content-Type 等
- 简单请求的 Content-Type 头只能是 text/plain、multipart/form-data 或 application/x-www-form-urlencoded
其实,简单请求就是普通 HTML Form 在不依赖脚本的情况下可以发出的请求,比如表单的 method 如果指定为 POST ,可以用 enctype 属性指定用什么方式对表单内容进行编码,合法的值就是前述这三种。
非简单请求就是普通 HTML Form 无法实现的请求。比如 PUT 方法、需要其他的内容编码方式、自定义头之类的。
上段内容摘自:https://www.jianshu.com/p/c0809fbd9335
对于非简单请求而言,浏览器实行跨域预检机制可以节约资源,也做了一道防线。因为如果后端不允许跨域,就不需要发送正式的请求;而简单请求是我们常用的操作,如果也需要发送预检请求,就浪费资源了。
下面进行实践操作,先在项目二中的index.html中添加put请求:
<!DOCTYPE html>
<html lang="en">
<head>
    <meta charset="UTF-8">
    <title>Title</title>
    <script src="jquery-1.10.2.js"></script>
</head>
<body>
    <button onclick="getData()">getData</button>
    <button onclick="putData()">putData</button>

    <script>
        function getData(){
            $.get('http://localhost:8080/helloCors', function (res) {
                alert("res");
            })
        }

        function putData() {
            $.ajax({
                url: 'http://localhost:8080/putHelloCors',
                type: 'put',
                success: function (res) {
                    alert(res);
                }
            })
        }
    </script>
</body>
</html>
然后在项目一中的controller里添加请求:
package org.linyf.cors.controller;

import org.springframework.web.bind.annotation.GetMapping;
import org.springframework.web.bind.annotation.Mapping;
import org.springframework.web.bind.annotation.PutMapping;
import org.springframework.web.bind.annotation.RestController;

@RestController
public class CorsController {
    @GetMapping("/helloCors")
    public String hello(){
        return "hello cors!";
    }
    @PutMapping("/putHelloCors")
    public String putHelloCors(){
        return "hello cors put!";
    }
}
启动两个项目后访问http://localhost:8081/index.html,打开控制台并切换到network选项卡,然后点击putData按钮:

可以看到有两个请求,点击第一个请求可以看到请求方式为OPTIONS,也就是预检请求的意思:

清空请求列表,再点击putData按钮,就只有一个请求了:
