1、介绍
-
什么是PostCSS
PostCSS是一个允许使用JS插件转换样式的工具。这些插件可以检查(lint)你的CSS,支持CSS变量和Mixins,编译尚未被浏览器广泛支持的先进的CSS语法,内联图片,以及其它很多优秀的功能。PostCSS 的 Autoprefixer 插件是最流行的 CSS 处理工具之一。
-
PostCSS特点
- 通过其插件生态系统提供多种功能
- 它的模块化,“使用你所需要的”性质
- 它的快速编译时间
- 创建自己的插件的可访问性
- 使用常规CSS的选项
- 创建不依赖于一个预处理器的库的能力
- 其无缝部署与许多流行的构建工具
2、Gulp中集成PostCSS
本篇文章将在gulp中集成PostCSS,如果你不了解Gulp使用的基础知识,请先查看3分钟学会gulp自动化构建工具
-
基本Gulp PostCSS设置
初始化gulp工程,安装gulp-postcss和gulp
在终端/命令提示符下,运行命令:
mkdir PostCssDemo && cd PostCssDemo
npm init -y
npm install --save-dev gulp gulp-postcss
touch gulpfile.js && open gulpfile.js
gulpfile.js
var gulp = require('gulp');
var postcss = require('gulp-postcss');

gulp.task('css', function () {
  var processors = [
  ];
  return gulp.src('./src/*.css')
    .pipe(postcss(processors))
    .pipe(gulp.dest('./dest'));
});
添加PostCSS插件
在终端/命令提示符下,运行命令:
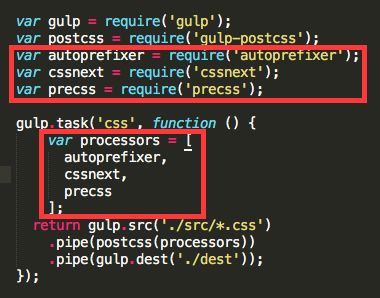
npm install autoprefixer cssnext precss --save-dev
gulpfile.js配置插件
创建 src/style.css
/* Testing autoprefixer */

.autoprefixer {
  display: flex;
}

/* Testing cssnext */

.cssnext {
  background: color(red alpha(-10%));
}

/* Testing precss */

.precss {
  @if 3 < 5 {
    background: green;
  }
  @else {
    background: blue;
  }
}
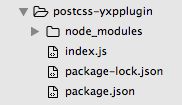
工程目录结构
运行gulp css
运行结束生成dest/style.css
/* Testing autoprefixer */
.autoprefixer {
  display: -webkit-box;
  display: -ms-flexbox;
  display: flex;
}
/* Testing cssnext */
.cssnext {
  background: rgba(255, 0, 0, 0.9);
}
/* Testing precss */
.precss {
    background: green
}
3、如何寻找需要的插件
- PostCss Github 仓库
- postcss.parts
- 在Twitter上关注@PostCSS
4、如何创建自己的插件
-
创建插件功能介绍
我将创建一个插件,通过以下语法轻松地将字体插入font-family 样式中:
h1 {
    font-family: "Open Sans", fontstack("Arial");
}
运行后
h1 {
    font-family: "Open Sans", Arial, "Helvetica Neue", Helvetica, sans-serif;
}
-
插件实现
创建postcss-myplugin插件
创建文件夹node_modules/postcss-yxpplugin
在终端/命令提示符下,运行命令:
mkdir node_modules/postcss-yxpplugin
cd node_modules/postcss-yxpplugin
npm init -y
npm install postcss --save
touch index.js && open index.js
node_modules/postcss-yxpplugin/index.js
var postcss = require('postcss');

module.exports = postcss.plugin('myplugin', function myplugin(options) {
    return function (css) {
        options = options || {};
        // Processing code will be added here
        console.log('我的插件被调用了');
    }
});
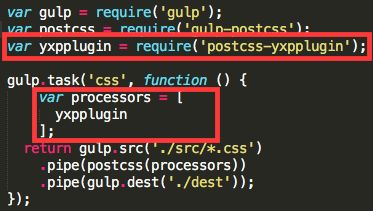
gulpfile.js配置postcss-yxpplugin插件
运行
node_modules/postcss-yxpplugin/index.js 实现插件字体插入font-family 样式功能
var postcss = require('postcss');

var fontstacks_config = {
    'Arial': 'Arial, "Helvetica Neue", Helvetica, sans-serif',
    'Times New Roman': 'TimesNewRoman, "Times New Roman", Times, Baskerville, Georgia, serif'
}

function toTitleCase(str) {
  return str.replace(/\w\S*/g, function(txt){return txt.charAt(0).toUpperCase() + txt.substr(1).toLowerCase();});
}

module.exports = postcss.plugin('yangxiaoping', function yangxiaoping(options) {

    return function (css) {

        options = options || {};
        // Processing code will be added here
        css.walkRules(function (rule) {
            rule.walkDecls(function (decl, i) {

                /**
                 * decl 提供decl.prop和decl.value2个属性
                 * 以css为例子:font-family: "Open Sans", fontstack("Arial");
                 * decl.prop === "Open Sans"
                 * decl.value === "Open Sans", fontstack("Arial")
                 */
                var value = decl.value;
                if (value.indexOf( 'fontstack(' ) !== -1) {
                    var fontstack_requested = value.match(/\(([^)]+)\)/)[1].replace(/["']/g, "");
                    var fontstack = fontstacks_config[fontstack_requested];
                    var first_font = value.substr(0, value.indexOf('fontstack('));
                    var new_value = first_font + fontstack;
                    decl.value = new_value;
                }

            });
        });

    }

});
创建src/style2.css
h1 {
    font-family: "Open Sans", fontstack("Arial");
}
运行
运行后生成style2.css
h1 {
    font-family: "Open Sans", Arial, "Helvetica Neue", Helvetica, sans-serif;
}
-
插件发布
1、在www.npmjs.org注册一个账号,这个账号会被添加到npm本地的配置中,用来发布module用。
在终端/命令提示符下,运行命令:
$ npm adduser
Username: your name
Password: your password
Email: yourmail[@gmail](/user/gmail).com
成功之后,npm会把认证信息存储在~/.npmrc中,并且可以通过以下命令查看npm当前使用的用户:
npm whoami
以上完成之后,我们终于可以发布自己的module了:
cd node_modules/postcss-yxpplugin
npm publish
查看自己发布的postcss-yxpplugin插件
-
使用postcss-yxpplugin插件
在终端/命令提示符下,运行命令:
cd PostCssDemo
nom install postcss-yxpplugin --save-dev
gulp css
5、参考资料
https://webdesign.tutsplus.com/categories/postcss
https://github.com/postcss/postcss#plugins
6、最后
示例代码地址
如果有什么疑问,可以在下面评论或者私信我。
如果您觉得有帮助,请给我点个,谢谢。


