Java 单元测试(2)mock
单元测试mock
- 前言
- 1. mock
- 1.1 什么情况需要mock
- 1.2 mock的分类
- 1.3 有哪些mock
- 2. mockito
- 2.1 mock引入
- 2.2 demo模拟
- 2.3 mock
- 2.4 InjectMocks
- 2.5 spy
- 2.6 打桩
- 2.6.1 方法打桩
- 2.6.2 异常打桩
- 2.6.3 参数、返回值打桩
- 2.7 verify灵魂
- 3. MockMvc
- 总结
前言
上一章讲解了 Java单元测试 标准模式。但实际情况是,往往我们工作中很多时候需要依赖第三方服务或者中间件才能执行单元测试,这时就需要一个关键工具mock。
1. mock
1.1 什么情况需要mock
mock并不是什么时候都需要,绝大部分情况其实不需要mock,也能完成单元测试;单元测试的本质是去除依赖来测试功能十分正常,优秀的单元测试可以极大程序验证核心功能的稳定性。而且可以继承sonarqube等平台每日构建,那什么情况需要mock呢
- MVC接口验证,比如HTTP接口
- 数据库,做单元测试不需要连接数据库
- 配置中心、网关等微服务发现治理依赖
- Redis、zookeeper、mq等第三方中间件
- 邮件、log、文件等服务
上面5点是常用的mock的地方,其实不止上面的5点,对其他服务有依赖才能完成的方法或功能都需要mock。
1.2 mock的分类
一般我们使用mock,其实还有stub这种方式也可以用来处理这种情况。
- mock
- stub
两者具有相似之处,都可以模拟外部依赖。
mock一般而言是模拟一个对象,通过动态代理,一般不会有真实的示例对象,注重功能的模拟。比如对第三方服务依赖,如配置中心,模拟的结果是输入key等参数拿到我们想要的配置能执行单元测试就可以了,并不会实现一套简单的配置中心。
stub注重对功能的测试重现,比如list,stub会新建一个list的实现,笔者只是了解一些。
1.3 有哪些mock
笔者了解到的有Mockito 、jmockit 、 powermock、EasyMock。其中笔者经常使用的是powermock与mockito,其实powermock就是在mockito或者esaymock的基础上实现字节码修改来支持私有方法与final类模拟。据说jmockit也挺强大,根据自己项目需要选型吧。
2. mockito
2.1 mock引入
以spring boot为例,spring boot的starter-test包含了很多测试依赖
		<dependency>
            <groupId>org.springframework.boot</groupId>
            <artifactId>spring-boot-starter-test</artifactId>
            <version>2.2.4.RELEASE</version>
            <scope>test</scope>
        </dependency>
引入jar依赖后,切记scope为test,表示仅测试依赖,打包不会带进jar或者war。
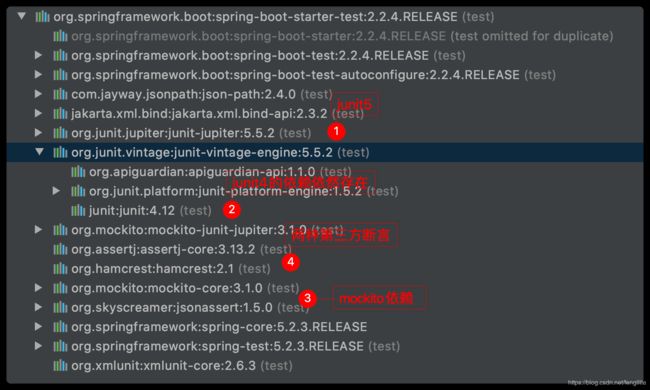
从上图可以看出spring boot推荐我们使用junit5即junit jupiter。断言推荐我们使用assertj或者hamcrest,mock推荐mockito。spring boot已经给我们考虑到常用的测试jar集成了。
要使用mockito的能力需要设置加载注解的方式,选其一即可:
- 前置设置
在junit方法之前通过MockitoAnnotations.initMocks(this);设置即可@BeforeAll public void setUp(){ MockitoAnnotations.initMocks(this); } - 注解支持
在Junit4中,使用RunWith注解加载
@RunWith(MockitoJUnitRunner.class),这种方式要注意不要与Spring等其他类冲突,比如 @RunWith(SpringRunner.class)。
笔者使用junit5,可以避免这种问题。推荐使用注解方式,代码比较美观。
在Junit5中使用@ExtendWith加载,加载的类也有改变@ExtendWith(MockitoExtension.class)
2.2 demo模拟
比如笔者有mapper的mybatis代码,正常应用需要连接数据库,才能跑起来,但是junit测试连接数据库,就会对数据库有依赖,显然不是我们想要的;而且测试后脏数据需要清理,在自动化单元测试过程中是不现实的。
模拟mapper
import org.springframework.stereotype.Component;

@Component
public class DemoMapper {

    public String getName(String id) {
        return id + "'name";
    }
}
实际的mapper是interface接口,笔者模拟是class替代
模拟service
public interface DemoService {
    String getMapperData(String id);
}

@Service
public class DemoServiceImpl implements DemoService {

    @Autowired
    private DemoMapper demoMapper;

    @Override
    public String getMapperData(String id) {
        return demoMapper.getName(id);
    }
}
模拟controller
@RestController
public class DemoController {

    @Autowired
    private DemoService demoService;

    @RequestMapping("/demo")
    public String sayDemo(String id){
        return demoService.getMapperData(id);
    }
}
编写test类,通过上一章的工具生成,加上注解与内容
这里注意@InjectMocks不能注入接口类型
@ExtendWith(MockitoExtension.class)
@SpringBootTest
class DemoServiceImplTest {

    @Mock
    private DemoMapper demoMapper;

    @InjectMocks
    private DemoServiceImpl demoService;//这里必须写实现类

    @Test
    void getMapperData() {
        when(demoMapper.getName(anyString())).thenReturn("mock");
        String result = demoService.getMapperData("sss");
        verify(demoMapper).getName(anyString());
        assertThat(result).isNotBlank().isEqualTo("mock");

    }
}
2.3 mock
动态代理生成mock实现,接口通过实现,类通过继承
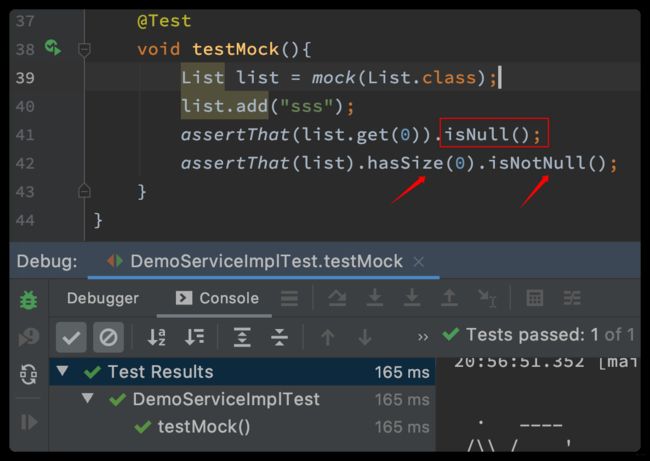
mock 生成的类,并不是具体的类,只有其行,所有方法都不是真实的方法,而且返回值都是null。
mock有两种方式
- Mock注解
- mock()静态方法
2.2的示例使用了Mock注解,推荐使用这种方式,可以与Spring Boot无缝集成;至于mock方法,很简单,经常在局部模拟使用
	@Test
    void testMock(){
        List list = mock(List.class);
    }
2.4 InjectMocks
@InjectMocks
injects mock or spy fields into tested object automatically.
意思是将mock的属性注入mock对象
2.2的示例其实已经很明显了,我们将demoMapper注入Service实现类的属性中了。并可以集成Spring
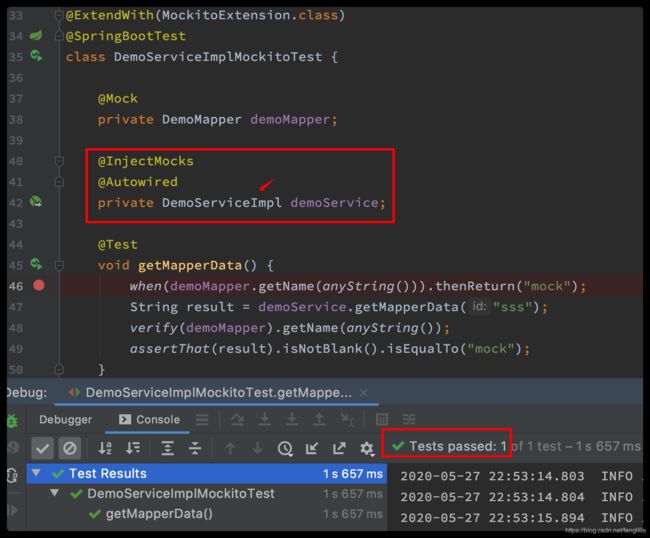
对于Spring而言,Spring自己也定义了很多Mock类,就在Spring-test的jar中
ReflectionTestUtils.setField(demoService, "demoMapper", demoMapper);
此处也可以使用Spring自带的设置属性mock的方式,如上,测试仍然OK
@ExtendWith(MockitoExtension.class)
@SpringBootTest
class DemoServiceImplTest {

    @Mock
    private DemoMapper demoMapper;

//    @InjectMocks
    @Autowired
    private DemoService demoService;

    @BeforeEach
    public void setUp(){
        ReflectionTestUtils.setField(demoService,
                "demoMapper",
                demoMapper);
    }

    @Test
    void getMapperData() {
        when(demoMapper.getName(anyString())).thenReturn("mock");
        String result = demoService.getMapperData("sss");
        verify(demoMapper).getName(anyString());
        assertThat(result).isNotBlank().isEqualTo("mock");
    }
}
2.5 spy
@Spy
Creates a spy of the real object. The spy calls real methods unless they are stubbed.
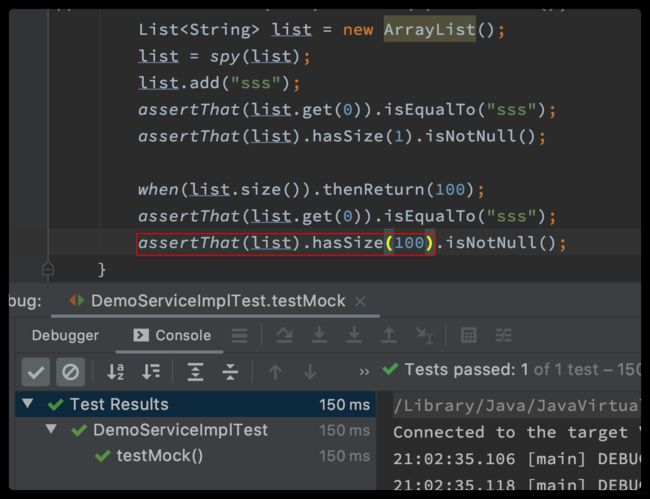
意思是将真实对象进行打桩,除了我们打桩的设置,其他仍然按照原来真实对象的方式运行。
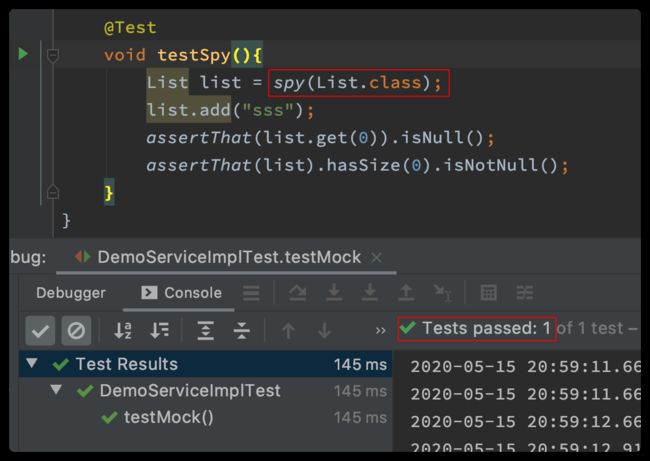
同样可以使用注解与静态方法的方式,与mock类似。
改为Spy,2.2的示例也可以正常执行。
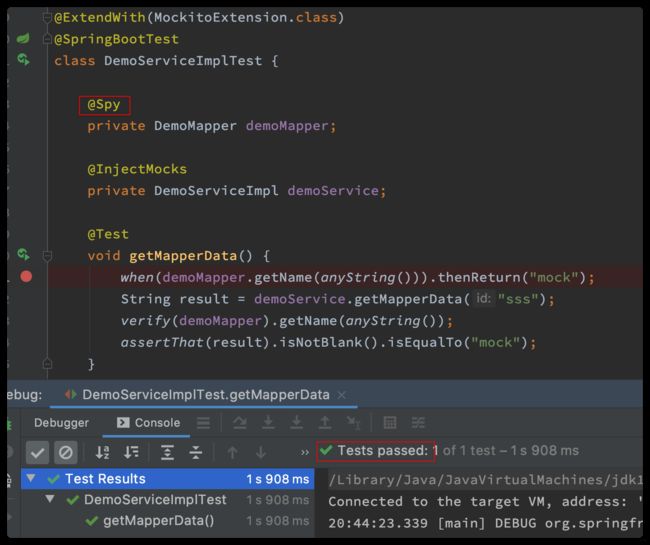
那么Spy与Mock有何异常呢,写一个test论证一下
2.6 打桩
打桩(Stub,也称存根):把所需的测试数据塞进对象中,按照模拟的输出返回结果。在Mockito 中,典型的when(…).thenReturn(…) 这个过程称为 Stub 打桩。一旦方法被 stub 了,就会返回这个 stub 的值,当然也可以返回多个值,按顺序依次调用返回。
由于Mockito使用动态代理方式打桩,所以对于 静态方法、私有方法、final方法、构造函数无能为力,如果使用多次打桩,只会使用最后一次。
2.6.1 方法打桩
when(mock.someMethod()).thenReturn(value)
可以返回多次结果
when(list.size()).thenReturn(1).thenReturn(2);
//简写,两者等同
when(list.size()).thenReturn(1,2);
第一次调用返回第一个结果,依次推进,直到一直返回最后的值
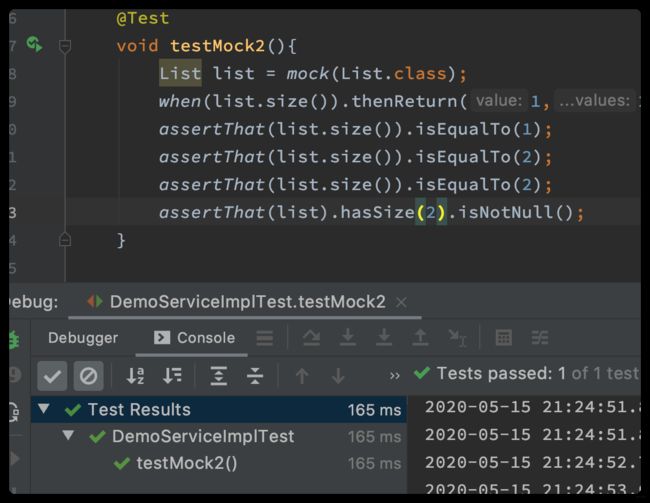
也可以反过来写,效果一样,stubbing写法
doReturn(1, 2).when(list).size();
我们知道void方法是没有返回值的,这个时候怎么模拟呢,就要用doNothing。Only void methods can doNothing()!
//Only void methods can doNothing()!
doNothing().when(list).add(anyInt(), anyString());
// 或直接
when(list).add(anyInt(), anyString());
2.6.2 异常打桩
如果方法抛出异常,或者需要模拟抛出异常,这也很简单
when(list.get(0)).thenThrow(new RuntimeException("我要抛异常"));
doThrow(new RuntimeException("我要抛异常")).when(list).get(0);
doNothing().doThrow(new RuntimeException("我要抛异常")).when(list).add(anyInt(), anyString());//流式风格,顺序生效
2.6.3 参数、返回值打桩
如果需要匹配参数,返回值,也可以支持正则表达式,注意
如果是多个参数,其中一个使用匹配表达式,则其他参数必须使用匹配表达式,否则报错

示例
when(list.get(anyInt())).thenReturn(anyString());
when(list.get(anyInt())).thenReturn(any(String.class));
doNothing().doThrow(new RuntimeException("我要抛异常")).when(list).add(anyInt(), anyString());//正确示例
如果需要根据条件动态的返回呢,这时就需要Answer接口
		doAnswer((Answer<String>) invocation -> {
            Object[] args = invocation.getArguments();
            return args + "自定义返回";
        }).when(list).contains(anyString());

        when(list.get(0)).thenAnswer(invocation -> {
            invocation.getArguments();
            invocation.getMethod();
            invocation.getMock();
            invocation.callRealMethod();
            return null;
        }).thenCallRealMethod();
功能很丰富,可以获取参数,获取mock对象,也可以执行真实方法,如果是接口mock对象执行真实方法会抛异常。
2.7 verify灵魂
我们通过上面的方式mock了,但是方法是否执行,执行几次,执行顺序等我们无从知晓,而且如果我们忘了打桩,方法执行结果为null,我们也不知道;此时我们需要验证。
	@Test
    void testMock0(){
        Map map = mock(Map.class);
        doReturn("111").when(map).put(anyString(), eq("123"));
        map.put("123", "123");
        verify(map, timeout(100).times(1)).put("123", "123");
    }
默认验证调用次数1,除了times(),还有never(),atLease(n),atMost(n)。
	public static <T> T verify(T mock) {
        return MOCKITO_CORE.verify(mock, times(1));
    }
还能验证超时timeout(100),可以串行验证。
还可以验证调用顺序,是否被调用,零调用
- verifyNoMoreInteractions() mock对象的方法被调用,未验证的不通过,即需要验证所有被调用的mock对象执行方法才通过
- verifyZeroInteractions() 验证mock对象的方法是否被调用,没有则通过
- InOrder 顺序验证方法的调用顺序,否则不通过
	@Test
    void testMock0(){
        Map map = mock(Map.class);
        doReturn("111").when(map).put(anyString(), eq("123"));
        map.put("123", "123");
        verify(map, timeout(100).times(1)).put("123", "123");

        Map map2 = mock(Map.class);
        doReturn("111").when(map2).put(anyString(), eq("123"));
        map2.put("123", "123");
        verify(map2, timeout(100).times(1)).put("123", "123");

        InOrder inOrder = inOrder( map2, map );
        inOrder.verify(map,times(1)).put("123", "123");
        inOrder.verify(map2,times(1)).put("123", "123");
    }
示例的验证交换就不通过,map先调用。此处不通过
		inOrder.verify(map2,times(1)).put("123", "123");
        inOrder.verify(map,times(1)).put("123", "123");
3. MockMvc
直接注入MockMvc,Spring boot的test自动配置框架已经生成好了

很简单,写一个单元测试试试
package com.feng.test.demo.controller;

import org.junit.jupiter.api.Test;
import org.springframework.beans.factory.annotation.Autowired;
import org.springframework.boot.test.autoconfigure.web.servlet.AutoConfigureMockMvc;
import org.springframework.boot.test.context.SpringBootTest;
import org.springframework.http.MediaType;
import org.springframework.test.web.servlet.MockMvc;
import org.springframework.test.web.servlet.request.MockMvcRequestBuilders;
import org.springframework.test.web.servlet.result.MockMvcResultMatchers;

import static org.junit.jupiter.api.Assertions.*;
import static org.springframework.test.web.servlet.result.MockMvcResultHandlers.print;

@SpringBootTest
@AutoConfigureMockMvc
class DemoControllerTest {

    @Autowired
    private MockMvc mockMvc;

    @Test
    void sayDemo() throws Exception {
        mockMvc.perform(
                //构造一个get请求
                MockMvcRequestBuilders.get("/demo")
                        .param("id", "333"))
                .andExpect(MockMvcResultMatchers.status().is(200))
                .andExpect(MockMvcResultMatchers.content().string("333-name"))
                .andDo(print())
                .andReturn();
    }
}
这里的print()方法很有意思,控制台打印
MockHttpServletRequest:
      HTTP Method = GET
      Request URI = /demo
       Parameters = {id=[333]}
          Headers = []
             Body = null
    Session Attrs = {}

Handler:
             Type = com.feng.test.demo.controller.DemoController
           Method = com.feng.test.demo.controller.DemoController#sayDemo(String)

Async:
    Async started = false
     Async result = null

Resolved Exception:
             Type = null

ModelAndView:
        View name = null
             View = null
            Model = null

FlashMap:
       Attributes = null

MockHttpServletResponse:
           Status = 200
    Error message = null
          Headers = [Content-Type:"text/plain;charset=UTF-8", Content-Length:"8"]
     Content type = text/plain;charset=UTF-8
             Body = 333-name
    Forwarded URL = null
   Redirected URL = null
          Cookies = []
当然我们也可以自己new MockMvc,Spring MockMvc构造器有StandaloneMockMvcBuilder与DefaultMockMvcBuilder两种。
@SpringBootTest
//@AutoConfigureMockMvc
class DemoControllerTest {

//    @Autowired
    private MockMvc mockMvc;

    @Autowired
    private WebApplicationContext webApplicationContext;

    @BeforeEach
    public void setUp() {
        this.mockMvc = MockMvcBuilders.webAppContextSetup(this.webApplicationContext).build();   //构造MockMvc
    }

    @Test
    void sayDemo() throws Exception {
        mockMvc.perform(
                //构造一个get请求
                MockMvcRequestBuilders.get("/demo")
                        .param("id", "333"))
                .andExpect(MockMvcResultMatchers.status().is(200))
                .andExpect(MockMvcResultMatchers.content().string("333-name"))
                .andDo(print())
                .andReturn();
    }
}
总结
本文讲了Spring-boot自带的test的jar的mock方式,对于static、final、private方法mockito就无能为力了,此时需要更强大的powerMock(基于mockito或者easyMock扩展),或者直接使用jMockit。当然一般情况
- 私有方法是不需要我们单元测试的,会在其他public方法的单元测试中被覆盖,如果没有说明单元测试覆盖不完全或者私有方法未使用。如果要单元测试可以使用反射。
- final方法,单元测试没问题,但是mock就需要字节码修改才行。或者通过别的方式。
- static方法,同final方法。

