今日头条前端面试以及题解
简答题
1.css3特性中的transform:translateZ(0)有什么作用
答案:
GPU加速,优化前端性能
2.列举三种禁止浏览器缓存的头字段,并写出响应的设置值
Expires:告诉浏览器把回送的资源缓存多长时间 -1或0则是不缓存
简要:添加Expires头能有效的利用浏览器的缓存能力来改善页面的性能,能在后续的页面中有效避免很多不必要的Http请求,WEB服务器使用Expires头来告诉Web客户端它可以使用一个组件的当前副本,直到指定的时间为止。
例如:Expires:Thu,15 Apr 2010 20:00:00 GMT; 他告诉浏览器缓存有效性持续到2010年4月15日为止,在这个时间之内相同的请求使用缓存,这个时间之外使用http请求。
Cache-Control:no-cache
Cathe-Control:max-age=315360000
Expires有一个非常大的缺陷,它使用一个固定的时间,要求服务器与客户端的时钟保持严格的同步,并且这一天到来后,服务器还得重新设定新的时间。
HTTP1.1引入了Cathe-Control,它使用max-age指定组件被缓存多久,从请求开始在max-age时间内浏览器使用缓存,之外的使用请求,这样就可以消除Expires的限制,
如果对浏览器兼容性要求很高的话,可以两个都使用。
Pragma:no-cache
3.精确获取页面元素位置的方式有哪些
那就是使用getBoundingClientRect()方法。它返回一个对象,其中包含了left、right、top、bottom四个属性,分别对应了该元素的左上角和右下角相对于浏览器窗口(viewport)左上角的距离。
var X= this.getBoundingClientRect().left;
var Y =this.getBoundingClientRect().top;
//再加上滚动距离,就可以得到绝对位置
var X= this.getBoundingClientRect().left+document.documentElement.scrollLeft;
var Y =this.getBoundingClientRect().top+document.documentElement.scrollTop;
4.正则从2018-10-07T11:48:47 Asia/zh-cn 提取出来结果[2018,10,07,11,48,47]
“2018-10-07T11:48:47 Asia/zh-cn”.match( /\d{1,}/g )
5.如何判断object是数组类型?
alert(typeof 1);                // 返回字符串"number"
alert(typeof "1");              // 返回字符串"string"
alert(typeof true);             // 返回字符串"boolean"
alert(typeof {});               // 返回字符串"object"
alert(typeof []);               // 返回字符串"object "
alert(typeof function(){});     // 返回字符串"function"
alert(typeof null);             // 返回字符串"object"
alert(typeof undefined);        // 返回字符串"undefined"
其中,typeof {}和typeof []的结果都是object,那么问题来了,我怎么通过typeof去判断一个对象是不是数组类型呢?
对象是对象,数组也是对象,js中万物皆对象,很显然,通过简单的typeof运算符是不能够达到目的,我们得换个方法。
1、从原型入手,Array.prototype.isPrototypeOf(obj);
利用isPrototypeOf()方法,判定Array是不是在obj的原型链中,如果是,则返回true,否则false。
Array.isArray([1, 2, 3]);  // true
Array.isArray({foo: 123}); // false
Array.isArray('foobar');   // false
Array.isArray(undefined);  // false
编程题
1.已知数据结构users,请实现语法支持user.unique能够按照name字段去重,并输出结构为:[“a”,“b”]
var users=[{
   id:1,name:"a"
},{
   id:2,name:"a"
},{
   id:3,name:"b"
},{
   id:4,name:"v"
}]
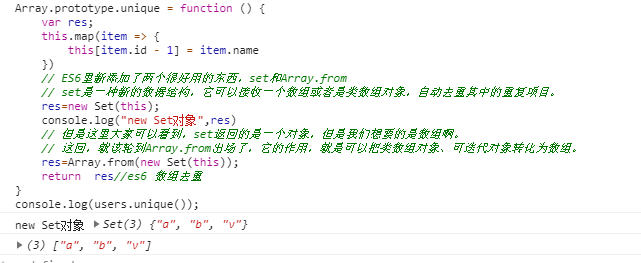
Array.prototype.unique = function () {
    var res;
    this.map(item => {
        this[item.id - 1] = item.name
    })
    // ES6里新添加了两个很好用的东西,set和Array.from
    // set是一种新的数据结构,它可以接收一个数组或者是类数组对象,自动去重其中的重复项目。
    res=new Set(this);
    console.log("new Set对象",res)
    // 但是这里大家可以看到,set返回的是一个对象,但是我们想要的是数组啊。
    // 这回,就该轮到Array.from出场了,它的作用,就是可以把类数组对象、可迭代对象转化为数组。
    res=Array.from(new Set(this));
    return  res//es6 数组去重
}
console.log(users.unique());
2.已知如下对象,请基于es6的proxy方法设计一个属性拦截读取操作的例子,要求实现去访问目标对象example中不存在的属性时,抛出错误:Property “$(property)” does not exist
const man={
    name:'jscoder',
    age:22
}
 //补全代码
const proxy = new Proxy(...)
proxy.name //"jscoder"
proxy.age //22
proxy.location //Property "$(property)" does not exist
考点
es6 javascript的Proxy 实例的方法 ,get() get方法用于拦截某个属性的读取操作。
var man = {
	name:'jscoder',
    age:22
};
var proxy = new Proxy(man, {
	get: function(target, property) {
		if(property in target) {
			return target[property];
		} else {
			throw new ReferenceError(`Property ${property} does not exist.`);
		}
	}
});
console.log(proxy.name)
console.log(proxy.age)
console.log(proxy.location)
Proxy 实例的方法的其他方法参考这个链接,很详细
https://blog.csdn.net/qq_30100043/article/details/53443017
3.给出如下虚拟dom的数据结构,如何实现简单的虚拟dom,渲染到目标dom树
//样例数据
let demoNode = ({
    tagName: 'ul',
    props: {'class': 'list'},
    children: [
        ({tagName: 'li', children: ['douyin']}),
        ({tagName: 'li', children: ['toutiao']})
    ]
});
//构建一个render函数,将demoNode对象渲染为以下dom
<ul class="list">
    <li>douyinli>
    <li>toutiaoli>
ul>
看到虚拟DOM,是不是感觉很玄乎,但是剥开它华丽的外衣,也就那样:
- 通过JavaScript来构建虚拟的DOM树结构,并将其呈现到页面中;
- 当数据改变,引起DOM树结构发生改变,从而生成一颗新的虚拟DOM树,将其与之前的DOM对比,将变化部分应用到真实的DOM树中,即页面中。
通过上面的介绍,下面,我们就来实现一个简单的虚拟DOM,并将其与真实的DOM关联。
构建虚拟DOM
虚拟DOM,其实就是用JavaScript对象来构建DOM树,如上ul组件模版,其树形结构如下:

通过JavaScript,我们可以很容易构建它,如下:
var elem = Element({
    tagName: 'ul',
    props: {'class': 'list'},
    children: [
        Element({tagName: 'li', children: ['item1']}),
        Element({tagName: 'li', children: ['item2']})
    ]
});
note:Element为一个构造函数,返回一个Element对象。为了更清晰的呈现虚拟DOM结构,我们省略了new,而在Element中实现。
/*
* @Params:
*     tagName(string)(requered)
*     props(object)(optional)
*     children(array)(optional)
* */
function Element({tagName, props, children}){
    if(!(this instanceof Element)){
        return new Element({tagName, props, children})
    }
    this.tagName = tagName;
    this.props = props || {};
    this.children = children || [];
}
好了,通过Element我们可以任意地构建虚拟DOM树了。但是有个问题,虚拟的终归是虚拟的,我们得将其呈现到页面中,不然,没卵用。。
怎么呈现呢?
从上面得知,这是一颗树嘛,那我们就通过遍历,逐个节点地创建真实DOM节点:
1. createElement;
2. createTextNode.
怎么遍历呢?
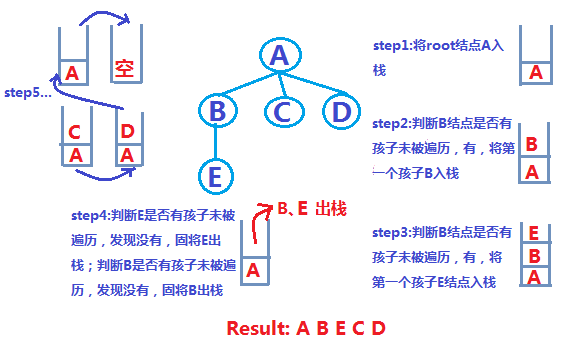
因为这是一颗树嘛,对于树形结构无外乎两种遍历:
1. 深度优先遍历(DFS)
2. 广度优先遍历(BFS)
针对实际情况,我们得采用DFS,为什么呢?
因为我们得将子节点append到父节点中
好了,那我们采用DFS,就来实现一个render函数吧,如下:
Element.prototype.render = function(){
    var el = document.createElement(this.tagName),
        props = this.props,
        propName,
        propValue;
    for(propName in props){
        propValue = props[propName];
        el.setAttribute(propName, propValue);
    }
    this.children.forEach(function(child){
        var childEl = null;
        if(child instanceof Element){
            childEl = child.render();
        }else{
            childEl = document.createTextNode(child);
        }
        el.appendChild(childEl);
    });
    return el;
};
此时,我们就可以轻松地将虚拟DOM呈现到指定真实DOM中啦。假设,我们将上诉ul虚拟DOM呈现到页面body中,如下:
var elem = Element({
    tagName: 'ul',
    props: {'class': 'list'},
    children: [
        Element({tagName: 'li', children: ['item1']}),
        Element({tagName: 'li', children: ['item2']})
    ]
});
document.querySelector('body').appendChild(elem.render());


