NS-3学习笔记 1
NS-3 是一个主要由C++编写并兼容python脚本的网络模拟工具。学习它的目的在于模拟那些不容易在物理网络中实现的过程。
我参考的资料是NS3的官方tutorial,主要内容包括:
- 介绍
- 学习资源
- 开始上手
- 基本概念
- 调整(Tweaking)
- 构建拓扑
- 跟踪
- 数据收集
总结
好了,我要开始“愉快”的学习了。
1. Introduction
NS-3是个主要面向研究和教育的离散时间模拟器。这个项目于2006年启动,开源,不与ns-2兼容。本tutorial将构建几个模拟例子,讲解关键概念和特性。
NS-3的特点:
- NS-3由一系列的库组成,这些库关系松散,可以随时引入新的库,例如可视化部分;别的模拟工具往往是一个整体,结合了GUI。
- NS-3的工作环境往往是命令行或程序界面,而不是可视化的
- NS-3主要运行于linux下
2. Resources
2.1. 网站
Official web:http://www.nsnam.org/
Documents:http://www.nsnam.org/documentation/
wiki:http://www.nsnam.org/wiki
sourcecode:http://code.nsnam.org/
2.2. 代码版本控制
使用Mercurial
2.3. 编译/配置工具
使用基于python的waf(据说是适于编译复杂大系统)
2.4. 开发环境
使用c++和python
许多ns-3的API用python写的,但模块都是用C++写的。
C++指南:http://www.cplusplus.com/doc/tutorial/
ns-3使用了GNU toolchain,了解请看http://en.wikipedia.org/wiki/GNU_toolchain
2.5. Socket编程
使用ns-3要了解Socket编程概念,新手可参考书《TCP/IP Sockets in C》Donahoo Michael J. and Calvert Kenneth L. 或其他一些资料。
3. 开始动手
NS-3是一帮闲人自发搞起来的,所以没有包装的很完美。使用前要下载源代码,然后编译部署。
3.1. 下载NS-3
安装向导文档:https://www.nsnam.org/wiki/Installation
其中有关Ubuntu下安装NS-3的部分,摘录如下:
下列程序包在Ubuntu 16.04 release下验证通过,其他版本可能有所不同。
Note: Ubuntu 14.04 LTS release requires upgrade to gcc-4.9 from default gcc-4.8.
minimal requirements for C++ (release):
apt-get install gcc g++ python
minimal requirements for Python (release):
apt-get install gcc g++ python python-dev
minimal requirements for Python (development):
apt-get install mercurial python-setuptools git
Python API scanning support: cmake libc6-dev libc6-dev-i386 g++-multilib.To rescan Python bindings requires gccxml and pygccxml, which are installed by bake. However, for Ubuntu 16.04, gccxml will not build without a patch and a build flag described here: https://www.nsnam.org/bugzilla/show_bug.cgi?id=2451
qt4 development tools are needed for Netanim animator (Note: qt version qt4, not qt5, is required)
apt-get install qt4-dev-tools libqt4-dev
Support for generating modified python bindings
apt-get install cmake libc6-dev libc6-dev-i386 g++-multilib
and you will want to install gccxml and pygccxml as per the instructions for python bindings (or through the bake build tool as described in the tutorial).
Debugging:
apt-get install gdb valgrind
GNU Scientific Library (GSL) support for more accurate WiFi error models
apt-get install gsl-bin libgsl2 libgsl-dev
The Network Simulation Cradle (nsc) requires the flex lexical analyzer and bison parser generator:
apt-get install flex bison libfl-dev
To read pcap packet traces:
apt-get install tcpdump
Database support for statistics framework:
apt-get install sqlite sqlite3 libsqlite3-dev
Xml-based version of the config store (requires libxml2 >= version 2.7):
apt-get install libxml2 libxml2-dev
A GTK-based configuration system:
apt-get install libgtk2.0-0 libgtk2.0-dev
To experiment with virtual machines and ns-3:
apt-get install vtun lxc
Support for utils/check-style.py code style check program:
apt-get install uncrustify
Doxygen and related inline documentation:
apt-get install doxygen graphviz imagemagick
apt-get install texlive texlive-extra-utils texlive-latex-extra texlive-font-utils texlive-lang-portuguese dvipng
The ns-3 manual and tutorial are written in reStructuredText for Sphinx (doc/tutorial, doc/manual, doc/models), and figures typically in dia (also needs the texlive packages above):
apt-get install python-sphinx dia
Note: Sphinx version >= 1.12 required for ns-3.15. To check your version, type “sphinx-build”. To fetch this package alone, outside of the Ubuntu package system, try “sudo easy_install -U Sphinx”.
Support for Gustavo Carneiro’s ns-3-pyviz visualizer:
apt-get install python-pygraphviz python-kiwi python-pygoocanvas libgoocanvas-dev ipython
Support for openflow module (requires some boost libraries):
apt-get install libboost-signals-dev libboost-filesystem-dev
Support for MPI-based distributed emulation:
apt-get install openmpi-bin openmpi-common openmpi-doc libopenmpi-dev
Support for bake tool:
apt-get install autoconf cvs bzr unrar
上面这段,是安装NS-3之前的预装内容。虽然有一定选择性,但建议新手逐一安装其中黑色加粗部分,不然后面配置编译时出了错,会增加个人的困惑。
补充:写完这篇文章后,我又经过多次安装尝试,仍然像初次安装时一样,经历了种种不测,所以对于这部分再补充记录一下。
1.首先在ubuntu 16.04及更高版本下安装下列包:sudo apt-get install gcc g++ python-dev python-setuptools git qt4-dev-tools libqt4-dev cmake libc6-dev libc6-dev-i386 g++-multilib gdb valgrind gsl-bin libgsl2 libgsl-dev flex bison libfl-dev tcpdump sqlite sqlite3 libsqlite3-dev libxml2 libxml2-dev libgtk2.0-0 libgtk2.0-dev vtun lxc uncrustify doxygen graphviz imagemagick texlive texlive-extra-utils texlive-latex-extra texlive-font-utils texlive-lang-portuguese dvipng python-sphinx dia python-pygraphviz python-kiwi python-pygoocanvas libgoocanvas-dev ipython libboost-signals-dev libboost-filesystem-dev openmpi-bin openmpi-common openmpi-doc libopenmpi-dev autoconf cvs bzr unrar gccxml
如果失败了就重新执行上述命令,问题可能是网络不好。
2.如果gccxml安装不上,可以参考下面的步骤
(1)sudo apt-get install libiberty apt-file
(2)在home/user/Downloads目录下,运行 git clone https://github.com/gccxml/gccxml 下载gccxml源文件
(3)在home/user/Downloads目录下,执行mkdir gccxml-build
(4)cd gccxml-build
(5)cmake ../gccxml -DCMAKE_INSTALL_PREFIX:PATH=/usr/share/gccxml/
(6)make
(7)make install3.使用pip安装pygccxml
pip install pygccxml4.建议安装mysql数据库
sudo apt-get install mysql-server mysql-client libmysqlclient-dev
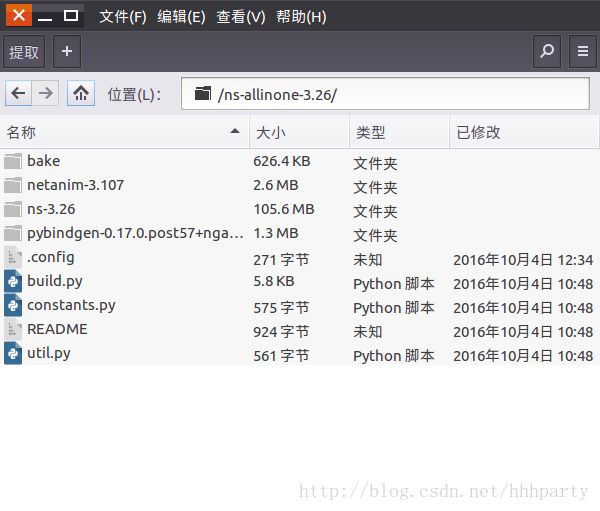
下载NS-3最新版本,从https://www.nsnam.org/releases/ 找,或者从某个版本的下载页面直接下载allinone,例如3.26版本的:https://www.nsnam.org/ns-3-26/download/
Tutorial中介绍了多种安装方法,我这里只记录了下载allinone 之后自己编译的那种。
下载完毕后,解压ns3allinone,里面的内容如下图
3.2. 编译NS-3
这里只记录使用推荐方式waf编译的内容。据说使用build.py或bake时,也是通过调用waf来完成具体配置的,而且后期做网络模拟时也要用到waf,所以学一学waf的使用很重要。
注意:最好在默认的系统python是python2.x,因为ns3使用的许多库,例如pyviz等还是支持python2.x,而且安装路径默认也是/usr/lib/python2/dist-packeges.
waf工具在ns3 allinone里一个名为ns3.xx的目录中,使用前要进入该目录,例如:
cd ns-allinone-3.26
cd ns-3.26
1.编译前首先要使用waf进行配置
步骤如下:
./waf clean
./waf configure –build-profile=optimized –enable-examples –enables-tests补充:在完成上述命令后,出现了如下汇总信息:
—- Summary of optional NS-3 features:
Build profile : debug Build directory :
BRITE Integration : not enabled (BRITE not enabled (see option –with-brite))
DES Metrics event collection : not enabled (defaults to disabled)
Emulation FdNetDevice : enabled
GNU Scientific Library (GSL) : enabled
Gcrypt library : not enabled (libgcrypt not found: you can use libgcrypt-config to find its location.)
GtkConfigStore : enabled MPI
Support : not enabled (option –enable-mpi not selected)
NS-3 Click Integration : not enabled (nsclick not enabled (see option –with-nsclick))
NS-3 OpenFlow Integration : not enabled (OpenFlow not enabled (see option –with-openflow))
Network Simulation Cradle : not enabled (NSC not found (see option –with-nsc))
PlanetLab FdNetDevice : not enabled (PlanetLab operating system not detected (see option –force-planetlab))
PyViz visualizer : enabled
Python API Scanning Support : not enabled (gccxml too old)
Python Bindings : enabled
Real SQlite stats data output : enabled
Tap FdNetDevice : enabled
Tests : enabled
Threading Primitives : enabled
Use sudo to set suid bit : not enabled (option –enable-sudo not selected)
XmlIo : enabled ‘configure’ finished successfully (3.433s)
上面not enabled需要注意,如果需要还是要安装相应的支持库或者使用–enable类参数允许启用某特性,然后重新执行本步骤。
运行第二条命令之后,会显示配置结果信息,可以对照一下自己的需求,如果自己关心的模块没有被支持,例如相应项not enabled,那就检查一下预装约束是否安装完全,重新执行上述两命令,或者追加特定的参数–enables-×××。
2.开始编译
使用下列命令
./waf
waf命令说明:
waf命令中一些用于配置阶段,一些用于编译阶段,可以使用./waf -h查看这些命令,例如:
./waf configure –enable-sudo –enable-examples –enable-tests 是在配置时,运行waf以sudo身份运行。
./waf –build-profile=debug 是在编译时启用debug
waf允许同时有多个编译结果,而不只是覆盖原来的build,当选择切换时,waf将编译那个指定的,而不是重新编译所有组件。可以先定义一些环境变量,例如:
export NS3CONFIG=”–enable-examples –enable-tests”
export NS3DEBUG=”–build-profile=debug –out=build/debug”
export NS3OPT==”–build-profile=optimized –out=build/optimized”
…
./waf configure NS3CONFIG NS3DEBUG
./waf build
…
./waf configure NS3CONFIG NS3OPT
./waf build
上面的例子中,waf使用了GCC C++编译器,g++来构建ns3.如果需要改变C++编译器,可以定义CXX环境变量,例如使用Clang C++编译器:
CXX=”clang++” ./waf configure
./waf build
3.安装
配置、编译完成后,可以使用waf来安装ns3中的各个库。但对于使用ns3来说,这步并不是必须的,因为build文件目录中已经存在可以执行的ns3程序了。
安装命令如下:
./waf install
默认情况下./waf install命令将安装ns3到/usr/local/bin中,库文件安装到/usr/local/lib中,头文件安装到/usr/local/include中。执行安装命令需要sudo权限。如果用户想将ns3安装在自定义的位置,可以在配置时使用–prefix参数,例如改到/opt/local下:
./waf configure –prefix=/opt/local
当执行waf是,waf首先使用build目录中的共享库文件,然后才会去找本地配置路径中的库文件,所以当安装库到本地系统时,最好检查一下那些将被使用的库。
4.测试NS3
运行ns-3中的单元测试,可以运行下列命令:
./test.py -c core
我这里得到的结果是:
230 of 233 tests passed (230 passed, 3 skipped, 0 failed, 0 crashed, 0 valgrind errors)
3.3 运行第一个NS3脚本
终于可以试试编写ns3脚本了,linux上安装程序总是一路坎坷。
运行脚本时,也要用waf,这保证了引用库文件路径的正确性和库的可用性。
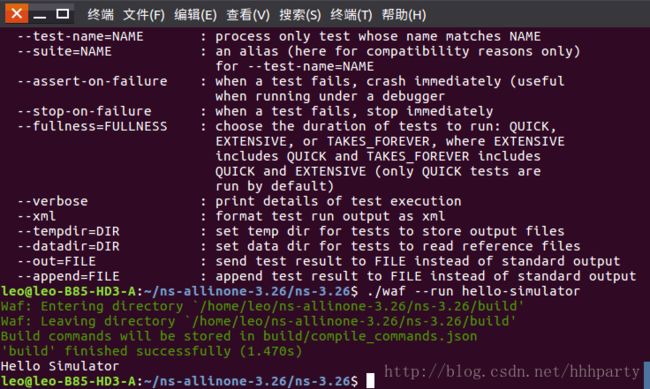
使用waf –run参数运行指定脚本:
./waf –run hello-simulator
执行后如果能出现下列字符串,说明你已经是一个NS3用户了
Hello Simulator
遗憾的是,总有人看不到。
如果你能看到waf消息,提到build成功但没有出现上述字符串,那是因为你的build模式在上面的编译环境改成optimized,而现在你要讲编译模式改成debug模式。运行下列命令:
./waf configure –build-profile=debug –enable-examples –enable-tests
./waf
ps我也是服了,这tutorial写的到处是陷阱,还好意思说为了让人更加清楚。
waf不会重新编译所有的库,只会对有影响的那些进行重编译。但工作量依旧很大。
重新编译后,再运行执行hello-simulator的命令,可以得到正确结果了
1. 程序参数
如果你的脚本需要在执行时输入参数,那么参考下列命令:
./waf –run ns3-程序名 –command-template=”%s <参数列表>”
有时在执行测试用例时,这十分有用,例如自己写了一个测试用例名叫mytest,ns3自带的test.py脚本用于启动并行测试,重复的调用真实的测试程序,可以执行下列命令:
./waf –run test-runner –command-template=”%s –suite=mytest –verbose”
要显示当前可用的测试程序,运行下列命令:
./waf –run test-runner –command-template=”%s –help”
2.调试
在运行ns3程序时,如果需要使用调试工具,如gdb,或内存检查工具valgrind,可以使用–command-template=“×××”形式。例如运行hello-simulator时使用gdb调试工具,运行下列命令:
$ ./waf –run=hello-simulator –command-template=”gdb %s –args ”
我用这个命令时,不能成功,必须在args位置写上要调试的可执行程序名,但我还不知道hello-simulator的可执行程序名叫什么,又是一个坑啊。
原文说明:Notice that the ns-3 program name goes with the –run argument, and the control utility (here gdb) is the first token in the –commmand-template argument. The –args tells gdb that the remainder of the command line belongs to the “inferior” program. (Some gdb‘s don’t understand the –args feature. In this case, omit the program arguments from the –command-template, and use the gdb command set args.)
3.工作目录
waf的工作目录在ns-allinone-3.26/ns-3.26中,改变这一工作目录可以使用“–cmd=×××”,命令如下:
./waf –cwd=…
这个问题我暂时用不到,就不深究了。有问题以后再补。今天先写到这里,明天继续。