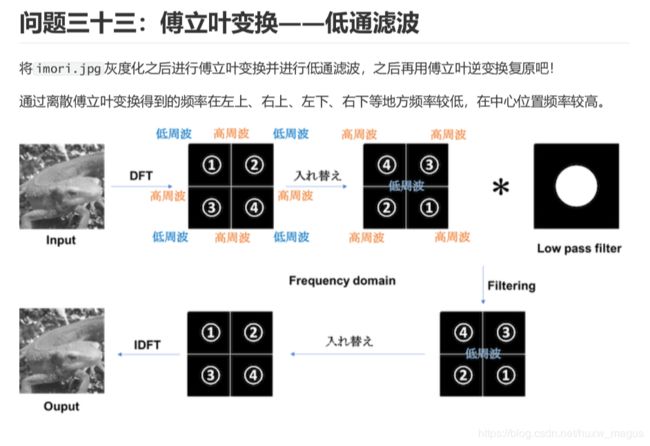
opencv打卡33: 傅立叶变换--低通滤波(代码详细)
1、介绍
2、代码
–>非常好理解的代码
import cv2
import numpy as np
import matplotlib.pyplot as plt

# gray
img = cv2.imread("lena.jpg", 0).astype(np.float32)

# 进行傅里叶变化
dft = cv2.dft(img, flags=cv2.DFT_COMPLEX_OUTPUT)
# dft=np.fft.fft2(gray)

# 将图像中的低频部分移动到图像的中心
dft_shift = np.fft.fftshift(dft)

# 定义掩模:生成的掩模中间为1周围为0
# 中心位置
rows, cols = img.shape
crow, ccol = int(rows / 2), int(cols / 2)
# 低通滤波
mask = np.zeros((rows, cols, 2), np.uint8)
mask[crow - 30:crow + 30, ccol - 30:ccol + 30] = 1

# IDFT
# 将掩模与傅里叶变化后图像相乘,保留中间部分
fshift = dft_shift * mask
# 进图像的低频和高频部分移动到图像原来的位置
f_ishift = np.fft.ifftshift(fshift)
# 进行傅里叶的逆变化
img_back = cv2.idft(f_ishift)
# 使用cv2.magnitude转化为空间域内
img_back = cv2.magnitude(img_back[:, :, 0], img_back[:, :, 1])

plt.subplot(121)
plt.imshow(img, cmap='gray')
plt.subplot(122)
plt.imshow(img_back, cmap='gray')
plt.show()
–>自我实现的代码,速度上比较优越
import cv2
import numpy as np
import matplotlib.pyplot as plt


# DFT hyper-parameters
K, L = 128, 128
channel = 3

# bgr -> gray
def bgr2gray(img):
	gray = 0.2126 * img[..., 2] + 0.7152 * img[..., 1] + 0.0722 * img[..., 0]
	return gray


# DFT
def dft(img):
	# Prepare DFT coefficient
	G = np.zeros((L, K, channel), dtype=np.complex)

	# prepare processed index corresponding to original image positions
	x = np.tile(np.arange(W), (H, 1))
	y = np.arange(H).repeat(W).reshape(H, -1)

	# dft
	for c in range(channel):
		for l in range(L):
			for k in range(K):
				G[l, k, c] = np.sum(img[..., c] * np.exp(-2j * np.pi * (x * k / K + y * l / L))) / np.sqrt(K * L)
				#for n in range(N):
				#    for m in range(M):
				#        v += gray[n, m] * np.exp(-2j * np.pi * (m * k / M + n * l / N))
				#G[l, k] = v / np.sqrt(M * N)

	return G

# IDFT
def idft(G):
	# prepare out image
	H, W, _ = G.shape
	out = np.zeros((H, W, channel), dtype=np.float32)

	# prepare processed index corresponding to original image positions
	x = np.tile(np.arange(W), (H, 1))
	y = np.arange(H).repeat(W).reshape(H, -1)

	# idft
	for c in range(channel):
		for l in range(H):
			for k in range(W):
				out[l, k, c] = np.abs(np.sum(G[..., c] * np.exp(2j * np.pi * (x * k / W + y * l / H)))) / np.sqrt(W * H)

	# clipping
	out = np.clip(out, 0, 255)
	out = out.astype(np.uint8)

	return out


# LPF
def lpf(G, ratio=0.5):
	H, W, _ = G.shape

	# transfer positions
	_G = np.zeros_like(G)
	_G[:H//2, :W//2] = G[H//2:, W//2:]
	_G[:H//2, W//2:] = G[H//2:, :W//2]
	_G[H//2:, :W//2] = G[:H//2, W//2:]
	_G[H//2:, W//2:] = G[:H//2, :W//2]

	# get distance from center (H / 2, W / 2)
	x = np.tile(np.arange(W), (H, 1))
	y = np.arange(H).repeat(W).reshape(H, -1)

	# make filter
	_x = x - W // 2
	_y = y - H // 2
	r = np.sqrt(_x ** 2 + _y ** 2)
	mask = np.ones((H, W), dtype=np.float32)
	mask[r > (W // 2 * ratio)] = 0

	mask = np.repeat(mask, channel).reshape(H, W, channel)

	# filtering
	_G *= mask

	# reverse original positions
	G[:H//2, :W//2] = _G[H//2:, W//2:]
	G[:H//2, W//2:] = _G[H//2:, :W//2]
	G[H//2:, :W//2] = _G[:H//2, W//2:]
	G[H//2:, W//2:] = _G[:H//2, :W//2]

	return G


# Read image
img = cv2.imread("imori.jpg").astype(np.float32)
H, W, C = img.shape

# Gray scale
gray = bgr2gray(img)

# DFT
G = dft(img)

# LPF
G = lpf(G)

# IDFT
out = idft(G)

# Save result
cv2.imshow("result", out)
cv2.waitKey(0)
cv2.imwrite("out.jpg", out)
3、反思
步骤写的很详细,具体应用情况有待思考。
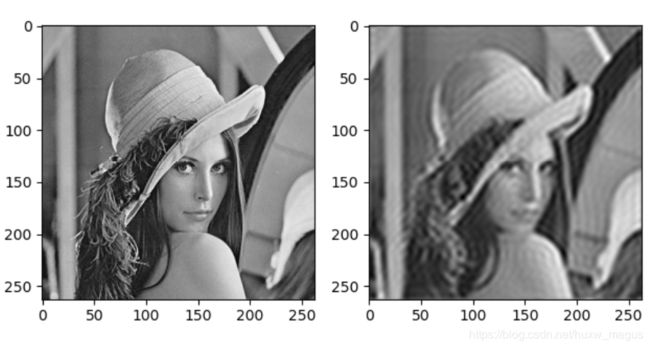
4、结果