基于Vue的组件化并发布到npm
基于Vue的组件化开发并发布到npm
- 创建项目
- 调整项目目录结构
- 修改打包配置
- 编写组件代码
- 编写组件配置文件
- 配置组件库入口文件
- 组件测试
- 发布插件库
- 配置package.json文件
- 关于README.md
- 发布到npm服务
- 可能的错误提示
- E401错误
- E402错误
- E403错误
- E404错误
- 网络问题引起的错误
在开始之前确保已经具备了Vue的开发环境。
创建项目
基于vue-cli脚手架创建项目。
vue create le-baby
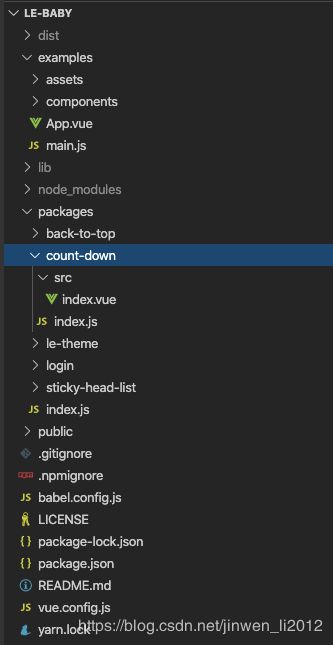
调整项目目录结构
修改打包配置
我们将src重命名为examples,并添加packages目录,用来存放我们的自定义组件。但是cli默认会启动src下的服务,如果目录名变了,我们需要手动修改配置。vue-cli中提供自定义打包配置项目的文件,如果没有,我们只需要手动创建vue.config.js即可。具体修改如下:
module.exports = {
pages: {
index: {
entry: 'examples/main.js',
template: 'public/index.html',
filename: 'index.html'
}
},
// 扩展 webpack 配置,使 packages 加入编译
chainWebpack: config => {
config.module
.rule('js')
.include
.add('/packages')
.end()
.use('babel')
.loader('babel-loader')
}
}
编写组件代码
常规的vue组件封装,此处就不给实例了。
编写组件配置文件
假如我们编写一个回到顶部的组件,配置如下:
//导入组件,确保from后路径指向组件源码文件
import LeBackToTop from './src/index'
// 为组件提供 install 安装方法,供按需引入
LeBackToTop.install = function (Vue) {
Vue.component(LeBackToTop.name, LeBackToTop)
}
// 导出组件
export default LeBackToTop
配置组件库入口文件
在packages的入口文件index.js(如果没有则自己创建)中导入组件并安装导出
// 导入组件
import LeBackToTop from './back-to-top'
import LeStickyHeadList from './sticky-head-list'
import LeLogin from './login'
import LeCountDown from './count-down'

// 组件列表
const components = [
    LeBackToTop,
    LeStickyHeadList,
    LeLogin,
    LeCountDown
]

// 定义 install 方法,接收 Vue 作为参数。如果使用 use 注册插件,那么所有的组件都会被注册
const install = function (Vue) {
  // 判断是否安装
  if (install.installed) return
  // 遍历注册全局组件
  components.map(component => Vue.component(component.name, component))
}

// 判断是否是直接引入文件
if (typeof window !== 'undefined' && window.Vue) {
  install(window.Vue)
}

export default {
  // 导出的对象必须具有 install,才能被 Vue.use() 方法安装
  install,
  // 以下是具体的组件列表
  LeBackToTop,
  LeStickyHeadList,
  LeLogin,
  LeCountDown
}
组件测试
在example下进行组件测试。
- 导入组件库
main.js下导入组件库。
import Vue from 'vue'
import ElementUI from 'element-ui'
import 'element-ui/lib/theme-chalk/index.css'
import LeBao from '../packages'

import App from './App.vue'

Vue.use(ElementUI)
Vue.use(LeBao)

Vue.config.productionTip = false

new Vue({
  render: h => h(App),
}).$mount('#app')
tip:
 1. 必须引入Vue,即,`import Vue from 'vue'`
 2. 由于我的登录组件中使用了element-ui,因此此处也引入了;
- 使用组件
<template>
  <div class="hello">
    <h1>{{ msg }}</h1>
    <!-- <le-login></le-login> -->
    <le-count-down ref="cCountDown" :show-day="true" :second="60" @timeup="timeupExe()"
      background-color="#f5f5f5" color="#FFA460" splitor-color="#ffa460"></le-count-down>
    <le-sticky-head-list :list-data='bisData'></le-sticky-head-list>
    <le-back-to-top ref="backToTop"></le-back-to-top>
  </div>
</template>
发布插件库
在验证组件可用之后,我们要考虑如何发布到npm上了,发布前我们需要先对package.json、.npmignore和README.md进行修改。
配置package.json文件
package.json中主要配置了组件库的基本信息和依赖情况。部分字段说明如下:
description:组件库的描述文本
keywords:组件库的关键词
license:许可协议
repository:组件库关联的git仓库地址
homepage:组件库展示的首页地址
main:组件库的主入口地址(在使用组件时引入的地址)
private:声明组件库的私有性
scripts:可执行的脚本命令
author:作者
contributors:贡献者
完整实例:
{
"name": "le-bao",
"description": "乐宝系列组件",
"version": "0.0.9",
"author": "Lele.Lee " ,
"license": "MIT",
"private": false,
"main": "lib/lebao.umd.min.js",
"scripts": {
"serve": "vue-cli-service serve --open",
"build": "vue-cli-service build",
//lib脚本说明:--target为编译文件输出目录;--name为文件名前缀;--dest lib为组件库代码入口文件;我们在命令行执行yarn lib命令,就会执行编译脚本。
"lib": "vue-cli-service build --target lib --name lebao --dest lib packages/index.js",
"lint": "vue-cli-service lint"
},
"dependencies": {
"axios": "^0.19.2",
"core-js": "^3.6.5",
"element-ui": "^2.13.2",
"node-sass": "^4.14.1",
"sass-loader": "^8.0.2",
"vue": "^2.6.11"
},
"bugs": {
"url": "https://github.com/ysg-lijinwen/le-baby/issues",
"email": "[email protected]"
},
"repository": {
"type": "git",
"url": "https://github.com/ysg-lijinwen/le-baby.git"
},
"contributors": [],
"homepage": "https://github.com/ysg-lijinwen/le-baby.git",
"keywords": [
"component",
"components",
"乐宝组件",
"优雅的按钮",
"vue",
"vue-component",
"Button",
"design"
],
"devDependencies": {
"@vue/cli-plugin-babel": "^4.4.0",
"@vue/cli-service": "^4.4.0",
"vue-template-compiler": "^2.6.11"
},
"browserslist": [
"> 1%",
"last 2 versions",
"not dead"
]
}
关于README.md
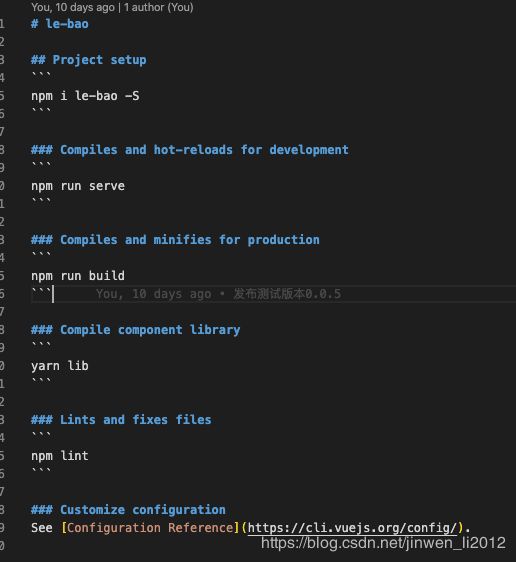
用于插件发布是,显示插件信息、使用方法、相关命令等。
5. 关于.npmignore文件
用于忽略不想发布到npm的相关文件/文件夹资源。实例如下:
.DS_Store
node_modules/
dist/
node_modules/.bin/
build/
config/
static/
.babelrc
.editorconfig
.gitignore
.npmignore
.postcssrc.js
index.html
package-lock.json
npm-debug.log*
yarn-debug.log*
yarn-error.log*

#Editordirectoriesandfiles
.idea
.vscode
*.suo
*.ntvs*
*.njsproj
*.sln
#忽略目录
examples/
packages/
public/
#忽略指定文件
vue.config.js
babel.config.js
*.map
发布到npm服务
- 本地编译组件
发布之前先在本地使用yarn lib进行编译,确保能够正常编译组件到lib目录下。 - 设置目标服务
npm config set registry https://registry.npmjs.org/ - 登录
npm login - 发布
npm publish
可能的错误提示
E401错误
pm ERR! code E401
npm ERR! 401 Unauthorized - PUT http://registry.npmjs.org/le-plugin - You must be logged in to publish packages.

npm ERR! A complete log of this run can be found in:
npm ERR!     /Users/lijinwen/.npm/_logs/2020-05-27T03_52_40_487Z-debug.log
这是未登录的错误提示,重新执行登录即可。登录及登录成功提示,如下:
lddeMacBook-Pro:le-plugin lijinwen$ npm login
Username: leelele
Password:
Email: (this IS public) [email protected]
Logged in as leelele on http://registry.npmjs.org/.   //登录成功提示
E402错误
402 Payment Required - PUT http://registry.npmjs.org/@le_bao%2fvui - You must sign up for private packages
这是因为包名是“@xxx/xxxx”会被npm认为要发布私包,私包需要收费,需将发布命令改成: npm publish --access public
E403错误
执行命令npm publish报错:403 Forbidden - PUT https://registry.npmjs.org/kunmomotest2 - You cannot publish over the previously published versions: 0.0.1.
这是提示不能发布以前发布过的版本号,所以我们需要升版本号,修改package.json配置文件中的版本号(version),然后重新发布。
npm ERR! code E403
npm ERR! 403 403 Forbidden - PUT https://registry.npm.taobao.org/le-plugin - [no_perms] Private mode enable, only admin can publish this module
npm ERR! 403 In most cases, you or one of your dependencies are requesting
npm ERR! 403 a package version that is forbidden by your security policy.

npm ERR! A complete log of this run can be found in:
npm ERR!     /Users/lijinwen/.npm/_logs/2020-05-27T03_50_52_679Z-debug.log
设置了淘宝镜像导致的报错,通过重新设置为官方镜像即可解决。设置命令npm config set registry http://registry.npmjs.org
E404错误
npm ERR! code E404
npm ERR! 404 Not Found - PUT http://registry.npmjs.org/@le_bao%2fvui - Scope not found
npm ERR! 404
npm ERR! 404  '@le_bao/[email protected]' is not in the npm registry.
npm ERR! 404 You should bug the author to publish it (or use the name yourself!)
npm ERR! 404
npm ERR! 404 Note that you can also install from a
npm ERR! 404 tarball, folder, http url, or git url.

npm ERR! A complete log of this run can be found in:
npm ERR!     /Users/lijinwen/.npm/_logs/2020-05-27T08_40_37_702Z-debug.log
可能是npm版本有些低,使用npm install npm@latest -g更新npm就好了。
网络问题引起的错误
可能的情况参考
