Kinect使用系列
最近在做基于Kinect的手势识别,这里介绍一下Kinect的使用
1.Kinect在Qt中的安装
下载Kinect的安装包,按照流程按照即可。
pro文件中需要填写opencv以及kinect的头文件以及库文件路径,我把它们都放在工程目录下了,如下代码所示。
#openCV路径
INCLUDEPATH += $$PWD/opencv/build/include\
               $$PWD/opencv/build/include/opencv\
               $$PWD/opencv/build/include/opencv2\
               $$PWD/inc\

LIBS += $$PWD/Lib/x64/Kinect20.lib

CONFIG(debug, debug|release): {
LIBS += -L$$PWD/opencv/build/x64/vc14/lib \
-lopencv_world342d \
} else:CONFIG(release, debug|release): {
LIBS += -L$$PWD/opencv/build/x64/vc14/lib \
-lopencv_world342 \
}
然后使用时包含头文件,即可使用。
#include "Kinect.h"
#include "Kinect.VisualGestureBuilder.h"
#include "Kinect.Face.h"
#include "Kinect.INPC.h"
2. 获取深度图像
IKinectSensor*          m_pKinectSensor;
    IDepthFrameReader*      m_pDepthFrameReader;
    IDepthFrameSource*      pDepthFrameSource = NULL;
    IFrameDescription*      depthFrameDescription = NULL;

    GetDefaultKinectSensor(&m_pKinectSensor);      //获取默认kinect传感器
    printf("打开kinect传感器成功\n");
    //打开传感器
    m_pKinectSensor->Open();

    //获得深度信息传感器
    m_pKinectSensor->get_DepthFrameSource(&pDepthFrameSource);
    //打开深度信息帧读取器
    pDepthFrameSource->OpenReader(&m_pDepthFrameReader);

    while (true)
    {
        IDepthFrame*       pDepthFrame = NULL;

        while(pDepthFrame == NULL){
            //由于有时候获取不到,因此循环获取最近的帧
            m_pDepthFrameReader->AcquireLatestFrame(&pDepthFrame);
        }
        pDepthFrame->get_FrameDescription(&depthFrameDescription);
        int depth_width, depth_height;
        //获取帧的像素信息(宽和高)
        depthFrameDescription->get_Width(&depth_width);
        depthFrameDescription->get_Height(&depth_height);
        printf("width=%d height=%d\n", depth_width, depth_height);
        UINT nBufferSize_depth = 0;
        UINT16 *pBuffer_depth = NULL;
        //获取图像像素个数和指向图像的指针
        pDepthFrame->AccessUnderlyingBuffer(&nBufferSize_depth, &pBuffer_depth);
        //转换为8位的mat
        Mat depthImg_show = ConvertMat(pBuffer_depth, depth_width, depth_height);
        //均衡化,为了提高显示效果
        equalizeHist(depthImg_show, depthImg_show);
    }
3.获取彩色图像
IKinectSensor*          m_pKinectSensor;

    IColorFrameSource*      pColorFrameSource;
    IColorFrameReader*      m_pColorFrameReader;
    IFrameDescription*      colorFrameDescription = NULL;
    ColorImageFormat        imageFormat = ColorImageFormat_None;

    GetDefaultKinectSensor(&m_pKinectSensor);      //获取默认kinect传感器
    printf("打开kinect传感器成功\n");
    //打开传感器
    m_pKinectSensor->Open();

    //获得彩色信息传感器
    m_pKinectSensor->get_ColorFrameSource(&pColorFrameSource);
    //打开彩色信息帧读取器
    pColorFrameSource->OpenReader(&m_pColorFrameReader);

    while (true)
    {
        IColorFrame*       pColorFrame = NULL;

        //获取彩色图像
        while(pColorFrame == NULL){
            //由于有时候获取不到,因此循环获取最近的帧
            m_pColorFrameReader->AcquireLatestFrame(&pColorFrame);
        }
        //获取图片描述信息
        pColorFrame->get_FrameDescription(&colorFrameDescription);
        int nWidth, nHeight;
        uchar *pBuffer = NULL;
        UINT nBufferSize = 0;
        colorFrameDescription->get_Width(&nWidth);
        colorFrameDescription->get_Height(&nHeight);
        cout << "width=" << nWidth << endl;
        cout << "Height=" << nHeight << endl;
        pColorFrame->get_RawColorImageFormat(&imageFormat);
        //输出结果为 ColorImageFormat_Yuy2    = 5,为Yuy2格式
        cout << "imageformat is " << imageFormat << endl;
        //新建一个mat对象,用于保存读入的图像,注意参数的高在前,宽在后
        Mat colorImg(nHeight, nWidth, CV_8UC4);
        pBuffer = colorImg.data;
        nBufferSize = colorImg.rows*colorImg.step;
        pColorFrame->CopyConvertedFrameDataToArray(nBufferSize,reinterpret_cast(pBuffer), ColorImageFormat_Bgra);
    }
4.Kinect v2在python中调用
官网链接:https://github.com/Kinect/PyKinect2
功能介绍:这个版本只支持颜色、深度和人体骨骼和人体骨骼帧。其中,PyKinectBodyGame样例是一个样例游戏,它着重阐述怎么使用Kinect得当颜色和人体骨骼帧。
6.基础知识
6.1 坐标系定义
坐标系参考博客:https://blog.csdn.net/jiaojialulu/article/details/53088170
相机知识参考博客:https://blog.csdn.net/osean_li/article/details/91046166
- 红外投影机 :发射红外线 提供深度数据
- 彩色摄像头 :提供彩色图像
- 红外摄像头 :接收红外线 提供深度数据
深度的量程:
物理限制:0.4米到3米
舒适区: 0.8米到2.5米
相机空间指的是kinect使用的3D空间坐标。它是这样定义的:
- 坐标原点(x=0,y=0,z=0)位于kinect的红外相机中心。
- X轴方向为顺着kinect的照射方向的左方向
- Y轴方向为顺着kinect的照射方向的上方向
- z轴方向为顺着kinect的照射方向
- 坐标单位为米(m) 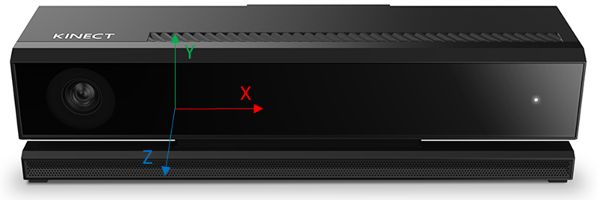
PS:注意!这是一个右手坐标系,这与计算机图形学中定义的相机空间是一致的.
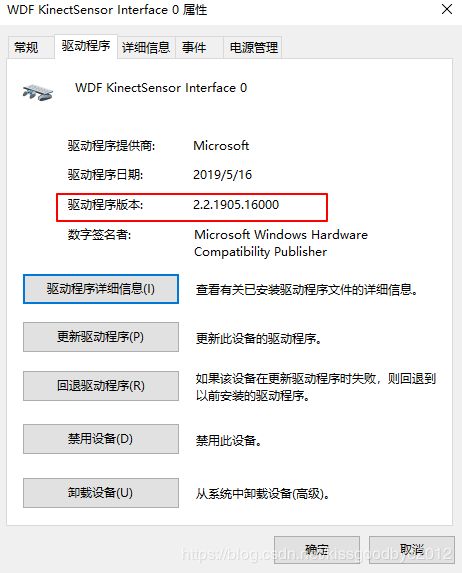
6.2 Kinectv2频繁重启
原因,驱动程序版本不对。解决方法:更新驱动程序(或者在如下的图片中联网自动更新,或者手动下载更新)
参考链接:https://blog.csdn.net/muchunpeng/article/details/102523465?utm_medium=distribute.pc_relevant.none-task-blog-OPENSEARCH-1.nonecase&depth_1-utm_source=distribute.pc_relevant.none-task-blog-OPENSEARCH-1.nonecase
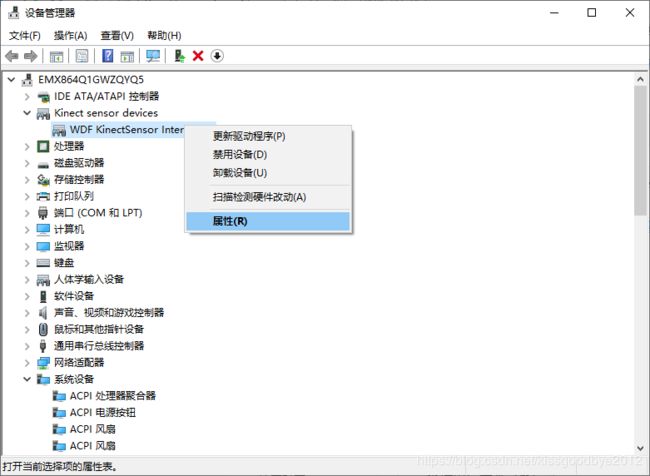
查看自己的版本如下:通过设备管理器,右键WDF KinectSensor接口0,选择属性。
我的版本为:2.2.1905.16000 或者如网上说的(应为2.2.1811.10000)