Nginx+Lua+FastDFS+Docker实现图片缩略图
Nginx+Lua+FastDFS实现图片缩略图
- 1、Docker安装
- 2、Docker安装FastDFS
- 2.1 搜索镜像
- 2.2 拉取镜像
- 2.3 查询镜像
- 2.4 容器安装
- 2.5 修改配置
- 3、实现方案
- 4、FastDFS镜像中配置http_image_filter_module
- 4.1 安装软件基础包
- 4.2 其他软件下载
- 4.3 配置Lua脚本实现剪切
- 4. 4 配置nginx
1、Docker安装
yum install docker -y
systemctl start docker  #启动docker
systemctl enable docker #开机启动docker
systemctl status docker #查看docker状态
docker version # 查看docker版本
DaoCloud 加速器 是广受欢迎的 Docker 工具,解决了国内用户访问 Docker Hub 缓慢的问题。DaoCloud 加速器结合国内的 CDN 服务与协议层优化,成倍的提升了下载速度。
 cat /etc/docker/daemon.json #修改这个文件为如下内容
{
    "registry-mirrors": [
        "http://95822026.m.daocloud.io"
    ],
    "insecure-registries": []
}
---------------------------------------------------------
或者用这条命令
curl -sSL https://get.daocloud.io/daotools/set_mirror.sh | sh -s http://95822026.m.daocloud.io
systemctl restart docker #事后重启docker
2、Docker安装FastDFS
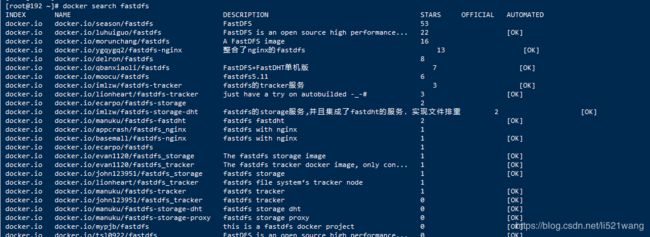
2.1 搜索镜像
docker search fastdfs #搜索fastdfs镜像
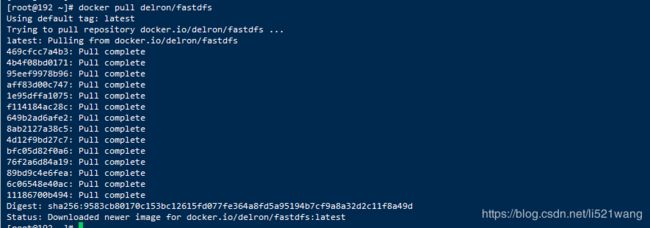
2.2 拉取镜像
docker pull delron/fastdfs #拉取最新版本的镜像
2.3 查询镜像
docker images #查询所有镜像
2.4 容器安装
1、使用docker镜像构建tracker容器(跟踪服务器,起到调度的作用):
docker run -d --privileged=true --network=host --name tracker -v /mydata/fdfs/tracker:/var/fdfs delron/fastdfs tracker
上面的命令是创建fastdfs的tracker容器并将容器内的文件存储路径映射到宿主机的/var/fdfs目录。
2、使用docker镜像构建storage容器(存储服务器,提供容量和备份服务):
docker run -d --privileged=true --network=host --name storage -e TRACKER_SERVER=192.168.1.181:22122 -v /mydata/fdfs/storage:/var/fdfs -e GROUP_NAME=group1 delron/fastdfs storage
TRACKER_SERVER=本机的ip地址:22122 本机ip地址不要使用127.0.0.1。
![]()
2.5 修改配置
docker ps -a  #查询所有的镜像
docker start + storage的CONTAINER ID
docker start + tracker的CONTAINER ID
docker exec -it storage /bin/bash
![]()
进入storage容器,到storage的配置文件中配置http访问的端口,配置文件在/etc/fdfs目录下的storage.conf。
3、实现方案
由于我这里图片处理用的是nginx,所以,有以下两种解决方法:
- Nginx自带的http_image_filter_module模块
- Nginx搭配Lua+GraphicsMagick
Nginx 虽然有自带的 image filter module 实现此功能,但是有弊端:
- image filter module 使用的是 GD,GD 性能、效率、处理后的图片质量不如 GraphicsMagick、并且裁剪后也不会保存,这样每次请求过来都要重新裁剪,所以访问很慢。
- image filter module 没法真正生成裁剪/缩放后的图片,而是通过 Nginx 直接输出的,这样每次请求或缓存过期后都需要重新裁剪/缩放,这样无疑会增加 Nginx 负担
这里使用Lua+GraphicsMagick实现图片自由裁剪、把裁剪后的图片放到一个目录,并做好过期或定期删除,访问时就去判断,有裁剪后的就取,没有的再做裁剪。但是这样也有个问题就是,用久了之后,会在本地硬盘产生很多缩略图,对硬盘造成浪费,所以需要定时的清理硬盘下的缩略图。
如果用Nginx来处理图片的话,就会有以下的优缺点:
▲ 优点
- 操作简单。通过简单配置,省去了后端裁剪程序的复杂性。
- 实时裁剪。可以实时访问在线裁剪图片。
- 灵活性强。后端程序裁剪图片时需要知道裁剪图片的尺寸和质量,使用nginx裁剪可以实时裁剪任意尺寸的图片。
- 不占用硬盘空间。
▲ 缺点
- 消耗CPU和内存,访问量大的时候就会给服务器带来很大的负担。(可以通过使用Nginx缓存和缓存服务器来解决)
- 功能不是很强大,支持的处理图片类型只包括JPEG, GIF, PNG, or WebP
4、FastDFS镜像中配置http_image_filter_module
4.1 安装软件基础包
yum -y install epel-release git
yum install -y gcc gcc-c++ zlib zlib-devel openssl openssl-devel pcre pcre-devel gd-devel
yum install -y libpng libjpeg libpng-devel libjpeg-devel ghostscript libtiff libtiff-devel freetype freetype-devel readline-devel ncurses-devel
4.2 其他软件下载
【注】需要下载的软件有
- nginx-http-concat
- ngx_devel_kit
- lua-nginx-module
- LuaJIT-2.0.4
- lua-5.3.1
- GraphicsMagick-1.3.18
- nginx1.12.2 (镜像中自带)

下载软件并进行解压操作
cd /usr/lcoal/src

# 下载依赖包
git clone https://github.com/alibaba/nginx-http-concat.git
git clone https://github.com/simpl/ngx_devel_kit.git
git clone https://github.com/openresty/echo-nginx-module.git
git clone https://github.com/openresty/lua-nginx-module.git
git clone https://github.com/happyfish100/fastdfs-nginx-module.git

# 安装LuaJIT
cd /usr/local/src
wget http://luajit.org/download/LuaJIT-2.0.4.tar.gz
tar -zxf LuaJIT-2.0.4.tar.gz
cd LuaJIT-2.0.4
make
make install
export LUAJIT_LIB=/usr/local/lib
export LUAJIT_INC=/usr/local/include/luajit-2.0
ln -s /usr/local/lib/libluajit-5.1.so.2 /lib64/libluajit-5.1.so.2

# 安装Lua
cd /usr/local/src
wget http://www.lua.org/ftp/lua-5.3.1.tar.gz
tar -zxvpf lua-5.3.1.tar.gz
cd lua-5.3.1
make linux && make install

# 安装GM
cd /usr/local/src
wget ftp://ftp.graphicsmagick.org/pub/GraphicsMagick/1.3/GraphicsMagick-1.3.18.tar.gz
tar -zxvf GraphicsMagick-1.3.18.tar.gz
cd GraphicsMagick-1.3.18
./configure --prefix=/usr/local/GraphicsMagick-1.3.18 --enable-shared
make  && make install
ln -s /usr/local/GraphicsMagick-1.3.18 /usr/local/GraphicsMagick
由于镜像中自带nginx,在/tmp/nginx/nginx-1.12.2目录下
cd /tmp/nginx/nginx-1.12.2

./configure --prefix=/usr/local/nginx-1.12.2 \
--with-http_ssl_module \
--with-http_realip_module \
--with-http_sub_module \
--with-http_flv_module \
--with-http_dav_module \
--with-http_gzip_static_module \
--with-http_stub_status_module \
--with-http_addition_module \
--add-module=/usr/local/src/fastdfs-nginx-module-master/src \
--with-http_image_filter_module \
--with-pcre \
--add-module=/usr/local/src/nginx-http-concat \
--add-module=/usr/local/src/lua-nginx-module-0.10.13 \
--add-module=/usr/local/src/ngx_devel_kit \
--add-module=/usr/local/src/echo-nginx-module \
--with-ld-opt=-Wl,-rpath,$LUAJIT_LIB
执行成功之后先执行make确保编译没有问题,成功之后make install
make
make install
cp /usr/local/nginx-1.12.2 /usr/local/nginx
4.3 配置Lua脚本实现剪切
在/usr/local/nginx/conf创建lua文件夹
cd /usr/local/nginx/conf
mkdir lua
# 创建lua脚本
vi fastdfs.lua
-- 写入文件
local function writefile(filename, info)
    local wfile=io.open(filename, "w") --写入文件(w覆盖)
    assert(wfile)  --打开时验证是否出错
    wfile:write(info)  --写入传入的内容
    wfile:close()  --调用结束后记得关闭
end

-- 检测路径是否目录
local function is_dir(sPath)
    if type(sPath) ~= "string" then return false end

    local response = os.execute( "cd " .. sPath )
    if response == 0 then
        return true
    end
    return false
end

-- 检测文件是否存在
local file_exists = function(name)
    local f=io.open(name,"r")
    if f~=nil then io.close(f) return true else return false end
end

-- 反向查找路径
function last_find(str, k)
    local ts = string.reverse(str);
    local _, i = string.find(ts, k);
    return string.len(ts) - i + 1;
end

local area = nil
local originalUri = ngx.var.uri;
local originalFile = ngx.var.file;
local index = last_find(ngx.var.uri, "([0-9]+)x([0-9]+)");
if index then
    originalUri = string.sub(ngx.var.uri, 0, index-2);
    area = string.sub(ngx.var.uri, index);
    index = string.find(area, "([.])");
    area = string.sub(area, 0, index-1);

    local index = last_find(originalFile, "([0-9]+)x([0-9]+)");
    originalFile = string.sub(originalFile, 0, index-2)
end

-- check original file
if not file_exists(originalFile) then
    local fileid = string.sub(originalUri, 2);
    -- main
    local fastdfs = require('restyfastdfs')
    local fdfs = fastdfs:new()
	fdfs:set_tracker("62.234.0.169", 22122)
    fdfs:set_timeout(1000)
    fdfs:set_tracker_keepalive(0, 100)
    fdfs:set_storage_keepalive(0, 100)
    local data = fdfs:do_download(fileid)
    if data then
       -- check image dir
        if not is_dir(ngx.var.image_dir) then
            os.execute("mkdir -p " .. ngx.var.image_dir)
        end
        writefile(originalFile, data)
    end
end

-- 创建缩略图
local image_sizes = {"710x300","735x250","250x150","186x150","122x122","120x120","345x345","295x295","292x292","262x262","274x274","190x190","150x150","144x144","110x110","690x340","72x72","100x100","180x180","480x240","750x740","216x216","490x190","126x126"};
function table.contains(table, element)
    for _, value in pairs(table) do
        if value == element then
            return true
        end
    end
    return false
end

if table.contains(image_sizes, area) then
    local bg;
    if string.lower(string.sub(ngx.var.file,-3))=="jpg" then
        bg=" -background white ";
    else
        bg=" -background transparent ";
    end;
    local command = "/usr/local/GraphicsMagick/bin/gm convert -quality 90 " .. originalFile  .. " -thumbnail " .. area .. bg .. " -gravity center -extent " .. area .. " " .. ngx.var.file;
    os.execute(command);
end;

if file_exists(ngx.var.file) then
    --ngx.req.set_uri(ngx.var.uri, true);
    ngx.exec(ngx.var.uri)
else
    ngx.exit(404)
end
4. 4 配置nginx
nginx配置用户
user root;
server {
        listen 8801;
        server_name 10.160.43.26;

        # LUA
        location /hello {
                default_type 'text/plain';
                content_by_lua 'ngx.say("hello,lua")';
                }

        # fastdfs 缩略图生成
        location /group1/M00 {
                alias /data/fastdfs/data/data;

                set $image_root "/data/fastdfs/data/data";
                if ($uri ~ "/([a-zA-Z0-9]+)/([a-zA-Z0-9]+)/([a-zA-Z0-9]+)/([a-zA-Z0-9]+)/(.*)") {
                  set $image_dir "$image_root/$3/$4/";
                  set $image_name "$5";
                  set $file "$image_dir$image_name";
                }

                if (!-f $file) {
        #         # 关闭lua代码缓存,方便调试lua脚本
                  #lua_code_cache off;
                  content_by_lua_file "/usr/local/nginx/conf/lua/fastdfs.lua";
                }
                ngx_fastdfs_module;
        }

        # log file
        access_log  logs/img_access.log access;
}
其中image_root为fastdfs的储存文件的目录,如果容器目录共享到宿主机,该配置可以为宿主机共享的图片保存地址。
配置完成,重启Nginx。开始测试
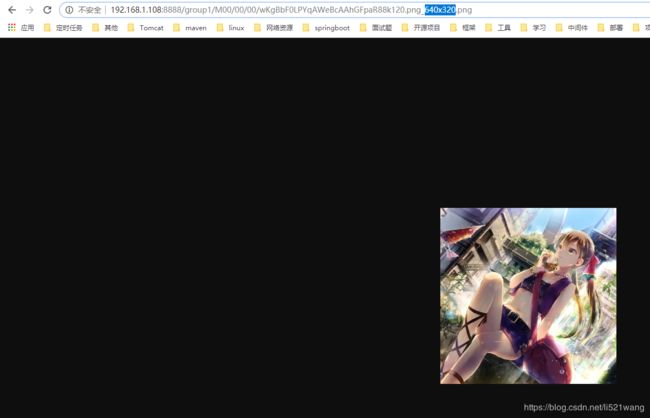
访问图片地址,例如:http://192.168.1.108:8888/group1/M00/00/00/wKgBbF0LPYqAWeBcAAhGFpaR88k120.png。效果图如下:

访问缩略图地址,地址如下:
http://192.168.1.108:8888/group1/M00/00/00/wKgBbF0LPYqAWeBcAAhGFpaR88k120.png_640x320.png


