GLSL矩阵变换详解(三、view matrix和projection matrix)
GLSL矩阵变换详解(二、旋转变换、平移变换以及QMatrix4x4)
的基础上再增加对摄像机位置、姿态的设置功能,以及成像区域的定义功能。
QMatrix4x4::lookAt(camera, center, upDirection)定义了摄像机的位置与姿态,属于view matrix操作的范畴。三个输入变量都是QVector3D类型。camera是摄像机在世界坐标系的坐标。center是摄像机的光轴上的任一点,也是世界坐标系坐标,它与camera连线决定了光轴的方向。这样获取影像后,还需要确定照片正上方的指向。upDirection决定了这一方向。这一方向同样在世界坐标系中表述。显然,这一方向不能与摄像机光轴平行。
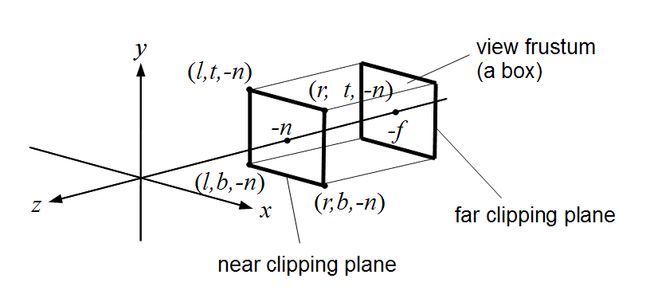
QMatrix4x4::ortho(left, right, bottom, top, near, far)定义了一块长方体(视景体),属于projection 操作的范畴。长方体的正面与camera的光轴垂直。near表示长方体正面与camera的距离,far表示长方体背面与camera的距离。其他量的意义见下图。
其中l表示left,r表示right,t表示top,b表示bottom
根据https://en.wikibooks.org/wiki/GLSL_Programming/Vertex_Transformations,view matrix操作在model matrix之后,而projection放在view之后。因此,在下面的实例中,我把ortho放在最前面,其次是lookAt,最后才是translate和rotate
h文件:
#ifndef MAINWINDOW_H
#define MAINWINDOW_H

#include
#include
#include
#include
#include

class MainWindow : public QOpenGLWidget, protected QOpenGLFunctions
{
    Q_OBJECT

public:
    MainWindow(QWidget *parent = 0);
    ~MainWindow();

    GLuint                          m_uiVertLoc;
    GLuint                          m_uiTexNum;
    QOpenGLTexture          *       m_pTextures;
    QOpenGLShaderProgram    *       m_pProgram;
    GLfloat                 *       m_pVertices;

protected:
    void        initializeGL();
    void        paintGL();
    void        resizeGL(int w, int h);
};

#endif // MAINWINDOW_H
cpp文件:
#include "mainwindow.h"

MainWindow::MainWindow(QWidget *parent)
    : QOpenGLWidget(parent)
{
}

MainWindow::~MainWindow()
{
    m_pTextures->release();
    delete m_pTextures;
    delete m_pProgram;
    delete [] m_pVertices;

}

void MainWindow::initializeGL()
{
    initializeOpenGLFunctions();

    m_uiTexNum = 0;
    m_pVertices = new GLfloat[18];
    //给顶点赋值
    GLfloat arrVertices[18] = {0.0, 1.0, 0.0,
                               0.0, 0.0, 0.0,
                               1.0, 0.0, 0.0,
                               1.0, 0.0, 0.0,
                               1.0, 1.0, 0.0,
                               0.0, 1.0, 0.0};
    m_pVertices = new GLfloat[18];
    memcpy(m_pVertices, arrVertices, 18 * sizeof(GLfloat));

    QOpenGLShader *vshader = new QOpenGLShader(QOpenGLShader::Vertex, this);
    const char *vsrc =
                        "#version 330\n"
                        "in vec3 pos;\n"
                        "out vec2 texCoord;\n"
                        "uniform mat4 mat4MVP;\n"
                        "void main()\n"
                        "{\n"
                        "    gl_Position = mat4MVP * vec4(pos, 1.0);\n"
                        "    texCoord = pos.xy;\n"
                        "}\n";
    vshader->compileSourceCode(vsrc);

    QOpenGLShader *fshader = new QOpenGLShader(QOpenGLShader::Fragment, this);
    const char *fsrc =
                        "#version 330\n"
                        "out vec4 color;\n"
                        "in vec2 texCoord;\n"
                        "uniform sampler2D Tex\n;"
                        "void main()\n"
                        "{\n"
                        "    color = texture(Tex, texCoord);\n"
                        //"      color = vec4(1.0, 0.0, 0.0, 0.0);\n"
                        "}\n";
    fshader->compileSourceCode(fsrc);

    m_pProgram = new QOpenGLShaderProgram;
    m_pProgram->addShader(vshader);
    m_pProgram->addShader(fshader);
    m_pProgram->link();
    m_pProgram->bind();

    m_uiVertLoc = m_pProgram->attributeLocation("pos");
    m_pProgram->enableAttributeArray(m_uiVertLoc);
    m_pProgram->setAttributeArray(m_uiVertLoc, m_pVertices, 3, 0);


    m_pTextures = new QOpenGLTexture(QImage(QString("earth.bmp")).mirrored());
    m_pTextures->setMinificationFilter(QOpenGLTexture::Nearest);
    m_pTextures->setMagnificationFilter(QOpenGLTexture::Linear);
    m_pTextures->setWrapMode(QOpenGLTexture::Repeat);
    m_pProgram->setUniformValue("Tex", m_uiTexNum);


    glEnable(GL_DEPTH_TEST);
    glClearColor(0,0,0,1);
}

void MainWindow::paintGL()
{
    //QMatrix4x4在声明时被默认为单位矩阵
    QMatrix4x4 m1, m2, m3, m;

    //m1.viewport(0,0,m_iWidth, m_iHeight,-15,15);//useless
    m1.ortho(-1.0f, +1.0f, -1.0f, 1.0f, 0.0f, 15.0f);//right//generate projection matrix
    m2.lookAt(QVector3D(10,0,10), QVector3D(0,0,0), QVector3D(0,1,0));//generate view matrix, right
    qDebug()<setUniformValue("mat4MVP", m);
    glClear(GL_COLOR_BUFFER_BIT | GL_DEPTH_BUFFER_BIT);
    m_pTextures->bind(m_uiTexNum);
    glDrawArrays(GL_TRIANGLES, 0, 6);
    m_pTextures->release();
}

void MainWindow::resizeGL(int w, int h)
{
    glViewport(0,0,w,h);
}
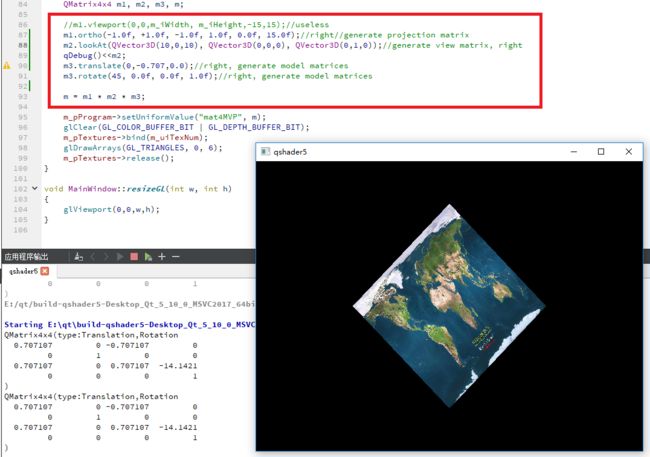
效果:
分析:
上图展现的是摄像机和纹理图在世界坐标系的位置。从摄像机到纹理中心的距离为14.14。而ortho(-1,1,-1,1,0,15)函数决定了从摄像机沿光轴方向走出15个单位内的物体都被成像,所以纹理可以看到。
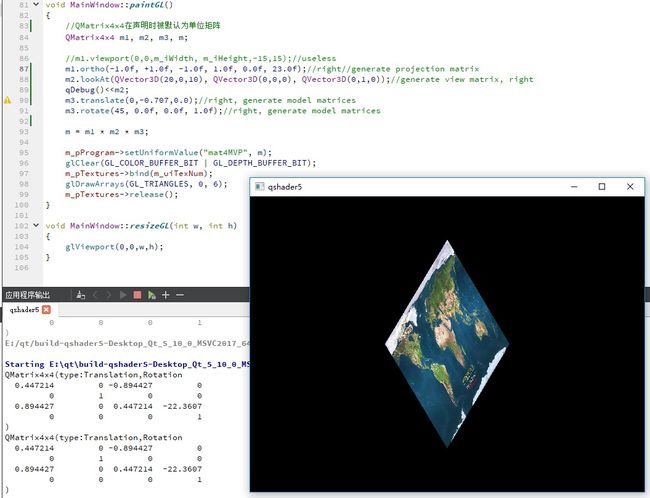
再将摄像机移动到更远的位置(20,0,10),此时由于摄像机视角明显倾斜,图像在X方向与Y方向比例差距就明显了。
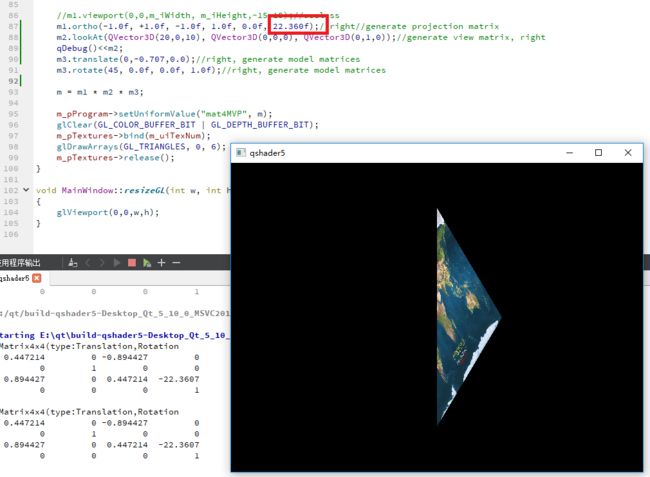
现在取一个极限值:22.36 = sqrt(20 * 20 + 10 * 10),这是摄像机到纹理中心的距离。将这个值作为视景体背面到摄像机的距离,则纹理有一半显示不出来了--突出视景体的那一半。


