RHCE模拟考题详解
考试说明:
此次考试汇总你将使用多个操作系统,一台是您面前的物理机桌面系统,
其他系统时运行在桌面系统上的已经预装好了的虚拟机。除非特别指出,
所有考试要求都是在虚拟机上完成。你没有 root 权限访问物理机。
但是你可以用物理机来测试虚拟机上要求完成的配置

#请注意:

因为考试系统时虚拟机,所以你需要使用桌面上的 vm console 图标来访问虚拟机。
您也可以通过 ssh 从桌面系统来访问虚拟机。但是您还没有完成相关考试要求前,
是不能通过 ssh 访问虚拟机的。

在考试期间 不允许和其他考生交流。也不允许尝试连接其他考生的主机。
测试系统和网络都在监控之中,上述两种情况的发生可能导致您考试成绩为零。

#其他配置信息:

您在考试中将使用两个系统的信息如下:
serverx.example.com 是一个主要的服务器
dekstopx.example.com 主要用作客户端  (x是您的考试号)
两个系统的 root 密码为 redhat

系统的 ip 有 dhcp 提供,您可以视其为正常。或者您可以按照以下信息重新配置静态IP
serverx.example.com 172.25.x.11
desktopx.example.com 172.25.x.10
子网掩码为 255.255.255.0  (x是您的考试号)

您的系统时 dns 域 example.com 的成员
所有 dns 域 example 中的系统都在子网 172.25.x.0/24 中,
同样在这个子网中的系统都在 example.com DNS域中。除非特别声明

classroom.example.com 提供了集中认证的服务域 EXAMPLE.COM.
两个系统 serverx 和 desktopx 已经预先配置成次域的客户端。
此域提供了下列账号:
	用户:ldapuser1
	密码:kerberos

防火墙默认是打开的,在您认为适当的时候可以关闭,其他火墙的设定可能在单独的要求中。

注意:在评分中签您的系统会被重启
准备工作: (在考试中不用做)
[root@foundation4 Desktop]# rht-vmctl reset desktop
[root@foundation4 Desktop]# rht-vmctl reset server
[root@foundation4 Desktop]# rht-vmctl view desktop
[root@foundation4 Desktop]# rht-vmctl view server
#执行脚本;注意,如果有pid占用的报错,请用kill -9 进程号 强制关闭进程即可
yum clean all
exam_rhce
#检测考试环境
[root@server4 ~]# getent passwd ldapuser1
ldapuser1:*:1701:1701:LDAP Test User 1:/home/guests/ldapuser1:/bin/bash
[root@desktop4~]# getent passwd ldapuser1
ldapuser1:*:1701:1701:LDAP Test User 1:/home/guests/ldapuser1:/bin/bash
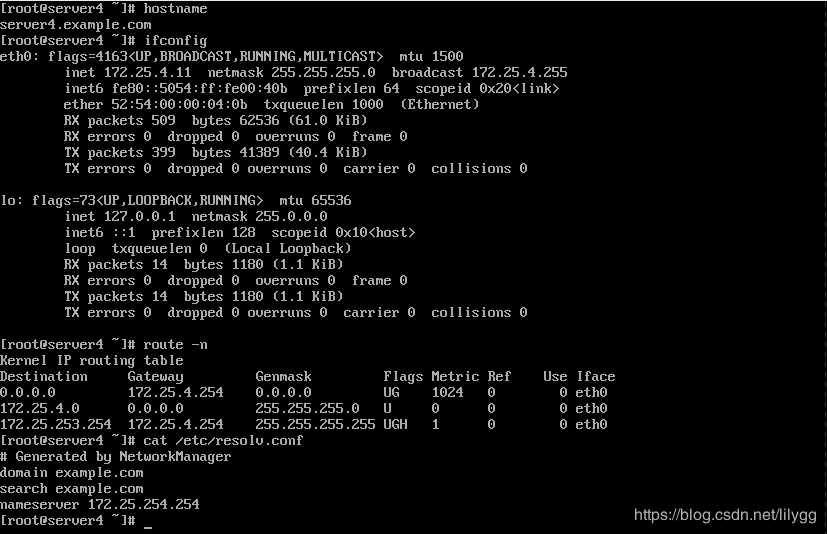
#考试环境中,默认已经完成网络配置
[root@server4 ~]# hostname
[root@server4 ~]# ifconfig
[root@server4 ~]# route -n
[root@server4 ~]# cat /etc/resolv.conf
[root@desktop4 ~]# hostname
[root@desktop4 ~]# ifconfig
[root@desktop4 ~]# route -n
[root@desktop4 ~]# cat /etc/resolv.conf
#注意:如果系统重启后,主机名称被更改了,则需要永久性更改主机名
[root@localhost ~]# hostnamectl set-hostname server4.example.com
[root@localhost ~]# hostname
server4.example.com
[root@localhost ~]# hostnamectl set-hostname desktop4.example.com
[root@localhost ~]# hostname
desktop4.example.com
考试题目:
1.配置 selinux
Selinux 必须在两个系统 serverx 和 desktopx 中运行 Enforcing 模式
在server4上:
# -X表示开启图形连接
[root@foundation4 ~]# ssh [email protected] -X
[root@server4 ~]# getenforce
Enforcing
在desktop4上:
[kiosk@foundation4 ~]$ ssh [email protected] -X
[root@desktop4 ~]# getenforce
Disabled
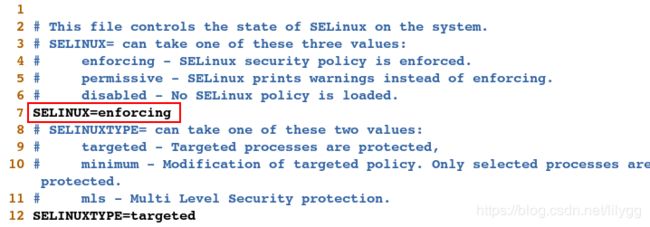
[root@desktop4 ~]# vim /etc/sysconfig/selinux
##################
7 SELINUX=enforcing     #强制状态
#重启才能生效
[root@desktop4 ~]# reboot
测试:
[kiosk@foundation4 ~]$ ssh [email protected] -X
[root@desktop4 ~]# getenforce
Enforcing
< 火墙策略 2,4 >
2.配置 ssh 访问
用户能从域 example.com 内的客户端通过 ssh 远程访问您的两个虚拟系统
在域 my133.org 内的客户端不能访问您的两个虚拟机
在server4上:
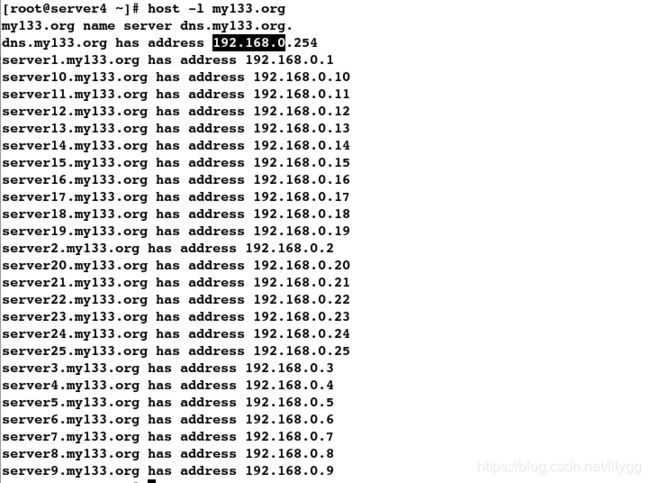
#查看my133.org域属于什么ip网段
[root@server4 ~]# host -l my133.org
# 拒绝my133.org域ssh访问本机
# --permanent:永久性设定,--direct --add-rule:添加自定义规则,filter INPUT 1:表示filter表中的INPUT链的第一条 -s:指定源地址,
# -p:指定协议,--dport:指定端口(22是ssh服务的端口),-j:执行动作(REJECT表示拒绝)
[root@server4 ~]# firewall-cmd --permanent --direct --add-rule ipv4 filter INPUT 1 -s 192.168.0.0/24 -p tcp --dport 22 -j REJECT
success
[root@server4 ~]# systemctl restart firewalld
[root@server4 ~]# firewall-cmd --direct --get-all-rules
ipv4 filter INPUT 1 -s 192.168.0.0/24 -p tcp --dport 22 -j REJECT
测试:
#临时添加网卡和ip(此ip属于my133.org域)
[root@server4 ~]# ifconfig eth0:0 192.168.0.11/24
[root@server4 ~]# ifconfig eth0:0
[root@foundation4 ~]# ifconfig br0:0 192.168.0.11/24
[root@foundation4 ~]# ifconfig br0:0
#发现能ping通但不能ssh连接
[root@foundation4 ~]# ping 192.168.0.111
[root@foundation4 ~]# ssh [email protected]
ssh: connect to host 192.168.0.111 port 22: Connection refused
在考试中,会直接给一台属于my133.org域的虚拟机,只需在此虚拟机上ssh连接测试即可。
在desktop4上:
[root@desktop4 ~]# firewall-cmd --permanent --direct --add-rule ipv4 filter INPUT 1 -s 192.168.0.0/24 -p tcp --dport 22 -j REJECT
success
[root@desktop4 ~]# systemctl restart firewalld
[root@desktop4 ~]# firewall-cmd --direct --get-all-rules
ipv4 filter INPUT 1 -s 192.168.0.0/24 -p tcp --dport 22 -j REJECT
测试:
[root@desktop4 ~]# ifconfig eth0:0 192.168.0.10/24
[root@desktop4 ~]# ifconfig eth0:0
#能ping通但无法ssh连接
[root@foundation4 ~]# ping 192.168.0.10
[root@foundation4 ~]# ssh 192.168.0.10
ssh: connect to host 192.168.0.10 port 22: Connection refused
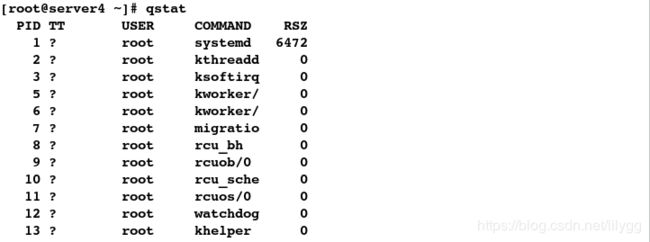
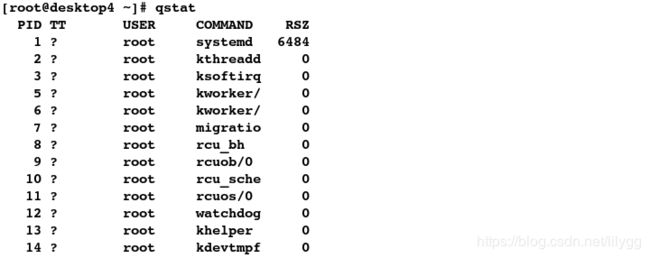
在系统 serverx 和 desktopx 上穿件自定义命令 qstat 此命令将执行一下命令:
/bin/ps -Ao pid,tt,user,fname,rsz    此命令对系统中所有用户有效
在server4上:
# alias:设置别名;注意是 >> 追加,千万别写成了 > (会覆盖原文件内容)
# ps查看进程;A表示所有进程,o表示显示进程指定信息
[root@server4 ~]# echo "alias qstat='/bin/ps -Ao pid,tt,user,fname,rsz'" >> /etc/bashrc
# 重新加载
[root@server4 ~]# source /etc/bashrc
测试:
[root@server4 ~]# qstat
[root@desktop4 ~]# echo "alias qstat='/bin/ps -Ao pid,tt,user,fname,rsz'" >> /etc/bashrc
[root@desktop4 ~]# source /etc/bashrc
测试:
[root@desktop4 ~]# qstat
在系统 serverx 中配置端口转发
在 172.25.x.0/24 网络中的系统,访问 server1 的本地端口 5423 将被转发到 80 此设定时永久生效的
#1.允许172.25.4.0/24 网段的主机可以访问本机(添加到信任域)
[root@server4 ~]# firewall-cmd --permanent --add-source=172.25.4.0/24 --zone=trusted
success
# 重启火墙,注意:每此添加火墙策略都需要重启
[root@server4 ~]# systemctl restart firewalld
[root@server4 ~]# firewall-cmd --list-all --zone=trusted
#2.端口转发
[root@server4 ~]# firewall-cmd --permanent --direct --add-rule ipv4 nat PREROUTING 1 -s 172.25.4.0/24 -p tcp --dport 5423 -j DNAT --to-dest :80
success
[root@server4 ~]# systemctl restart firewalld
[root@server4 ~]# firewall-cmd --direct --get-all-rules
ipv4 filter INPUT 1 -s 192.168.0.0/24 -p tcp --dport 22 -j REJECT
ipv4 nat PREROUTING 1 -s 172.25.4.0/24 -p tcp --dport 5423 -j DNAT --to-dest :80
测试:
[root@server4 ~]# yum install -y httpd
[root@server4 ~]# systemctl start httpd
[root@server4 ~]# systemctl enable httpd
ln -s '/usr/lib/systemd/system/httpd.service' '/etc/systemd/system/multi-user.target.wants/httpd.service'
[root@desktop4 ~]# firefox &
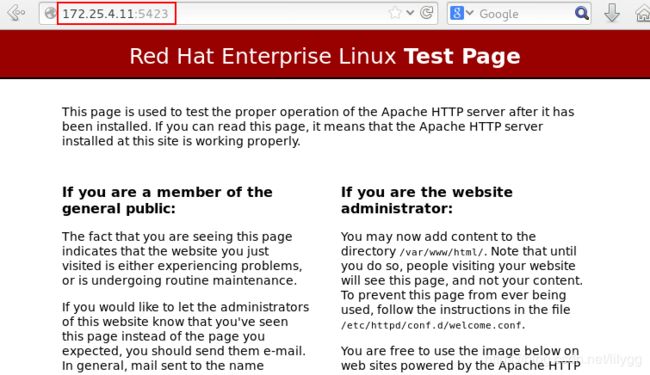
输入:172.25.4.11 可访问到apahce的默认发布页面(默认使用的是80端口)
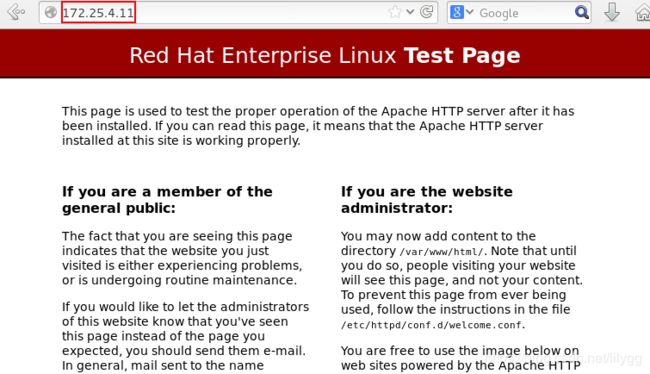
输入:172.25.4.11:5423 也可访问到apahce的默认发布页面,即说明5423端口转发到80端口
5.配置链路聚合
在 serverx.example.com 和 desktopx.example.com 之间按以下要求配置一个链接
此链路使用 eth1 和 eth2
此链路在一个接口失效时扔能正常工作
此链路 serverx 使用地址 172.16.x.65/24
此链路 desktopx 使用的地址 172.16.x.75/24
此链路在系统重启之后仍然保持正常状态
在server4上:
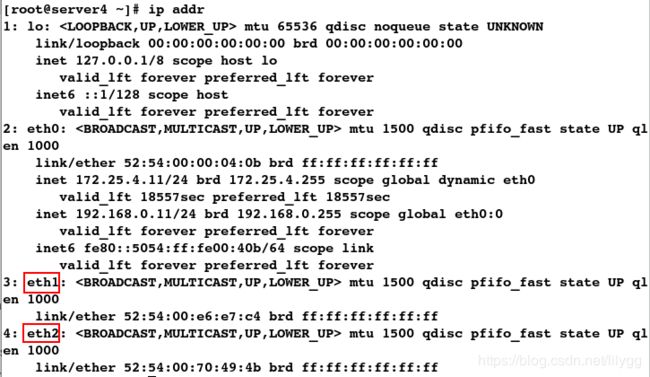
#1.添加网卡 eth1和eth2
[root@server4~]# ip addr
#2.添加team0接口
#静态添加链接;con-name表示链接,ifname表示设备/接口,type表示类型,config表示指定工作模式(activebackup:主备模式)
[root@server4 ~]# nmcli connection add con-name team0 ifname team0 type team config '{"runner":{"name":"activebackup"}}' ip4 172.16.4.65/24
#3.添加eth1网卡和eth2网卡
[root@server4 ~]# nmcli connection add con-name eth1 ifname eth1 type team-slave master team0
[root@server4 ~]# nmcli connection add con-name eth2 ifname eth2 type team-slave master team0
#查看链接
[root@server4 ~]# nmcli connection show
#查看team0设备的ip
[root@server4 ~]# ip addr
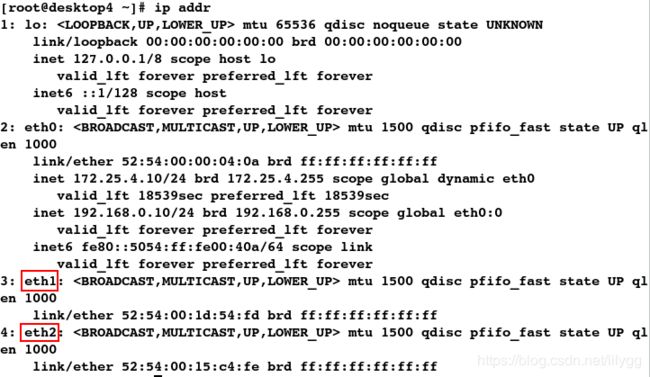
#1.添加网卡 eth1和eth2
[root@desktop4 ~]# ip addr
#2.添加team0接口
[root@desktop4 ~]# nmcli connection add con-name team0 ifname team0 type team config '{"runner":{"name":"activebackup"}}' ip4 172.16.4.75/24
#3.添加eth1网卡和eth2网卡
[root@desktop4 ~]# nmcli connection add con-name eth1 ifname eth1 type team-slave master team0
[root@desktop4 ~]# nmcli connection add con-name eth2 ifname eth2 type team-slave master team0
#查看链接
[root@desktop4 ~]# nmcli connection show
[root@desktop4 ~]# ip addr
注意:如果team0接口ip添加错误,直接delete删除即可,注意:需要先删除网卡再删除接口
[root@desktop4 ~]# nmcli connection delete eth1
[root@desktop4 ~]# nmcli connection delete eth2
[root@desktop4 ~]# nmcli connection delete team0
测试:
1.测试server4:
#可以ping通
[root@desktop4 ~]# ping 172.16.4.65
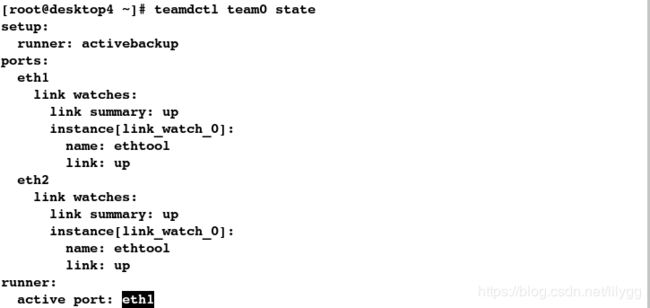
#查看team0接口的状态
[root@server4 ~]# teamdctl team0 state
#关闭正在工作的eth1设备
[root@server4 ~]# ifconfig eth1 down
#此时仍然可以ping通,因为eth2备用网卡会顶替工作
[root@desktop4 ~]# ping 172.16.4.65
#注意:测试完后一定要把eth1网卡激活
[root@server4 ~]# ifconfig eth1 up
[root@server4 ~]# teamdctl team0 state
2.测试desktop4:
[root@server4 ~]# ping 172.16.18.75
[root@desktop4 ~]# teamdctl team0 state
[root@desktop4 ~]# ifconfig eth1 down
[root@server4 ~]# ping 172.16.4.75
[root@desktop4 ~]# ifconfig eth1 up
[root@desktop4 ~]# teamdctl team0 state
在您的考试系统上配置接口 eth0 使用下列 ipv6 地址
serverx  上的地址 2018:ac18::10a/64
desktopx 上的地址 2018:ac18::11b/64
两个地址可以通信,并且在重新启动后依然生效,两快网卡的 ipv4 地址依然生效
在server4上:
[root@server4 ~]# nmcli connection show
[root@server4 ~]# nmcli connection modify "System eth0" ipv6.method manual ipv6.addresses 2018:ac18::10a/64
[root@server4 ~]# systemctl restart network
[root@server4 ~]# ip addr
[root@desktop4 ~]# nmcli connection show
[root@desktop4 ~]# nmcli connection modify "System eth0" ipv6.method manual ipv6.addresses 2018:ac18::11b/64
[root@desktop4 ~]# systemctl restart network
[root@desktop4 ~]# ip addr
1.测试server4:
[root@desktop4 ~]# ping6 2018:ac18::10a
2.测试desktop4:
[root@server4 ~]# ping6 2018:ac18::11b
在系统 serverx 和 desktopx 上配置邮件服务
这些系统不接收外部发送来的邮件
这些系统上发送的任何邮件都会自动路由到 classroom.example.com
这些系统上发送的邮件显示来自 example.com
您可以通过用户 hal 来测试您的配置,访问:
http://classroom.example.com/exam_mail/hal.txt(x是您的考试号)
[root@server4 ~]# yum list postfix
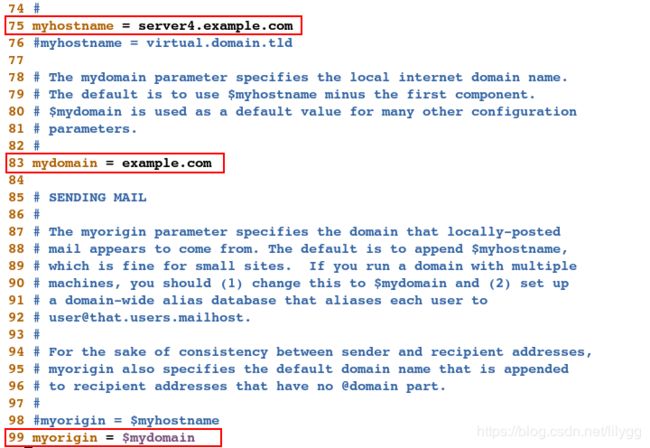
[root@server4 ~]# vim /etc/postfix/main.cf
##################
 75 myhostname = server4.example.com     #主机名
 83 mydomain = example.com                #域名(系统上发送的邮件来源)
 99 myorigin = $mydomain
 164 mydestination =                      #不接收外部发送来的邮件
 317 relayhost = classroom.example.com    #自动路由到classroom.example.com
[root@server4 ~]# systemctl restart postfix.service
[root@server4 ~]# systemctl enable postfix
[root@server4 ~]# scp /etc/postfix/main.cf [email protected]:/etc/postfix/main.cf
[root@server4 ~]# yum list postfix
[root@desktop4 ~]# vim /etc/postfix/main.cf
###################
 75 myhostname = desktop4.example.com      #主机名
[root@desktop4 ~]# systemctl restart postfix.service
测试:
1.测试server4:
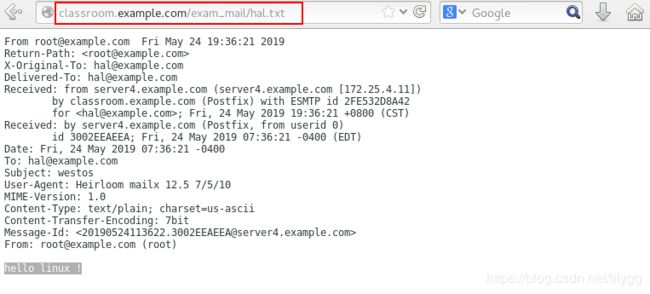
[root@server4 ~]# mail hal
Subject: westos    #邮件主题
hello linux !      #邮件内容
.                  #发送邮件
EOT
[root@server4 ~]# mailq     #查看待发送的邮件队列;empty即说明邮件发送成功
Mail queue is empty
# 注意:需要先打开浏览器,再发送邮件;因为每隔1分钟邮件便会自动被清理
[root@desktop4 ~]# firefox &
输入: http://classroom.example.com/exam_mail/hal.txt 即可查看到邮件内容
2.测试desktop:
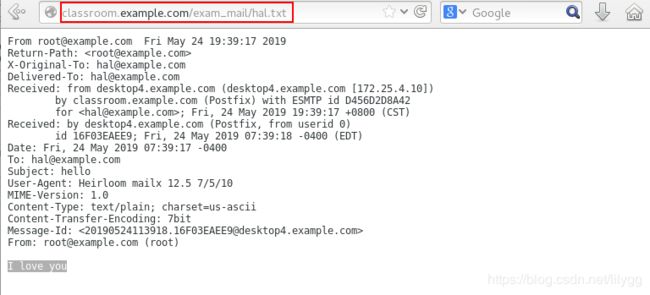
[root@desktop4 ~]# mail hal
Subject: hello
I love you
.
EOT
[root@desktop4 ~]# mailq
Mail queue is empty
[root@server4 ~]# firefox &
输入: http://classroom.example.com/exam_mail/hal.txt 即可查看到邮件内容
注意:如果出现如下报错,则执行刷新操作即可
[root@server4 ~]# mailq
-Queue ID- --Size-- ----Arrival Time---- -Sender/Recipient-------
BE6F5EAEEA      436 Wed May 22 01:13:35  [email protected]
(Host or domain name not found. Name service error for name=classroom.example.com type=MX: Host not found, try again)
                                         [email protected]
[root@server4 ~]# postqueue -f
[root@server4 ~]# mailq
Mail queue is empty
< smb共享: 8,9 >
8.通过 smb 共享目录
在 serverx 上配置 smb 服务
您的 smb 服务必须时 STAFF 工作组的一个成员
共享/groupdir 目录共享名必须是 common
只有 example.com 域的客户可以访问 common 共享
Common 必须时可以浏览的
用户 barney 必须能够都取共享的内容,如果需要的话验证密码是 westos
(1).安装部署smb服务
[root@server4 ~]# yum install -y samba samba-common samba-client -y
[root@server4 ~]# systemctl start smb
[root@server4 ~]# systemctl enable smb
(2).创建共享目录并更改安全上下文
[root@server4 ~]# mkdir /groupdir
#必须更改安全上下文,因为selinux为强制状态
[root@server4 ~]# semanage fcontext -a -t samba_share_t '/groupdir(/.*)?'
#刷新
[root@server4 ~]# restorecon -RvvF /groupdir
[root@server4 ~]# ll -Zd /groupdir
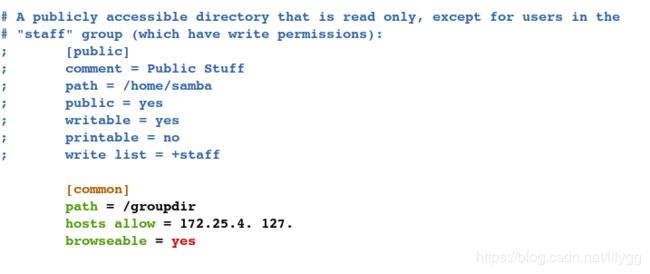
[root@server4 ~]# vim /etc/samba/smb.conf
##################
 89     workgroup = STAFF               #工作组


在文件末尾添加:

        [common]    				    #共享目录名称
        path = /groupdir    		    #共享目录路径
        hosts allow = 172.25.4. 127.    #允许example.com域(在172.25.4.网段)的客户可以访问common 共享;127. 表示本机
        browseable = yes    			#common可被浏览
[root@server4 ~]# systemctl restart smb
(4).添加smb用户
#必须先创建此用户,才能将其添加到smb用户中
[root@server4 ~]# useradd -s /sbin/nologin barney
[root@server4 ~]# smbpasswd -a barney
New SMB password:
Retype new SMB password:
Added user barney.
[root@server4 ~]# pdbedit -L
barney:1001:
测试:
#安装smb客户端软件
[root@desktop4~]# yum install -y samba-client
#匿名用户登陆
[root@desktop4 ~]# smbclient -L //172.25.4.11
#本地用户登陆
[root@desktop4 ~]# smbclient //172.25.4.11/common -U barney
[root@server4 ~]# touch /groupdir/file
#barney用户可以读取到共享目录内容的更改
[root@desktop4 ~]# smbclient //172.25.4.11/common -U barney
#注意:测试完了必须删除
[root@server4 ~]# rm -rf /groupdir/file
9.smb 多用户挂载配置
在 serverx 共享通过 smb 目录/data
共享名称 data
共享目录 data 只能被 example.com 域中的客户使用
共享目录 data 必须可以被浏览
用户 manager 必须能以读的方式访问此共享,访问密码是 westos
用户 wolferyne 必须能够以读写的方式访问此共享,访问密码是 westos
此共享永久挂载到 desktopx 主机的 /mnt/westos 目录 , 并使用用户 manager 作为认证
任何用户通过用户 wolferyne 来临时获取写的权限
(1).smb共享目录
#1.创建共享目录
[root@server4 ~]# mkdir /data
#2.更改安全的上下文
[root@server4 ~]# semanage fcontext -a -t samba_share_t '/data(/.*)?'
[root@server4 ~]# restorecon -RvvF /data/
[root@server4 ~]# ll -Zd /data
drwxrwxr-x+ root root system_u:object_r:samba_share_t:s0 /data/
#3.共享目录
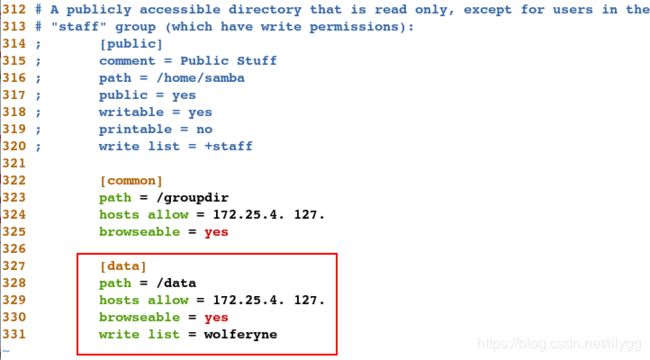
[root@server4 ~]# vim /etc/samba/smb.conf
##################
        [data]								#共享目录名称
        path=/data							#共享目录路径
        hosts allow = 172.25.18. 127.       #允许example.com域中的客户访问
        browseable = yes         			#允许被浏览
        write list = wolferyne				#可写用户列表
[root@server4 ~]# systemctl restart smb
(2).添加smb用户
[root@server4 ~]# useradd -s /sbin/nologin manager
[root@server4 ~]# useradd -s /sbin/nologin wolferyne
[root@server4 ~]# smbpasswd -a manager
New SMB password:
Retype new SMB password:
Added user manager.
[root@server4 ~]# smbpasswd -a wolferyne
New SMB password:
Retype new SMB password:
Added user wolferyne.
[root@server4 ~]# pdbedit -L
barney:1001:
wolferyne:1003:
manager:1002:
(3).更改权限
[root@server4 ~]# setfacl -m u:wolferyne:rwx /data/
[root@server4 ~]# getfacl /data/
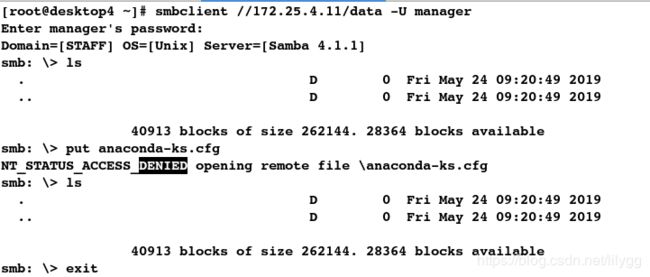
#manager用户对共享目录只读
[root@desktop4 ~]# smbclient //172.25.4.11/data -U manager
smb: \> ls
smb: \> put anaconda-ks.cfg    #上传失败,不可写
smb: \> exit
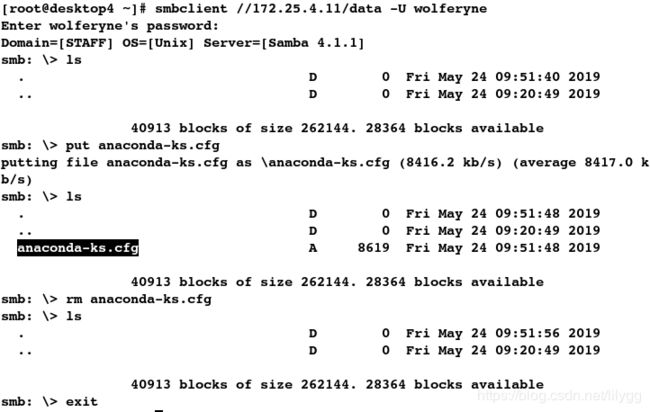
#wolferyne用户对共享目录/data可读写
[root@desktop4 ~]# smbclient //172.25.4.11/data -U wolferyne
smb: \> ls
smb: \> put anaconda-ks.cfg     #上传成功,可写
smb: \> ls
smb: \> rm anaconda-ks.cfg      #注意:测试完之后,需要删除(中间不能加-rf参数)
smb: \> ls
smb: \> exit
#只能被 example.com 域中的客户使用
[root@server4 ~]# systemctl stop firewalld
[root@server4 ~]# ifconfig eth0:1 172.25.254.11/24
[root@server4 ~]# ifconfig eth0:1
[root@foundation4 ~]# yum install -y samba-client
[root@foundation4 ~]# smbclient //172.25.254.11/data -U wolferyne
[root@foundation4 ~]# smbclient //172.25.254.11/data -U manager
#注意:测试完了,一定要开启火墙
[root@server4 ~]# systemctl start firewalld
(3).smb多用户挂载
#1.安装cifs
[root@desktop4 ~]# yum install -y cifs-utils.x86_64 -y
#2.编写认证文件
[root@desktop4 ~]# vim /root/examsmb
###################
username=manager
password=westos
[root@desktop4 ~]# chmod 600 /root/examsmb
#查看参数帮助
[root@desktop4 ~]# man mount.cifs
#3.挂载
[root@desktop4 ~]# mkdir /mnt/westos
[root@desktop4 ~]# vim /etc/fstab
###################
//172.25.4.11/data  /mnt/westos  cifs   defaults,credentials=/root/examsmb,sec=ntlmssp,multiuser   0 0

参数解释:
credentials:指定认证认证文件    sec:指定认证方式    multiuser:多用户挂载
[root@desktop4 ~]# mount -a
[root@desktop4 ~]# df
[root@desktop4 ~]# su - student
[student@desktop4 ~]$ cd /mnt
[student@desktop4 mnt]$ ls
ls: cannot access westos: Permission denied
westos
[student@desktop4 mnt]$ cd westos
[student@desktop4 westos]$ ls
ls: reading directory .: Permission denied
#任何用户通过用户 wolferyne 来临时获取写的权限
[student@desktop4 westos]$ cifscreds add -u wolferyne 172.25.4.11
Password:
[student@desktop4 westos]$ cd /mnt/westos/
[student@desktop4 westos]$ ll
total 0
[student@desktop4 westos]$ touch file
[student@desktop4 westos]$ ll
total 0
-rw-r--r--. 1 1003 1003 0 May 22 05:02 file
#注意:测试完后需要删除文件
[student@desktop4 westos]$ rm -rf file
[student@desktop4 westos]$ exit
logout
10.配置 NFS 服务
在 serverx 配置 nfs
以只读的方式共享目录/public 能被 example.com 域中的系统访问
以读写的方式共享目录/protected 能被 example.com 域中的系统访问
访问/protected 需要通过 kerberos 安全加密,您可以使用下面的 url 提供的秘钥
http://classroom.example.com/pub/keytabs/serverx.keytab
目录/protected 应该包含名称为 restricted,拥有人为 ldapuser1 的子目录
用户 ldapuser1 能够使用读写的方式访问/protected/restricted
(1).安装部署nfs服务
#注意:安装的软件是nfs-utils
[root@server4 ~]# yum list nfs-utils
#注意:开启的服务是nfs-server
[root@server4 ~]# systemctl start nfs-server
[root@server4 ~]# systemctl enable nfs-server
ln -s '/usr/lib/systemd/system/nfs-server.service' '/etc/systemd/system/nfs.target.wants/nfs-server.service'
(2).nfs方式共享目录
#1.创建目录
[root@server4 ~]# mkdir /public
[root@server4 ~]# mkdir /protected
#2.共享目录
[root@server4 ~]# vim /etc/exports
##################
/public         172.25.4.0/24(ro,async)
/protected      172.25.4.0/24(rw,async,sec=krb5p)
共享目录                          参数
#3.刷新配置
[root@server4 ~]# exportfs -rv
[root@server4 ~]# wget http://classroom.example.com/pub/keytabs/server4.keytab -O /etc/krb5.keytab
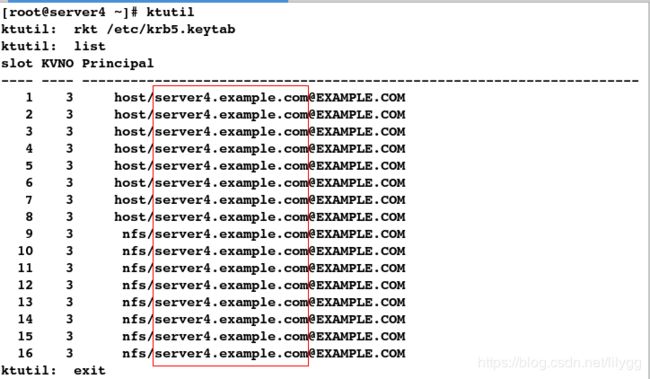
[root@server4 ~]# ktutil
ktutil:  rkt /etc/krb5.keytab
ktutil:  list    #和本机的主机名相同即为成功
#注意:服务端开启的是nfs-secure-server
[root@server4 ~]# systemctl start nfs-secure-server
[root@server4 ~]# systemctl enable nfs-secure-server
ln -s '/usr/lib/systemd/system/nfs-secure-server.service' '/etc/systemd/system/nfs.target.wants/nfs-secure-server.service'
(4).更改目录拥有人和权限
[root@server4 ~]# mkdir /protected/restricted
#更改拥有人
[root@server4 ~]# chown ldapuser1 /protected/restricted
[root@server4 ~]# ll -d /protected/restricted
drwxr-xr-x. 2 ldapuser1 root 6 May 22 08:33 /protected/restricted
#更改权限
[root@server4 ~]# chmod 777 /protected/restricted/
11.挂载一个 nfs 共享
在 desktopx 上挂载一个来自 serverx.example.com 的 nfs 共享
/public 挂在在下面的目录 /mnt/nfsmount 上
/protected 挂载在下面目录 /mnt/nfssecure 上,并且使用安全方式访问,
秘钥:  http://classroom.example.com/pub/keytabs/desktopx.keytab
用户 ldapuser1 能够在/mnt/nfssecure/restricted 上创建文件这些文件系统在开机启动时自动挂载
(1).查询nfs服务器
[root@desktop4 ~]# showmount -e 172.25.4.11
[root@desktop4 ~]# wget http://classroom.example.com/pub/keytabs/desktop4.keytab -O /etc/krb5.keytab
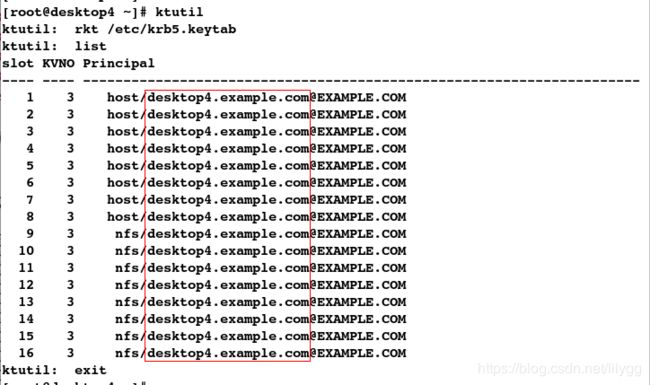
[root@desktop4 ~]# ktutil
ktutil:  rkt /etc/krb5.keytab
ktutil:  list       #和本机的主机名相同即为成功
#注意:客户端开启的是 nfs-secure
[root@desktop4 ~]# systemctl start nfs-secure
[root@desktop4 ~]# systemctl enable nfs-secure
ln -s '/usr/lib/systemd/system/nfs-secure.service' '/etc/systemd/system/nfs.target.wants/nfs-secure.service'
(3).挂载
[root@desktop4 ~]# mkdir /mnt/nfsmount
[root@desktop4 ~]# mkdir /mnt/nfssecure
[root@desktop4 ~]# vim /etc/fstab
###################
172.25.4.11:/public     /mnt/nfsmount   nfs   defaults   0 0
172.25.4.11:/protected  /mnt/nfssecure  nfs   defaults,sec=krb5p   0 0

注释: sec 表示认证方式
[root@desktop4 ~]# mount -a
[root@desktop4 ~]# df
[root@desktop4 ~]# ssh ldapuser1@localhost
-bash-4.2$ cd /mnt/nfssecure/restricted/
-bash-4.2$ ls
-bash-4.2$ touch file
-bash-4.2$ ll
total 0
-rw-rw-r--. 1 ldapuser1 ldapuser1 0 May 22 08:58 file     #如果是用户组组是nobody,则必须给 /protected/restricted/目录权限
-bash-4.2$ rm -rf file
-bash-4.2$ exit
[root@desktop4 ~]# su - ldapuser2
-bash-4.2$ cd /mnt/nfssecure/restricted/
-bash: cd: /mnt/nfssecure/restricted/: Permission denied
-bash-4.2$ exit
< Apcahe的部署: 12,13,14,15,16 >
12.实现一个 web 服务器
在 serverx 上配置一个站点 http://serverx.exampmle.com从
http://classroom.example.com/pub/materials/station.html
下载文件,并且将文件重名名为 index.html 不要修改该此文件的内容
将文件 index.html 拷贝到您的 web 服务器的 Documentroot 目录下
来自 example.com 域的客户可以访问此 web 服务
来自 my133t.org 域的可以端拒绝访问此 web
(1).部署apahce服务
#查看是否安装apache,若没有请自行安装
[root@server4 ~]# rpm -aq httpd
httpd-2.4.6-17.el7.x86_64
[root@server4 ~]# systemctl start httpd
[root@server4 ~]# systemctl enable httpd
ln -s '/usr/lib/systemd/system/httpd.service' '/etc/systemd/system/multi-user.target.wants/httpd.service'
#下载发布页面,注意需下载到默认发布目录中
[root@server4 ~]# cd /var/www/html/
[root@server4 html]# wget http://classroom.example.com/pub/materials/station.html -O index.html
[root@server4 html]# ls
index.html
(2).拒绝my133t.org域访问此 web
#查看my133t.org域的ip网段
[root@server4 ~]# host -l my133.org
#配置虚拟主机和访问控制
[root@server4 ~]# cd /etc/httpd/conf.d/
[root@server4 conf.d]# ls
autoindex.conf  README  userdir.conf  welcome.conf
#注意:文件名必须是以.conf结尾才能识别,否则不生效!!!
[root@server4 conf.d]# vim vhost.conf
#######################
                        	 	#配置虚拟主机
        DocumentRoot /var/www/html        #指定发布目录


            			   		#访问控制
        Order Allow,Deny
        Allow from All
        Deny from 192.168.0.0/24
[root@server4 conf.d]# systemctl restart httpd
(3).添加解析
[root@server4 ~]# vim /etc/hosts
#####################
172.25.4.10  desktop4.example.com
172.25.4.11  server4.exmaple.com
[root@desktop4 ~]# vim /etc/hosts
##################
172.25.4.10  desktop4.example.com
172.25.4.11  server4.exmaple.com
1.来自 example.com 域的客户可以访问此 web 服务
[root@desktop4 ~]# firefox &
输入server4的ip,即可访问到指定的发布页面

输入server4的主机名,也可访问;因为添加了解析

2.来自 my133.org 域的拒绝访问此 web 服务

# 注意:测试时需要先将火墙关闭
[root@server4 conf.d]# systemctl stop firewalld
[root@server4 conf.d]# ifconfig eth0:0 192.168.0.11/24
[root@server4 conf.d]# ifconfig
[root@foundation4 ~]# ifconfig br0:0 192.168.0.250/24
[root@foundation4 ~]# ifconfig
[root@foundation4 ~]# ping 192.168.0.11
[root@foundation4 ~]# firefox &
输入:192.168.0.11/index.html 出现禁止访问

# 注意:测试完成后,需将火墙开启
[root@server4 conf.d]# systemctl start firewalld
13.配置安全 web 服务
站点 https://serverx.example.com 配置 tls 加密一个已签名的证书
从 http://classroom.example.com/pub/tls/certs/westos.crt
从 http://classroom.example.com/pub/tls/private/westos.key
从 http://classroom.example.com/pub/example-ca.crt
(1).安装mod_ssl
[root@server4 ~]# yum install -y mod_ssl
(2).下载证书和key
[root@server4 ~]# cd /etc/httpd/
[root@server4 httpd]# wget http://classroom.example.com/pub/tls/certs/westos.crt
[root@server4 httpd]# wget http://classroom.example.com/pub/tls/private/westos.key
[root@server4 httpd]# wget http://classroom.example.com/pub/example-ca.crt
[root@server4 httpd]# ls
conf    conf.modules.d  logs     run         westos.key
conf.d  example-ca.crt  modules  westos.crt
(3).关联证书和key
[root@server4 httpd]# ll /etc/httpd/westos.crt
-rw-r--r--. 1 root root 855 May 26  2017 /etc/httpd/westos.crt
[root@server4 httpd]# ll /etc/httpd/westos.key
-rw-r--r--. 1 root root 937 May 26  2017 /etc/httpd/westos.key
[root@server4 httpd]# ll /etc/httpd/example-ca.crt
-rw-r--r--. 1 root root 1220 Jul 10  2014 /etc/httpd/example-ca.crt
[root@server4 httpd]# vim /etc/httpd/conf.d/ssl.conf
######################
100 SSLCertificateFile /etc/httpd/westos.crt
107 SSLCertificateKeyFile /etc/httpd/westos.key
122 SSLCACertificateFile /etc/httpd/example-ca.crt
[root@server4 httpd]# systemctl restart httpd
(4).添加解析
[root@server4 httpd]# vim /etc/hosts
[root@server4 httpd]# firefox &
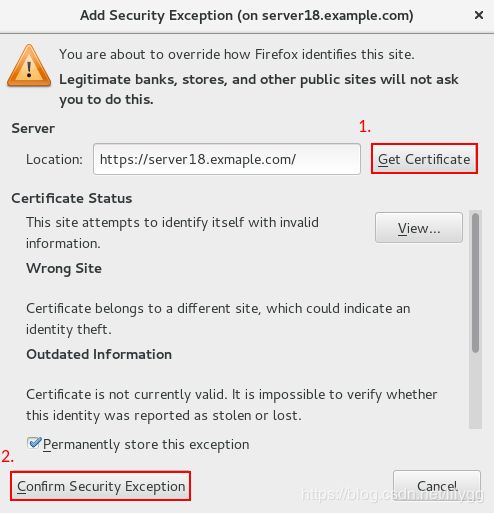
输入: https://westos.example.com 获取证书

测试:查看证书
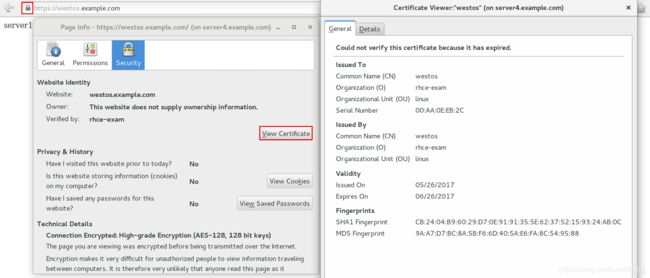
14.配置虚拟主机
在serverx上拓展您的web服务器,为站点
http://wwwx.example.com 创建一个虚拟主机
设定默认发布目录为/var/www/virtual
从classroom.example.com/pub/materials/www.html 下载文件并
重命名为 index.html,不要对文件 index.html 的内容做任何修改
将文件 index.html 放到默认发目录下
确保 barney 用户能在/var/www/virtual 目录下创建文件
(1).创建发布目录并下载发布文件
[root@server4 ~]# mkdir /var/www/virtual
[root@server4 ~]# cd /var/www/virtual
[root@server4 virtual]# wget classroom.example.com/pub/materials/www.html -O index.html
[root@server4 virtual]# ls
index.html
#指定barney用户对/var/www/virtual目录可读写
[root@server4 virtual]# setfacl -m u:barney:rwx /var/www/virtual
测试:确保 barney 用户能在/var/www/virtual 目录下创建文件

# barney用户没有可交互的shell
[root@server4 virtual]# su - barney
This account is currently not available.
# 指定shell
[root@server4 virtual]# usermod -s /bin/bash barney
[root@server4 virtual]# su - barney
Last login: Wed May 22 10:11:11 EDT 2019 on pts/0
[barney@server4 ~]$ cd /var/www/virtual/
[barney@server4 virtual]$ ls
index.html
[barney@server4 virtual]$ touch file
[barney@server4 virtual]$ ls
file  index.html
[barney@server4 virtual]$ rm -rf file
[barney@server4virtual]$ exit
(2).配置虚拟主机
[root@server4 virtual]# cd /etc/httpd/conf.d/
[root@server4 conf.d]# ls
autoindex.conf  README  ssl.conf  userdir.conf  vhost.conf  welcome.conf
[root@server4 conf.d]# vim vhost.conf
#######################

        ServerName www4.example.com      	#指定访问域名
        DocumentRoot /var/www/virtual    	#指定发布目录


        Require all granted                	#目录授权
[root@server4 conf.d]# systemctl restart httpd
(3).添加解析
[root@server4 conf.d]# vim /etc/hosts
[root@desktop4 ~]# vim /etc/hosts
[root@desktop4 ~]# firefox &
输入: www4.example.com 即可访问/var/www/virtual目录下的发布文件内容

15.配置您的 serverx 上的 web 服务器
在默认发布目录下创建一个名为 confidential 的目录
从 http://classroom.example.com/pub/materials/private.html
下载到这个目录中,并且重命名为 index.html
不要修改这个文件的内容
从 serverx 上,任何人都可以浏览此目录,但是其他系统不能访问此目录中的内容
(1).创建发布目录并下载发布文件
[root@server4 ~]# mkdir /var/www/html/confidential
[root@server4 ~]# cd /var/www/html/confidential
[root@server4 confidential]# wget http://classroom.example.com/pub/materials/private.html -O index.html
[root@server4 confidential]# ls
index.html
(2).配置虚拟主机
[root@server4 confidential]# cd /etc/httpd/conf.d/
#注意写的位置,访问写在一起
[root@server4 conf.d]# vim vhost.conf
#######################
           #访问控制
        Order Deny,Allow         #设置访问顺序
        Deny from All                          	   #先拒绝所有,再允许本机访问
        Allow from 172.25.4.11
        Allow from server4.exmaple.com
        Allow from 127.0.0.1
        Allow from localhost
[root@server4 conf.d]# systemctl restart httpd
测试:
#本机可以访问confidential
[root@server4 confidential]# firefox &
#除本机以外的其他主机均不可访问
[root@desktop4 ~]# firefox &
在 server1 上配置提供 web 内容
动态内容由名为 transitive.example.com 的虚拟机提供虚拟机监听端口:8989
从 http://classroom.example.com/pub/materials/script.wsgi
下载一个脚本,然后防到合适的位置,不要修改该此文件内容
客户访问 http://transitive.example.com:8989时应该生成动态的web页面
此站点 必须能被 example.com 域内的所有系统访问
(1).安装mod_wsgi
[root@server4 ~]# yum install -y mod_wsgi.x86_64
(2).下载动态脚本
[root@server4 ~]# cd /var/www/cgi-bin/
[root@server4 cgi-bin]# wget http://classroom.example.com/pub/materials/script.wsgi
[root@server4 cgi-bin]# ls
script.wsgi
(3).配置虚拟主机
[root@server4 cgi-bin]# cd /etc/httpd/conf.d/
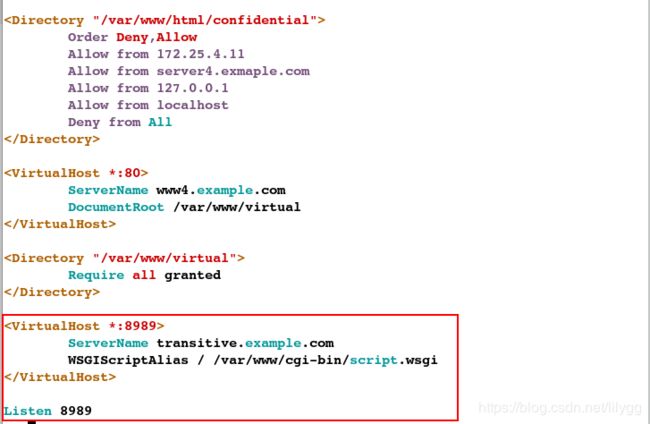
[root@server4 conf.d]# vim vhost.conf
#######################

        ServerName transitive.example.com				   #指定访问域名
        WSGIScriptAlias / /var/www/cgi-bin/script.wsgi     #指定动态脚本


Listen 8989    #指定端口
#查看当前允许的httpd端口
[root@server4 conf.d]# semanage port -l | grep http
#添加http端口;-a:添加,-t:类型,-p:协议和端口
[root@server4 conf.d]# semanage port -a -t http_port_t -p tcp 8989
[root@server4 conf.d]# semanage port -l | grep http
#注意:必须添加了端口,服务才能重启成功
[root@server4 conf.d]# systemctl restart httpd
[root@server4 ~]# netstat -antlp | grep httpd
[root@server4 ~]# vim /etc/hosts
[root@desktop4 ~]# vim /etc/hosts
[root@desktop4 ~]# firefox &
在 serverx 上创建一个/root/scripts.sh 的脚本,让其提供下列特性
当运行/root/scripts.sh all 输出 none
当运行/root/scripts.sh none 输出 all
当没有任何参数或者参数不是 all 或 none 时,其错误输出产生下列信息:
/root/scripts.sh all|none
#1.编写脚本
[root@server4 ~]# vim /root/scripts.sh
##################
#!/bin/bash
case $1 in          #case语句
    all)
    echo none
    ;;
    none)
    echo all
    ;;
    *)
    echo "/root/scripts.sh all|none"
esac
#2.给脚本一个可执行权限
[root@server4 ~]# chmod +x /root/scripts.sh
测试:
[root@server4 ~]# /root/scripts.sh all
none
[root@server4 ~]# /root/scripts.sh none
all
[root@server4 ~]# /root/scripts.sh
/root/scripts.sh all|none
# -x表示检测脚本执行过程
[root@server4 ~]# sh -x /root/scripts.sh
+ case $1 in
+ echo '/root/scripts.sh all|none'
18.创建一个添加用户的脚本
在server上创建一个脚本,名为/root/mkusers,此脚本能实现为server创建本地用户,
并且这些用户的用户名来自一个包含用户名列表的文件。同时满足下列要求:
此脚本要求提供一个参数,此参数就是包含用户名列表的文件
如果没有提供参数,此脚本应该给出下面的提示信息Usage:/root/mkusers filename
然后退出并返回相应的值。
如果提供一个不存在的文件名,此脚本应该给出下面的提示信息 Input file not found
然后退出并返回相应的值
创建的用户登录shell是/bin/false ,此脚本不需要为用户设置密码
您可以从下面的URL获取用户名列表作为测试用http://classroom.example.com/pub/materials/userlist
[root@server4 ~]# vim /root/mkusers
#################
#!/bin/bash
if [ ! $# -eq 1 ]                                   #判断参数的个数是否为1;  !表示非,  $#表示参数的个数,  -eq判断相等
then
    echo "Usage:/root/mkusers filename"
    exit 1
elif [ ! -f $1 ]              					    #判断该参数是否为文件; -f判断是否为文件, $1表示脚本后的第一串字符,  exit 后边跟非零数 表示非正常退出,即你的程序产生了一个错误
then
    echo "Input file not found"
    exit 2
else                   								#逐个创建文件中的用户
    for user in 1 `cat $1`
    do
        useradd -s /bin/false $user
    done
fi
[root@server4 ~]# chmod +x /root/mkusers
测试:
[root@server4 ~]# /root/mkusers
Usage:/root/mkusers filename
[root@server4 ~]# /root/mkusers file
Input file not found
19.配置 iscsi 服务端
配置serverx提供一个iscsi服务磁盘名称
iqn.2014-11.com.example:serverx端口 3260
用 iscsi_data 作为后端卷,大小为 3G
此服务只能被 desktopx.example.com 访问
(1).创建逻辑卷
#1.创建物理分区
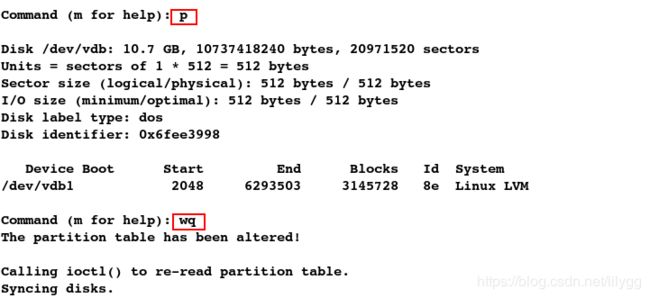
[root@server4 ~]# fdisk /dev/vdb
Command (m for help): n
Select (default p): p
Partition number (1-4, default 1): 1
First sector (2048-20971519, default 2048):
Last sector, +sectors or +size{K,M,G} (2048-20971519, default 20971519): +3G
Command (m for help): t
Hex code (type L to list all codes): 8e
Command (m for help): p
Command (m for help): wq
[root@server4 ~]# partprobe
[root@server4 ~]# cat /proc/partitions
#2.创建物理卷
[root@server4 ~]# pvcreate /dev/vdb1
#3.创建物理卷组
[root@server4 ~]# vgcreate v0 /dev/vdb1
#查看物理卷组的详细信息
[root@server4 ~]# vgdisplay
#4.创建逻辑卷
[root@server4 ~]# lvcreate -l 767 -n iscsi_data v0
#查看逻辑卷
[root@server4 ~]# lvs
#1.安装部署targetcli
[root@server4 ~]# yum install -y targetcli
[root@server4 ~]# systemctl start target
[root@server4 ~]# systemctl enable target
ln -s '/usr/lib/systemd/system/target.service' '/etc/systemd/system/multi-user.target.wants/target.service'
#2.共享设备
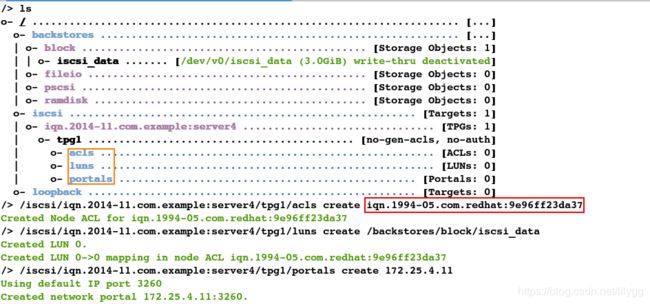
[root@server18 ~]# targetcli
/> ls
/> /backstores/block create iscsi_data /dev/v0/iscsi_data       #重命名
/> /iscsi create iqn.2014-11.com.example:server4     			#创建iqn
/> ls
/> /iscsi/iqn.2014-11.com.example:server4/tpg1/acls create iqn.1994-05.com.redhat:9e96ff23da37        #生成key;此key即为客户端的key
/> /iscsi/iqn.2014-11.com.example:server4/tpg1/luns create /backstores/block/iscsi_data     		  #关联设备
/> /iscsi/iqn.2014-11.com.example:server4/tpg1/portals create 172.25.4.11    						  #创建网络端口;本机ip
/> ls
/> exit
[root@desktop4 ~]# vim /etc/iscsi/initiatorname.iscsi
#1.发现设备
[root@desktop4 ~]# iscsiadm -m discovery -t st -p 172.25.4.11
172.25.4.11:3260,1 iqn.2014-11.com.example:server4
#2.登陆设备
[root@desktop4 ~]# iscsiadm -m node -T iqn.2014-11.com.example:server4 -p 172.25.4.11 -l
[root@desktop4 ~]# fdisk -l
配置 desktopx 使其能链接在 server1 上提供的 iscsi
iscsi 设备在系统启动的期间自动加载
块设备 iscsi 上包含一个大小为 1900M 的分区,并格式化为 xfs
此分区自动挂载在/mnt/data 上同时在系统启动的期间自动挂载
(1).对共享设备进行分区
[root@desktop4 ~]# fdisk /dev/sda
Command (m for help): n
Select (default p): p
Partition number (1-4, default 1):
First sector (8192-6283263, default 8192):
Last sector, +sectors or +size{K,M,G} (8192-6283263, default 6283263): +1900M
Command (m for help): wq
[root@desktop4~]# partprobe
[root@desktop4 ~]# cat /proc/partitions
#1.格式化
[root@desktop4 ~]# mkfs.xfs /dev/sda1
#2.创建目录
[root@desktop4 ~]# mkdir /mnt/data
#3.查看uuid,网络设备最好用uuid方式挂载
[root@desktop4 ~]# blkid
#4.挂载
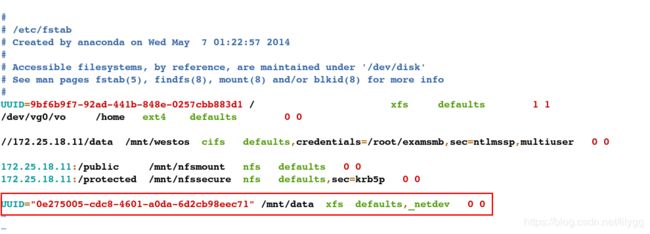
[root@desktop4 ~]# vim /etc/fstab
###################
UUID="9f1e0b7f-a20e-458c-bb4f-0f1766b287ac" /mnt/data   xfs   defaults,_netdev   0 0

注释:  _netdev 表示网络设备 ; 最好用UUID方式挂载,因为设备名可能会被更改,但UUID一定不会改变
[root@desktop4 ~]# mount -a
[root@desktop4 ~]# df
在 serverx 上创建一个 mariadb,名为 Contacts
数据库应该包含来自数据库复制的内容。复制文件的 url
http://classroom.example.com/pub/materials/users.mdb
数据库只能被 localhost 访问
除了 root 用户,此数据库只能被 Luigi 查询,此用户密码为 westos
超级用户密码为 westos,同时不允许空密码登陆
(1).安装部署mariadb
#注意:安装的是mariadb-server
[root@server4 ~]# yum install -y mariadb-server
[root@server4 ~]# systemctl start mariadb
[root@server4 ~]# systemctl enable mariadb
ln -s '/usr/lib/systemd/system/mariadb.service' '/etc/systemd/system/multi-user.target.wants/mariadb.service'
(2).初始化
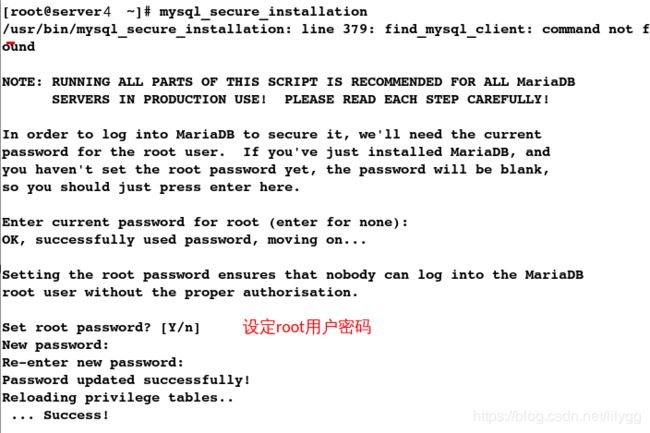
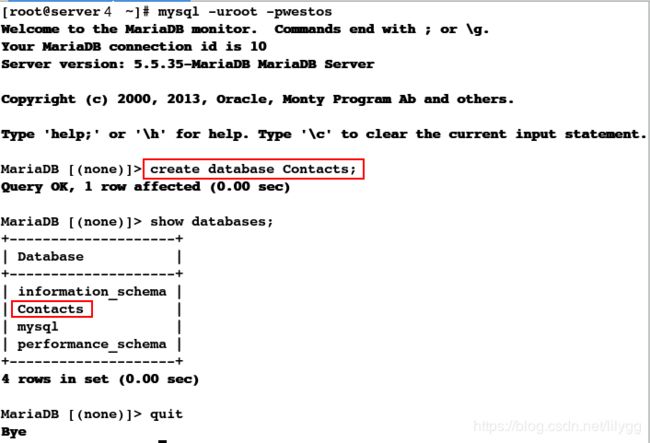
[root@server4 ~]# mysql_secure_installation
[root@server4 ~]# mysql -uroot -pwestos
MariaDB [(none)]> create database Contacts;    # 创建数据库
MariaDB [(none)]> show databases;
MariaDB [(none)]> quit
#1.下载复制内容
[root@server4 ~]# wget http://classroom.example.com/pub/materials/users.mdb
#2.导入数据库
[root@server4 ~]# mysql -uroot -pwestos Contacts < users.mdb
(5).创建用户并授权
[root@server4 ~]# mysql -uroot -pwestos
MariaDB [(none)]> create user Luigi@localhost identified by 'westos';    #创建用户
MariaDB [(none)]> grant SELECT ON Contacts.* to Luigi@localhost;         #用户授权
MariaDB [(none)]> show grants for Luigi@localhost;           			 #查看用户权限
MariaDB [(none)]> quit
在系统 serverx 上使用数据库 contacts,并且使用相应 sql 查询以回答下列问题
请找出 密码为forsook的人的名字
[root@server4 ~]# mysql -uLuigi -pwestos
MariaDB [(none)]> show databases;
MariaDB [(none)]> use Contacts;
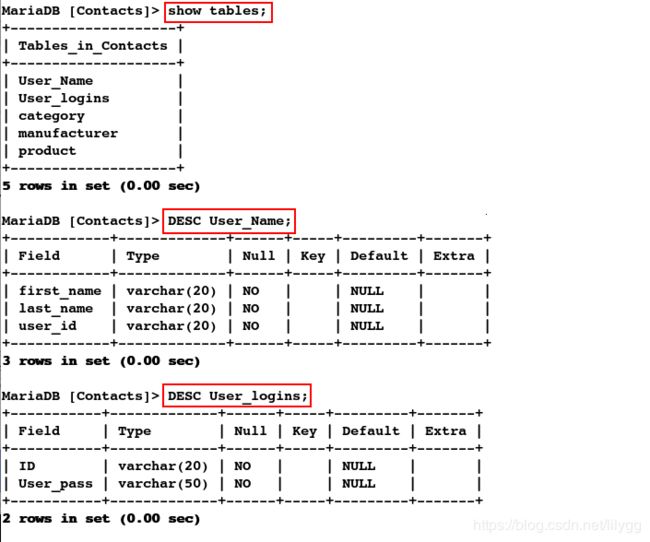
MariaDB [Contacts]> show tables;
MariaDB [Contacts]> DESC User_Name;             #查询表结构
MariaDB [Contacts]> DESC User_logins;
MariaDB [Contacts]> select * from User_logins;
MariaDB [Contacts]> select id from User_logins where User_pass='forsook';     #根据密码查询相应的id
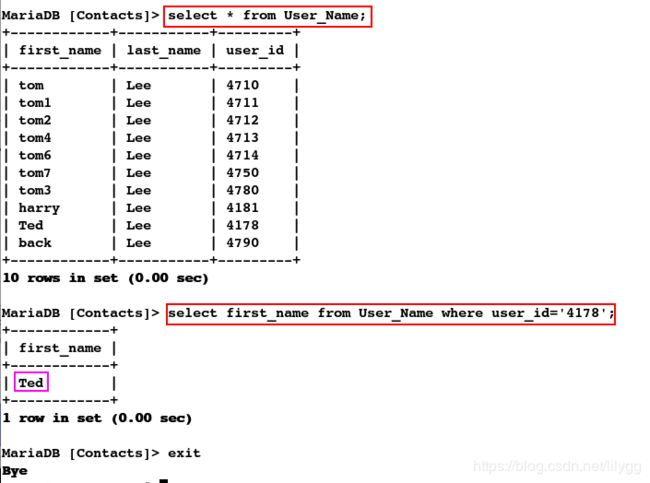
MariaDB [Contacts]> select * from User_Name;
MariaDB [Contacts]> select first_name from User_Name where user_id=4178;    #根据id查询相应的名字
MariaDB [Contacts]> exit


