超详细Retrofit源码解析(一)
一、什么是Retrofit
A type-safe HTTP client for Android and Java
以上是官网给出的答案,翻译成中文:Retrofit是Android和Java上类型安全的http客户端。
简而言之,Retrofit是对http网络请求框架的封装,与Volley\AsyncHttpClient等类似,简化了用户的http请求流程。
它支持DELETE\GET\POST\PUT\HEADER\OPTION\PATCH等请求方式,默认使用okhttp作为网络请求引擎。
二、Retrofit的一些重要类及接口
- Call
该接口代表一个实际的http请求,它的主要作用有三个:
1. 调用createRawCall创建请求;
2. 调用okhttp发送请求;
3. 将okhttp返回的响应解析成Retrofit对应的Response
4. 对于异步的enqueue操作,还有执行相应的onResponse和onFailure回调操作
抛开mock测试相关,该类的实现类主要有:OkHttpCall\ExecutorCallbackCall。
- CallAdapter
顾名思义,该接口的主要作用是适配,将一个带有响应类型为R的Call请求适配成需要的类型T。所以该接口的定义是CallAdapter。其核心方法T adapt(Call call)的作用就在于此。
该类内部还封装了一个抽象工厂类Factory。通过Retrofit.create会产生一个接口对象,该接口对象内部的方法的返回值都具有返回类型。Factory正是用于创建基于该返回类型而生的CallAdapter。
抛开mock测试相关,CallAdapter的实现类主要有:BodyCallAdapter\ResponseCallAdapter\RxJavaCallAdapter\RxJava2CallAdapter。
抛开mock测试相关,CallAdapter.Factory的实现类分布在retrofit-adapters包中,有GuavaCallAdapterFactory\Java8CallAdapterFactory\RxJavaCallAdapterFactory\RxJava2CallAdapterFactory\ScalaCallAdapterFactory
- Converter
Converter主要有三个方法,对应三个作用。
1. 当请求带有请求体时,将请求体转换成OkHttp对应的RequestBody
2. 将响应解析成需要的实体对象T
3. 将Field\FieldMap\Header\HeaderMap\Path\Query\QueryMap等的值转换成String类型
当需要自定义数据转换机制时,可以实现该接口,并注册到Retrofit中。目前默认的数据转换采用Gson,也可根据需要自定义成xml\protoBuf\fastJson等。
三、根据设计模式分析源码
首先放一张stay大神画的Retrofit请求的流程图
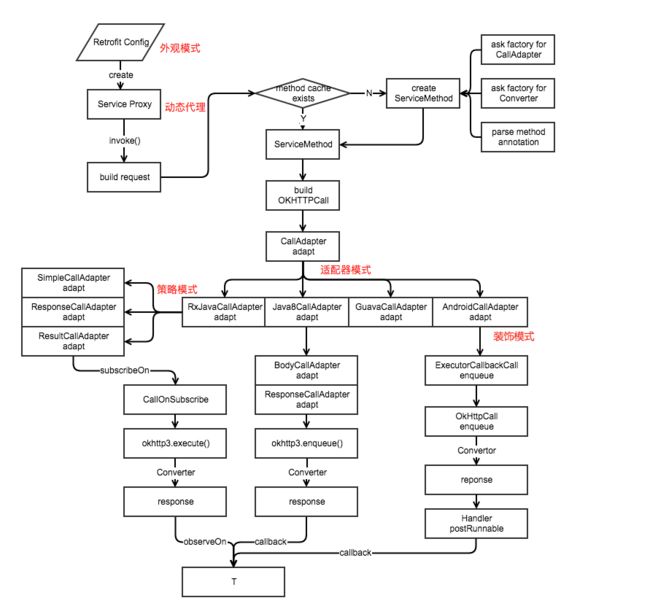
接下来我们将根据这张流程图的走势,结合遇到的设计模式,分析Retrofit的设计源码。对于一些常见的、简单的设计模式,本文不做分析。
外观(门面)模式
我们知道,在使用Retrofit库时,基本是围绕着Retrofit这个类本身来使用的。该类内部封装了不同的组件,如CallAdapter\ServiceMethod\Converter等。
我们在使用Retrofit时,并没有直接与CallAdapter\ServiceMethod\Converter等打交道,而是通过Retrofit提供的接口间接去使用这些组件。这种对外提供简单统一的接口、隐蔽内部子系统的具体实现、将变化隔离的设计方式称为“外观模式”,也叫“门面模式”。
private final Map<Method, ServiceMethod> serviceMethodCache = new ConcurrentHashMap<>(); final okhttp3.Call.Factory callFactory; final HttpUrl baseUrl; final ListconverterFactories; final List adapterFactories; final @Nullable Executor callbackExecutor; final boolean validateEagerly; 建造者模式
在使用Retrofit前,需要先创建出Retrofit对象。Retrofit的构造方法的访问权限是protected级别的,非继承类无法直接通过new Retrofit的方式创建Retrofit对象,同时Retrofit类又是final类型的,因此无法被继承。也就是说,直接通过new Retrofit来构造Retrofit对象的方式是行不通的。
幸运的是,Retrofit内部提供了Builder建造者类,用于构建Retrofit对象,也就出现了我们使用Retrofit时的通用写法:
Retrofit retrofit = new Retrofit.Builder()
    .baseUrl("https://api.github.com/")
    .build();
通过Builder的build方法,最终生成一个Retrofit对象。这里需要详细分析一下构建流程,以便我们理解Builder中几个重要对象的默认赋值,也便于更好地理解后续文章的分析。
//无参的构造方法默认调用带有platform参数的构造方法
public Builder() {
  this(Platform.get());
}

Builder(Platform platform) {
  this.platform = platform;
}
在创建Builder对象时,最终会调用带有platForm参数的构造方法。Platform又是什么呢?顾名思义,它代表的是平台的意思,我们跟踪进PlatForm源码查看,会发现内部封装了一个静态私有变量PLATFORM。毫无疑问,这就是我们在Builder构造时传入的参数了。该参数通过findPlatform静态方法获取。
private static Platform findPlatform() {
try {
  Class.forName("android.os.Build");
  if (Build.VERSION.SDK_INT != 0) {
    return new Android();
  }
} catch (ClassNotFoundException ignored) {
}
try {
  Class.forName("java.util.Optional");
  return new Java8();
} catch (ClassNotFoundException ignored) {
}
return new Platform();
}
当ClassLoader可以查找到android.os.Build,则代表该平台是Android;
当ClassLoader可以查找到java.util.Optional,则代表是Java8;
否则直接返回Platform。Android和Java8都继承自Platform。
//Android类定义
static class Android extends Platform {
    ...
}

//Java8类定义
static class Java8 extends Platform {
    ...
}
显然,我们的程序是运行在Android上的,因此该处优先返回的自然是Android对象。Android的内部结构如下,大家先熟悉一下,关注重点是ExecutorCallAdapterFactory和MainThreadExecutor。这两个结构在接下来将起到重要作用。
先小小地剧透一下MainThreadExecutor的作用:它是用来将异步请求的回调从子线程切换到主线程执行的!!!
 static class Android extends Platform {
@Override public Executor defaultCallbackExecutor() {
  return new MainThreadExecutor();
}

@Override CallAdapter.Factory defaultCallAdapterFactory(@Nullable Executor callbackExecutor) {
  if (callbackExecutor == null) throw new AssertionError();
  return new ExecutorCallAdapterFactory(callbackExecutor);
}

static class MainThreadExecutor implements Executor {
  private final Handler handler = new Handler(Looper.getMainLooper());

  @Override public void execute(Runnable r) {
    handler.post(r);
  }
}
}
创建完Builder对象之后,接下来就是调用Builder的build方法来构建出具体的Retrofit对象了。
public Retrofit build() { okhttp3.Call.Factory callFactory = this.callFactory; if (callFactory == null) { callFactory = new OkHttpClient(); } Executor callbackExecutor = this.callbackExecutor; if (callbackExecutor == null) { callbackExecutor = platform.defaultCallbackExecutor(); } ListadapterFactories = new ArrayList<>(this.adapterFactories); adapterFactories.add(platform.defaultCallAdapterFactory(callbackExecutor)); List converterFactories = new ArrayList<>(1 + this.converterFactories.size()); converterFactories.add(new BuiltInConverters()); converterFactories.addAll(this.converterFactories); return new Retrofit(callFactory, baseUrl, converterFactories, adapterFactories, callbackExecutor, validateEagerly); } build方法里面主要执行了以下几个初始化操作:
1. 判断callFactory是否为null,,显然,由于使用了无参的Builder构造方法,因此callFactory==null,callFactory默认被赋值为OkHttpClient,即默认使用okhttp作为网络请求引擎。
2. 判断callbackExecutor是否为null,同样callbackExecutor==null,进入到callbackExecutor = platform.defaultCallbackExecutor(),根据上述分析,这里调用的是Android的defaultCallbackExecutor(),最终返回MainThreadExecutor对象。
3. adapterFactories添加适配器工厂,默认添加了platform.defaultCallAdapterFactory(callbackExecutor),回溯到Android类中,发现该方法返回ExecutorCallAdapterFactory对象。
4. converterFactories添加转换器工厂,默认内置了BuiltInConverters,同时也添加用户自定义的转换器。
执行完以上初始化操作后,最终会调用Retrofit的构造方法创建对象。
动态代理
在创建完Retrofit对象后,还记得接下来的使用姿势吗?
是的,我们还需要一个接口,在这个接口里面需要预定义一些方法,这些方法使用Retrofit提供的注解声明参数,范式如下:
public interface GitHubService { @GET("users/{user}/repos") Call声明完接口之后,接下来就是调用Retrofit的create方法返回一个接口代理对象,而后就可以通过这个代理对象调用接口中的方法了,范式如下:
GitHubService service = retrofit.create(GitHubService.class); Callcreate方法是Retrofit动态代理的核心所在。
publicT create(final Class service) { //传入的service对象必须是接口,且该接 //口不能继承任何其他接口 Utils.validateServiceInterface(service); if (validateEagerly) { eagerlyValidateMethods(service); } return (T) Proxy.newProxyInstance(service.getClassLoader(), new Class[] { service }, new InvocationHandler() { private final Platform platform = Platform.get(); @Override public Object invoke(Object proxy, Method method, @Nullable Object[] args) throws Throwable { // 如果方法隶属于Object,则当做普通方法处理 if (method.getDeclaringClass() == Object.class) { return method.invoke(this, args); } //如果是接口里default方法(Java8新特性),则调 //用默认方法处理 if (platform.isDefaultMethod(method)) { return platform.invokeDefaultMethod(method, service, proxy, args); } ServiceMethod 动态代理与装饰者模式很像,都是通过拦截某些方法,在这些方法前后做一些附加操作。但动态代理又与装饰者模式又存在区别,个人认为,主要有以下不同:
1. 动态代理更倾向于用在当有较多的方法需要被拦截处理的情况,即批量处理的情况;
2. 装饰者模式倾向于用在需要拦截的方法的量较少的情况,即单个操作的情况;create方法里,通过Proxy的newProxyInstance构造出一个代理对象,Retrofit给该代理对象传递了一个InvocationHandler,之后我们所有经过代理对象调用的接口方法,都会被该InvocationHandler拦截处理。
在InvocationHandler的invoke方法里,会读取接口里声明的方法参数,并生成对应的Call,之后将该Call适配成程序需要的类型返回。
首先,invoke方法里需要先获取ServiceMethod对象。ServiceMethod的类名很直观地表明了它就是我们在GithubService接口里定义的方法。
ServiceMethod可以看到,loadServiceMethod首先会到serviceMethodCache缓存中去取,如果可以取到ServiceMethod对象,就直接返回;否则调用ServiceMethod的Builder建造器去构造,并将构造结果缓存到serviceMethodCache中。
接下来我们一起来看看ServiceMethod.Builder的build方法,瞧一瞧它在里面到底做了哪些事。
public ServiceMethod build() {
  //创建callAdapter和convert对象
  callAdapter = createCallAdapter();
  responseType = callAdapter.responseType();
  responseConverter = createResponseConverter();

  //提取方法级别的注解
  for (Annotation annotation : methodAnnotations) {
    parseMethodAnnotation(annotation);
  }

  //提取参数级别的注解,生成不同的参数处理器,分发处理
  int parameterCount = parameterAnnotationsArray.length;
  parameterHandlers = new ParameterHandler[parameterCount];
  for (int p = 0; p < parameterCount; p++) {
    Type parameterType = parameterTypes[p];

    Annotation[] parameterAnnotations = parameterAnnotationsArray[p];

    parameterHandlers[p] = parseParameter(p, parameterType, parameterAnnotations);
  }

  return new ServiceMethod<>(this);
}
以上我们省略掉了部分逻辑,只留下核心部分,便于分析。在build方法里,第一步先调用createCallAdapter和createResponseConverter创建callAdapter和responseConverter对象。
之后遍历接口方法的所有注解,调用parseMethodAnnotation处理每个方法级别的注解。方法级别的注解是用于方法上的,例如@GET\@POST\@Headers\@Multipart\@FormUrlEncoded等。该方法定义如下。
 private void parseMethodAnnotation(Annotation annotation) {
  if (annotation instanceof DELETE) {
    parseHttpMethodAndPath("DELETE", ((DELETE) annotation).value(), false);
  } else if (annotation instanceof GET) {
    parseHttpMethodAndPath("GET", ((GET) annotation).value(), false);
  } else if (annotation instanceof HEAD) {
    parseHttpMethodAndPath("HEAD", ((HEAD) annotation).value(), false);
    if (!Void.class.equals(responseType)) {
      throw methodError("HEAD method must use Void as response type.");
    }
  } else if (annotation instanceof PATCH) {
    parseHttpMethodAndPath("PATCH", ((PATCH) annotation).value(), true);
  } else if (annotation instanceof POST) {
    parseHttpMethodAndPath("POST", ((POST) annotation).value(), true);
  } else if (annotation instanceof PUT) {
    parseHttpMethodAndPath("PUT", ((PUT) annotation).value(), true);
  } else if (annotation instanceof OPTIONS) {
    parseHttpMethodAndPath("OPTIONS", ((OPTIONS) annotation).value(), false);
  } else if (annotation instanceof HTTP) {
    HTTP http = (HTTP) annotation;
    parseHttpMethodAndPath(http.method(), http.path(), http.hasBody());
  } else if (annotation instanceof retrofit2.http.Headers) {
    String[] headersToParse = ((retrofit2.http.Headers) annotation).value();
    if (headersToParse.length == 0) {
      throw methodError("@Headers annotation is empty.");
    }
    headers = parseHeaders(headersToParse);
  } else if (annotation instanceof Multipart) {
    if (isFormEncoded) {
      throw methodError("Only one encoding annotation is allowed.");
    }
    isMultipart = true;
  } else if (annotation instanceof FormUrlEncoded) {
    if (isMultipart) {
      throw methodError("Only one encoding annotation is allowed.");
    }
    isFormEncoded = true;
  }
}
这部分逻辑一目了然,不做赘述。
提取完方法级别的注解,接下来就是提取参数级别的注解了。参数级别的注解就是在方法形参上添加的注解标记。
private ParameterHandler parseParameter(
    int p, Type parameterType, Annotation[] annotations) {
  ParameterHandler result = null;
  for (Annotation annotation : annotations) {
    ParameterHandler annotationAction = parseParameterAnnotation(
        p, parameterType, annotations, annotation);

    if (annotationAction == null) {
      continue;
    }

    result = annotationAction;
  }


  return result;
}
从以上代码分析可知,parseParameter会遍历每个注解,并调用了parseParameterAnnotation去解析注解,之后返回参数处理器。parseParameterAnnotation的代码太多,但逻辑很清晰,这里仅贴出部分示例代码,具体详细代码请读者自行翻阅源码阅读。
 if (annotation instanceof Url) {
    gotUrl = true;

    if (type == HttpUrl.class
        || type == String.class
        || type == URI.class
        || (type instanceof Class && "android.net.Uri".equals(((Class) type).getName()))) {
      return new ParameterHandler.RelativeUrl();
    }

} else if (annotation instanceof Path) {
    gotPath = true;

    Path path = (Path) annotation;
    String name = path.value();
    validatePathName(p, name);

    Converter converter = retrofit.stringConverter(type, annotations);
    return new ParameterHandler.Path<>(name, converter, path.encoded());
}else if(...){
    ...
}
策略模式
对于每个参数级别的注解,最终都会返回ParameterHandler.Xxx对象。ParameterHandler.Xxx是ParameterHandler的静态内部类,这些内部类都是继承自ParameterHandler,对应具体的参数注解类型。ParameterHandler.Xxx的继承采用了策略模式,每个ParameterHandler的子类都实现了各自的apply方法。这部分代码也请读者自行翻阅,不难理解。
策略模式与模板方法模式非常类似,导致很多读者可能对它们的概念有些混淆。这里简单说一下个人对这两种设计模式的区别的理解。
这两种模式都是在父类定义一个抽象的或者空的算法接口,而具体的算法实现则延迟到子类实现。区别就在于,模板方法模式更多地是倾向于算法流程中的某些节点算法的延迟实现,也就是从算法流程中拆分出的一部分子算法;策略模式注重的是单一算法,其本身就是一个完整的算法实现,无需拆分。
经过上述漫长的解析过程,构成ServiceMethod所需的成员的赋值终于准备完成,最终,ServiceMethod.Builder.build方法返回了new ServiceMethod对象。
至此,我们已经分析到了Retrofit.create在动态代理时解析注解封装进ServiceMethod的过程。相信大家也需要一点时间消化,我们先休息会,稍后回来~~~~