WebRTC IOS 版编译步骤
1,同步工具
svn co http://src.chromium.org/chrome/trunk/tools/depot_tools ~/
2,设置环境变量同步代码
export PATH=~/depot_tools:$PATH
gclient config http://webrtc.googlecode.com/svn/trunk/
echo "target_os = ['mac']" >> .gclient
gclient sync
3,再次同步iOS 代码
sed -i "" '$d' .gclient
echo "target_os = ['ios', 'mac']" >> .gclient
gclient sync
4,修改arch类型
修改 trunk/build/common.gypi
'VALID_ARCHS': 'armv7 i386', 为 'VALID_ARCHS': 'armv7',
4,生产xcode项目文件
export GYP_DEFINES="build_with_libjingle=1 build_with_chromium=0 libjingle_objc=1"
export GYP_GENERATORS='xcode'
{ //iOS
export GYP_DEFINES="$GYP_DEFINES OS=ios target_arch=armv7"
export GYP_GENERATOR_FLAGS="$GYP_GENERATOR_FLAGS output_dir=out_ios"
export GYP_CROSSCOMPILE=1
}
{ //iOSsim
export GYP_DEFINES="$GYP_DEFINES OS=ios target_arch=ia32"
export GYP_GENERATOR_FLAGS="$GYP_GENERATOR_FLAGS output_dir=out_sim"
export GYP_CROSSCOMPILE=1
}
{ // MacOS
export GYP_DEFINES="$GYP_DEFINES OS=mac target_arch=x64"
export GYP_GENERATOR_FLAGS="$GYP_GENERATOR_FLAGS output_dir=out_mac"
}
gclient runhooks
5,打开all.xcodeproj 编译
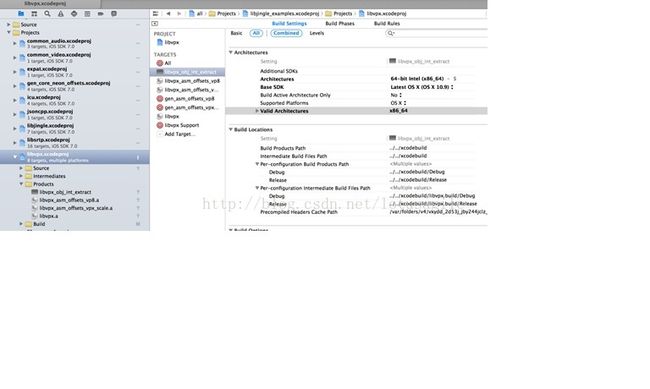
6,遇到libvpx 无法编译通过时的解决办法
选中 all ->libjingle_examples.xcodeproj -> libvpx.xcodeproj
修改右侧的libvpx_obj_int_extract 编译属性
Valid Architectures = x86_64
Supported Platforms = OS X
Base SDK = Latest OS X
Architectures = 64-bit Intel(x86_64)
