本文项目采用python3.6版本语言,利用scrapy框架进行爬取。
该项目实现的功能是获取http://www.proxy360.cn和http://www.xicidaili.com网站中的代理信息,由于网站设有反爬虫机制,网站是通过浏览器发送过来的User-Agent的值来确认浏览器身份的,所以为了避免被查出是爬虫,所以该项目中修改了USER_AGENT的值,关于常见反爬虫机制请参照本博客“Scrapy爬虫实战五:爬虫攻防 ”的内容。由于爬取http://www.xicidaili.com的内容较多,在验证代理是否可用的过程中使用了多线程。
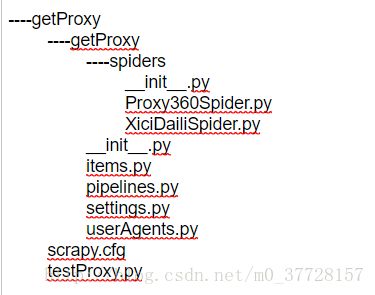
下面是本次项目的目录结构:
----getProxy
getProxy
上述目录结构中,没有后缀名的为文件夹,有后缀的为文件。我们需要修改只有Proxy360Spider.py(XiciDailiSpider.py ) 、items.py、pipelines.py、settings.py这四个文件。
其中items.py决定爬取哪些项目,Proxy360Spider.py( XiciDailiSpider.py ) 决定怎么爬,setting.py决定由谁去处理爬取的内容,pipelines决定爬取后
内容怎样处理。由于我们爬取的两个代理网站的源代码不类似,所以我们写了Proxy360Spider.py( XiciDailiSpider.py )两个文件,目录中的两个
__inti__.py文件都是空文件,保留这两个文件主要是为了让他们所在 的文件夹可以作为 Python的模块使用。目录中的scrapy.cfg为配置文件,testProxy.py是测试爬取出来的
代理是否可用的。
1、选择爬取的项目items.py
#决定爬取哪些项目

import scrapy

class GetProxyItem(scrapy.Item):
    ip=scrapy.Field()
    port=scrapy.Field()
    type=scrapy.Field()
    location=scrapy.Field()
    protocol=scrapy.Field()
    source=scrapy.Field()
    id=scrapy.Field()#用来保存记录条数
2
.1、
定义怎样爬取,爬取360代理的文件Proxy360Spider.py
#定义如何爬取
import scrapy
from getProxy.items import GetProxyItem

class Proxy360Spider(scrapy.Spider):
    name="proxy360Spider"
    allowed_domains=['proxy360.cn']
    nations=['Brazil','China','America','Taiwan','Japan','Thailand','Vietnam','bahrein']
    start_urls=[]
    count=0
    for nation in nations:
        start_urls.append('http://www.proxy360.cn/Region/'+nation)

    def parse(self,response):

        subSelector=response.xpath('//div[@class="proxylistitem" and @name="list_proxy_ip"]')
        items=[]

        for sub in subSelector:
            item=GetProxyItem()
            item['ip']=sub.xpath('.//span[1]/text()').extract()[0]
            item['port']=sub.xpath('.//span[2]/text()').extract()[0]
            item['type']=sub.xpath('.//span[3]/text()').extract()[0]
            item['location']=sub.xpath('.//span[4]/text()').extract()[0]
            item['protocol']='HTTP'
            item['source']='proxy360'
            self.count+=1
            item['id']=str(self.count)
            items.append(item)

        return items
由于360代理中包含多个地区 的代理,首先找寻多个地区代理url的规律,可以这些地区的url都是由“http://www.proxy360.cn/Region/”加上地区名构成的,
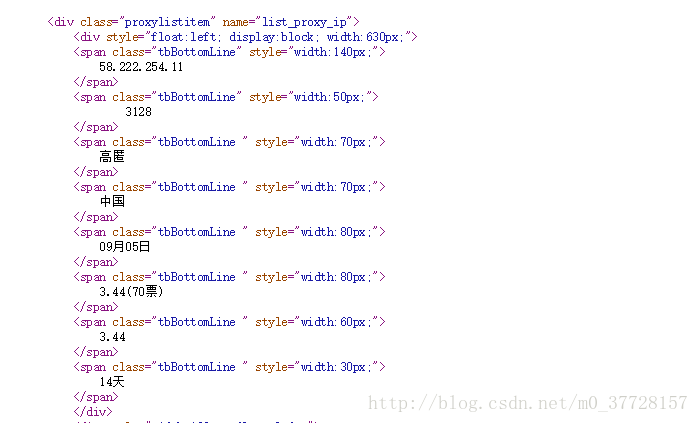
任意点开一个url,打开网页源代码,如下图所示:
可以发现我们需要的代理信息都在class="
proxylistitem "
name ="
list_proxy_ip ">这个标签下,用xpath选择器先得到所有的这种标签,然后再一层一层的得到我们需要的信息。
2 .1、 定义怎样爬取,爬取西刺免费代理IP 的文件XiciDailiSpider.py
import scrapy
from getProxy.items import GetProxyItem

class XiciDailiSpider(scrapy.Spider):
    name='xiciDailiSpider'
    allowed_domains=['xicidaili.com']
    wds=['nn','nt','wn','wt']
    pages=20
    start_urls=[]
    count=0
    for type in wds:
        for i in range(1,pages+1):
            start_urls.append('http://www.xicidaili.com/'+type+'/'+str(i))

    def parse(self,response):
        subSelector=response.xpath('//tr[@class=""]|//tr[@class="odd"]')
        items=[]
        for sub in subSelector:
            item=GetProxyItem()
            item['ip']=sub.xpath('.//td[2]/text()').extract()[0]
            item['port']=sub.xpath('.//td[3]/text()').extract()[0]
            item['type']=sub.xpath('.//td[5]/text()').extract()[0]
            if sub.xpath('.//td[4]/a/text()'):
                item['location']=sub.xpath('//td[4]/a/text()').extract()[0]
            else:
                item['location']=sub.xpath('.//td[4]/text()').extract()[0]
            item['protocol']=sub.xpath('.//td[6]/text()').extract()[0]
            item['source']='xicidaili'
            self.count+=1
            item['id']=str(self.count)
            items.append(item)
        return items
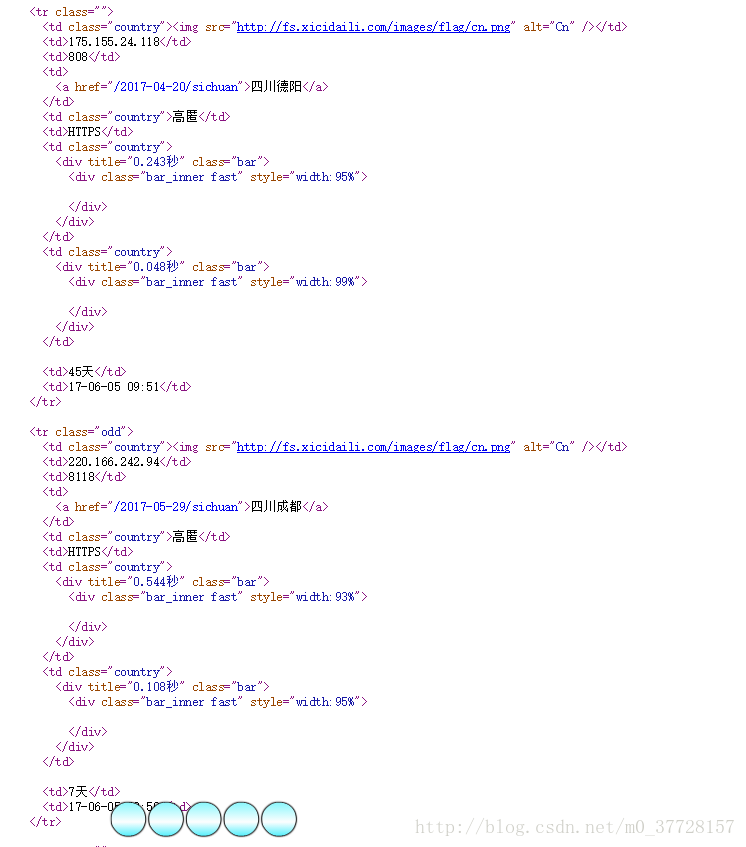
同样爬取西刺代理的url也是有多个,第一步仍然是找寻url规律,读者去
http://www.xicidaili.com/网站中多点几下,关注url的变化就能得出规律,这里不再赘述。
查看网页源代码可以发现,我们需要的代理信息都在 class="">或者 class="odd ">这两个标签下,读者重点看代码中是如何一层一层找到我们需要的信息的。
3、保存爬取的结果pipelines.py
#保存爬取结果
import time

class GetProxyPipeline(object):
    def process_item(self,item,spider):
        today= time.strftime('%Y-%m-%d',time.localtime())
        fileName='proxy'+today+'.txt'
        with open(fileName,'a') as fp:
            fp.write('记录'+item['id'].strip()+':'+'\t')
            fp.write(item['ip'].strip()+'\t')
            fp.write(item['port'].strip()+'\t')
            fp.write(item['protocol'].strip()+'\t')
            fp.write(item['type'].strip()+'\t')
            fp.write(item['location'].strip()+'\t')
            fp.write(item['source'].strip()+'\t\n')

        return item
结果保存为.txt的文件,文件以proxy加当天日期命名。
4、分派任务的settings.py
from getProxy import userAgents

BOT_NAME='getProxy'

SPIDER_MODULES=['getProxy.spiders']

NEWSPIDER_MODULE='getProxy.spiders'

USER_AGENT=userAgents.pcUserAgent.get('Firefox 4.0.1 – Windows')

ITEM_PIPELINES={'getProxy.pipelines.GetProxyPipeline':300}
这里修改了USER_AGENT,导入userAgents模块,下面给出userAgents模块代码:
pcUserAgent = {
"safari 5.1 – MAC":"User-Agent:Mozilla/5.0 (Macintosh; U; Intel Mac OS X 10_6_8; en-us) AppleWebKit/534.50 (KHTML, like Gecko) Version/5.1 Safari/534.50",
"safari 5.1 – Windows":"User-Agent:Mozilla/5.0 (Windows; U; Windows NT 6.1; en-us) AppleWebKit/534.50 (KHTML, like Gecko) Version/5.1 Safari/534.50",
"IE 9.0":"User-Agent:Mozilla/5.0 (compatible; MSIE 9.0; Windows NT 6.1; Trident/5.0);",
"IE 8.0":"User-Agent:Mozilla/4.0 (compatible; MSIE 8.0; Windows NT 6.0; Trident/4.0)",
"IE 7.0":"User-Agent:Mozilla/4.0 (compatible; MSIE 7.0; Windows NT 6.0)",
"IE 6.0":"User-Agent: Mozilla/4.0 (compatible; MSIE 6.0; Windows NT 5.1)",
"Firefox 4.0.1 – MAC":"User-Agent: Mozilla/5.0 (Macintosh; Intel Mac OS X 10.6; rv:2.0.1) Gecko/20100101 Firefox/4.0.1",
"Firefox 4.0.1 – Windows":"User-Agent:Mozilla/5.0 (Windows NT 6.1; rv:2.0.1) Gecko/20100101 Firefox/4.0.1",
"Opera 11.11 – MAC":"User-Agent:Opera/9.80 (Macintosh; Intel Mac OS X 10.6.8; U; en) Presto/2.8.131 Version/11.11",
"Opera 11.11 – Windows":"User-Agent:Opera/9.80 (Windows NT 6.1; U; en) Presto/2.8.131 Version/11.11",
"Chrome 17.0 – MAC":"User-Agent: Mozilla/5.0 (Macintosh; Intel Mac OS X 10_7_0) AppleWebKit/535.11 (KHTML, like Gecko) Chrome/17.0.963.56 Safari/535.11",
"Maxthon":"User-Agent: Mozilla/4.0 (compatible; MSIE 7.0; Windows NT 5.1; Maxthon 2.0)",
"Tencent TT":"User-Agent: Mozilla/4.0 (compatible; MSIE 7.0; Windows NT 5.1; TencentTraveler 4.0)",
"The World 2.x":"User-Agent: Mozilla/4.0 (compatible; MSIE 7.0; Windows NT 5.1)",
"The World 3.x":"User-Agent: Mozilla/4.0 (compatible; MSIE 7.0; Windows NT 5.1; The World)",
"sogou 1.x":"User-Agent: Mozilla/4.0 (compatible; MSIE 7.0; Windows NT 5.1; Trident/4.0; SE 2.X MetaSr 1.0; SE 2.X MetaSr 1.0; .NET CLR 2.0.50727; SE 2.X MetaSr 1.0)",
"360":"User-Agent: Mozilla/4.0 (compatible; MSIE 7.0; Windows NT 5.1; 360SE)",
"Avant":"User-Agent: Mozilla/4.0 (compatible; MSIE 7.0; Windows NT 5.1; Avant Browser)",
"Green Browser":"User-Agent: Mozilla/4.0 (compatible; MSIE 7.0; Windows NT 5.1)"
}

mobileUserAgent = {
"iOS 4.33 – iPhone":"User-Agent:Mozilla/5.0 (iPhone; U; CPU iPhone OS 4_3_3 like Mac OS X; en-us) AppleWebKit/533.17.9 (KHTML, like Gecko) Version/5.0.2 Mobile/8J2 Safari/6533.18.5",
"iOS 4.33 – iPod Touch":"User-Agent:Mozilla/5.0 (iPod; U; CPU iPhone OS 4_3_3 like Mac OS X; en-us) AppleWebKit/533.17.9 (KHTML, like Gecko) Version/5.0.2 Mobile/8J2 Safari/6533.18.5",
"iOS 4.33 – iPad":"User-Agent:Mozilla/5.0 (iPad; U; CPU OS 4_3_3 like Mac OS X; en-us) AppleWebKit/533.17.9 (KHTML, like Gecko) Version/5.0.2 Mobile/8J2 Safari/6533.18.5",
"Android N1":"User-Agent: Mozilla/5.0 (Linux; U; Android 2.3.7; en-us; Nexus One Build/FRF91) AppleWebKit/533.1 (KHTML, like Gecko) Version/4.0 Mobile Safari/533.1",
"Android QQ":"User-Agent: MQQBrowser/26 Mozilla/5.0 (Linux; U; Android 2.3.7; zh-cn; MB200 Build/GRJ22; CyanogenMod-7) AppleWebKit/533.1 (KHTML, like Gecko) Version/4.0 Mobile Safari/533.1",
"Android Opera ":"User-Agent: Opera/9.80 (Android 2.3.4; Linux; Opera Mobi/build-1107180945; U; en-GB) Presto/2.8.149 Version/11.10",
"Android Pad Moto Xoom":"User-Agent: Mozilla/5.0 (Linux; U; Android 3.0; en-us; Xoom Build/HRI39) AppleWebKit/534.13 (KHTML, like Gecko) Version/4.0 Safari/534.13",
"BlackBerry":"User-Agent: Mozilla/5.0 (BlackBerry; U; BlackBerry 9800; en) AppleWebKit/534.1+ (KHTML, like Gecko) Version/6.0.0.337 Mobile Safari/534.1+",
"WebOS HP Touchpad":"User-Agent: Mozilla/5.0 (hp-tablet; Linux; hpwOS/3.0.0; U; en-US) AppleWebKit/534.6 (KHTML, like Gecko) wOSBrowser/233.70 Safari/534.6 TouchPad/1.0",
"Nokia N97":"User-Agent: Mozilla/5.0 (SymbianOS/9.4; Series60/5.0 NokiaN97-1/20.0.019; Profile/MIDP-2.1 Configuration/CLDC-1.1) AppleWebKit/525 (KHTML, like Gecko) BrowserNG/7.1.18124",
"Windows Phone Mango":"User-Agent: Mozilla/5.0 (compatible; MSIE 9.0; Windows Phone OS 7.5; Trident/5.0; IEMobile/9.0; HTC; Titan)",
"UC":"User-Agent: UCWEB7.0.2.37/28/999",
"UC standard":"User-Agent: NOKIA5700/ UCWEB7.0.2.37/28/999",
"UCOpenwave":"User-Agent: Openwave/ UCWEB7.0.2.37/28/999",
"UC Opera":"User-Agent: Mozilla/4.0 (compatible; MSIE 6.0; ) Opera/UCWEB7.0.2.37/28/999"
}
5、
配置文件scrapy.cfg
[settings]
default=getProxy.settings

[deploy]
project=getProxy
6、怎么运行
cmd->cd 将文件调到我们项目所在的这一层文件,也就是上面目录结构中scrapy.cfg所在的这一层文件夹,然后输入命令:scrapy crawl proxy360Spider
或者
scrapy crawl xiciDailiSpider
这里的proxy360Spider 是我们Proxy360Spider Spider类中name="proxy360Spider"的值,更改name的值输入的命令也将更改,xiciDailiSpider也是同理。
我们写了两个网站的爬虫,所以要用依次输入上面的两个命令,主要是因为360代理中的代理ip太少,所以又多爬取了一个网站。
7、测试爬取出的代理是否可用testProxy.py
from urllib import request
import re
import threading
import time

class TestProxy(object):
    def __init__(self):
        self.sFile=r'proxy'+time.strftime('%Y-%m-%d',time.localtime())+'.txt'
   #     self.sFile=r'alive.txt'
        self.dFile=r'alive_.txt'
        self.URL=r'http://www.baidu.com/'
        self.threads=10
        self.timeout=3
        self.regex=re.compile(r'baidu.com')
        self.aliveList=[]

        self.run()

    def run(self):
        with open(self.sFile,'r') as fp:
            lines=fp.readlines()
            line=lines.pop()
            while lines:
                for i in range(self.threads):
                    try:
                        t=threading.Thread(target=self.linkWithProxy,args=(line,))
                        t.start()

                        if lines:
                            line=lines.pop()
                        else:
                            continue
                    except:
                        print('创建线程失败!\n')


        with open(self.dFile,'a') as fp:
            for i in range(len(self.aliveList)):
                fp.write(self.aliveList[i])

    def linkWithProxy(self,line):
        lineList=line.split('\t')
        protocol=lineList[3].lower()
        server=protocol+r'://'+lineList[1]+':'+lineList[2]
        opener=request.build_opener(request.ProxyHandler({protocol:server}))
        request.install_opener(opener)
        try:
            response=request.urlopen(self.URL,timeout=self.timeout)
        except:
            print('%s connect failed!\n' %server)
            return
        else:
            try:
                strRe=response.read()
            except:
                print('%s connect failed!\n' %server)
                return
            if self.regex.search(str(strRe)):
                print('%s connect success!!!!!!!\n' %server)
                self.aliveList.append(line)

if __name__=='__main__':
    tp=TestProxy()
本博客有参考《 Python
网络爬虫实战》一书,该书采用的是python2.x在 Linux
系统下运行的,采用python3.x在windows下运行的可以参考本博客。
你可能感兴趣的:(python网络爬虫,scrapy,爬虫,python,实战,代理ip)
Go语言操作Redis集群实战指南
Jump小酱
本文还有配套的精品资源,点击获取简介:Redis作为高性能的键值存储数据库,常用于缓存、消息队列等场景。Go语言,因其简洁语法和高效性能,是分布式服务的首选语言。本文将展示如何利用Go语言操作Redis集群,包括安装依赖、配置连接、执行基本操作、处理哈希数据、实现发布订阅功能、事务处理以及错误处理。通过实践案例,读者将学会如何将Redis集群集成到Go应用中,并运用其强大的API来满足不同的开发需
DeepSpeed Chat大模型训练【训练类ChatGPT 的大模型】
u013250861
# LLM/训练 人工智能 深度学习
第1章:DeepSpeed-Chat模型训练实战本章内容介绍如何使用微软最新发布的DeepSpeedChat来训练类ChatGPT的大模型。通过本章内容,你将了解:DS-Chat是什么?如何准备运行环境ChatGPT训练的基本知识DS-Chat的使用方法【观看视频解说】1DeepSpeed-Chat是什么?【观看视频解说】DeepSpeed-Chat是微软最新公布的一套工具,用于训练类ChatGP
【MySQL】表空间丢失处理(Tablespace is missing for table 错误处理)
m0_74824823
面试 学习路线 阿里巴巴 mysql 数据库
问题背景最近,我在运行一个基于Python爬虫的项目时,爬虫需要频繁与MySQL数据库交互。不幸的是,在数据爬取过程中,Windows系统突然强制更新并重启。这次意外中断导致MySQL数据库的三个表格(2022年、2023年和2024年的数据表)出现了“Tablespaceismissing”的错误。起初,我尝试了常规的CHECKTABLE和REPAIRTABLE方法,但这些都没有解决问题。最终,
Python 继承详解
江湖一条鱼
python
继承是面向对象编程(OOP)的一个重要特性,允许一个类(子类)从另一个类(父类)继承属性和方法。继承可以提高代码的重用性,增强程序的可扩展性和可维护性。目录一、继承的作用二、继承的语法1.单继承2.多继承三、子类扩展1.添加新功能2.重写父类方法3.调用父类方法四、继承的特殊情况1.子类初始化父类2.方法解析顺序(MRO)五、抽象类与接口1.抽象类2.接口3.ABC类4.使用方法1.定义抽象基类2
常用网络工具分析(ping,tcpdump等)
一户董
杂 tcpdump 网络
写在前面本文看下常用网络工具。1:ping1.1:用途用于检验网络的连通性。1.2:实战在Linux环境中执行:pingwww.sina.com.cn:[root@localhost~]#pingwww.sina.com.cnPINGspool.grid.sinaedge.com(111.62.129.51)56(84)bytesofdata.64bytesfrom111.62.129.51(11
【如何学习商城源码】
启山智软 商城 源码
微信小程序 小程序 java
学习商城源码是一个系统而深入的过程,需要掌握多种方法和技巧。以下是一些建议,帮助你有效地学习商城源码:一、搭建学习环境准备开发工具编程语言相关:根据商城源码使用的编程语言,安装相应的集成开发环境(IDE)。例如,若源码是Java语言编写的,可安装IntelliJIDEA或Eclipse;若是Python语言,可选择PyCharm等。这些IDE能帮助你高效地编辑、调试代码,提供语法高亮、自动补全等功
从零创建一个 Django 项目
m0_74824823
面试 学习路线 阿里巴巴 django python 后端
1.准备环境在开始之前,确保你的开发环境满足以下要求:安装了Python(推荐3.8或更高版本)。安装pip包管理工具。如果要使用MySQL或PostgreSQL,确保对应的数据库已安装。创建虚拟环境在项目目录中创建并激活虚拟环境,保证项目依赖隔离:#创建虚拟环境python-mvenvenv#激活虚拟环境#WindowsenvScriptsactivate#Linux/Macsourceenv/
anaconda中的python在pycharm中用不了_Pycharm中使用Anaconda
白白前
Pycharm中使用Anaconda问题:安装完Pycharm和Anaconda后,想让Pycharm能调用Anaconda中包含的各种包。这样就不用重复安装各种包了。Anaconda下载安装Anaconda指的是一个开源的Python发行版本,其包含了conda、Python等180多个科学包及其依赖项。因为包含了大量的科学包,Anaconda的下载文件比较大(约515MB)。安装Anacond
python - 永久存储
susie0815
python python 服务器
打开文件使用open()函数打开文件时,openfilemode(文件打开模式)是一个决定了以何种方式打开文件以及对文件可以进行哪些操作的重要参数。基本模式只读模式(‘r’)默认的打开模式,用于读取文件。如果文件不存在,会抛出FileNotFoundError异常。try:file=open('test.txt','r')content=file.read()print(content)file.
自动化测试的学习路线
Ws_
学习
自动化测试是提高软件开发效率和质量的关键手段。学习自动化测试通常涉及多个方面的技能,从基础的编程语言知识到测试工具的使用,再到实际的测试脚本编写和执行。以下是一个学习自动化测试的路线图,帮助你有条不紊地掌握相关技能:1.基础知识在开始自动化测试之前,首先要具备一定的编程和软件测试基础:编程语言:Python、Java、JavaScript或者Ruby(根据你选择的自动化测试工具决定)软件测试基础:
Python自动化测试
Ws_
python python
Python自动化测试是软件开发中的重要组成部分,可以帮助提高测试效率和准确性。以下是学习Python自动化测试的基本路线,以及相关资料的链接:学习路线1.基础知识Python基础:掌握Python语言的基本语法、数据类型、控制流、函数、面向对象编程等。你可以先确保对Python的基本语法有清晰的理解。参考资料:Python官方文档书籍推荐:《Python编程:从入门到实践》2.了解自动化测试的基
Python实现Excel表格保存到不同文件夹
Leo_Aqu
excel python
"""点击“上传”按钮,从本地上传待处理的Excel表格点击“处理”按钮,对Excel表格进行处理点击“保存A”按钮,保存处理后的Excel表格到A文件夹下点击“保存B”按钮,保存处理后的Excel表格到B文件夹下"""#作者:Leo#时间:2024/9/2621:52importtkinterastkfromtkinterimportfiledialog,messageboximportpand
通义灵码AI程序员
天天向上杰
AI编程 AIGC 人工智能
通义灵码是阿里云与通义实验室联合打造的智能编码辅助工具,基于通义大模型技术,为开发者提供多种编程辅助功能。它支持多种编程语言,包括Java、Python、Go、TypeScript、JavaScript、C/C++、PHP、C#、Ruby等200多种编码语言。通义灵码AI程序员:今年1月,通义灵码AI程序员全面上线,同时支持VSCode、JetBrainsIDEs,是国内首个真正落地的AI程序员。
python使用技巧
超超是超超
python
1、耗时装饰器importtimedefdecorate(func):definner():begin=time.time()result=func()end=time.time()print(f'函数{func}耗时{end-begin}')returnresultreturninner2、查看代码运行耗时fromline_profilerimportLineProfilerdefoperati
Anaconda与python和pycharm的安装及其关系
Daylight..
学习笔记 pycharm python ide
Anaconda与python和pycharm的安装及其关系一、Anaconda与python和pycharm的关系:1.Anaconda包含python,并且里面含有许多常用的库。(安装了Anaconda就不需要安装python了)2.pycharm是一种IDE(集成开发环境),在其中可以编写Python程序。(工具和语言的关系)。二、如何安装?Anaconda的安装Anaconda官网下载地址
ImportError: cannot import name ‘Mapping‘ from ‘collections‘
AI算法网奇
python基础 前端 javascript 数据库
ImportError:cannotimportname'Mapping'from'collections'解决方法:fromcollections.abcimportMapping#正确导入Mappingdefprocess_mapping(data):ifisinstance(data,Mapping):#使用Mapping进行类型检查#处理映射类型的代码pass测试命令:python-c"f
python图形界面化编程GUI(二)常用的组件(Text、Radiobutton、Checkbutton、Canvas)和布局管理器(gird、pack、place)
hwwaizs
python-GUI图形化编程 python 开发语言
Text文本框Text(多行文本框)的主要用于显示多行文本,还可以显示网页链接,图片,HTML页面,甚至CSS样式表,添加组件等。主要用来显示信息,也常被当做简单的文本处理器、⽂本编辑器或者网页浏览器来使用。IDLE就是Text组件构成的。insert插入的时候可以用INSERT代表当前光标的位置,END代表在结尾的位置,也可以用插入小数的形式,2.3代表第二行第三列后插入。fromtkinter
Go Web 开发基础:从入门到实战
一小路一
掌握 Go 语言:编程世界的进阶钥匙 golang 前端 面试 后端 服务器
GoWeb开发基础:从入门到实战Go语言因其高效性和简洁性,成为了后端开发的热门选择之一。Go的net/http包提供了强大的Web服务功能,可以帮助我们快速搭建Web应用。本文将带领你从基础开始,逐步了解如何使用Go创建Web服务、处理路由、使用模板引擎、提供静态文件服务,并与数据库进行交互。文章内容包含常见的错误示例和面试题,帮助你更好地理解GoWeb开发。1.使用net/http创建一个简单
【深度解析】最短路径算法:Dijkstra与Floyd-Warshall
吴师兄大模型
算法 数据结构 python 最短路径算法 Dijkstra算法 Floyd-Warshall 开发语言
系列文章目录01-从零开始掌握Python数据结构:提升代码效率的必备技能!02-算法复杂度全解析:时间与空间复杂度优化秘籍03-线性数据结构解密:数组的定义、操作与实际应用04-深入浅出链表:Python实现与应用全面解析05-栈数据结构详解:Python实现与经典应用场景06-深入理解队列数据结构:从定义到Python实现与应用场景07-双端队列(Deque)详解:Python实现与滑动窗口应
CSE 231 Computer Python program
后端
CSE231Spring2025ComputerProject#4LearningobjectivesThisassignmentfocusesonthedesign,implementationandtestingofaPythonprogramthatusescharacterstringsforlookingattheDNAsequencesforkeyproteinsandseeingho
代理IP服务如何优化AI大模型训练的分布式计算效率
http
AI大模型训练就像一场接力赛,每个计算节点都是接力选手,而代理IP则是保证选手们“跑得更稳、交接更顺”的隐形教练。在分布式计算中,效率瓶颈往往不是算力本身,而是数据调度与通信协作的隐性损耗。接下来,我们从三个实操场景拆解代理IP的增效逻辑。场景一:数据采集与分发的“高速公路”分布式训练的第一步是将海量数据切分到不同计算节点。假设某团队要训练法律文书解析模型,需从20个省级法院网站抓取判例。如果所有
HarmonyOS Next智能安防系统中的人脸比对与异构计算实战
harmonyos
本文旨在深入探讨基于华为鸿蒙HarmonyOSNext系统(截止目前API12)构建智能安防系统中人脸比对与异构计算技术的实战应用,基于实际开发经验进行总结。主要作为技术分享与交流载体,难免错漏,欢迎各位同仁提出宝贵意见和问题,以便共同进步。本文为原创内容,任何形式的转载必须注明出处及原作者。一、智能安防系统需求与架构设计(一)功能需求分析实时人脸检测与识别需求在智能安防系统中,实时人脸检测与识别
HarmonyOS Next智能语音助手的语音合成与模型优化实战
harmonyos
本文旨在深入探讨基于华为鸿蒙HarmonyOSNext系统(截止目前API12)构建智能语音助手过程中语音合成与模型优化技术的实战应用,基于实际开发经验进行总结。主要作为技术分享与交流载体,难免错漏,欢迎各位同仁提出宝贵意见和问题,以便共同进步。本文为原创内容,任何形式的转载必须注明出处及原作者。一、语音助手功能需求与架构规划(一)功能需求梳理语音指令识别需求智能语音助手需要准确识别用户的语音指令
全网最全!DeepSeek 新手入门教程合集
人工智能deepseek
如果你是初次接触DeepSeek的普通用户或开发者,面对海量教程却无从下手?别担心!本文为你整理全网最易懂、最实用的DeepSeek学习资源,涵盖快速上手、编程实战、系统手册等,附直达链接,收藏这一篇就够了!一、快速入门指南《DeepSeek入门教程》-博客园亮点:手把手教你注册账号、获取APIKey,并提供Python调用多轮对话的代码示例,适合初级开发者。直达链接:点击查看核心内容:API调用
【Python】Python入门——判断语句
zhoushanguhe
Python python 编程 开发语言
Python入门——判断语句。内容包括if语句、条件表达式、三元运算、match语句等。目录一、if语句1.基本if-else语句2.常用比较运算符3.if-else连写4.pass语句5.变量的作用域二、条件表达式三、三元运算四、match语句五、其他一、if语句1.基本if-else语句当条件成立时,执行某些语句;否则执行另一些语句。注意:if和else后需要加上冒号:if语句的代码块需要缩进
兄弟们,我的deepseek终于可以控制浏览器了:Part 1/n,含代码
几道之旅
Dify:智能体(Agent) 工作流 知识库 全搞定 几道之旅AI专栏VVVIP 人工智能
文章目录前言helloworld前言其实,deepseek控制浏览器咱之前就发过,只不过当时没有想到这么好的标题,哈哈。所依赖的,依然是BrowserUse这个项目BrowserUse项目官网helloworld按照官网配置好环境后,只需新建一个python文件(例如,叫main.py?)然后运行即可。fromlangchain_openaiimportChatOpenAIfrombrowser_
CSE 231 Computer Python program
后端
CSE231Spring2025ComputerProject#4LearningobjectivesThisassignmentfocusesonthedesign,implementationandtestingofaPythonprogramthatusescharacterstringsforlookingattheDNAsequencesforkeyproteinsandseeingho
Sentinel实战:构建可靠的微服务防护系统
ivwdcwso
安全 sentinel 微服务 架构 防护 安全 java 开发
1.引言在微服务架构中,保障系统的可用性和稳定性至关重要。Sentinel作为一个强大的流量控制组件,为我们提供了实现熔断、限流、系统保护等功能的有力工具。本文将通过实际案例,详细介绍Sentinel的使用方法和最佳实践,并探讨如何在容器环境中部署Sentinel。2.Sentinel简介Sentinel是阿里巴巴开源的面向分布式服务架构的流量控制组件,主要以流量为切入点,从流量控制、熔断降级、系
【部署】Ktransformer是什么、如何利用单卡24GB显存部署Deepseek-R1 和 Deepseek-V3
仙人掌_lz
人工智能 人工智能 AI 部署 自然语言处理
简介KTransformers是一个灵活的、以Python为中心的框架,旨在通过先进的内核优化和放置/并行策略提升HuggingFaceTransformers的使用体验。它具有高度的可扩展性,用户可通过单行代码注入优化模块,获得兼容Transformers的接口、符合OpenAI和Ollama的RESTfulAPI,甚至简化的ChatGPT风格的WebUI。KTransformers的性能优化基
C语言-回调函数的应用
woainizhongguo.
C/C++ c语言
什么是回调函数回调函数就是一个被作为参数传递的函数。在C语言中,回调函数只能使用函数指针实现,在C++、Python、ECMAScript等更现代的编程语言中还可以使用仿函数或匿名函数。工作机制⑴定义一个回调函数;⑵提供函数实现的一方在初始化的时候,将回调函数的函数指针注册给调用者;⑶当特定的事件或条件发生的时候,调用者使用函数指针调用回调函数对事件进行处理。应用案例(1)应用层:通过调用hal层
辗转相处求最大公约数
沐刃青蛟
C++ 漏洞
无言面对”江东父老“了,接触编程一年了,今天发现还不会辗转相除法求最大公约数。惭愧惭愧!
为此,总结一下以方便日后忘了好查找。
1.输入要比较的两个数a,b
忽略:2.比较大小(因为后面要的是大的数对小的数做%操作)
3.辗转相除(用循环不停的取余,如a%b,直至b=0)
4.最后的a为两数的最大公约数
&
F5负载均衡会话保持技术及原理技术白皮书
bijian1013
F5 负载均衡
一.什么是会话保持? 在大多数电子商务的应用系统或者需要进行用户身份认证的在线系统中,一个客户与服务器经常经过好几次的交互过程才能完成一笔交易或者是一个请求的完成。由于这几次交互过程是密切相关的,服务器在进行这些交互过程的某一个交互步骤时,往往需要了解上一次交互过程的处理结果,或者上几步的交互过程结果,服务器进行下
Object.equals方法:重载还是覆盖
Cwind
java generics override overload
本文译自StackOverflow上对此问题的讨论。
原问题链接
在阅读Joshua Bloch的《Effective Java(第二版)》第8条“覆盖equals时请遵守通用约定”时对如下论述有疑问:
“不要将equals声明中的Object对象替换为其他的类型。程序员编写出下面这样的equals方法并不鲜见,这会使程序员花上数个小时都搞不清它为什么不能正常工作:”
pu
初始线程
15700786134
暑假学习的第一课是讲线程,任务是是界面上的一条线运动起来。
既然是在界面上,那必定得先有一个界面,所以第一步就是,自己的类继承JAVA中的JFrame,在新建的类中写一个界面,代码如下:
public class ShapeFr
Linux的tcpdump
被触发
tcpdump
用简单的话来定义tcpdump,就是:dump the traffic on a network,根据使用者的定义对网络上的数据包进行截获的包分析工具。 tcpdump可以将网络中传送的数据包的“头”完全截获下来提供分析。它支 持针对网络层、协议、主机、网络或端口的过滤,并提供and、or、not等逻辑语句来帮助你去掉无用的信息。
实用命令实例
默认启动
tcpdump
普通情况下,直
安卓程序listview优化后还是卡顿
肆无忌惮_
ListView
最近用eclipse开发一个安卓app,listview使用baseadapter,里面有一个ImageView和两个TextView。使用了Holder内部类进行优化了还是很卡顿。后来发现是图片资源的问题。把一张分辨率高的图片放在了drawable-mdpi文件夹下,当我在每个item中显示,他都要进行缩放,导致很卡顿。解决办法是把这个高分辨率图片放到drawable-xxhdpi下。
&nb
扩展easyUI tab控件,添加加载遮罩效果
知了ing
jquery
(function () {
$.extend($.fn.tabs.methods, {
//显示遮罩
loading: function (jq, msg) {
return jq.each(function () {
var panel = $(this).tabs(&
gradle上传jar到nexus
矮蛋蛋
gradle
原文地址:
https://docs.gradle.org/current/userguide/maven_plugin.html
configurations {
deployerJars
}
dependencies {
deployerJars "org.apache.maven.wagon
千万条数据外网导入数据库的解决方案。
alleni123
sql mysql
从某网上爬了数千万的数据,存在文本中。
然后要导入mysql数据库。
悲剧的是数据库和我存数据的服务器不在一个内网里面。。
ping了一下, 19ms的延迟。
于是下面的代码是没用的。
ps = con.prepareStatement(sql);
ps.setString(1, info.getYear())............;
ps.exec
JAVA IO InputStreamReader和OutputStreamReader
百合不是茶
JAVA.io操作 字符流
这是第三篇关于java.io的文章了,从开始对io的不了解-->熟悉--->模糊,是这几天来对文件操作中最大的感受,本来自己认为的熟悉了的,刚刚在回想起前面学的好像又不是很清晰了,模糊对我现在或许是最好的鼓励 我会更加的去学 加油!:
JAVA的API提供了另外一种数据保存途径,使用字符流来保存的,字符流只能保存字符形式的流
字节流和字符的难点:a,怎么将读到的数据
MO、MT解读
bijian1013
GSM
MO= Mobile originate,上行,即用户上发给SP的信息。MT= Mobile Terminate,下行,即SP端下发给用户的信息;
上行:mo提交短信到短信中心下行:mt短信中心向特定的用户转发短信,你的短信是这样的,你所提交的短信,投递的地址是短信中心。短信中心收到你的短信后,存储转发,转发的时候就会根据你填写的接收方号码寻找路由,下发。在彩信领域是一样的道理。下行业务:由SP
五个JavaScript基础问题
bijian1013
JavaScript call apply this Hoisting
下面是五个关于前端相关的基础问题,但却很能体现JavaScript的基本功底。
问题1:Scope作用范围
考虑下面的代码:
(function() {
var a = b = 5;
})();
console.log(b);
什么会被打印在控制台上?
回答:
上面的代码会打印 5。
&nbs
【Thrift二】Thrift Hello World
bit1129
Hello world
本篇,不考虑细节问题和为什么,先照葫芦画瓢写一个Thrift版本的Hello World,了解Thrift RPC服务开发的基本流程
1. 在Intellij中创建一个Maven模块,加入对Thrift的依赖,同时还要加上slf4j依赖,如果不加slf4j依赖,在后面启动Thrift Server时会报错
<dependency>
【Avro一】Avro入门
bit1129
入门
本文的目的主要是总结下基于Avro Schema代码生成,然后进行序列化和反序列化开发的基本流程。需要指出的是,Avro并不要求一定得根据Schema文件生成代码,这对于动态类型语言很有用。
1. 添加Maven依赖
<?xml version="1.0" encoding="UTF-8"?>
<proj
安装nginx+ngx_lua支持WAF防护功能
ronin47
需要的软件:LuaJIT-2.0.0.tar.gz nginx-1.4.4.tar.gz &nb
java-5.查找最小的K个元素-使用最大堆
bylijinnan
java
import java.util.Arrays;
import java.util.Random;
public class MinKElement {
/**
* 5.最小的K个元素
* I would like to use MaxHeap.
* using QuickSort is also OK
*/
public static void
TCP的TIME-WAIT
bylijinnan
socket
原文连接:
http://vincent.bernat.im/en/blog/2014-tcp-time-wait-state-linux.html
以下为对原文的阅读笔记
说明:
主动关闭的一方称为local end,被动关闭的一方称为remote end
本地IP、本地端口、远端IP、远端端口这一“四元组”称为quadruplet,也称为socket
1、TIME_WA
jquery ajax 序列化表单
coder_xpf
Jquery ajax 序列化
checkbox 如果不设定值,默认选中值为on;设定值之后,选中则为设定的值
<input type="checkbox" name="favor" id="favor" checked="checked"/>
$("#favor&quo
Apache集群乱码和最高并发控制
cuisuqiang
apache tomcat 并发 集群 乱码
都知道如果使用Http访问,那么在Connector中增加URIEncoding即可,其实使用AJP时也一样,增加useBodyEncodingForURI和URIEncoding即可。
最大连接数也是一样的,增加maxThreads属性即可,如下,配置如下:
<Connector maxThreads="300" port="8019" prot
websocket
dalan_123
websocket
一、低延迟的客户端-服务器 和 服务器-客户端的连接
很多时候所谓的http的请求、响应的模式,都是客户端加载一个网页,直到用户在进行下一次点击的时候,什么都不会发生。并且所有的http的通信都是客户端控制的,这时候就需要用户的互动或定期轮训的,以便从服务器端加载新的数据。
通常采用的技术比如推送和comet(使用http长连接、无需安装浏览器安装插件的两种方式:基于ajax的长
菜鸟分析网络执法官
dcj3sjt126com
网络
最近在论坛上看到很多贴子在讨论网络执法官的问题。菜鸟我正好知道这回事情.人道"人之患好为人师" 手里忍不住,就写点东西吧. 我也很忙.又没有MM,又没有MONEY....晕倒有点跑题.
OK,闲话少说,切如正题. 要了解网络执法官的原理. 就要先了解局域网的通信的原理.
前面我们看到了.在以太网上传输的都是具有以太网头的数据包.
Android相对布局属性全集
dcj3sjt126com
android
RelativeLayout布局android:layout_marginTop="25dip" //顶部距离android:gravity="left" //空间布局位置android:layout_marginLeft="15dip //距离左边距
// 相对于给定ID控件android:layout_above 将该控件的底部置于给定ID的
Tomcat内存设置详解
eksliang
jvm tomcat tomcat内存设置
Java内存溢出详解
一、常见的Java内存溢出有以下三种:
1. java.lang.OutOfMemoryError: Java heap space ----JVM Heap(堆)溢出JVM在启动的时候会自动设置JVM Heap的值,其初始空间(即-Xms)是物理内存的1/64,最大空间(-Xmx)不可超过物理内存。
可以利用JVM提
Java6 JVM参数选项
greatwqs
java HotSpot jvm jvm参数 JVM Options
Java 6 JVM参数选项大全(中文版)
作者:Ken Wu
Email:
[email protected]
转载本文档请注明原文链接 http://kenwublog.com/docs/java6-jvm-options-chinese-edition.htm!
本文是基于最新的SUN官方文档Java SE 6 Hotspot VM Opt
weblogic创建JMC
i5land
weblogic jms
进入 weblogic控制太
1.创建持久化存储
--Services--Persistant Stores--new--Create FileStores--name随便起--target默认--Directory写入在本机建立的文件夹的路径--ok
2.创建JMS服务器
--Services--Messaging--JMS Servers--new--name随便起--Pers
基于 DHT 网络的磁力链接和BT种子的搜索引擎架构
justjavac
DHT
上周开发了一个磁力链接和 BT 种子的搜索引擎 {Magnet & Torrent},本文简单介绍一下主要的系统功能和用到的技术。
系统包括几个独立的部分:
使用 Python 的 Scrapy 框架开发的网络爬虫,用来爬取磁力链接和种子;
使用 PHP CI 框架开发的简易网站;
搜索引擎目前直接使用的 MySQL,将来可以考虑使
sql添加、删除表中的列
macroli
sql
添加没有默认值:alter table Test add BazaarType char(1)
有默认值的添加列:alter table Test add BazaarType char(1) default(0)
删除没有默认值的列:alter table Test drop COLUMN BazaarType
删除有默认值的列:先删除约束(默认值)alter table Test DRO
PHP中二维数组的排序方法
abc123456789cba
排序 二维数组 PHP
<?php/*** @package BugFree* @version $Id: FunctionsMain.inc.php,v 1.32 2005/09/24 11:38:37 wwccss Exp $*** Sort an two-dimension array by some level
hive优化之------控制hive任务中的map数和reduce数
superlxw1234
hive hive优化
一、 控制hive任务中的map数: 1. 通常情况下,作业会通过input的目录产生一个或者多个map任务。 主要的决定因素有: input的文件总个数,input的文件大小,集群设置的文件块大小(目前为128M, 可在hive中通过set dfs.block.size;命令查看到,该参数不能自定义修改);2.
Spring Boot 1.2.4 发布
wiselyman
spring boot
Spring Boot 1.2.4已于6.4日发布,repo.spring.io and Maven Central可以下载(推荐使用maven或者gradle构建下载)。
这是一个维护版本,包含了一些修复small number of fixes,建议所有的用户升级。
Spring Boot 1.3的第一个里程碑版本将在几天后发布,包含许多


