一起来学SpringBoot | 第二十五篇:打造属于你的聊天室(WebSocket)
SpringBoot是为了简化Spring应用的创建、运行、调试、部署等一系列问题而诞生的产物,自动装配的特性让我们可以更好的关注业务本身而不是外部的XML配置,我们只需遵循规范,引入相关的依赖就可以轻易的搭建出一个 WEB 工程
Webscoket 对浏览器有一定的要求,所以使用之前要考虑兼容性的问题….
Webscoket
WebSocket 是 HTML5 新增的一种在单个 TCP 连接上进行全双工通讯的协议,与 HTTP 协议没有太大关系….
在 WebSocket API 中,浏览器和服务器只需要做一个握手的动作,然后,浏览器和服务器之间就形成了一条快速通道。两者之间就直接可以数据互相传送。
浏览器通过 JavaScript 向服务器发出建立 WebSocket 连接的请求,连接建立以后,客户端和服务器端就可以通过 TCP 连接直接交换数据。
当你获取 WebSocket 连接后,你可以通过 send() 方法来向服务器发送数据,并通过 onmessage() 事件来接收服务器返回的数据..
长连接
与 AJAX 轮训的方式差不多,但长连接不像 AJAX 轮训一样,而是采用的阻塞模型(一直打电话,没收到就不挂电话);客户端发起连接后,如果没消息,就一直不返回 Response 给客户端。直到有消息才返回,返回完之后,客户端再次建立连接,周而复始。
在没有 WebSocket 之前,大家常用的手段应该就是轮训了,比如每隔几秒发起一次请求,但这样带来的就是高性能开销,都知道一次 HTTP 响应是需要经过三次握手和四次挥手,远不如 TCP 长连接来的划算
WebSocket 事件
本章目标
利用 Spring Boot 与 WebSocke 打造 一对一 和 一对多 的在线聊天….
导入依赖
依赖 spring-boot-starter-websocket…
<dependencies>
    <dependency>
        <groupId>org.springframework.bootgroupId>
        <artifactId>spring-boot-starter-webartifactId>
    dependency>
    <dependency>
        <groupId>org.springframework.bootgroupId>
        <artifactId>spring-boot-starter-websocketartifactId>
    dependency>
dependencies>
属性配置
工具类
为了减少代码量,此处就不集成 Redis、Mysql 之类的存储化依赖…
package com.battcn.utils;

import javax.websocket.RemoteEndpoint;
import javax.websocket.Session;
import java.io.IOException;
import java.util.Map;
import java.util.concurrent.ConcurrentHashMap;

/**
 * @author Levin
 * @since 2018/6/26 0026
 */
public final class WebSocketUtils {

    /**
     * 模拟存储 websocket session 使用
     */
    public static final Map LIVING_SESSIONS_CACHE = new ConcurrentHashMap<>();

    public static void sendMessageAll(String message) {
        LIVING_SESSIONS_CACHE.forEach((sessionId, session) -> sendMessage(session, message));
    }

    /**
     * 发送给指定用户消息
     *
     * @param session 用户 session
     * @param message 发送内容
     */
    public static void sendMessage(Session session, String message) {
        if (session == null) {
            return;
        }
        final RemoteEndpoint.Basic basic = session.getBasicRemote();
        if (basic == null) {
            return;
        }
        try {
            basic.sendText(message);
        } catch (IOException e) {
            e.printStackTrace();
        }
    }
}
服务端点
@ServerEndpoint 中的内容就是 WebSocket 协议的地址,其实仔细看会发现与 @RequestMapping 也是异曲同工的…
- HTTP 协议:
http://localhost:8080/path - WebSocket 协议:
ws://localhost:8080/path
@OnOpen、@OnMessage、@OnClose、@OnError 注解与 WebSocket 中监听事件是相对应的…
package com.battcn.websocket;

import org.slf4j.Logger;
import org.slf4j.LoggerFactory;
import org.springframework.stereotype.Component;
import org.springframework.web.bind.annotation.GetMapping;
import org.springframework.web.bind.annotation.PathVariable;
import org.springframework.web.bind.annotation.RestController;

import javax.websocket.*;
import javax.websocket.server.PathParam;
import javax.websocket.server.ServerEndpoint;
import java.io.IOException;

import static com.battcn.utils.WebSocketUtils.LIVING_SESSIONS_CACHE;
import static com.battcn.utils.WebSocketUtils.sendMessage;
import static com.battcn.utils.WebSocketUtils.sendMessageAll;

/**
 * 聊天室
 *
 * @author Levin
 * @since 2018/6/26 0026
 */
@RestController
@ServerEndpoint("/chat-room/{username}")
public class ChatRoomServerEndpoint {

    private static final Logger log = LoggerFactory.getLogger(ChatRoomServerEndpoint.class);

    @OnOpen
    public void openSession(@PathParam("username") String username, Session session) {
        LIVING_SESSIONS_CACHE.put(username, session);
        String message = "欢迎用户[" + username + "] 来到聊天室!";
        log.info(message);
        sendMessageAll(message);

    }

    @OnMessage
    public void onMessage(@PathParam("username") String username, String message) {
        log.info(message);
        sendMessageAll("用户[" + username + "] : " + message);
    }

    @OnClose
    public void onClose(@PathParam("username") String username, Session session) {
        //当前的Session 移除
        LIVING_SESSIONS_CACHE.remove(username);
        //并且通知其他人当前用户已经离开聊天室了
        sendMessageAll("用户[" + username + "] 已经离开聊天室了!");
        try {
            session.close();
        } catch (IOException e) {
            e.printStackTrace();
        }
    }

    @OnError
    public void onError(Session session, Throwable throwable) {
        try {
            session.close();
        } catch (IOException e) {
            e.printStackTrace();
        }
        throwable.printStackTrace();
    }


    @GetMapping("/chat-room/{sender}/to/{receive}")
    public void onMessage(@PathVariable("sender") String sender, @PathVariable("receive") String receive, String message) {
        sendMessage(LIVING_SESSIONS_CACHE.get(receive), "[" + sender + "]" + "-> [" + receive + "] : " + message);
    }

}
聊天室 HTML
onopen建立 WebSocket 连接时触发。message客户端监听服务端事件,当服务端向客户端推送消息时会被监听到。errorWebSocket 发生错误时触发。close关闭 WebSocket 连接时触发。
<html lang="en">
<head>
  <meta charset="UTF-8">
  <title>battcn websockettitle>
  <script src="jquery-3.2.1.min.js" >script>
head>
<body>

<label for="message_content">聊  天  室 label><textarea id="message_content" readonly="readonly" cols="57" rows="10">

textarea>

<br/>


<label for="in_user_name">用户姓名  label><input id="in_user_name" value=""/>
<button id="btn_join">加入聊天室button>
<button id="btn_exit">离开聊天室button>

<br/><br/>

<label for="in_room_msg">群发消息  label><input id="in_room_msg" value=""/>
<button id="btn_send_all">发送消息button>


<br/><br/><br/>

好友聊天
<br/>
<label for="in_sender">发送者  label><input id="in_sender" value=""/><br/>
<label for="in_receive">接受者  label><input id="in_receive" value=""/><br/>
<label for="in_point_message">消息体  label><input id="in_point_message" value=""/><button id="btn_send_point">发送消息button>

body>

<script type="text/javascript">
    $(document).ready(function(){
        var urlPrefix ='ws://localhost:8080/chat-room/';
        var ws = null;
        $('#btn_join').click(function(){
            var username = $('#in_user_name').val();
            var url = urlPrefix + username;
            ws = new WebSocket(url);
            ws.onopen = function () {
                console.log("建立 websocket 连接...");
            };
            ws.onmessage = function(event){
                //服务端发送的消息
                $('#message_content').append(event.data+'\n');
            };
            ws.onclose = function(){
                 $('#message_content').append('用户['+username+'] 已经离开聊天室!');
                 console.log("关闭 websocket 连接...");
            }
        });
        //客户端发送消息到服务器
        $('#btn_send_all').click(function(){
            var msg = $('#in_room_msg').val();
            if(ws){
                ws.send(msg);
            }
        });
        // 退出聊天室
        $('#btn_exit').click(function(){
            if(ws){
                ws.close();
            }
        });

        $("#btn_send_point").click(function() {
           var sender = $("#in_sender").val();
           var receive = $("#in_receive").val();
            var message = $("#in_point_message").val();
           $.get("/chat-room/"+sender+"/to/"+receive+"?message="+message,function() {
              alert("发送成功...")
           })
        })

    })
script>

html>
主函数
package com.battcn;

import org.springframework.boot.SpringApplication;
import org.springframework.boot.autoconfigure.SpringBootApplication;
import org.springframework.context.annotation.Bean;
import org.springframework.web.socket.config.annotation.EnableWebSocket;
import org.springframework.web.socket.server.standard.ServerEndpointExporter;


/**
 * @author Levin
 */
@EnableWebSocket
@SpringBootApplication
public class Chapter24Application {

    public static void main(String[] args) {
        SpringApplication.run(Chapter24Application.class, args);

    }

    @Bean
    public ServerEndpointExporter serverEndpointExporter() {
        return new ServerEndpointExporter();
    }
}
测试
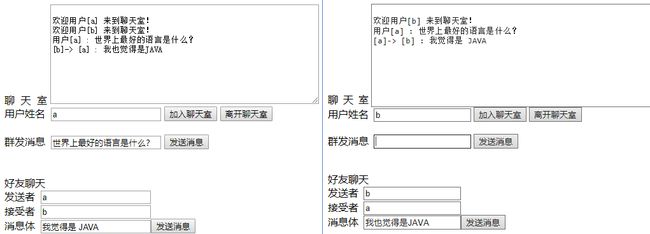
启动 Chapter24Application.java 中的 main 方法,为了更好的演示效果这里打开了俩浏览器窗口做的测试…
总结
目前很多大佬都写过关于 SpringBoot 的教程了,如有雷同,请多多包涵,本教程基于最新的 spring-boot-starter-parent:2.0.3.RELEASE编写,包括新版本的特性都会一起介绍…
说点什么
- 个人QQ:1837307557
- battcn开源群(适合新手):391619659
- 微信公众号(欢迎调戏):
battcn
![]()
个人博客:http://blog.battcn.com/
全文代码:https://github.com/battcn/spring-boot2-learning/tree/master/chapter24

