搭建 WebRTC TURN&STUN 服务器
原理部分,大家自行百度搜索或其他途径。本文主要讲述如何搭建和搭建完后如何验证两部分。
安装环境
Ubuntu 18.04.1 LTS
安装依赖库
通过su,进入root用户,进行安装
1、安装libssl-dev
root@VM-0-9-ubuntu:/home/download# apt install libssl-dev2、libevent
2.1 下载
wget https://github.com/libevent/libevent/releases/download/release-2.1.11-stable/libevent-2.1.11-stable.tar.gz --no-check-certificate2.2 解压与编译
root@VM-0-9-ubuntu:/home/download# tar xvfz libevent-2.1.11-stable.tar.gz
root@VM-0-9-ubuntu:/home/download# cd libevent-2.1.11-stable
root@VM-0-9-ubuntu:/home/download/libevent-2.1.11-stable# ./configure
root@VM-0-9-ubuntu:/home/download/libevent-2.1.11-stable# make
root@VM-0-9-ubuntu:/home/download/libevent-2.1.11-stable# make install
3、sqlite安装
root@VM-0-9-ubuntu:/home/download# apt install sqlite34、sqlite开发库安装
root@VM-0-9-ubuntu:/home/download# apt install libsqlite3-dev安装coturn
获取Coturn源码,从https://github.com/coturn/coturn/wiki/Downloads 查阅版本
1、下载
root@VM-0-9-ubuntu:/home/download# wget https://coturn.net/turnserver/v4.5.0.8/turnserver-4.5.0.8.tar.gz --no-check-certificate2、解压与编译
root@VM-0-9-ubuntu:/home/download# tar zxvf turnserver-4.5.0.8.tar.gz
root@VM-0-9-ubuntu:/home/download# cd turnserver-4.5.0.8
root@VM-0-9-ubuntu:/home/download/turnserver-4.5.0.8# ./configure
root@VM-0-9-ubuntu:/home/download/turnserver-4.5.0.8# make
root@VM-0-9-ubuntu:/home/download/turnserver-4.5.0.8# make install
3、编译安装成功结果
TURN数据库配置
1、增加用户
root@VM-0-9-ubuntu:/home/download# turnadmin -a -u uff -r ff.cn -p 999999注意:
- 如果不用默认db也可以通过命令行配置需要使用的db文件路径
- 需要sudo否则无法写入db文件,查询为空,或者给db文件改权限。
- 如果没有安装sqlite并不会报错,只是查询为空。
2、查看当前的普通用户
root@VM-0-9-ubuntu:/home/download# turnadmin -l
uff[ff.cn]
root@VM-0-9-ubuntu:/home/download#
3、删除普通用户
root@VM-0-9-ubuntu:/home# turnadmin -d -u uff -r ff.cn
root@VM-0-9-ubuntu:/home# turnadmin -l
root@VM-0-9-ubuntu:/home#
4、命令查看
https://github.com/coturn/coturn/wiki/turnadmin,详细见man turnadmin
TURN服务配置文件
turnserver默认搜索位置:/etc/turnserver.conf或/usr/local/etc/turnserver.conf,一般只需对部分进行配置,以下是我的配置,供参考
listening-port=3478 #指定监听的端口
external-ip=106.54.10.165 #指定云主机的公网IP地址
user=uff:999999 #访问 stun/rurn服务的用户和密码
realm=ff.cn #域名,这个一定要设置
开放端口
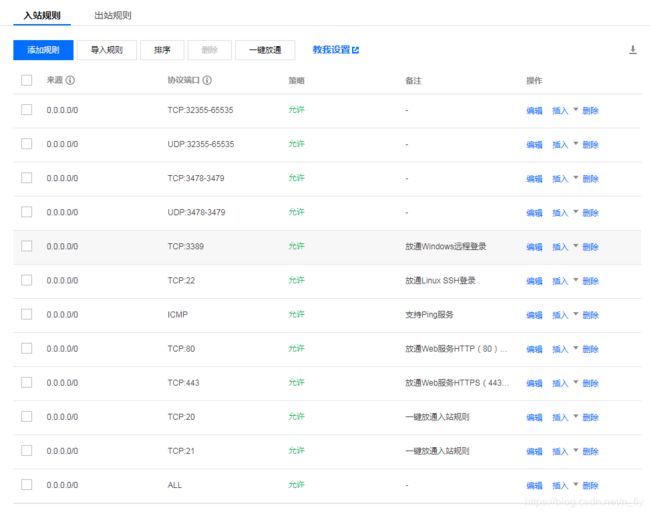
在腾讯云上添加安全组规则(开放端口,其它云服务器类似):
3478/3478
32355/65535
出方向和入方向配置一样就行
启动服务
1、确保端口开发
iptables -A INPUT -p udp --dport 端口(如:3478) -j ACCEPT
2、启动
2.1 后台启动
service coturn start
2.2 非后台启动
turnserver
2.3 注意
初次运行请使用非后台启动,会显示当前运行状态,如果有错误会直接显示在控制台上.
3、验证监听端口
lsof -n i4TCP:端口 | grep LISTEN
或直接查看所有UDP/TCP端口
netstat -nat | grep LISTEN
4、验证服务
4.1 stun
apt install stun-client
之后运行
stun domain:port // 例如:stun ff.cn:3478
4.2 直接测试
浏览器输入
domain/IP:port // 例如:ff.cn:3478/xxx.xxx.x.xx:3478
通过测试截图
4.3 在线测试(推荐)
网址
https://webrtc.github.io/samples/src/content/peerconnection/trickle-ice/
测试截图
参考链接:
https://yq.aliyun.com/articles/670085
https://blog.csdn.net/ts_dchs/article/details/97279097
https://www.pressc.cn/967.html
https://blog.csdn.net/qq_41345773/article/details/88965707


