初级篇:(一)Tensorflow2.x 学习---实践篇
文章目录
- 实践
- 1. 图像分类
- 导入
- 数据集
- 预处理
- 搭建模型
- 编译模型
- 训练模型
- 评估准确度
- 进行预测
- 2. 使用 Keras 和 Tensorflow Hub 对电影评论进行文本分类
- 问题描述
- 导入库
- 数据集
- 查看数据集
- 构建模型
- 编译模型
- 训练模型
- 评估模型
- 3. Text classification with preprocessed text: Movie review
- 导入
- 数据集
- 数据集
- 子词分词器
- 查看数据集
- Prepare the data for training
- Build the model
- 编译
- 训练
- 评估
- 评估图绘制
- 4.Basic regression: Predict fuel efficiency
- 导入
- 数据集
- 获取
- 查看
- Inspect the data
- 建立模型
- 训练模型
- 评估
- 图评估
- 函数评估
- 预测
- 小结
- 1. 导入模块tf和keras
- 2. 数据集
- 1. 导入
- 2. 预处理
- 3. 模型搭建
- 4.模型训练
- 5. 模型评估
- 6. 模型预测
实践
1. 图像分类
导入
感觉2.0几乎都会导入tf和keras
# TensorFlow and tf.keras
import tensorflow as tf
from tensorflow import keras
数据集
tf常见数据集与使用:
keras.datasets.fashion_mnist
tf.keras.datasets.mnist
fashion_mnist 和mnist 标签类似都是10个,都是灰度图,像素值都是28x28.
They’re good starting points to test and debug code.
Here, 60,000 images are used to train the network and 10,000 images to evaluate how accurately the network learned to classify images. You can access the Fashion MNIST directly from TensorFlow. Import and load the Fashion MNIST data directly from TensorFlow:
这些数据集导入下一步都是用拆包方式
(x_train, y_train), (x_test, y_test) = mnist.load_data()
例如
mnist = tf.keras.datasets.mnist
(x_train, y_train), (x_test, y_test) = mnist.load_data()
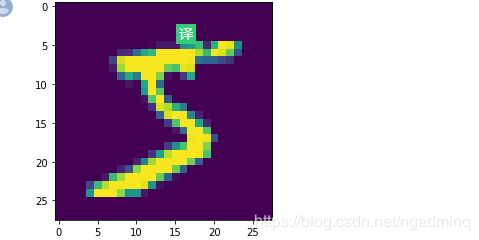
进一步查看数据集:
x_train.shape
plt.figure()
plt.imshow(x_train[0])
plt.grid(False)
plt.show()
plt.figure(figsize=(10,10))
for i in range(25):
    plt.subplot(5,5,i+1)
    plt.xticks([])
    plt.yticks([])
    plt.grid(False)
    plt.imshow(train_images[i], cmap=plt.cm.binary)
    plt.xlabel(class_names[train_labels[i]])
plt.show()
预处理
把图转换在0-1的浮点数,除.0不可少
x_train, x_test = x_train / 255.0, x_test / 255.0
搭建模型
套路啊,一般简单使用都会将图Flatten一下。
2.0的感觉现在已经把所有模型层,数据集也是。。。全放在keras里去了。
Dense就是神经网络,接受的是输出
总的说来,搭建模型只需要写好三层就可以。
即keras.Sequential
(
输入:一般参数要写输入维度,
隐藏层:一般参数要写隐藏层维度和activation=‘relu’,
输出层:写输出维度即可
)
model = keras.Sequential([
    keras.layers.Flatten(input_shape=(28, 28)),
    keras.layers.Dense(128, activation='relu'),
    keras.layers.Dense(10)
])
编译模型
同搭建模型一样,还是得写三个东西:
损失函数,优化器,指标
model.compile(optimizer='adam',          loss=tf.keras.losses.SparseCategoricalCrossentropy(from_logits=True),
           metrics=['accuracy'])
训练模型
把数据放进去就好了,最基础传入的参数就是训练数据集,标签和迭代次数
history = model.fit(train_images, train_labels, epochs=10,verbose=1)
评估准确度
test_loss, test_acc = model.evaluate(test_images,  test_labels, verbose=2)

print('\nTest accuracy:', test_acc)
进行预测
预测先得到预测模型
然后将预测数据放入
最后拿到最大化概率所对应的数据
probability_model = tf.keras.Sequential([model,
                                     tf.keras.layers.Softmax()])
predictions = probability_model.predict(test_images)
np.argmax(predictions[0])
也可以用这种方式得出的效果一毛一样
对于数据一开始的处理只需要将其增加一个维度即可,与batch对应
# Add the image to a batch where it's the only member.
img = (np.expand_dims(img,0))

print(img.shape)
然后将数据进行放入预测模型中进行预测
predictions_single = probability_model.predict(img)

print(predictions_single)
2. 使用 Keras 和 Tensorflow Hub 对电影评论进行文本分类
问题描述
文本二元分类问题,使用IMDB数据集。
这次教程多使用了tf_hub,即使用了迁移学习。
导入库
import tensorflow_datasets as tfds
import tensorflow_hub as hub
print("Hub version: ", hub.__version__)
# 查看是否支持eagerly
print("Eager mode: ", tf.executing_eagerly())
数据集
数据集直接load即可,在load选择数据集和,设置切割比例
【tfds.load 方法返回一个 tf.data.Dataset 对象。部分重要的参数如下:
as_supervised :若为 True,则根据数据集的特性,将数据集中的每行元素整理为有监督的二元组 (input, label) (即 “数据 + 标签”)形式,否则数据集中的每行元素为包含所有特征的字典。
split:指定返回数据集的特定部分。若不指定,则返回整个数据集。一般有 tfds.Split.TRAIN (训练集)和 tfds.Split.TEST (测试集)选项。】
关于load使用
# 将训练集分割成 60% 和 40%,从而最终我们将得到 15,000 个训练样本
# 10,000 个验证样本以及 25,000 个测试样本。
train_data,validation_data, test_data = tfds.load(
    name="imdb_reviews",
    split=('train[:60%]', 'train[60%:]', 'test'),
    as_supervised=True)
查看数据集
直接load的数据集要经过next(iter(.batch()))才能查看
train_examples_batch, train_labels_batch = next(iter(train_data.batch(10)))
train_examples_batch
train_labels_batch
构建模型
预训练的嵌入模型具有固定长度。
无论输入文本的长度如何,嵌入(embeddings)输出的形状都是:(num_examples, embedding_dimension)。
embedding = "https://tfhub.dev/google/tf2-preview/gnews-swivel-20dim/1"
hub_layer = hub.KerasLayer(embedding, input_shape=[],
                           dtype=tf.string, trainable=True)
hub_layer(train_examples_batch[:3])
构建基础,这里构建和上个小节一样,只是将其拆为model.add,
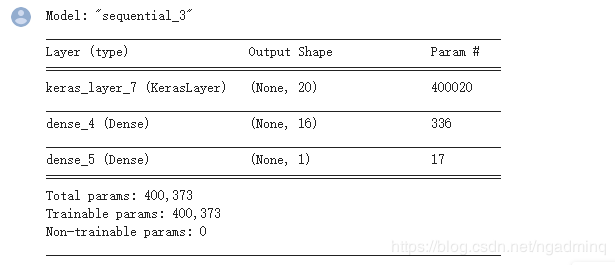
感觉每次构建模型使用model.summary更直观啊!
model = tf.keras.Sequential()
model.add(hub_layer)
model.add(tf.keras.layers.Dense(16, activation='relu'))
model.add(tf.keras.layers.Dense(1))

model.summary()
编译模型
这不是损失函数的唯一选择,例如,您可以选择 mean_squared_error 。但是,一般来说 binary_crossentropy 更适合处理概率——它能够度量概率分布之间的“距离”,或者在我们的示例中,指的是度量 ground-truth 分布与预测值之间的“距离”。
model.compile(optimizer='adam',
              loss=tf.keras.losses.BinaryCrossentropy(from_logits=True),
              metrics=['accuracy'])
训练模型
from_logits=False就表示把已经概率化了的输出,重新映射回原值
。。。。。=True不映射
日志显示,0为不在标准输出流输出日志信息,1为输出进度条记录,2为每个epoch输出一行记录。这个参数在fit,evalute都有。默认是1
这次比1节就是多了个日志输出。
history = model.fit(train_data.shuffle(10000).batch(512),
                    epochs=20,
                    validation_data=validation_data.batch(512),
                    verbose=1)
评估模型
同上
test_loss, test_acc = model.evaluate(test_data.batch(512), verbose=2)
3. Text classification with preprocessed text: Movie review
导入
from tensorflow import keras

import tensorflow_datasets as tfds
tfds.disable_progress_bar()

import numpy as np

print(tf.__version__)
数据集
这里跟S2不同的在于split
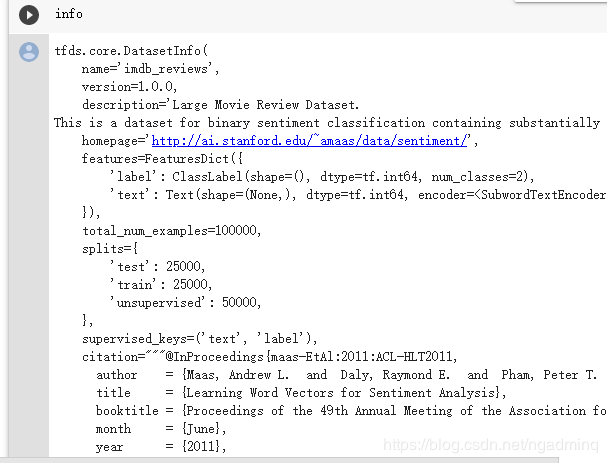
还有通过设置with_info参数多打印了一个info,info省得了我们仔细去查看数据的麻烦,还是很有用的。对于不熟悉的数据集,最好使用with_info参数。官网上这么说if True, tfds.load will return the tuple (tf.data.Dataset, tfds.core.DatasetInfo) containing the info associated with the builder.
(train_data, test_data), info = tfds.load(
    # Use the version pre-encoded with an ~8k vocabulary.
    'imdb_reviews/subwords8k',
    # Return the train/test datasets as a tuple.
    split = (tfds.Split.TRAIN, tfds.Split.TEST),
    # Return (example, label) pairs from the dataset (instead of a dictionary).
    as_supervised=True,
    # Also return the `info` structure.
    with_info=True)
数据集
子词分词器
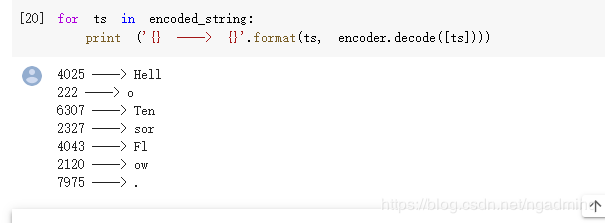
可逆TextEncoder使用带有字节级别回退的单词.即创建了子词分词器
The dataset info includes the text encoder (a tfds.features.text.SubwordTextEncoder).
了解更多关于subwordTextEncoder
encoder = info.features['text'].encoder
sample_string = 'Hello TensorFlow.'

encoded_string = encoder.encode(sample_string)
print ('Encoded string is {}'.format(encoded_string))

original_string = encoder.decode(encoded_string)
print ('The original string: "{}"'.format(original_string))

assert original_string == sample_string
 子词分词器作用:如果单词不在字典中,则编码器通过将其分为子单词或字符来对字符串进行编码。因此,字符串越类似于数据集,编码的表示形式越短。
查看数据集
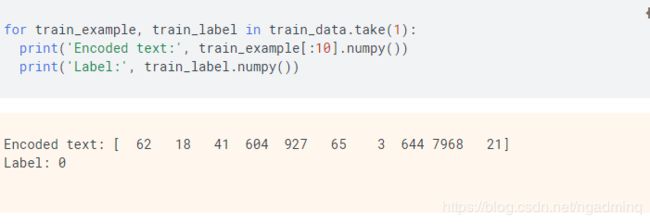
通过使用load导入的数据集是使用take(。)拿到单份。我尝试换成batch(1)把colab跑卡了。
Prepare the data for training
总的来看,最基本的文本数据预处理就是padding。
不过2.2已经不再需要padding了,默认就是补全到最长。
经过padding后的数据,在每次batch中不一定一样。
BUFFER_SIZE = 1000

train_batches = (
    train_data
    .shuffle(BUFFER_SIZE)
    .padded_batch(32, padded_shapes=([None],[])))

test_batches = (
    test_data
    .padded_batch(32, padded_shapes=([None],[])))
Build the model
这里没有使用mask,因此填充的0可能会作为一部分。但也有解决方法的,往后再学解决填充的0变成了一部分
GlobalAveragePooling1D:尽可能简单的处理了可变长。
model = keras.Sequential([
  keras.layers.Embedding(encoder.vocab_size, 16),
  keras.layers.GlobalAveragePooling1D(),
  keras.layers.Dense(1)])

model.summary()
编译
model.compile(optimizer='adam',
              loss=tf.losses.BinaryCrossentropy(from_logits=True),
              metrics=['accuracy'])
训练
这次仅仅多了个steps:在验证集上的step总数
history = model.fit(train_batches,
                    epochs=10,
                    validation_data=test_batches,
                    validation_steps=30)
评估
这个命名更简洁。
loss, accuracy = model.evaluate(test_batches)

print("Loss: ", loss)
print("Accuracy: ", accuracy)
评估图绘制
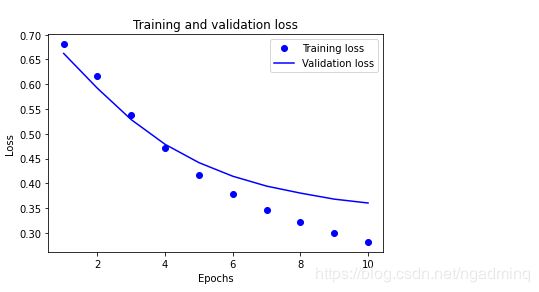
众所周知,history有loss和准确度
history_dict = history.history
history_dict.keys()
import matplotlib.pyplot as plt

acc = history_dict['accuracy']
val_acc = history_dict['val_accuracy']
loss = history_dict['loss']
val_loss = history_dict['val_loss']

epochs = range(1, len(acc) + 1)

# "bo" is for "blue dot"
plt.plot(epochs, loss, 'bo', label='Training loss')
# b is for "solid blue line"
plt.plot(epochs, val_loss, 'b', label='Validation loss')
plt.title('Training and validation loss')
plt.xlabel('Epochs')
plt.ylabel('Loss')
plt.legend()

plt.show()
4.Basic regression: Predict fuel efficiency
导入
import pathlib
import tensorflow_docs as tfdocs
import tensorflow_docs.plots
import tensorflow_docs.modeling
数据集
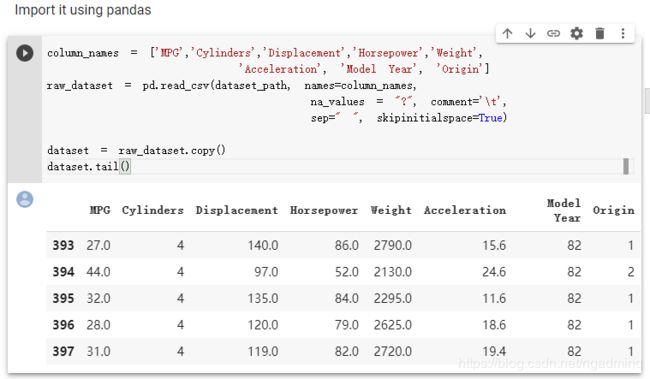
获取
keras.utils.get_file远程下载文件
dataset_path = keras.utils.get_file("auto-mpg.data", "http://archive.ics.uci.edu/ml/machine-learning-databases/auto-mpg/auto-mpg.data")
dataset_path
查看
train_dataset = dataset.sample(frac=0.8,random_state=0)
test_dataset = dataset.drop(train_dataset.index)
Inspect the data
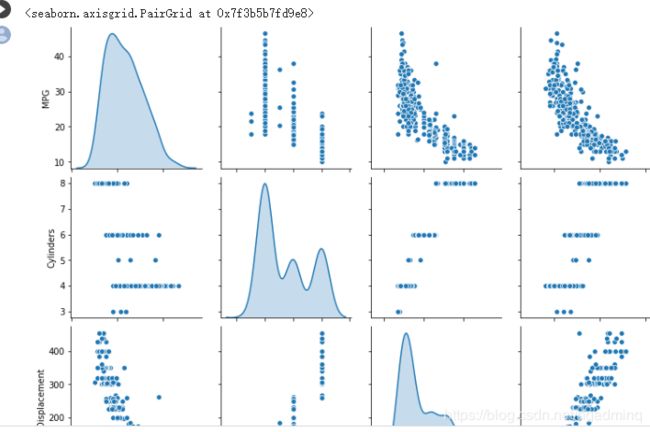
有时我们不仅需要查看单个变量的分布,同时也需要查看变量之间的联系,这时就需要用到联合分布图
sns.pairplot(train_dataset[["MPG", "Cylinders", "Displacement", "Weight"]], diag_kind="kde")
建立模型
这样写最简洁好看
def build_model():
  model = keras.Sequential([
    layers.Dense(64, activation='relu', input_shape=[len(train_dataset.keys())]),
    layers.Dense(64, activation='relu'),
    layers.Dense(1)
  ])

  optimizer = tf.keras.optimizers.RMSprop(0.001)

  model.compile(loss='mse',
                optimizer=optimizer,
                metrics=['mae', 'mse'])
  return model
  model = build_model()
训练模型
相比于之前的另外切割交叉验证集方法,这次更简约。直接设置了validation_split。
因为我们的指标是两个,打印出来的东西很多了,所以这里就使用了将verbose设置为0.如果训练步数很短的话就设置为2.
EPOCHS = 1000

history = model.fit(
  normed_train_data, train_labels,
  epochs=EPOCHS, validation_split = 0.2, verbose=0,
  callbacks=[tfdocs.modeling.EpochDots()])
评估
图评估
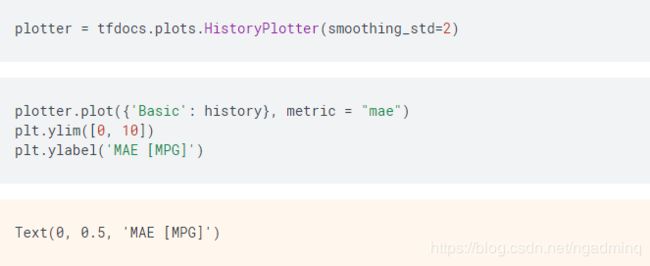
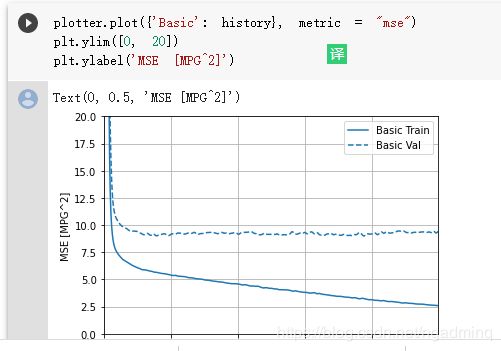
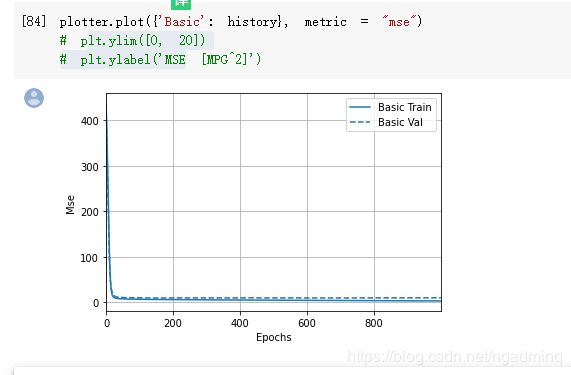
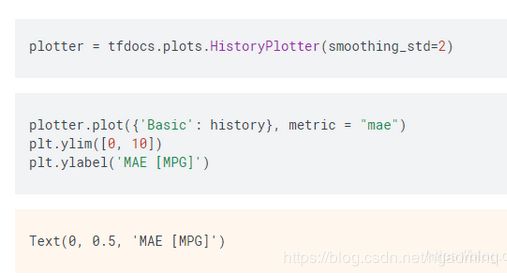
现在又多了一种更简洁的可视化方法,前面直接用plt的太臃肿了,对吗?而且在有很多轮情况下,plt还不能带的函数可以直接将结果平滑化,必须额外处理才可以。
现在这种方法只需要先使用一下plotter即可。
函数评估
因为前面metric设置了两个,所以这里评估也设置为两个。这里的verbose就很随意了,因为不像前面一样,设置不当会打印一大堆东西,让自己眼花缭乱。这里设不设也就一两行

预测
test_predictions = model.predict(normed_test_data).flatten()
小结
这部分总结代码和思想来自于后面小节的实践
1. 导入模块tf和keras
import tensorflow as tf

from tensorflow import keras
from tensorflow.keras import layers
2. 数据集
1. 导入
现有的数据集来自于import tensorflow_datasets as tfds
这份数据比2要难一点。
现有的数据集来自于tf.keras.datasets
导入很有规律性
mnist = tf.keras.datasets.mnist
(x_train, y_train), (x_test, y_test) = mnist.load_data()
数据集来自于链接
keras.utils.get_file
2. 预处理
切割
切割训练和测试即可,因为验证可以直接从model.fit设置参数valid_split得到
归一化
这里只说明一点,图的归一化是除以小数以转换到float
迁移学习
3. 模型搭建
1. 模型创建
总的说来,搭建模型只需要写好三层就可以。
即keras.Sequential
(
输入:一般参数要写输入维度,
隐藏层:一般参数要写隐藏层维度和activation=‘relu’,
输出层:写输出维度即可
)
2. 模型编译
同搭建模型一样,还是得写三个东西:
损失函数,优化器,指标
def build_model():
  model = keras.Sequential([
    layers.Dense(64, activation='relu', input_shape=[len(train_dataset.keys())]),
    layers.Dense(64, activation='relu'),
    layers.Dense(1)
  ])

  optimizer = tf.keras.optimizers.RMSprop(0.001)

  model.compile(loss='mse',
                optimizer=optimizer,
                metrics=['mae', 'mse'])
  return model
  model = build_model()
4.模型训练
按照以下格式,注意的是传入verbose要根据自己需求
EPOCHS = 1000

history = model.fit(
  normed_train_data, train_labels,
  epochs=EPOCHS, validation_split = 0.2, verbose=0,
  callbacks=[tfdocs.modeling.EpochDots()])
5. 模型评估
2. 函数评估
loss, accuracy = model.evaluate(test_batches)

print("Loss: ", loss)
print("Accuracy: ", accuracy)
6. 模型预测
图预测
需要增加softmax层
probability_model = tf.keras.Sequential([model,
                                     tf.keras.layers.Softmax()])
predictions = probability_model.predict(test_images)
np.argmax(predictions[0])
其他预测
test_predictions = model.predict(normed_test_data).flatten()
参考链接
https://www.tensorflow.org/tutorials/quickstart/beginner?hl=zh-cn
