gtest谷歌C++单元测试框架
一、什仫是gtest
gtest是一个跨平台的(Liunx、Mac OS X、Windows 、Cygwin 、Windows CE and Symbian ) C++单元测试框架,由google公司发布。gtest是为在不同平台上为编写C++测试而生成的。它提供了丰富的断言、致命和非致命判断、参数化、”死亡测试”等等。
了解了什仫是gtest之后下面让我们来学习gtest的一些使用规则吧!
一、安装配置
1、简介
2、安装
下载地址:
https://code.google.com/p/googletest/downloads/list
解压安装:
unzip gtest-1.7.0.zip && cd gtest-1.7.0 && ./configure && make
头文件目录为 include/gtest ,链接库为 lib/.libs/libgtest.{a,so}
例子代码在 samples/ 目录下,或直接访问以下 URL:
https://code.google.com/p/googletest/wiki/V1_7_Documentation
http://www.cnblogs.com/coderzh/archive/2009/04/06/1426755.html
3、简单 Demo
一、gtest系列之TEST宏
TEST(test_case_name, test_name)
TEST_F(test_fixture,test_name) //多个测试场景需要相同数据配置的情况,用TEST_F。TEST_F test fixture,测试夹具,测试套,承担了一个注册的功能。
TEST(test_case_name, test_name)
TEST_F(test_fixture,test_name) //多个测试场景需要相同数据配置的情况,用 TEST_F 。TEST_F test fixture,测试夹具,测试套,承担了一个注册的功能。
TEST宏的作用是创建一个简单测试,它定义了一个测试函数,在这个函数里可以使用任何C++代码并使用提供的断言来进行检查。后续文章还会提到TEST_P这个宏,在这里就先不介绍了。
二、gtest系列之断言
gtest中断言的宏可以分为两类:一类是ASSERT宏,另一类就是EXPECT宏了。
1、ASSERT_系列:如果当前点检测失败则退出当前函数
2、EXPECT_系列:如果当前点检测失败则继续往下执行
如果你对自动输出的错误信息不满意的话,也是可以通过operator<<能够在失败的时候打印日志,将一些自定义的信息输出。
ASSERT_系列:
bool值检查
1、 ASSERT_TRUE(参数),期待结果是true
2、ASSERT_FALSE(参数),期待结果是false
数值型数据检查
3、ASSERT_EQ(参数1,参数2),传入的是需要比较的两个数 equal
4、ASSERT_NE(参数1,参数2),not equal,不等于才返回true
5、ASSERT_LT(参数1,参数2),less than,小于才返回true
6、ASSERT_GT(参数1,参数2),greater than,大于才返回true
7、ASSERT_LE(参数1,参数2),less equal,小于等于才返回true
8、ASSERT_GE(参数1,参数2),greater equal,大于等于才返回true
字符串检查
9、ASSERT_STREQ(expected_str, actual_str),两个C风格的字符串相等才正确返回
10、ASSERT_STRNE(str1, str2),两个C风格的字符串不相等时才正确返回
11、ASSERT_STRCASEEQ(expected_str, actual_str)
12、ASSERT_STRCASENE(str1, str2)
13、EXPECT_系列,也是具有类似的宏结构的
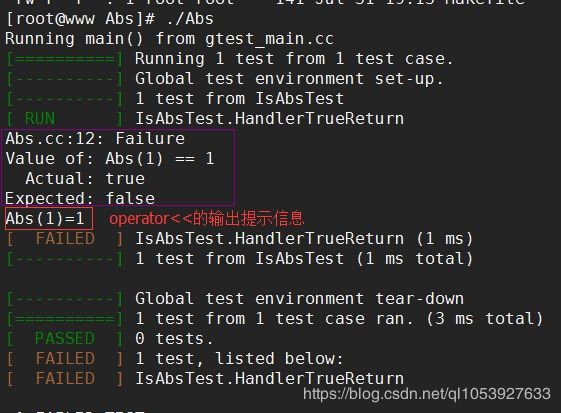
下面我们来做一个测试,实现一个求绝对值的函数,并在TEST宏里面使用ASSERT来进行测试不同类型的数据。
#include1、正确测试

2、将第一条语句写成: ASSERT_FALSE(Abs(1) == 1) << “Abs(1)=1”,此时再次测试就会打印出自定义的出错信息了。
三、gtest系列之事件机制
“事件” 本质是框架给你提供了一个机会, 让你能在这样的几个机会来执行你自己定制的代码, 来给测试用例准备/清理数据。gtest提供了多种事件机制,总结一下gtest的事件一共有三种:
1、TestSuite事件
需要写一个类,继承testing::Test,然后实现两个静态方法:SetUpTestCase 方法在第一个TestCase之前执行;TearDownTestCase方法在最后一个TestCase之后执行。
2、TestCase事件
是挂在每个案例执行前后的,需要实现的是SetUp方法和TearDown方法。SetUp方法在每个TestCase之前执行;TearDown方法在每个TestCase之后执行。
3、全局事件
要实现全局事件,必须写一个类,继承testing::Environment类,实现里面的SetUp和TearDown方法。SetUp方法在所有案例执行前执行;TearDown方法在所有案例执行后执行。
例如全局事件可以按照下列方式来使用:
除了要继承testing::Environment类,还要定义一个该全局环境的一个对象并将该对象添加到全局环境测试中去。

下面我们再来做一个测试实例,测试Map的find()和size()函数并通过继承testing::Test来实现。
此时的TEST宏必须写成TEST_F,而且它的第一个参数必须与类名一致,
TEST_F test fixture,测试夹具,测试套,承担了一个注册的功能。
代码实现如下:
class TestMap:public testing::Test
{
public:
//添加日志
static void SetUpTestCase()
{
cout<<"SetUpTestCase"<<endl;
}
static void TearDownTestCase()
{
cout<<"TearDownTestCase"<<endl;
}
virtual void SetUp() //TEST跑之前会执行SetUp
{
cout<<"SetUp"<<endl;
test_map.insert(make_pair(1,0));
test_map.insert(make_pair(2,1));
test_map.insert(make_pair(3,2));
test_map.insert(make_pair(4,3));
test_map.insert(make_pair(5,4));
}
virtual void TearDown() //TEST跑完之后会执行TearDown
{
cout<<"TearDown"<<endl;
test_map.clear();
}
map<int,int> test_map;
};
TEST_F(TestMap,Find) //此时使用的是TEST_F宏
{
map<int,int>::iterator it=test_map.find(1);
ASSERT_NE(it,test_map.end());
}
TEST_F(TestMap,Size)
{
ASSERT_EQ(test_map.size(),5);
}
int main(int argc,char *argv[])
{
testing::InitGoogleTest(&argc, argv);//将命令行参数传递给gtest
return RUN_ALL_TESTS(); //RUN_ALL_TESTS()运行所有测试案例
}
四、gtest系列之死亡测试
这里的”死亡”指的是程序的奔溃。通常在测试的过程中,我们需要考虑各种各样的输入,有的输入可能直接导致程序奔溃,这个时候我们就要检查程序是否按照预期的方式挂掉,这也就是所谓的”死亡测试”。
死亡测试所用到的宏:
1、ASSERT_DEATH(参数1,参数2),程序挂了并且错误信息和参数2匹配,此时认为测试通过。如果参数2为空字符串,则只需要看程序挂没挂即可。
2、ASSERT_EXIT(参数1,参数2,参数3),语句停止并且错误信息和被提前给的信息匹配。
下面我们再来做一个测试实例,测试当程序出问题时候死亡测试如何使用?
五、一个关于gtest的简单例子
#include以上测试用例都是在Linux系统下测试的,读者需自行在Linux下安装gtest。
Linux环境下安装使用
GTest的安装与使用
安装GTest
1、安装源代码
下载gtest,release-1.8.0
git clone https://github.com/google/googletest
gtest编译
cd googletest
生成Makefile文件(先安装cmake,brew install cmake),继续输入命令编译:
cmake CMakeLists.txt
执行make,生成两个静态库:libgtest.a libgtest_main.a
make
拷贝到系统目录,注意,如果下诉目录位置在不同版本位置有变动,用find . -name “libgtest*.a” 找到位置
sudo cp libgtest*.a  /usr/lib
sudo cp –a include/gtest /usr/include
检查是否安装成功
可以写一个简单的测试代码如下:
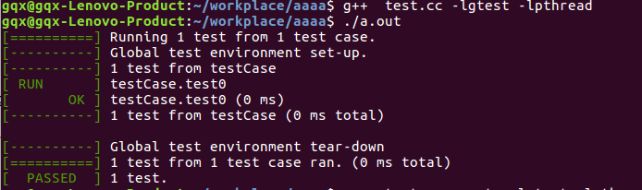
#include在该文件的终端输入编译指令:
 gqx@gqx-Lenovo-Product:~/workplace/aaaa$ g++  test.cc -lgtest -lpthread
 gqx@gqx-Lenovo-Product:~/workplace/aaaa$ ./a.out
即得到如下显示结果:
GTest的一些基本概念
要测试一个类或函数,我们需要对其行为做出断言。当一个断言失败时,Google Test会在屏幕上输出该代码所在的源文件及其所在的位置行号,以及错误信息。也可以在编写断言时,提供一个自定义的错误信息,这个信息在失败时会被附加在Google Test的错误信息之后。
断言常常成对出现,它们都测试同一个类或者函数,但对当前功能有着不同的效果。ASSERT_*版本的断言失败时会产生致命失败,并结束当前函数。EXPECT_*版本的断言产生非致命失败,而不会中止当前函数。通常更推荐使用EXPECT_*断言,因为它们运行一个测试中可以有不止一个的错误被报告出来。但如果在编写断言如果失败,就没有必要继续往下执行的测试时,你应该使用ASSERT_*断言。 因为失败的ASSERT_*断言会立刻从当前的函数返回,可能会跳过其后的一些的清洁代码,这样也许会导致空间泄漏。
GTest的断言
1、布尔值检查
| Fatal assertion | Nonfatal assertion | Verifies |
|---|---|---|
| ASSERT_TRUE(condition); | EXPECT_TRUE(condition); | condition is true |
| ASSERT_FALSE(condition); | EXPECT_FALSE(condition); | condition is false |
2、数值型数据检查
| Fatal assertion | Nonfatal assertion | Verifies |
|---|---|---|
| ASSERT_EQ(expected, actual); | EXPECT_EQ(expected, actual); | expected == actual |
| ASSERT_NE(val1, val2); | EXPECT_NE(val1, val2); | val1 != val2 |
| ASSERT_LT(val1, val2); | EXPECT_LT(val1, val2); | val1 < val2 |
| ASSERT_LE(val1, val2); | EXPECT_LE(val1, val2); | val1 <= val2 |
| ASSERT_GT(val1, val2); | EXPECT_GT(val1, val2); | val1 > val2 |
| ASSERT_GE(val1, val2); | EXPECT_GE(val1, val2); | val1 >= val2 |
3、字符串比较
| Fatal assertion | Nonfatal assertion | Verifies |
|---|---|---|
| ASSERT_STREQ(expected_str, actual_str); | EXPECT_STREQ(expected_str, actual_str); | 两个C字符串有相同的内容 |
| ASSERT_STRNE(str1, str2); | EXPECT_STRNE(str1, str2); | 两个C字符串有不同的内容 |
| ASSERT_STRCASEEQ(expected_str, actual_str); | EXPECT_STRCASEEQ(expected_str, actual_str); | 两个C字符串有相同的内容,忽略大小写 |
| ASSERT_STRCASENE(str1, str2); | EXPECT_STRCASENE(str1, str2); | 两个C字符串有不同的内容,忽略大小写 |
4、异常检查
| Fatal assertion | Nonfatal assertion | Verifies |
|---|---|---|
| ASSERT_THROW(statement, exception_type); | EXPECT_THROW(statement, exception_type); | statement throws an exception of the given type |
| ASSERT_ANY_THROW(statement); | EXPECT_ANY_THROW(statement); | statement throws an exception of any type |
| ASSERT_NO_THROW(statement); | EXPECT_NO_THROW(statement); | statement doesn’t throw any exception |
5、浮点型检查
| Fatal assertion | Nonfatal assertion | Verifies |
|---|---|---|
| ASSERT_FLOAT_EQ(expected, actual); | EXPECT_FLOAT_EQ(expected, actual); | the two float values are almost equal |
| ASSERT_DOUBLE_EQ(expected, actual); | EXPECT_DOUBLE_EQ(expected, actual); | the two double values are almost equal |
对相近的两个数比较:
| Fatal assertion | Nonfatal assertion | Verifies |
|---|---|---|
| ASSERT_NEAR(val1, val2, abs_error); | EXPECT_NEAR(val1, val2, abs_error); | the difference between val1 and val2 doesn’t exceed the given absolute error |
6、此外还有类型检查、谓词检查等
事件机制
全局事件
要实现全局事件,必须写一个类,继承testing::Environment类,实现里面的SetUp和TearDown方法。
SetUp()方法在所有案例执行前执行TearDown()方法在所有案例执行后执行
还需要告诉gtest添加这个全局事件,我们需要在main函数中通过testing::AddGlobalTestEnvironment方法将事件挂进来,也就是说,我们可以写很多个这样的类,然后将他们的事件都挂上去。
TestSuite事件
我们需要写一个类,继承testing::Test,然后实现两个静态方法
SetUpTestCase()方法在第一个TestCase之前执行TearDownTestCase()方法在最后一个TestCase之后执行
在编写测试案例时,我们需要使用TEST_F这个宏,第一个参数必须是我们上面类的名字,代表一个TestSuite。
TestCase事件
TestCase事件是挂在每个案例执行前后的,实现方式和上面的几乎一样,不过需要实现的是SetUp方法和TearDown方法:
SetUp()方法在每个TestCase之前执行TearDown()方法在每个TestCase之后执行
以下案例解决说明上述三个事件的使用
#include相关结果和说明如下:

参数化
当考虑多次要为被测函数传入不同的值的情况时,可以按下面的方式去测试。必须添加一个类,继承testing::TestWithParam。其中T就是你需要参数化的参数类型,如下面的案例是int型参数。(官方文档上的案例)
#include