CentOS7.4,anaconda3,python3.6,tensorflow环境下gdal的编译和问题解决
CentOS7.4,anaconda3,python3.6,tensorflow环境下gdal的编译和问题解决
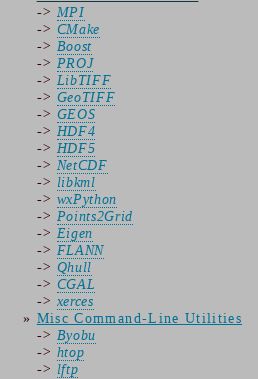
这是gdal可能会用到的额外的包,按自己需要先提前编译。
这里的话我主要用了proj,Libtiff,Geotiff,Geos,Hdf5这5个包,基本能满足需要
安装步骤
新建一个安装目录:
cd /home/Elam
mkdir gdalsrc
cd gdalsrc
编译额外包:
1.proj
yum install gcc-c++
wget http://download.osgeo.org/proj/proj-4.8.0.tar.gz
tar -zxvf proj-4.8.0.tar.gz
cd proj-4.8.0
mkdir build
./configure --prefix=/home/Elam/gdalsrc/proj-4.8.0/build
# compile
make -j
# install into build dir
make install
创建一个统一的添加环境变量的文件夹:
cd /home/Elam/gdalsrc
mkdir envsh
cd envsh
vim export_path.sh
添加下面两行代码
export LD_LIBRARY_PATH="/home/Elam/gdalsrc/proj-4.8.0/build/lib:$LD_LIBRARY_PATH"
export PATH="/hoem/Elam/gdalsrc/proj-4.8.0/build/bin:$PATH"
可以source export_path.sh 然后键入proj看看是否编译成功
2.libtiff
yum install gcc-c++ zlib-devel libjpeg-turbo-devel
cd /home/Elam/gdalsrc
wget http://download.osgeo.org/libtiff/tiff-4.0.9.tar.gz  最新版本是4.0.9
tar -zxvf tiff-4.0.9.tar.gz
cd tiff-4.0.9
ls一下发现build文件夹已经存在,因此不需要重新创建直接configure
./configure --prefix=/home/Elam/gdalsrc/tiff-4.0.9/build/ \
            --exec-prefix=/home/Elam/gdalsrc/tiff-4.0.9/build
make -j
make check
# install to build dir
make install
# confirm install
./build/bin/tiffinfo
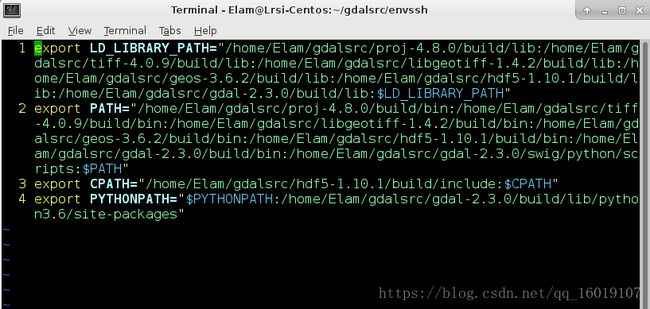
进入刚才创建的export_path添加新的环境变量,如下图:
3.Geotiff
在gdalsrc目录下
wget http://download.osgeo.org/geotiff/libgeotiff/libgeotiff-1.4.2.tar.gz
tar -xvfz libgeotiff-1.4.2.tar.gz
cd libgeotiff-1.4.2/
mkdir build
./configure --prefix=/home/Elam/gdalsrc/libgeotiff-1.4.2/build \
            --with-proj=/home/Elam/gdalsrc/proj-4.8.0/build \
            --with-libtiff=/home/Elam/gdalsrc/tiff-4.0.9/build \
            --with-zlib --with-jpeg
# compile
make -j
# install into build dir
make install
进入export_path添加新的环境变量,如下图:
4.Geos
yum install gcc-c++ swig python-devel
cd /home/Elam/gdalsrc
wget http://download.osgeo.org/geos/geos-3.6.2.tar.bz2
tar -xvjf geos-3.6.2.tar.bz2
cd geos-3.6.2
mkdir build
./configure --prefix=/home/Elam/gdalsrc/geos-3.6.2/build --enable-python
# compile
make -j$threads
make check
# install into build dir
make install
# check install
./build/bin/geos-config --version
gdal编译过程中碰到的问题主要出现在编译这个库中
错误:
./configure –prefix=/home/Elam/gdalsrc/geos-3.6.2/build –enable-python
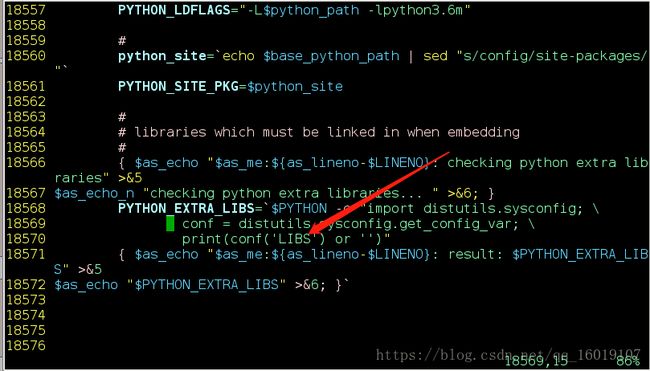
configure出现cannot find Python library path错误:
解决方法:
vim configure
在左下角输入/cannot find Python library path
回车
找到对应行附近
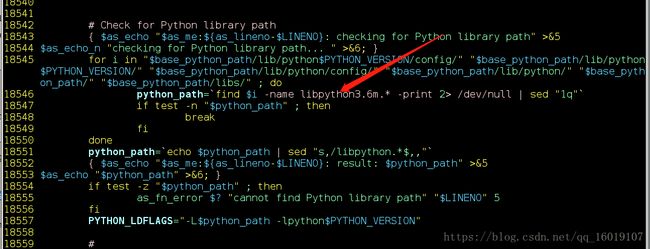
将libpython$PYTHOH_VERSION改成你自己对应的.so和.a版本(具体版本可以到上面include路径同一路径下lib文件夹中查看)
如上 我改成了libpython3.6m
修改后:wq
重新configure
继续修改configure文件
重新configure
如果后续还报/usr/bin/ld: cannot find -lpython3.6错误
继续修改
重新configure
然后继续
make –j
make check
make install
添加新的环境变量
source
5.hdf5
yum install gcc-c++ zlib-devel
cd /home/Elam/gdalsrc
wget http://www.hdfgroup.org/ftp/HDF5/current/src/hdf5-1.8.11.tar.gz
tar xvfz hdf5-1.8.11.tar.gz
cd hdf5-1.8.11
touch release_docs/INSTALL_VMS.txt
mkdir build
CFLAGS=-O0 \
./configure \
  --prefix=/home/Elam/gdalsrc/hdf5-1.10.1/build \
  --enable-shared \
  --enable-build-all \
  --with-zlib \
  --with-pthread \
  --enable-cxx \
# compile
make -j
# test build -- all tests should pass
make -j check
# install into build dir
make install
添加新的环境变量,注意这里还有include文件夹
gdal编译
我从网上下了一个2.3.0版本的,网址:http://download.osgeo.org/gdal/
yum install subversion gcc-c++ sqlite-devel libxml2-devel python-devel numpy swig expat-devel libcurl-devel xerces-c-devel unixODBC-devel postgresql postgresql-devel
cd /home/Elam/gdalsrc
tar -zxvf gdal-2.3.0.tar.gz
cd gdal-2.3.0
mkdir build
./configure \
--prefix=/home/Elam/gdalsrc/gdal-2.3.0/build \
--with-jpeg=external \
--without-libtool \
--with-python=/usr/local/anaconda3/bin/python \
--with-static-proj4=/home/Elam/gdalsrc/proj-4.8.0/build \
--with-libtiff=/home/Elam/gdalsrc/tiff-4.0.9/build \
--with-geotiff=/home/Elam/gdalsrc/libgeotiff-1.4.2/build \
--with-geos=/home/Elam/gdalsrc/geos-3.6.2/build/bin/geos-config \
--with-hdf5=/home/Elam/gdalsrc/hdf5-1.10.1/build \

make -j
# install into build dir
make install
添加新的环境变量:
进入build/bin里面
gdal-config –-version看看是否编译成功
cd /home/Elam/gdalsrc/gdal-2.3.0/swig
make -j
cd python
python setup.py install --prefix=/home/Elam/gdalsrc/gdal-2.3.0/build
添加环境变量,或者直接用sys的路子添加路径
source
重新新建一个终端
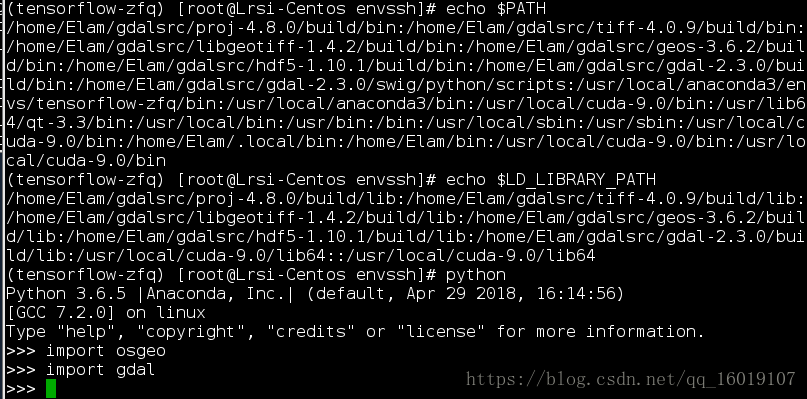
先用
echo $PATH
echo $LD_LIBRARY_PATH
查看各个库的路径是否都在
如果不在,则重新source一下那个export_path.sh 如果不想每次都重新source,就直接添加到系统的环境变量当中去
进入python终端
看看能不能import
binggo!


![![图片描述][4]](http://img.e-com-net.com/image/info8/90dc66436c664744965247b1e8e30425.jpg)
![![图片描述][6]](http://img.e-com-net.com/image/info8/9f8a3f765e6d419c8bf68d67edbc43c3.jpg)
