Flume快速入门系列(6) | 聚合
此篇博文讲的是Flume的聚合。
目录
- 1. 需求
- 2. 需求分析
- 3. 实现步骤
- 1. 准备工作
- 2. 创建flume1-logger-flume.conf
- 3. 创建flume2-netcat-flume.conf
- 4. 创建flume3-flume-logger.conf
- 5. 执行配置文件
- 6. 在hadoop003上向/opt/module目录下的group.log追加内容
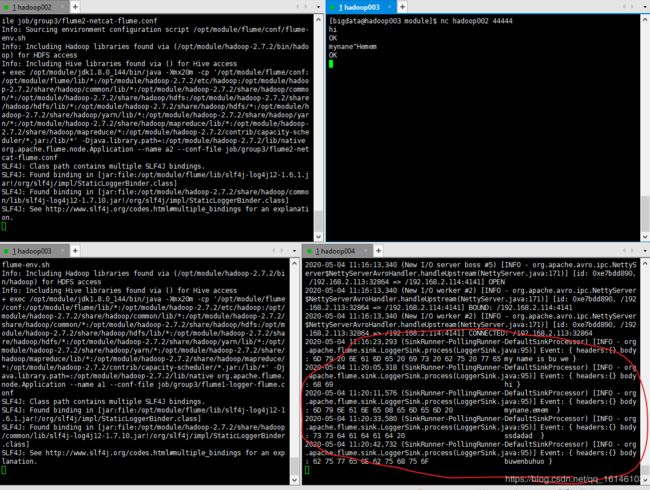
- 7. 在hadoop002上向44444端口发送数据
- 8. 检查hadoop004上数据
1. 需求
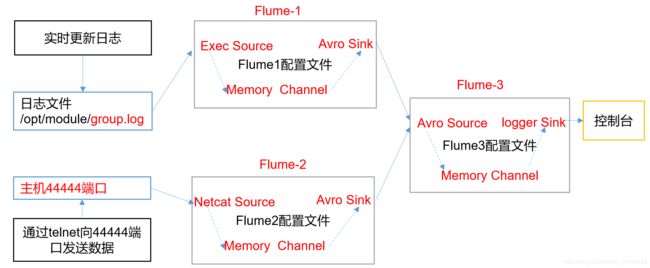
hadoop003上的Flume-1监控文件/opt/module/group.log,
hadoop002上的Flume-2监控某一个端口的数据流,
Flume-1与Flume-2将数据发送给hadoop004上的Flume-3,Flume-3将最终数据打印到控制台。
2. 需求分析
3. 实现步骤
1. 准备工作
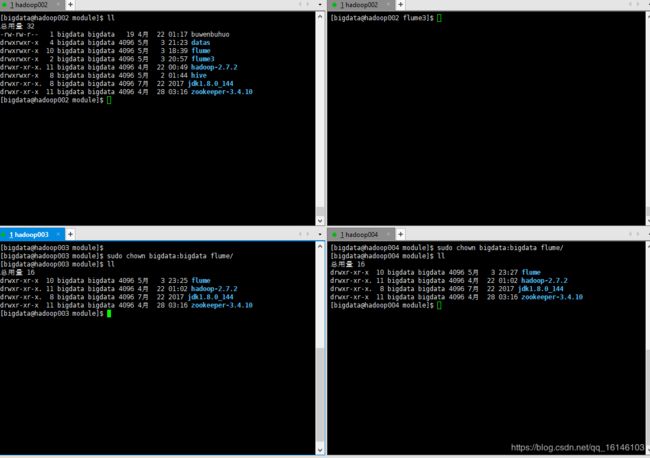
- 1. 分发Flume,并更改属主
[bigdata@hadoop003 module]$ sudo chown -R bigdata:bigdata flume/
- 2. 在hadoop002、hadoop003以及hadoop004的/opt/module/flume/job目录下创建一个group3文件夹。
[bigdata@hadoop003 job]$ mkdir group3
2. 创建flume1-logger-flume.conf
配置Source用于监控hive.log文件,配置Sink输出数据到下一级Flume。
- 1. 在hadoop003上创建配置文件并打开
[bigdata@hadoop003 group3]$ vim flume1-logger-flume.conf
- 2.添加如下内容
# Name the components on this agent
a1.sources = r1
a1.sinks = k1
a1.channels = c1

# Describe/configure the source
a1.sources.r1.type = exec
a1.sources.r1.command = tail -F /opt/module/group.log
a1.sources.r1.shell = /bin/bash -c

# Describe the sink
a1.sinks.k1.type = avro
a1.sinks.k1.hostname = hadoop004
a1.sinks.k1.port = 4141

# Describe the channel
a1.channels.c1.type = memory
a1.channels.c1.capacity = 1000
a1.channels.c1.transactionCapacity = 100

# Bind the source and sink to the channel
a1.sources.r1.channels = c1
a1.sinks.k1.channel = c1
3. 创建flume2-netcat-flume.conf
配置Source监控端口44444数据流,配置Sink数据到下一级Flume:
- 1. 在hadoop002上创建配置文件并打开
[bigdata@hadoop002 group3]$ vim flume2-netcat-flume.conf
- 2. 添加如下内容
# Name the components on this agent
a2.sources = r1
a2.sinks = k1
a2.channels = c1

# Describe/configure the source
a2.sources.r1.type = netcat
a2.sources.r1.bind = hadoop002
a2.sources.r1.port = 44444

# Describe the sink
a2.sinks.k1.type = avro
a2.sinks.k1.hostname = hadoop004
a2.sinks.k1.port = 4141

# Use a channel which buffers events in memory
a2.channels.c1.type = memory
a2.channels.c1.capacity = 1000
a2.channels.c1.transactionCapacity = 100

# Bind the source and sink to the channel
a2.sources.r1.channels = c1
a2.sinks.k1.channel = c1
4. 创建flume3-flume-logger.conf
配置source用于接收flume1与flume2发送过来的数据流,最终合并后sink到控制台。
- 1. 在hadoop004上创建配置文件并打开
[bigdata@hadoop004 group3]$ vim flume3-flume-logger.conf
- 2. 添加如下内容
# Name the components on this agent
a3.sources = r1
a3.sinks = k1
a3.channels = c1

# Describe/configure the source
a3.sources.r1.type = avro
a3.sources.r1.bind = hadoop004
a3.sources.r1.port = 4141

# Describe the sink
# Describe the sink
a3.sinks.k1.type = logger

# Describe the channel
a3.channels.c1.type = memory
a3.channels.c1.capacity = 1000
a3.channels.c1.transactionCapacity = 100

# Bind the source and sink to the channel
a3.sources.r1.channels = c1
a3.sinks.k1.channel = c1
5. 执行配置文件
分别开启对应配置文件:flume3-flume-logger.conf,flume2-netcat-flume.conf,flume1-logger-flume.conf。
[bigdata@hadoop004 flume]$ bin/flume-ng agent --conf conf/ --name a3 --conf-file job/group3/flume3-flume-logger.conf -Dflume.root.logger=INFO,console
[bigdata@hadoop002 flume]$ bin/flume-ng agent --conf conf/ --name a2 --conf-file job/group3/flume2-netcat-flume.conf
[bigdata@hadoop003 flume]$ bin/flume-ng agent --conf conf/ --name a1 --conf-file job/group3/flume1-logger-flume.conf
6. 在hadoop003上向/opt/module目录下的group.log追加内容
[bigdata@hadoop003 module]$ echo 'hello' > group.log
[bigdata@hadoop003 module]$ echo 'my name is bu wen bu huo' > group.log
7. 在hadoop002上向44444端口发送数据
[bigdata@hadoop002 flume]$ netstat -nltp   // 查看进程
[bigdata@hadoop002 module]$ nc hadoop002 44444
8. 检查hadoop004上数据
本次的分享就到这里了,
![]()
看 完 就 赞 , 养 成 习 惯 ! ! ! \color{#FF0000}{看完就赞,养成习惯!!!} 看完就赞,养成习惯!!!^ _ ^ ❤️ ❤️ ❤️
码字不易,大家的支持就是我坚持下去的动力。点赞后不要忘了关注我哦!


