尚硅谷尚筹网单一架构知识十七尚硅谷SpringSecurity
1 权限管理过程中的相关概念
1.1 主体
英文单词:principal
使用系统的用户或设备或从其他系统远程登录的用户等等。简单说就是谁使用系统谁就是主体。
1.2 认证
英文单词:authentication
权限管理系统确认一个主体的身份,允许主体进入系统。简单说就是“主体”证明自己是谁。
笼统的认为就是以前所做的登录操作。
1.3 授权
英文单词:authorization
将操作系统的“权力”“授予”“主体”,这样主体就具备了操作系统中特定功能的能力。
所以简单来说,授权就是给用户分配权限。

2 权限管理的主流框架
2.1 SpringSecurity
Spring技术栈的组成部分。

通过提供完整可扩展的认证和授权支持保护你的应用程序。
https://spring.io/projects/spring-security
SpringSecurity特点:
和Spring无缝整合。
全面的权限控制。
专门为Web开发而设计。
旧版本不能脱离Web环境使用。
新版本对整个框架进行了分层抽取,分成了核心模块和Web模块。单独引入核心模块就可以脱离Web环境。
重量级。
2.2 Shiro
Apache旗下的轻量级权限控制框架。

特点:
轻量级。Shiro主张的理念是把复杂的事情变简单。针对对性能有更高要求的互联网应用有更好表现。
通用性。
好处:不局限于Web环境,可以脱离Web环境使用。
缺陷:在Web环境下一些特定的需求需要手动编写代码定制。
官网网址:http://shiro.apache.org/
学习视频网址:http://www.gulixueyuan.com/course/45
3 使用配置类代替XML配置文件
3.1 @Configuration注解
@Target(ElementType.TYPE)
@Retention(RetentionPolicy.RUNTIME)
@Documented
@Component//由于当前注解带有@Component注解,所以标记当前注解的类可以享受包的自动扫描
public @interface Configuration {

	/**
	 * Explicitly specify the name of the Spring bean definition associated
	 * with this Configuration class.  If left unspecified (the common case),
	 * a bean name will be automatically generated.
	 *
	 * The custom name applies only if the Configuration class is picked up via
	 * component scanning or supplied directly to a {@link AnnotationConfigApplicationContext}.
	 * If the Configuration class is registered as a traditional XML bean definition,
	 * the name/id of the bean element will take precedence.
	 *
	 * @return the specified bean name, if any
	 * @see org.springframework.beans.factory.support.DefaultBeanNameGenerator
	 */
	String value() default "";
}
类标记了这个注解就可以使用这个类代替Spring的XML配置文件。
3.2 @Bean注解
用来代替XML配置文件中的bean标签。下面两种形式效果一致:
类标记了这个注解就可以使用这个类代替Spring的XML配置文件。
@Configuration
public class AnnotaionConfig{

	@Bean
	public EmpHandler getEmpHandler(){
		return new EmpHandler();
	}

}
提示:Spring通过调用标记了@Bean注解的方法将对象放入IOC容器行为不会重复调用方法。原因是Spring想要获取bean对应的实例对象时会查看IOC容器中是否已经有了这个对象,如果有则不会执行这个方法,从而保证这个bean是单一实例的。
如果希望对应的bean是多实例的,则可以配合@Scope注解。
5 在HelloWorld基础上加入SpringSecurity
5.1 加入SpringSecurity依赖
org.springframework.security
spring-security-web
4.2.10.RELEASE
		org.springframework.security
		spring-security-config
		4.2.10.RELEASE


		org.springframework.security
		spring-security-taglibs
		4.2.10.RELEASE
jar包
5.2 加入SpringSecurity控制权限的Filter
SpringSecurity使用的是过滤器Filter而不是拦截器Interceptor,意味着SpringSecurity能够管理的不仅仅是SpringMVC中的handler请求,还包含Web应用中所有请求。比如:项目中的静态资源也会被拦截,从而进行权限控制。
springSecurityFilterChain
org.springframework.web.filter.DelegatingFilterProxy
springSecurityFilterChain
/*
特别注意:springSecurityFilterChain标签中必须是springSecurityFilterChain。因为springSecurityFilterChain在IOC容器中对应真正执行权限控制的二十几个Filter,只有叫这个名字才能够加载到这些Filter。
5.3 加入配置类
com.atguigu.security.config.WebAppSecurityConfig
@Configuration
@EnableWebSecurity
public class WebAppSecurityConfig extends WebSecurityConfigurerAdapter {
}
Enable理解为启用。
@EnableWebSecurity注解表示启用Web安全功能。
以后会接触到很多@EnableXxx注解,用来启用对应的功能。
5.4 效果
所有请求都被SpringSecurity拦截,要求登录才可以访问。
静态资源也都被拦截,要求登录。
登录失败有错误提示。
6.3 实验3:设置登录系统的账号、密码
6.3.1 页面设置
给index.jsp设置表单
${SPRING_SECURITY_LAST_EXCEPTION.message}
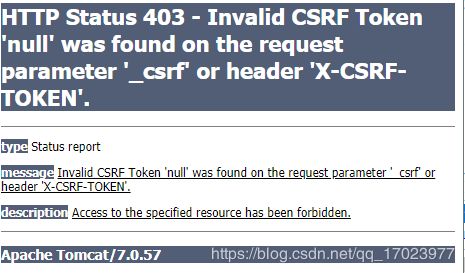
…… **6.3.3 ※了解:_csrf如何防止跨站请求伪造?** Cross-site request forgery跨站请求伪造发送登录请求时没有携带_csrf值,则返回下面错误:

从钓鱼网站的页面提交的请求无法携带正确、被承认的令牌。

面试相关问题:在单点登录系统中,认证中心根据浏览器的Cookie识别用户身份。那如果用户的Cookie被劫持仿冒用户身份登录系统怎么办?
除了Cookie之外,还使用_csrf生成的token防止跨站请求伪造。
最后:登录成功后具体资源都可以访问了。
6.4 实验4:用户注销
通过调用HttpSecurity对象的一系列方法设置注销功能。
logout()方法:开启注销功能
logoutUrl()方法:自定义注销功能的URL地址

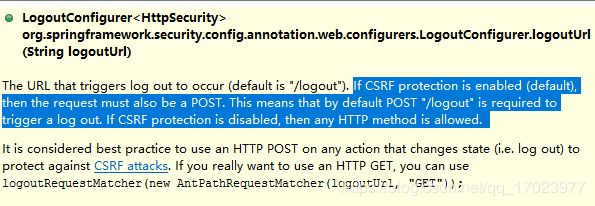
如果CSRF功能没有禁用,那么退出请求必须是POST方式。如果禁用了CSRF功能则任何请求方式都可以。
logoutSuccessUrl()方法:退出成功后前往的URL地址
addLogoutHandler()方法:添加退出处理器
logoutSuccessHandler()方法:退出成功处理器
退出的表单
退出
6.6 实验6:自定义403错误页面
由main.jsp复制得到no_auth.jsp。修改如下:
抱歉!您没有权限访问此功能!
前往自定义页面方式一:
	@RequestMapping("/to/no/auth/page")
	public String toNoAuthPage() {
	    return "no_auth";
	}
HttpSecurity对象.exceptionHandling().accessDeniedPage("/to/no/auth/page");
前往自定义页面方式二:
HttpSecurity对象.exceptionHandling().accessDeniedHandler(new AccessDeniedHandler() {

    @Override
    public void handle(HttpServletRequest request, HttpServletResponse response,
            AccessDeniedException accessDeniedException) throws IOException, ServletException {
        request.setAttribute("message", accessDeniedException.getMessage());
        request.getRequestDispatcher("/WEB-INF/views/no_auth.jsp").forward(request, response);
    }
});
6.7 实验7:记住我-内存版
HttpSecurity对象调用rememberMe()方法。
登录表单携带名为remember-me的请求参数。具体做法是将登录表单中的checkbox的name设置为remember-me
如果不能使用“remember-me”作为请求参数名称,可以使用rememberMeParameter()方法定制。
记住我原理简要分析:

通过开发者工具看到浏览器端存储了名为remember-me的Cookie。根据这个Cookie的value在服务器端找到以前登录的User。

而且这个Cookie被设置为存储2个星期的时间。

6.8 实验8:记住我-数据库版
为了让服务器重启也不影响记住登录状态,将用户登录状态信息存入数据库。
在WebAppSecurityConfig类中注入数据源
 @Autowired
    private DataSource dataSource;
JdbcTokenRepositoryImpl repository = new JdbcTokenRepositoryImpl();
repository.setDataSource(dataSource);
HttpSecurity对象.tokenRepository(repository);
注意:需要进入JdbcTokenRepositoryImpl 类中找到创建persistent_logins表的SQL语句创建persistent_logins表。
CREATE TABLE persistent_logins (
username VARCHAR (64) NOT NULL,
series VARCHAR (64) PRIMARY KEY,
token VARCHAR (64) NOT NULL,
last_used TIMESTAMP NOT NULL
);
6.10 实验10:应用自定义密码加密规则
BCryptPasswordEncoder创建对象后代替自定义passwordEncoder对象即可。BCryptPasswordEncoder在加密时通过加入随机盐值让每一次的加密结果都不同。能够避免密码的明文被猜到。
而在对明文和密文进行比较时,BCryptPasswordEncoder会在密文的固定位置取出盐值,重新进行加密。
// 测试代码
BCryptPasswordEncoder encoder = new BCryptPasswordEncoder();

CharSequence rawPassword = "123123";

for(int i = 0; i < 10; i++) {

	String encodedPassword = encoder.encode(rawPassword);

	System.out.println(encodedPassword);

}

System.out.println();

boolean matches = encoder.matches(rawPassword, "$2a$10$Y2Cq8ilT21ME.lvu6bwcPO/RMkU7ucAZpmFzx7GDTXK9KNxHyEM1e");
System.out.println(matches);
7 众筹项目加入SpringSecurity环境

7.1 加入依赖
org.springframework.security
spring-security-web
4.2.10.RELEASE
org.springframework.security
spring-security-config
4.2.10.RELEASE
org.springframework.security
spring-security-taglibs
4.2.10.RELEASE
7.2 Filter
7.3 配置类
@Configuration
@EnableWebSecurity
@EnableGlobalMethodSecurity(prePostEnabled=true)
public class CrowdfundingSecurityConfig extends WebSecurityConfigurerAdapter {
}
@EnableGlobalMethodSecurity(prePostEnabled=true)注解表示启用全局方法权限管理功能。
7.4 自动扫描的包
考虑到权限控制系统更多的需要控制Web请求,而且有些请求没有经过Service方法,所以在SpringMVC的IOC容器中扫描CrowdfundingSecurityConfig。但是,SpringSecurity是有管理Service、Dao方法的能力的。
/atcrowdfunding-admin-1-webui/src/main/resources/spring-web-mvc.xml
7.5 多个IOC容器之间的关系
问题描述:项目启动时控制台抛异常说找不到“springSecurityFilterChain”的bean。
org.springframework.beans.factory.NoSuchBeanDefinitionException: No bean named ‘springSecurityFilterChain’ is defined
问题分析:
Web组件加载顺序:Listener→Filter→Servlet
Spring IOC容器:ContextLoaderListener创建
SpringMVC IOC容器:DispatcherServlet创建
springSecurityFilterChain:从IOC容器中找到对应的bean
ContextLoaderListener初始化后,springSecurityFilterChain就在ContextLoaderListener创建的IOC容器中查找所需要的bean,但是我们没有在ContextLoaderListener的IOC容器中扫描SpringSecurity的配置类,所以springSecurityFilterChain对应的bean找不到。

问题解决:
将ContextLoaderListener取消,原本由ContextLoaderListener读取的Spring配置文件交给DispatcherServlet负责读取。
@Override
protected void configure(HttpSecurity security) throws Exception {
    //super.configure(security);

security
	.authorizeRequests()
	.antMatchers("/index.html")
	.permitAll()
	.antMatchers("/bootstrap/**")
	.permitAll()
	.antMatchers("/css/**")
	.permitAll()
	.antMatchers("/fonts/**")
	.permitAll()
	.antMatchers("/img/**")
	.permitAll()
	.antMatchers("/jquery/**")
	.permitAll()
	.antMatchers("/layer/**")
	.permitAll()
	.antMatchers("/script/**")
	.permitAll()
	.antMatchers("/ztree/**")
	.permitAll()
	.anyRequest()
	.authenticated()
	.and()
	.formLogin()
	.loginPage("/admin/to/login/page.html")
	.permitAll()
	.loginProcessingUrl("/admin/security/login.html")
	. ()
	.usernameParameter("loginacct")
	.passwordParameter("userpswd")
	.defaultSuccessUrl("/admin/to/main/page.html")
	.and()
	.logout()
	.logoutUrl("/admin/security/logout.html")
	.logoutSuccessUrl("/index.html")
	.and()
	.csrf()
	.disable();	// 禁用CSRF功能

//禁用CSRF功能。注意:这仅仅是我们学习过程中偷懒的做法,实际开发时还是不要禁用。
security.csrf().disable();
8.4 登录操作查询相关数据的SQL
// 1.根据用户名从数据库查询Admin对象
AdminExample adminExample = new AdminExample();

adminExample
	.createCriteria()
	.andLoginacctEqualTo(username);

List adminList = adminMapper.selectByExample(adminExample);
List roleList = roleMapper.selectAssignRoleList(adminId);
8.5 SecurityAdmin封装
/**
 * 扩展User类
 * 创建SecurityAdmin对象时调用构造器,传入originalAdmin和authorities
 * 可以通过getOriginalAdmin()方法获取原始Admin对象
 *
 */
public class SecurityAdmin extends User {

    private static final long serialVersionUID = 1L;

    private Admin originalAdmin;

    public SecurityAdmin(Admin originalAdmin, Collection authorities) {
        super(originalAdmin.getLoginAcct(), originalAdmin.getUserPswd(), authorities);
        this.originalAdmin = originalAdmin;
    }

    public Admin getOriginalAdmin() {
        return originalAdmin;
    }

}
8.6 loadUserByUsername(String username)方法
@Override
public UserDetails loadUserByUsername(String username) throws UsernameNotFoundException {

	// 1.根据用户名从数据库查询Admin对象
	AdminExample adminExample = new AdminExample();

	adminExample
		.createCriteria()
		.andLoginacctEqualTo(username);

	List adminList = adminMapper.selectByExample(adminExample);

	if(adminList == null || adminList.size() != 1) {
		return null;
	}

	Admin admin = adminList.get(0);

	// 2.获取数据库中密码
	// String userpswd = admin.getUserpswd();

	// 3.查询Admin对应的权限信息(包括角色、权限)
	Integer adminId = admin.getId();

	// ①创建集合用来存放权限信息
	Collection authorities = new ArrayList<>();

	// ②根据adminId查询对应的角色
	List roleList = roleMapper.selectAssignRoleList(adminId);
	for (Role role : roleList) {

		String roleName = role.getName();

		// 注意:一定要加“ROLE_”
		authorities.add(new SimpleGrantedAuthority("ROLE_"+roleName));
	}

	// ③根据adminId查询对应的权限
	List authNameList = authMapper.selectAssignedAuthList(adminId);
	for (String authName : authNameList) {

		authorities.add(new SimpleGrantedAuthority(authName));

	}

	// 4.封装到User的子类SecurityAdmin类型的对象中
	// User user = new User(username, userpswd, authorities );
	SecurityAdmin securityAdmin = new SecurityAdmin(admin, authorities);

	return securityAdmin;
}
9 认证功能问题调整
9.1 取消手动进行登录检查的拦截器
/atcrowdfunding-1-ui/src/main/resources/spring-web.xml
9.2 登录成功后显示实际登录的用户名
第一步:导入SpringSecurity标签库
<%@ taglib uri=“http://www.springframework.org/security/tags” prefix=“security” %>
第二步:使用security:authentication标签
9.3 加入关联关系假数据
页面操作或者直接将数据插入到数据库中即可。
9.4 保存Admin时使用SpringSecurity加密方式
	@Autowired
	private BCryptPasswordEncoder passwordEncoder;

	@RequestMapping("/admin/save")
	public String saveAdmin(Admin admin) {

		String userpswd = admin.getUserpswd();

		userpswd = passwordEncoder.encode(userpswd);

		admin.setUserpswd(userpswd);

		adminService.saveAdmin(admin);

		return "redirect:/admin/query.html?pageNo="+Integer.MAX_VALUE;
	}
10 权限控制
10.1 handler方法的权限控制
linda:
ROLE_总裁
role:get
peiqi:
ROLE_经理
user:get
需要进行权限控制的handler方法
com.atguigu.crowd.handler.AdminHandler
@PreAuthorize(value="hasRole('PM - 项目经理')")
@RequestMapping("/admin/query")
public String queryWithSearch(
			@RequestParam(value="keyword", defaultValue="") String keyword,
			@RequestParam(value="pageNo", defaultValue="1") int pageNo,
			Model model
		) {
// 1.调用Service方法获取分页数据
PageInfo pageInfo = adminService.getAdminPageInfoWithKeyword(keyword, pageNo, ArgumentsConstant.PAGE_SIZE);

// 2.将分页数据存入模型
model.addAttribute(AttrNameConstant.PAGE, pageInfo);

// 3.跳转页面
return "admin_page";
}
注意:@PreAuthorize注解生效需要@EnableGlobalMethodSecurity(prePostEnabled=true)注解支持。
10.2 使用全局配置控制
.antMatchers("/admin/query/for/search.html")
			.hasRole("董事长")

……

			.and()
			.exceptionHandling()
			.accessDeniedHandler(new CrowdFundingAccessDeniedHandler())
accessDeniedHandler()方法指定了检测到权限不匹配时的处理方式
public class CrowdFundingAccessDeniedHandler implements AccessDeniedHandler {

	@Override
	public void handle(HttpServletRequest request, HttpServletResponse response,
			AccessDeniedException accessDeniedException) throws IOException, ServletException {
		request.setAttribute("exception", accessDeniedException);
		request.getRequestDispatcher("/WEB-INF/system-error.jsp").forward(request, response);
	}
10.3 页面元素权限控制
使用SpringSecurity提供的标签可以详细对页面元素进行权限控制。
第一步:导入标签库
<%@ taglib uri=“http://www.springframework.org/security/tags” prefix=“security” %>
第二步:使用security:authorize标签
package com.atguigu.crowd.funding.config;

import org.springframework.beans.factory.annotation.Autowired;
import org.springframework.context.annotation.Bean;
import org.springframework.context.annotation.Configuration;
import org.springframework.security.config.annotation.authentication.builders.AuthenticationManagerBuilder;
import org.springframework.security.config.annotation.method.configuration.EnableGlobalMethodSecurity;
import org.springframework.security.config.annotation.web.builders.HttpSecurity;
import org.springframework.security.config.annotation.web.configuration.EnableWebSecurity;
import org.springframework.security.config.annotation.web.configuration.WebSecurityConfigurerAdapter;
import org.springframework.security.core.userdetails.UserDetailsService;
import org.springframework.security.crypto.bcrypt.BCryptPasswordEncoder;

import com.atguigu.crowd.funding.exeption.CrowdFundingAccessDeniedHandler;

@Configuration
@EnableWebSecurity
@EnableGlobalMethodSecurity(prePostEnabled=true)
public class CrowdfundingSecurityConfig extends WebSecurityConfigurerAdapter {

	@Autowired
	private UserDetailsService userDetailsService;

	// Spring在真正调用这个方法前会检查,IOC容器中是否已经有了对应的bean,
	// 如果有,则不会真正调用这个方法。而是直接把IOC容器中的bean返回。
	@Bean
	public BCryptPasswordEncoder getPasswordEncoder() {
		return new BCryptPasswordEncoder();
	}

	@Override
	protected void configure(AuthenticationManagerBuilder builder) throws Exception {

//		测试使用
//		builder
//			.inMemoryAuthentication()
//			.withUser("kathry")
//			.password("789789")
//			.roles("king");

		builder.userDetailsService(userDetailsService).passwordEncoder(getPasswordEncoder());
	}

	@Override
	protected void configure(HttpSecurity security) throws Exception {

		security
			.authorizeRequests()
			.antMatchers("/index.html","/bootstrap/**","/css/**","/fonts/**","/img/**","/jquery/**","/layer/**","/script/**","/ztree/**")
			.permitAll()
			.antMatchers("/admin/query/for/search.html")
			.hasRole("董事长")
			.anyRequest()
			.authenticated()
			.and()
			.exceptionHandling()
			.accessDeniedHandler(new CrowdFundingAccessDeniedHandler())
			.and()
			.formLogin()
			.loginPage("/admin/to/login/page.html")
			.permitAll()
			.loginProcessingUrl("/admin/security/do/login.html")
			.permitAll()
			.usernameParameter("loginAcct")
			.passwordParameter("userPswd")
			.defaultSuccessUrl("/admin/to/main/page.html")
			.and()
			.logout()
			.logoutUrl("/admin/security/do/logout.html")
			.logoutSuccessUrl("/index.html")
			.and()
			.csrf()
			.disable();

	}

}
package com.atguigu.crowd.funding.service.impl;

import java.util.ArrayList;
import java.util.List;

import org.springframework.beans.factory.annotation.Autowired;
import org.springframework.security.core.GrantedAuthority;
import org.springframework.security.core.authority.SimpleGrantedAuthority;
import org.springframework.security.core.userdetails.UserDetails;
import org.springframework.security.core.userdetails.UserDetailsService;
import org.springframework.security.core.userdetails.UsernameNotFoundException;
import org.springframework.stereotype.Service;

import com.atguigu.crowd.funding.config.SecurityAdmin;
import com.atguigu.crowd.funding.entity.Admin;
import com.atguigu.crowd.funding.entity.AdminExample;
import com.atguigu.crowd.funding.entity.Auth;
import com.atguigu.crowd.funding.entity.Role;
import com.atguigu.crowd.funding.mapper.AdminMapper;
import com.atguigu.crowd.funding.mapper.AuthMapper;
import com.atguigu.crowd.funding.mapper.RoleMapper;
import com.atguigu.crowd.funding.util.CrowdFundingUtils;

@Service
public class CrowdFundingUserDetailsService implements UserDetailsService {

	@Autowired
	private AdminMapper adminMapper;

	@Autowired
	private RoleMapper roleMapper;

	@Autowired
	private AuthMapper authMapper;

	@Override
	public UserDetails loadUserByUsername(String username) throws UsernameNotFoundException {

		// 1.创建Example对象
		AdminExample adminExample = new AdminExample();

		// 2.封装查询条件
		adminExample.createCriteria().andLoginAcctEqualTo(username);

		// 3.执行查询
		List list = adminMapper.selectByExample(adminExample);

		// 4.检查list是否有效
		if(!CrowdFundingUtils.collectionEffective(list)) {
			return null;
		}

		// 5.从list中取出Admin对象
		Admin admin = list.get(0);

		// 6.获取密码
		// String userPswd = admin.getUserPswd();

		// 7.封装角色、权限信息
		// [1]封装角色信息
		// ①创建存储角色、权限信息的集合
		List authorities = new ArrayList<>();

		// ②获取adminId
		Integer adminId = admin.getId();

		// ③查询分配给当前Admin的角色
		List roleList = roleMapper.selectAssignedRoleList(adminId);

		// ④遍历角色集合
		for (Role role : roleList) {

			// ⑤不要忘记加前缀!!!
			String roleName = "ROLE_" + role.getName();

			// ⑥创建SimpleGrantedAuthority对象存入集合
			authorities.add(new SimpleGrantedAuthority(roleName));

		}

		// [2]封装权限信息
		// ①查询当前Admin对应的权限
		List authList = authMapper.selectAuthListByAdminId(adminId);

		// ②遍历
		for (Auth auth : authList) {

			// ③这里不加前缀!!!
			String authName = auth.getName();

			// ※特殊处理:authName如果不是有效字符串,则抛弃
			if(!CrowdFundingUtils.stringEffective(authName)) {
				continue ;
			}

			// ④创建SimpleGrantedAuthority对象存入集合
			authorities.add(new SimpleGrantedAuthority(authName));

		}

		// 8.返回User对象
		return new SecurityAdmin(admin, authorities);
	}

}
