30分钟精通mybatis-plus插件开发
mybatis-plus项目地址:https://github.com/baomidou/mybatis-plus
mybatis-plus使用实例地址:https://github.com/baomidou/mybatis-plus-samples
mybatis-plus使用文档地址:https://mybatis.plus/
简介
MyBatis-Plus(简称 MP)是一个 MyBatis 的增强工具,在 MyBatis 的基础上只做增强不做改变,为简化开发、提高效率而生。
特性
无侵入:只做增强不做改变,引入它不会对现有工程产生影响,如丝般顺滑
损耗小:启动即会自动注入基本 CURD,性能基本无损耗,直接面向对象操作
强大的 CRUD 操作:内置通用 Mapper、通用 Service,仅仅通过少量配置即可实现单表大部分 CRUD 操作,更有强大的条件构造器,满足各类使用需求
支持 Lambda 形式调用:通过 Lambda 表达式,方便的编写各类查询条件,无需再担心字段写错
支持多种数据库:支持 MySQL、MariaDB、Oracle、DB2、H2、HSQL、SQLite、Postgre、SQLServer2005、SQLServer 等多种数据库
支持主键自动生成:支持多达 4 种主键策略(内含分布式唯一 ID 生成器 - Sequence),可自由配置,完美解决主键问题
支持 XML 热加载:Mapper 对应的 XML 支持热加载,对于简单的 CRUD 操作,甚至可以无 XML 启动
支持 ActiveRecord 模式:支持 ActiveRecord 形式调用,实体类只需继承 Model 类即可进行强大的 CRUD 操作
支持自定义全局通用操作:支持全局通用方法注入( Write once, use anywhere )
支持关键词自动转义:支持数据库关键词(order、key......)自动转义,还可自定义关键词
内置代码生成器:采用代码或者 Maven 插件可快速生成 Mapper 、 Model 、 Service 、 Controller 层代码,支持模板引擎,更有超多自定义配置等您来使用
内置分页插件:基于 MyBatis 物理分页,开发者无需关心具体操作,配置好插件之后,写分页等同于普通 List 查询
内置性能分析插件:可输出 Sql 语句以及其执行时间,建议开发测试时启用该功能,能快速揪出慢查询
内置全局拦截插件:提供全表 delete 、 update 操作智能分析阻断,也可自定义拦截规则,预防误操作
内置 Sql 注入剥离器:支持 Sql 注入剥离,有效预防 Sql 注入攻击
框架结构

弄清楚了mybatis-plus的诸多好处之后,那么下面就来开始我们的代码吧。
快速开始
首先新建一个maven工程并在pom中加入相关的依赖。
            org.springframework.boot
            spring-boot-starter-web


            mysql
            mysql-connector-java


            com.baomidou
            mybatis-plus-boot-starter
            3.1.0


            org.projectlombok
            lombok
            1.18.6
其中lomback是方便我们写实体类的时候少写一些代码。
创建一张user用户表
CREATE TABLE `user` (
  `id` int(12) NOT NULL AUTO_INCREMENT,
  `name` varchar(255) NOT NULL,
  `age` int(4) DEFAULT NULL,
  `email` varchar(255) DEFAULT NULL,
  `phone` varchar(255) DEFAULT NULL,
  PRIMARY KEY (`id`)
) ENGINE=InnoDB AUTO_INCREMENT=1 DEFAULT CHARSET=utf8;
插入两条测试数据
INSERT INTO `user` VALUES (1, '张三', 18, '[email protected]', '123');
INSERT INTO `user` VALUES (2, '王五', 20, '[email protected]', '234');
在application.yml中添加相关配置信息
#数据源
spring:
  datasource:
    url: jdbc:mysql://localhost:3306/yifeng?useUnicode=true&characterEncoding=UTF-8&useSSL=true&serverTimezone=UTC
    username: root
    password: root
    driverClassName: com.mysql.cj.jdbc.Driver
启动类上面添加mapper扫描器
@SpringBootApplication
@MapperScan("com.yifeng.springboot.mapper")
public class SpringbootTest {
    public static void main(String[] args) {
        SpringApplication.run(SpringbootTest.class, args);
    }
}
新建UserMapper继承BaseMapper,新建User实体类
public interface UserMapper extends BaseMapper{
}
@Data
@Builder
public class User {
private Integer id;
private String name;
private Integer age;
private String email;
private String phone;
}新建UserController
@RestController
public class UserController {

    @Autowired
    private UserMapper userMapper;
    @RequestMapping("/user")
    public Object getUser(){
        List yfUser = userMapper.selectList(null);
        return yfUser;
    }
}
这里调用了BaseMapper的自带方法,selectList查询用户列表并返回List集合。
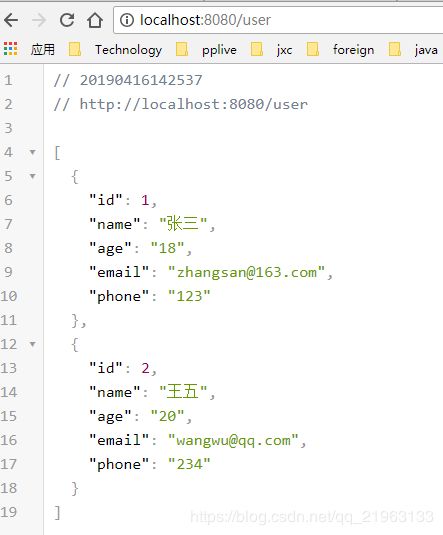
在浏览器端输入localhost:8080/user,就能看到这是已经正确的返回了所有的user。
至此,第一个mybatis-plus的程序我们就已经完成了,下面我们将探讨一些更高级的用法,使我们在项目中开发更简便。
BaseMapper深入解析:
打开BaseMapper的源码
/**
* Mapper 继承该接口后,无需编写 mapper.xml 文件,即可获得CRUD功能
* 这个 Mapper 支持 id 泛型
*
* @author hubin
* @since 2016-01-23
*/
public interface BaseMapper extends Mapper {
/**
* 插入一条记录
*
* @param entity 实体对象
*/
int insert(T entity);
/**
* 根据 ID 删除
*
* @param id 主键ID
*/
int deleteById(Serializable id);
/**
* 根据 columnMap 条件,删除记录
*
* @param columnMap 表字段 map 对象
*/
int deleteByMap(@Param(Constants.COLUMN_MAP) Map columnMap);
/**
* 根据 entity 条件,删除记录
*
* @param wrapper 实体对象封装操作类(可以为 null)
*/
int delete(@Param(Constants.WRAPPER) Wrapper wrapper);
/**
* 删除(根据ID 批量删除)
*
* @param idList 主键ID列表(不能为 null 以及 empty)
*/
int deleteBatchIds(@Param(Constants.COLLECTION) Collection idList);
/**
* 根据 ID 修改
*
* @param entity 实体对象
*/
int updateById(@Param(Constants.ENTITY) T entity);
/**
* 根据 whereEntity 条件,更新记录
*
* @param entity 实体对象 (set 条件值,可以为 null)
* @param updateWrapper 实体对象封装操作类(可以为 null,里面的 entity 用于生成 where 语句)
*/
int update(@Param(Constants.ENTITY) T entity, @Param(Constants.WRAPPER) Wrapper updateWrapper);
/**
* 根据 ID 查询
*
* @param id 主键ID
*/
T selectById(Serializable id);
/**
* 查询(根据ID 批量查询)
*
* @param idList 主键ID列表(不能为 null 以及 empty)
*/
List selectBatchIds(@Param(Constants.COLLECTION) Collection idList);
/**
* 查询(根据 columnMap 条件)
*
* @param columnMap 表字段 map 对象
*/
List selectByMap(@Param(Constants.COLUMN_MAP) Map columnMap);
/**
* 根据 entity 条件,查询一条记录
*
* @param queryWrapper 实体对象封装操作类(可以为 null)
*/
T selectOne(@Param(Constants.WRAPPER) Wrapper queryWrapper);
/**
* 根据 Wrapper 条件,查询总记录数
*
* @param queryWrapper 实体对象封装操作类(可以为 null)
*/
Integer selectCount(@Param(Constants.WRAPPER) Wrapper queryWrapper);
/**
* 根据 entity 条件,查询全部记录
*
* @param queryWrapper 实体对象封装操作类(可以为 null)
*/
List selectList(@Param(Constants.WRAPPER) Wrapper queryWrapper);
/**
* 根据 Wrapper 条件,查询全部记录
*
* @param queryWrapper 实体对象封装操作类(可以为 null)
*/
List> selectMaps(@Param(Constants.WRAPPER) Wrapper queryWrapper);
/**
* 根据 Wrapper 条件,查询全部记录
* 注意: 只返回第一个字段的值
*
* @param queryWrapper 实体对象封装操作类(可以为 null)
*/
List 可以看到,作者已经进行了详细的注释,我们编写代码的时候,只需继承这个接口就可以快速的使用这些方法,
1.int insert(T entity);插入一条记录
这是一个比较基础的插入方法,在mysql中,如果我们想要插入之后返回自增主键怎么办呢,其实在我们进行插入操作之后,它已经对我们的对象的id进行了赋值,下面请看演示,为方便测试,我们在pom中加入springboot的测试依赖包
            org.springframework.boot
            spring-boot-starter-test
            test
在test文件中新建一个测试类,目录结构如下。
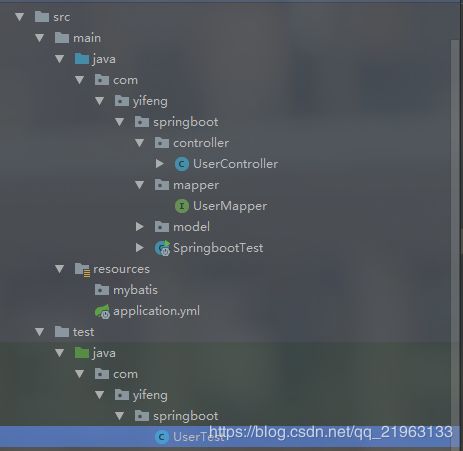
在UserTest中添加测试方法insert。
@RunWith(SpringRunner.class)
@SpringBootTest
public class UserTest {

    @Resource
    private UserMapper userMapper;

    @Test
    public void testSelect() {
        User user = User.builder().name("小明").age(18).email("[email protected]").phone("12345").build();
        userMapper.insert(user);
        System.out.println(user.getId());
    }

}
运行此方法。
org.mybatis.spring.MyBatisSystemException: nested exception is org.apache.ibatis.reflection.ReflectionException: Could not set property 'id' of 'class com.yifeng.springboot.model.User' with value '1118044523312259074' Cause: java.lang.IllegalArgumentException: argument type mismatch
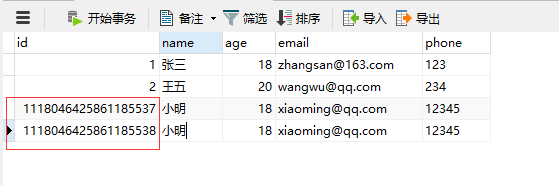
运行此方法,我们会发现在控制台报错了,具体原因大概是1118044523312259074不能设置为id,它已经超出了我们的id Integer的范围,既然int不行,那么我们将它改为long呢,由于这个数字太长,在数据库中,我们也应该讲int改为bigint,并且将它的位数增长,下面来尝试一下。

![]()
修改完毕之后,我们再来运行这个测试方法。
运行正常结束,可以看到小明这条记录被正常插入,并且在控制台输出了这个id。


但是如果我们不想用他这个随机生成的id,而是用我们自己的自增长id呢,
通过查看源码,它的id生成的方式有五种策略,来自于一个枚举类,关于怎样查看源码可以参考这篇文章,https://blog.csdn.net/u010514052/article/details/81775595
public enum IdType {
    AUTO(0),
    NONE(1),
    INPUT(2),
    ID_WORKER(3),
    UUID(4),
    ID_WORKER_STR(5);

    private final int key;

    private IdType(int key) {
        this.key = key;
    }

    public int getKey() {
        return this.key;
    }
}- AUTO 数据库ID自增
- INPUT 用户输入ID
- ID_WORKER 全局唯一ID,Long类型的主键
- ID_WORKER_STR 字符串全局唯一ID
- UUID 全局唯一ID,UUID类型的主键
- NONE 该类型为未设置主键类型
它默认采用的是ID_WORKER(3),这种策略,找到问题之后,那么就很好解决了,我们只需将ID的生成策略改成自增就行了。
在User类的id属性上,添加一个注解就行了。
@TableId(type = IdType.AUTO)
    private Long id;
这时我们再来运行一下这个方法。
此时在控制台中,打印出了自增主键

在数据库中也插入了这条数据,注意,这里的id上面是7结尾,下面是8结尾,因为自增的策略是以最大的为基准进行增加的。
至此,关于插入的方法我们就已经完全掌握了。
2.int deleteById(Serializable id);根据id删除数据
这个也比较简单,我么在测试类中添加一个删除方法,删除张三的那条数据。
@Test
    public void testDeleteById() {
        int i = userMapper.deleteById(1);
        System.out.println(i);
    }
运行测试方法
![]()
控制台打印出了1,这是受影响的条数,在查看数据库中,张三已经被删除。

3.int deleteByMap(@Param(Constants.COLUMN_MAP) Map columnMap);根据map删除
这个方法咋一看不是很明白该怎么使用,根据他的注释,我们大胆猜测他是根据map中的键(代表列的名称),值(代表列的值来进行删除的),下面我们来进行验证。我们在map中插入一个name,值Wie小明,根据预期,数据库中的小明的两条记录都将被删除,下面来进行测试。
@Test
    public void testDeleteByMap() {
        Map map = new HashMap<>();
        map.put("name", "小明");
        int i = userMapper.deleteByMap(map);
        System.out.println(i);
    }
运行成功之后,我们可以看到,在控制台中输出了2,再看数据库中,小明的记录也被删除掉了。


4.int deleteBatchIds(@Param(Constants.COLLECTION) Collection idList);这个方法根据名字不难理解,通过一个id的集合删除数据
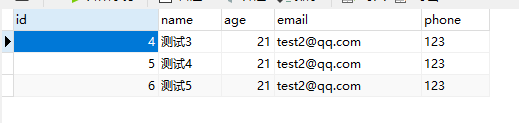
为方便测试,这里我们加入几条测试数据。

这里我们加入了五条测试数据,下面我们将通过一个id的集合,来删除这些数据。
@Test
    public void testDeleteBatchIds() {
        int i = userMapper.deleteBatchIds(Arrays.asList(1, 2, 3));
        System.out.println(i);
    }
运行此方法。控制台打印输出3,数据库中id为1,2,3的三条数据被成功删除。
![]()
5.int delete(@Param(Constants.WRAPPER) Wrapper wrapper);通过一个包装类来删除。
在idea中,搜索Wrapper这个类,然后按住Ctrl+h即可查看这个类的所有的实现类。
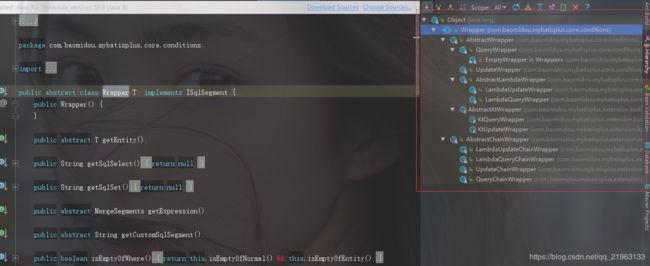
这里我们随便选择一个实现类来就行了。这里选择QueryWrapper,关于其他的实现,有兴趣的可以自己尝试下。wrapper中有很多的方法,支持链式调用,有兴趣的可以深入研究一下。
 @Test
    public void testDelete() {
        int i = userMapper.delete(new QueryWrapper().eq("age", "21").eq("id", 5));
        System.out.println(i);
    }
成功删除了age为21并且id为5的这条记录。
![]()

6.int updateById(@Param(Constants.ENTITY) T entity);根据id修改,传入实体类参数即可。
将id为4的用户年龄修改为22岁
@Test
    public void testUpdate() {
        int i = userMapper.updateById(User.builder().id(4l).age(22).build());
        System.out.println(i);
}![]()

7.int update(@Param(Constants.ENTITY) T entity, @Param(Constants.WRAPPER) Wrapper updateWrapper);
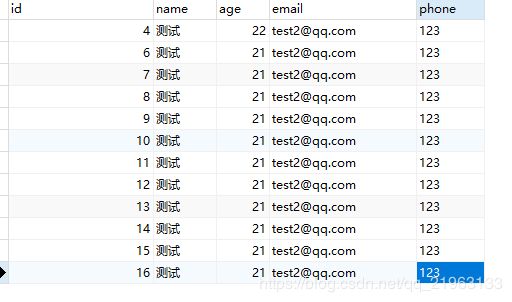
前面的实体类为修改的值,后面的wrapper为条件值,相当于sql语句中的where,我们将邮箱为qq.com的用户名改为测试。
@Test
    public void testUpdate() {
        int i = userMapper.update(User.builder().name("测试").build(), new UpdateWrapper().like("email", "qq.com"));
        System.out.println(i);
} 

8.T selectById(Serializable id);通过id查询。
@Test
    public void testSelectById() {
        User user = userMapper.selectById(4);
        System.out.println(user);
    }
控制台正确输出。

9.List selectBatchIds(@Param(Constants.COLLECTION) Collection idList);通过一个id的集合来批量查询。注意这里的集合不能为空
@Test
    public void testSelectBatchIds() {
        List list = userMapper.selectBatchIds(Arrays.asList(4,6));
        System.out.println(list);
} ![]()
10.List selectByMap(@Param(Constants.COLUMN_MAP) Map columnMap);通过一个Map条件来查询。这里可以写多个条件,在sql语句中相当于where条件用and连接。
@Test
    public void testSelecByMap() {
        Map map = new HashMap<>();
        map.put("name", "测试");
        List list = userMapper.selectByMap(map);
        System.out.println(list);
} ![]()
11.T selectOne(@Param(Constants.WRAPPER) Wrapper queryWrapper);查询一条记录,如果查出了多条会抛出异常。
@Test
    public void testSelecOne() {
        User user = userMapper.selectOne(new QueryWrapper().eq("id", "4"));
        System.out.println(user);
} ![]()
12.Integer selectCount(@Param(Constants.WRAPPER) Wrapper queryWrapper);查询总记录数,wrapper为空则查询所有。
@Test
    public void testSelectCount() {
        int count = userMapper.selectCount(null);
        System.out.println(count);
    }
13.List selectList(@Param(Constants.WRAPPER) Wrapper queryWrapper);通过wrapper条件查询一个list。
@Test
    public void testSelectList() {
        List users = userMapper.selectList(new QueryWrapper().eq("name", "测试"));
        System.out.println(users);
} ![]()
14.List> selectMaps(@Param(Constants.WRAPPER) Wrapper queryWrapper);根据条件查询,将返回的实体类转换成map的格式装在list集合中。
@Test
    public void testSelectMaps() {
        List> maps = userMapper.selectMaps(new QueryWrapper().eq("name", "测试"));
        System.out.println(maps);
    }
![]()
15.List
@Test
public void testSelectObjs() {
List![]()
16.IPage selectPage(IPage page, @Param(Constants.WRAPPER) Wrapper queryWrapper);分页查询,wrapper为查询条件,page为分页实体类。为方便测试,这里我们加入几条测试数据。
这里我们查询第二页的数据,并且每页显示3条数据。
@Test
    public void testSelectPage() {
        Page page = new Page(2,3);
        IPage userIPage = userMapper.selectPage(page, new QueryWrapper().eq("name", "测试"));
        System.out.println("总条数 ------> " + userIPage.getTotal());
        System.out.println("当前页数 ------> " + userIPage.getCurrent());
        System.out.println("当前每页显示数 ------> " + userIPage.getSize());
        System.out.println(userIPage.getRecords());
    }
运行代码,观察结果,发现返回的结果是错误的,总条数为0,结果数据是全部的数据。
![]()
查看官方的文档我们知道,需要在我们的项目中配置分页插件,
在我们的项目中,新建一个mybatis的配置类,然后注入分页的bean,即可。
@Configuration
public class MybatisPlusConfig {

    @Bean
    public PaginationInterceptor paginationInterceptor() {
        return new PaginationInterceptor();
    }
}
再次运行测试代码,可以看到结果正常显示。

17.IPage> selectMapsPage(IPage page, @Param(Constants.WRAPPER) Wrapper queryWrapper);也是分页查询,只是将查询到的数据的实体类转化成了map对象。查询第三页,每页显示三条记录。
@Test
    public void testSelectMapsPage() {
        Page page = new Page(3,3);
        IPage> userIPage = userMapper.selectMapsPage(page, new QueryWrapper().eq("name", "测试"));
        System.out.println("总条数 ------> " + userIPage.getTotal());
        System.out.println("当前页数 ------> " + userIPage.getCurrent());
        System.out.println("当前每页显示数 ------> " + userIPage.getSize());
        System.out.println(userIPage.getRecords());
} ![]()
至此,BaseMapper的所有方法我们都测试完毕,读者自己再测试过程中,可以多测试一下wrapper的各种条件以加深印象。
下面我们来使用自己定义的查询,在实际开发过程中,很多时候都需要用到多表的查询,这时就需要我们自己书写sql语句了。
为方便测试,这里我们将原先的测试数据全部删除,新建几条测试数据。
我们先从一个比较简单的方法开始,通过用户名查询用户信息。
1.通过注解开发。
在mapper中新增方法,并书写sql语句。
@Select("select * from user where name=#{name}")
    User findUserByName(String name);
添加测试方法。
@Test
    public void testFindUserByName(){
        User user = userMapper.findUserByName("小明");
        System.out.println(user);
    }
结果正确输出
![]()
2.通过xml的方式开发。
在application.yml中添加mybatis的xml文件的路径。
mybatis-plus:
  config-location: classpath:mybatis/*.xml
在resource文件夹下面新建mybatis文件夹,在mybatis文件夹下面新建userMapper.xml,并书写sql语句。
id, name, age, email, phone
在接口中添加方法。
User findUserByName(String name);添加测试类并运行测试方法。
@Test
    public void testFindUserByName(){
        User user = userMapper.findUserByName("小明");
        System.out.println(user);
}![]()
结果正确输出。
更详细的教程大家可以查看官方的文档,在文章开头已经给出,最后我们来介绍一下代码生成工具。
下面我们新建一张商品表来演示如何快速生成模块代码。
CREATE TABLE `goods` (
  `id` int(11) NOT NULL AUTO_INCREMENT,
  `name` varchar(255) NOT NULL,
  `description` varchar(255) DEFAULT NULL,
  `price` decimal(10,2) NOT NULL,
  `pic` varchar(255) NOT NULL,
  PRIMARY KEY (`id`)
) ENGINE=InnoDB DEFAULT CHARSET=utf8;
在pom中加入相关依赖
            com.baomidou
            mybatis-plus-generator
            3.1.0


            org.springframework.boot
            spring-boot-starter-freemarker
然后在我们的项目中新建一个生成类。
package com.yifeng.springboot.util;

import com.baomidou.mybatisplus.core.toolkit.StringPool;
import com.baomidou.mybatisplus.generator.AutoGenerator;
import com.baomidou.mybatisplus.generator.InjectionConfig;
import com.baomidou.mybatisplus.generator.config.*;
import com.baomidou.mybatisplus.generator.config.po.TableInfo;
import com.baomidou.mybatisplus.generator.config.rules.NamingStrategy;
import com.baomidou.mybatisplus.generator.engine.FreemarkerTemplateEngine;

import java.util.ArrayList;
import java.util.List;
import java.util.Scanner;

/**
 * @Author: Kevin
 * @Description:

 * @Date Created in 10:48 2019/4/17
 * @Modified By
 * @Version 1.0
 */
public class MybatisGenerator {

    /**
     * RUN THIS
     */
    public static void main(String[] args) {
        // 代码生成器
        AutoGenerator mpg = new AutoGenerator();

        // 全局配置
        GlobalConfig gc = new GlobalConfig();
        String projectPath = System.getProperty("user.dir");
        gc.setOutputDir(projectPath + "/src/main/java");
        gc.setAuthor("yifeng");
        gc.setOpen(false);
        mpg.setGlobalConfig(gc);

        // 数据源配置
        DataSourceConfig dsc = new DataSourceConfig();
        dsc.setUrl("jdbc:mysql://localhost:3306/test?useUnicode=true&characterEncoding=UTF-8&useSSL=true&serverTimezone=UTC");
        // dsc.setSchemaName("public");
        dsc.setDriverName("com.mysql.cj.jdbc.Driver");
        dsc.setUsername("root");
        dsc.setPassword("root");
        mpg.setDataSource(dsc);

        // 包配置
        PackageConfig pc = new PackageConfig();
        pc.setModuleName("test");
        pc.setParent("com.yifeng.springboot");
        mpg.setPackageInfo(pc);

        // 自定义配置
        InjectionConfig cfg = new InjectionConfig() {
            @Override
            public void initMap() {
                // to do nothing
            }
        };
        List focList = new ArrayList<>();
        focList.add(new FileOutConfig("/templates/mapper.xml.ftl") {
            @Override
            public String outputFile(TableInfo tableInfo) {
                // 自定义输入文件名称
                return projectPath + "/src/main/resources/mapper/" + pc.getModuleName()
                        + "/" + tableInfo.getEntityName() + "Mapper" + StringPool.DOT_XML;
            }
        });
        cfg.setFileOutConfigList(focList);
        mpg.setCfg(cfg);
        mpg.setTemplate(new TemplateConfig().setXml(null));

        // 策略配置
        StrategyConfig strategy = new StrategyConfig();
        strategy.setNaming(NamingStrategy.underline_to_camel);
        strategy.setColumnNaming(NamingStrategy.underline_to_camel);
        //需要继承的Entity
        //strategy.setSuperEntityClass("com.yifeng.springboot.common.BaseEntity");
        strategy.setEntityLombokModel(true);
        //需要继承的Controller
        //strategy.setSuperControllerClass("com.yifeng.springboot.common.BaseController");
        strategy.setInclude("goods");
        strategy.setSuperEntityColumns("id");
        strategy.setControllerMappingHyphenStyle(true);
        strategy.setTablePrefix(pc.getModuleName() + "_");
        mpg.setStrategy(strategy);
        // 选择 freemarker 引擎需要指定如下加,注意 pom 依赖必须有!
        mpg.setTemplateEngine(new FreemarkerTemplateEngine());
        mpg.execute();
    }
}
运行此方法,就会在项目中生成test模块的代码。
