kerberos安装部署
1:服务端安装
yum install krb5-server krb5-libs krb5-auth-dialog krb5-workstation krb5-devel -y
2 在 slave端安装
yum install krb5-devel krb5-workstation -y
3:修改配置文件
(1):vi /etc/krb5.conf
[logging]
default = FILE:/var/log/krb5libs.log
kdc = FILE:/var/log/krb5kdc.log
admin_server = FILE:/var/log/kadmind.log
[libdefaults]
dns_lookup_realm = false
ticket_lifetime = 24h
renew_lifetime = 7d
renewable = true
forwardable = true
rdns = false
pkinit_anchors = /etc/pki/tls/certs/ca-bundle.crt
default_realm = DYLAN.COM
default_ccache_name = KEYRING:persistent:%{uid}
[realms]
DYLAN.COM = {
kdc = node16.testbigdate:88
admin_server = node16.testbigdate:749
}
[domain_realm]
.dylan.com = DYLAN.com
dylan.com = DYLAN.com
[kdc]
profile=/var/kerberos/krb5kdc/kdc.conf
(2): vi /var/kerberos/krb5kdc/kdc.conf
[kdcdefaults]
kdc_ports = 88
kdc_tcp_ports = 88
[realms]
DYLAN.COM = {
#master_key_type = aes256-cts
acl_file = /var/kerberos/krb5kdc/kadm5.acl
dict_file = /usr/share/dict/words
admin_keytab = /var/kerberos/krb5kdc/kadm5.keytab
# supported_enctypes = aes256-cts:normal aes128-cts:normal des3-hmac-sha1:normal arcfour-hmac:normal camellia256-cts:normal camellia128-cts:normal des-hmac-sha1:normal des-cbc-md5:normal des-cbc-crc:normal
supported_enctypes = des3-hmac-sha1:normal arcfour-hmac:normal camellia256-cts:normal camellia128-cts:normal des-hmac-sha1:normal des-cbc-md5:normal des-cbc-crc:normal
max_life=24h
max_renewable_life=10d
}
(3): vi /var/kerberos/krb5kdc/kadm5.acl
4:把文件 传输到 其他节点
scp -r /etc/krb5.conf root@hadoop02:/etc/
scp -r /etc/krb5.conf root@hadoop03:/etc/
5:安装数据库
cd /usr/sbin/
用这个命令创建数据库
./kdb5_util create -r DYLAN.COM -s (也可以指定数据库 -D xxx)
6:数据库创建好之后,可以启动服务
service krb5kdc start
service kadmin start
chkconfig --level 35 krb5kdc on(开机就启动 )
chkconfig --level 35 kadmin on(开机就启动 )
7:创建管理员
ll /usr/sbin/k*
设置 管理员账户密码:
/usr/sbin/kadmin.local -q "addprinc root/admin"
7::kerberos测试和使用
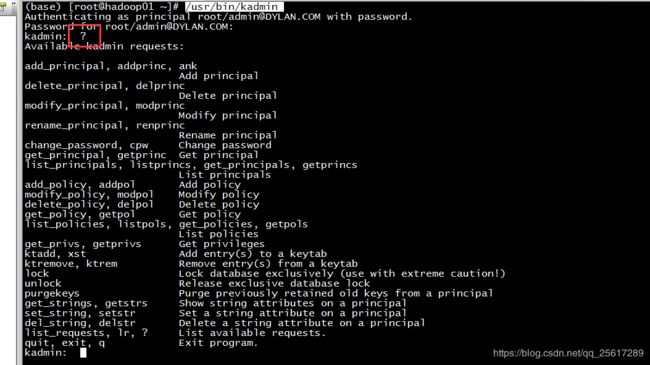
kadmin或者/usr/bin/kadmin 输入 密码:d199010
输入 ?,弹出命令提示框:
/usr/bin/klist -e
/usr/bin/kinit root/admin
/usr/bin/kdestroy
kadmin.local -q "ktadd kadmin/admin"
/usr/bin/klist -k /etc/krb5.keytab
通过测试,kerberos可以正常工作了。


