STM32程序烧录软件设计
本次STM32程序烧录软件是基于本人的上一篇博客所设计的BootLoader实现的,因为实际使用过程中,我们不能说每次下载程序都打开一个Python工程来进行下载,到别的电脑上也不一定有Python的环境,最好的方式是能够做个下载助手,这样更加的使用和友好。 因为上一篇博客中使用的TCP客户端是用Python写的,Python也能用来开发界面软件,所以程序烧录软件用了PyQt5来做,
PyQt5可以简单的理解为Python和QT的融合,QT是非常流行的功能强大的界面开发软件,PyQt几乎拥有QT中所有的功能,而且函数形式也是大同小异,使用PyQt开发的感觉总体上来说比用QT开发爽很多,因为PyQt中可以使用Python的各种API,有时候同一种功能的实现既可以用Python API来实现,也可以用QT的API来实现,哪种实现起来更爽就用哪种,因为以前学了一段时间的深度学习,用的是Python语言,如果使用PyQt的话,就可以把深度学习等等看起来比较牛逼的应用结合QT一起开发。
一、烧录软件界面设计
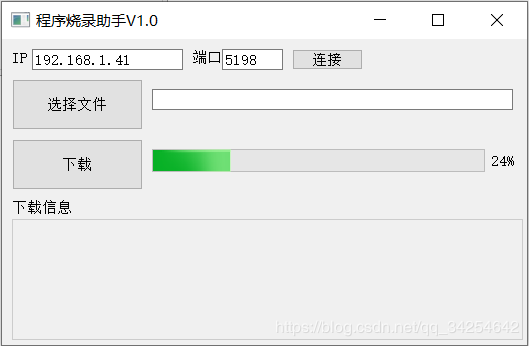
QT Designer的具体使用方法就不多说了,首先打开Qt designer创建新的QT窗体工程,目前只实现最基本的程序下载功能,界面简简单单的不用太花里胡哨。程序烧录助手的界面如下(随便拖一拖控件就完成了):
二、将ui文件转化为py文件
打开cmd命令行,进入到ui文件所在的目录,然后输入命令pyuic5 -o mainwindow.py mainwindow.ui
命令执行正确的话就可以在ui文件同级目录看到生成的mainwindow.py文件了,接下来我把py文件的名字改成了ISPwindow.py,当然不改也行,生成的py文件就可以供python调用生成界面了。
三、如何显示界面
刚刚将ui界面文件转换成了py文件,现在我们要将这个界面显示出来,简单写几行代码就可以了,我使用的Python编译器是PyCharm,先看看ISPwindow.py里面的代码,这是根据ui文件自动生成的。
# -*- coding: utf-8 -*-
# Form implementation generated from reading ui file 'ISPwindow.ui'
#
# Created by: PyQt5 UI code generator 5.6
#
# WARNING! All changes made in this file will be lost!
from PyQt5 import QtCore, QtGui, QtWidgets
class Ui_MainWindow(object):
def setupUi(self, MainWindow):
MainWindow.setObjectName("MainWindow")
MainWindow.resize(525, 306)
self.centralWidget = QtWidgets.QWidget(MainWindow)
self.centralWidget.setObjectName("centralWidget")
self.btn_download = QtWidgets.QPushButton(self.centralWidget)
self.btn_download.setGeometry(QtCore.QRect(10, 100, 131, 51))
self.btn_download.setObjectName("btn_download")
self.edt_ipAddress = QtWidgets.QLineEdit(self.centralWidget)
self.edt_ipAddress.setGeometry(QtCore.QRect(30, 10, 151, 21))
self.edt_ipAddress.setObjectName("edt_ipAddress")
self.label = QtWidgets.QLabel(self.centralWidget)
self.label.setGeometry(QtCore.QRect(10, 10, 31, 16))
self.label.setObjectName("label")
self.edt_port = QtWidgets.QLineEdit(self.centralWidget)
self.edt_port.setGeometry(QtCore.QRect(220, 10, 61, 21))
self.edt_port.setObjectName("edt_port")
self.label_2 = QtWidgets.QLabel(self.centralWidget)
self.label_2.setGeometry(QtCore.QRect(190, 10, 31, 16))
self.label_2.setObjectName("label_2")
self.btn_selectFile = QtWidgets.QPushButton(self.centralWidget)
self.btn_selectFile.setGeometry(QtCore.QRect(10, 40, 131, 51))
self.btn_selectFile.setObjectName("btn_selectFile")
self.btn_tcpConnect = QtWidgets.QPushButton(self.centralWidget)
self.btn_tcpConnect.setGeometry(QtCore.QRect(290, 10, 71, 21))
self.btn_tcpConnect.setObjectName("btn_tcpConnect")
self.pgb_downloadProgress = QtWidgets.QProgressBar(self.centralWidget)
self.pgb_downloadProgress.setGeometry(QtCore.QRect(150, 110, 371, 23))
self.pgb_downloadProgress.setProperty("value", 24)
self.pgb_downloadProgress.setObjectName("pgb_downloadProgress")
self.edt_filePath = QtWidgets.QLineEdit(self.centralWidget)
self.edt_filePath.setGeometry(QtCore.QRect(150, 50, 361, 21))
self.edt_filePath.setObjectName("edt_filePath")
self.edt_downloadMsg = QtWidgets.QTextEdit(self.centralWidget)
self.edt_downloadMsg.setEnabled(False)
self.edt_downloadMsg.setGeometry(QtCore.QRect(10, 180, 511, 121))
self.edt_downloadMsg.setObjectName("edt_downloadMsg")
self.label_3 = QtWidgets.QLabel(self.centralWidget)
self.label_3.setGeometry(QtCore.QRect(10, 160, 91, 16))
self.label_3.setObjectName("label_3")
# MainWindow.setCentralWidget(self.centralWidget)
self.retranslateUi(MainWindow)
QtCore.QMetaObject.connectSlotsByName(MainWindow)
def retranslateUi(self, MainWindow):
_translate = QtCore.QCoreApplication.translate
MainWindow.setWindowTitle(_translate("MainWindow", "程序烧录助手V1.0"))
self.btn_download.setText(_translate("MainWindow", "下载"))
self.edt_ipAddress.setText(_translate("MainWindow", "192.168.1.41"))
self.label.setText(_translate("MainWindow", "IP"))
self.edt_port.setText(_translate("MainWindow", "5198"))
self.label_2.setText(_translate("MainWindow", "端口"))
self.btn_selectFile.setText(_translate("MainWindow", "选择文件"))
self.btn_tcpConnect.setText(_translate("MainWindow", "连接"))
self.edt_downloadMsg.setHtml(_translate("MainWindow", "\n"
"\n"
"
"))
self.label_3.setText(_translate("MainWindow", "下载信息"))
然后创建一个新的py文件 ISPdownloader.py,内容如下:
from ISPwindow import Ui_MainWindow
from PyQt5.QtWidgets import *

class Demo(QWidget, Ui_MainWindow):
    def __init__(self):
        super(Demo, self).__init__()
        self.setupUi(self)

if __name__ == '__main__':
    app = QApplication(sys.argv)
    demo = Demo()
    demo.show()
    sys.exit(app.exec_())
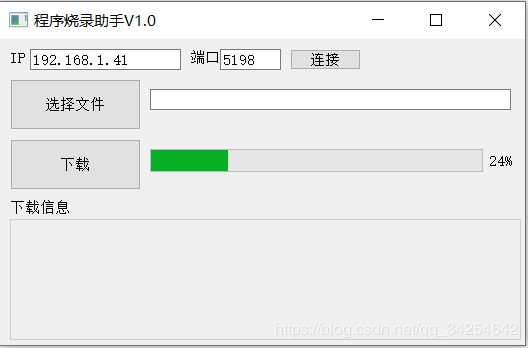
这样就可以把界面显示出来了,效果如下,其实和Qt designer中的效果是一样的。
四、编写功能实现
在我的上一篇博客里面已经实现了使用TCP通信烧写程序的基本功能了,现在只需要做做界面上控件的功能映射就可以了,还是原来的套路,实现代码如下:
import sys
from socket import *
from ISPwindow import Ui_MainWindow
from PyQt5.QtWidgets import *
import os
import ctypes
import traceback

class Demo(QWidget, Ui_MainWindow):
    def __init__(self):
        super(Demo, self).__init__()
        self.setupUi(self)

        self.btn_selectFile.clicked.connect(self.slot_openFile)
        self.btn_tcpConnect.clicked.connect(self.slot_tcpConnect)
        self.btn_download.clicked.connect(self.slot_downloadFile)

        self.pgb_downloadProgress.setValue(0)

        self.edt_downloadMsg.setEnabled(True)
        self.edt_downloadMsg.setReadOnly(True)
        self.edt_filePath.setEnabled(True)
        self.edt_filePath.setReadOnly(True)
        self.edt_downloadMsg.setText("")

        self.filePath = ""
        self.tcpHost = 'localhost'
        self.tcpRecBufSize = 2048
        self.tcpAddr = ""

        self.isTcpConnected = False

        self.maxFIleSize = 384*1024
        self.fileSize = 0
        self.fileCRC = 0

    def slot_openFile(self):
        filePath, _ = QFileDialog.getOpenFileName(self, "选择下载文件", os.getcwd(), "Bin File (*.bin)")

        if filePath == "":
            if self.filePath == "":
                QMessageBox.warning(self, "文件选择错误", "没有选择下载文件,请重新选择!", QMessageBox.Ok, QMessageBox.Ok)
                return
            else:
                filePath = self.filePath

        size = os.path.getsize(filePath)

        if size > self.maxFIleSize:
            QMessageBox.warning(self, "文件选择错误", "下载文件太大了,最大为384KB,请重新选择!", QMessageBox.Ok, QMessageBox.Ok)
            return

        self.fileSize = size
        self.filePath = filePath
        self.edt_filePath.setText(self.filePath)

    def slot_downloadFile(self):
        try:
            self.DownloadFile()
        except Exception as e:
            self.edt_downloadMsg.setText(self.edt_downloadMsg.toPlainText() + '\r\n下载出错')
            traceback.print_exc()

    def slot_tcpConnect(self):
        if self.isTcpConnected == False:
            try:
                self.tcpSock = socket(AF_INET, SOCK_STREAM)
                self.tcpAddr = (self.edt_ipAddress.text(), int(self.edt_port.text()))
                self.tcpSock.connect(self.tcpAddr)

                self.btn_tcpConnect.setText("断开")
                self.isTcpConnected = True
            except Exception as e:
                self.edt_downloadMsg.setText(self.edt_downloadMsg.toPlainText() + '\r\n连接失败!')
                traceback.print_exc()
                return

            self.edt_downloadMsg.setText(self.edt_downloadMsg.toPlainText() + '\r\n连接成功!')
        else:
            self.tcpSock.close()
            self.edt_downloadMsg.setText(self.edt_downloadMsg.toPlainText() + '\r\n断开成功!')
            self.btn_tcpConnect.setText("连接")
            self.isTcpConnected = False


    def CalculateFileCRC(self, filePath):
        file = open(filePath, "rb")

        buf = file.read(4)
        crc = 0

        while len(buf) > 0:
            crc = crc ^ (int.from_bytes(buf, byteorder='little', signed=False))
            buf = file.read(4)

        file.close()

        return crc

    def DownloadFile(self):

        if self.filePath == "":
            QMessageBox.warning(self, "提示", "请选择下载文件!", QMessageBox.Ok, QMessageBox.Ok)
            return

        if self.isTcpConnected == False:
            QMessageBox.warning(self, "提示", "请先连接到开发板!", QMessageBox.Ok, QMessageBox.Ok)
            return

        # 传输下载头
        self.fileCRC = self.CalculateFileCRC(self.filePath)

        headInfo = []
        headInfo.append(ctypes.c_uint32(0x55591012))
        headInfo.append(ctypes.c_uint32(~0x55591012))
        headInfo.append(ctypes.c_uint32(0x00000000))
        headInfo.append(ctypes.c_uint32(self.fileSize))
        headInfo.append(ctypes.c_uint32(self.fileCRC))
        headInfo.append(ctypes.c_uint32(headInfo[0].value ^ headInfo[1].value ^ headInfo[2].value ^ headInfo[3].value ^ headInfo[4].value))

        DownloadHead = bytes()

        for item in headInfo:
            DownloadHead = DownloadHead + bytes(item)

        self.tcpSock.send(DownloadHead)

        file = open(self.filePath, "rb")

        downloadLen = 0

        self.edt_downloadMsg.setText(self.edt_downloadMsg.toPlainText() + "\r\n下载中......")
        while True:
            buf = file.read(120)

            if len(buf) <= 0:
                if downloadLen == self.fileSize:
                    self.edt_downloadMsg.setText(self.edt_downloadMsg.toPlainText() + "\r\n下载成功!")
                else:
                    self.edt_downloadMsg.setText(self.edt_downloadMsg.toPlainText() + "\r\n下载出错!")
                    self.edt_downloadMsg.setText(self.edt_downloadMsg.toPlainText() + "\r\n文件大小为" + str(self.fileSize) + "Byte,实际下载大小为" + str(downloadLen) + "Byte")
                break;

            self.tcpSock.send(buf)
            rec = self.tcpSock.recv(self.tcpRecBufSize)

            if buf != rec:
                self.edt_downloadMsg.setText(self.edt_downloadMsg.toPlainText() + "\r\n下载出错!")
                self.edt_downloadMsg.setText(self.edt_downloadMsg.toPlainText() + "\r\n恢复数据包不正确")
                break

            downloadLen = downloadLen + len(buf)

            self.pgb_downloadProgress.setValue(downloadLen * 100 / self.fileSize)

        #程序下载完,开发板程序跳转到APP之后TCP连接就断了
        self.tcpSock.close()
        self.btn_tcpConnect.setText("连接")
        self.isTcpConnected = False

if __name__ == '__main__':
    app = QApplication(sys.argv)
    demo = Demo()
    demo.show()
    sys.exit(app.exec_())
五、效果演示
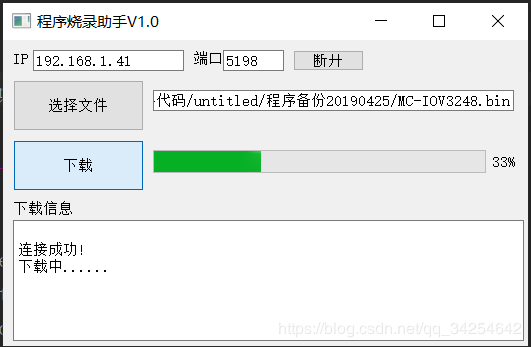
STM32端的BootLoader代码还是上一篇博客的代码,一点没改过,接下来看看效果。
六、将工程打包成exe文件
开发的工作都做好了,调试也没问题了,然后将python工程打包成exe文件就可以拿到其他人的电脑上去用了。要打包成exe文件,首先打开cmd命令窗口,进入到python工程的ISPdownloader.py文件所在的同级目录,然后运行命令pyinstaller.exe -F -w ISPdownloader.py,运行没问题的话就生成了两个文件夹,build和dist。exe文件就在dist目录里面。
其实软件也没实现太多的功能,打包一下有15M左右,感觉有点大,上网查了很多资料,貌似PyQt开发界面软件就是有这样的一个让人不爽的地方,exe文件比较大,但也能理解啊,里面要包含一些Python和Qt的库,肯定会大一点的。
七、结束语
到这里,就实现了通过上位机软件更新STM32端程序的功能了,还是比较好实现的。我们只需要把设备连接到局域网里面来,就可以实现远程对设备程序的更新了,用网络下载比用烧录器或者是串口下载程序方便很多。


