Qt与FFmpeg联合开发指南(六) -- 摄像头每一帧数据的捕捉
要在QT中使用摄像头,就要链接多媒体模块以及多媒体工具模块:
QT += multimedia
QT += multimediawidgets
接下来我们要用到三个类:
- QCamera:摄像头对象
- QCameraViewfinder:用于实时显示摄像头传来的图像的控件
- QCameraImageCapture:用于捕获摄像头图像实现拍照功能
具体实现测试代码如下:
camere =new QCamera(this); //创建摄像头对象
viewfinder =new QCameraViewfinder(this);    //创建实时显示摄像头图像的对象
imageCapture =new QCameraImageCapture(camere); //创建截取摄像头图像的对象
//创建并设置按钮对象
QPushButton* button1 =new QPushButton("Capture");
QPushButton* button2 =new QPushButton("Exit");
//创建并设置布局对象
QVBoxLayout* mainLayout =new QVBoxLayout(this);
mainLayout->addWidget(viewfinder); //将取景器加入主界面中
mainLayout->addWidget(button1);
mainLayout->addWidget(button2);
camere->setViewfinder(viewfinder); //给camera设置viewfinder
camere->start(); //开始摄像
显示优化设计:
在qt widgets上显示视频,一般是通过paintEvent,或者是qlabel,来显示image。这样的话,cpu显示占用率很高。我发现有两个解决方法:
1.显示视频的那个类,设置父类为nullptr,这样,cpu占用率会下降一些;
2.显示视频的那个类, 让它继承QOpenGLWidget,这样,在嵌入式设备上面,使用的是gpu渲染,而不是cpu,然后重新使用paintEvent()函数,来绘画视频就没问题了。
QOpenGLWidget描述
QOpenGLWidget类是用于渲染OpenGL图形。
除了可以选择使用QPainter和标准的OpenGL渲染图形,QOpenGLWidget类提供了在Qt应用程序中显示OpenGL图形的功能。它使用起来非常简单:新建类继承于QOpenGLWidget,使用方法就像继承于QWidget类子类一样。
QOpenGLWidget类提供了三个方便的虚函数,可以在新建的子类中重新实现以完成OpenGL的任务:
paintGL()—渲染OpenGL场景,需要更新Widget时就会调用。
resizeGL()—设置OpenGL视口,投影等。每当调整Widget的大小时(第一次显示窗口Widget时会调用它)。
initializeGL()—建立OpenGL的资源和状态。在第一次调用resizeGL()或paintGL()之前调用一次。
如果需要从paintGL()以外的地方触发重绘(一个典型的例子是使用定时器为场景设置动画),应该调用widget的update()函数来进行更新。
核心代码如下
void OpenGLWidget::showCameraFrameSlot(QImage image)
{
    m_CameraFrame = image;
    this->update();
}

void OpenGLWidget::paintGL()
{
    QPainter painter(this);
    if (m_CameraFrame.size().width() <= 0)
    {
        return;
    }
    QImage _image = m_CameraFrame.scaled(this->size());
    painter.drawImage(0, 0, _image);
}
Qt使用QAbstractVideoSurface捕获视频帧(信号槽方式),并用QPainter画出来
Qt中捕获视频流方式:
用QCamera::setViewfinder(QAbstractVideoSurface *surface)
- QAbstractVideoSurface类是视频演示表面的基类。
- QAbstractVideoSurface类定义视频制作者用于与视频演示表面交互操作的标准接口。您可以将此接口子类化,以接收来自解码媒体或相机等源的视频帧,以执行您自己的处理。
实现:
自定义一个类继承于QAbstractVideoSurface,如我定义了一个类CameraVideoSurface,代码如下:
CameraVideoSurface.h如下:
class CameraVideoSurface : public QAbstractVideoSurface
{
    Q_OBJECT
public:
    CameraVideoSurface(QObject *parent = NULL);
    ~CameraVideoSurface();
    void setCameraResolution(const QSize &size);
protected:
    QList supportedPixelFormats(
            QAbstractVideoBuffer::HandleType handleType = QAbstractVideoBuffer::NoHandle) const override;
    bool present(const QVideoFrame &frame) override;
private slots:
    void cameraStopSlot();
signals:
    void showFrame(QImage image);
private:
    void InitEncoder();
    void Encode(AVFrame *frame);
private:
    AVFormatContext *pOutputFormatCtx;
    AVCodecContext *pCodecCtx;
    AVCodec *pCodec;
    AVStream *pOutputStream;
    AVPacket *packet;
    AVFrame *yuvFrame;
    struct SwsContext *image_convert_ctx;
}; CameraVideoSurface.cpp如下
CameraVideoSurface::CameraVideoSurface(QObject *parent)
    : QAbstractVideoSurface(parent),
      pOutputFormatCtx(NULL),
      pCodec(NULL),
      pOutputStream(NULL),
      packet(NULL),
      yuvFrame(NULL),
      image_convert_ctx(NULL)
{
    this->InitEncoder();
}

CameraVideoSurface::~CameraVideoSurface()
{
    avformat_close_input(&pOutputFormatCtx);
    av_frame_free(&yuvFrame);
    av_packet_free(&packet);
    avcodec_close(pCodecCtx);
}

void CameraVideoSurface::setCameraResolution(const QSize &size)
{
    this->setNativeResolution(size);
}
QList CameraVideoSurface::supportedPixelFormats
(QAbstractVideoBuffer::HandleType handleType) const
{
    QList pixelFormats;
    pixelFormats.append(QVideoFrame::Format_RGB32);
    pixelFormats.append(QVideoFrame::Format_YUV420P);
    return pixelFormats;
}

bool CameraVideoSurface::present(const QVideoFrame &frame)
{

    if (frame.isValid())
    {
        QVideoFrame cloneFrame(frame);
        cloneFrame.map(QAbstractVideoBuffer::ReadOnly);
        QImage image(cloneFrame.bits(), cloneFrame.width(), cloneFrame.height(),
                     QVideoFrame::imageFormatFromPixelFormat(frame.pixelFormat()));
        image = image.mirrored(true, true);

        // rgb 转 yuv
        uint8_t *data[AV_NUM_DATA_POINTERS] = {0};
        data[0] = (uint8_t *)image.constBits();
        int linesize[AV_NUM_DATA_POINTERS] = {0};
        linesize[0] = pCodecCtx->width * 4;
        sws_scale(image_convert_ctx, data, linesize, 0, pCodecCtx->height,
                  yuvFrame->data, yuvFrame->linesize);
        // 编码
        this->Encode(yuvFrame);
        emit showFrame(image);
        cloneFrame.unmap();
        return true;
    }
    return false;
}

void CameraVideoSurface::InitEncoder()
{
    av_register_all();
    avformat_network_init();
    avcodec_register_all();

    QString outputFileName = "output.h264";
    QString encoderName = "libx264";
    //QString rtmpAddress = "rtmp://192.168.1.111/live/livestream";

    pCodec = avcodec_find_encoder_by_name(encoderName.toStdString().c_str());
    if(NULL == pCodec)
    {
        qDebug() <<"查找视频编码器失败!";
        return;
    }
    pCodecCtx = avcodec_alloc_context3(pCodec);
    if(NULL == pCodecCtx)
    {
        qDebug() <<"开辟编解码器上下文";
        return;
    }
    // 输入样本参数
    pCodecCtx->bit_rate = 400000;
    pCodecCtx->width = 1280;
    pCodecCtx->height = 720;
    pCodecCtx->time_base = {1, 25};
    pCodecCtx->framerate = {25, 1};
    pCodecCtx->gop_size = 10;
    pCodecCtx->max_b_frames = 1;
    pCodecCtx->qmin = 10;
    pCodecCtx->qmax = 51;
    pCodecCtx->pix_fmt = AV_PIX_FMT_YUV420P;

    if(AV_CODEC_ID_H264 == pCodecCtx->codec_id)
    {
        av_opt_set(pCodecCtx->priv_data, "preset", "slow", 0);
        av_opt_set(pCodecCtx->priv_data, "tune", "zerolatency", 0);
    }
    // 打开编码器
    if(avcodec_open2(pCodecCtx, pCodec, NULL) < 0)
    {
        qDebug() <<"打开编码器失败 !";
        return;
    }


    pOutputFormatCtx = avformat_alloc_context();
    if(NULL == pOutputFormatCtx)
    {
        qDebug() <<"视频封装器开辟失败!";
        return;
    }
    AVOutputFormat *outputFormat = av_guess_format(NULL, outputFileName.toStdString().c_str(), NULL);
    if(NULL == outputFormat)
    {
        qDebug() <<"猜测outputformat失败 !";
        return;
    }
    pOutputFormatCtx->oformat = outputFormat;


    // oprn url
    if(avio_open(&pOutputFormatCtx->pb, outputFileName.toStdString().c_str(), AVIO_FLAG_READ_WRITE) < 0)
    {
        qDebug() <<"打开输出文件失败!";
        return;
    }

    pOutputStream = avformat_new_stream(pOutputFormatCtx, NULL);
    if(NULL == pOutputStream)
    {
        qDebug() <<"新建输出流失败 !";
        return;
    }
    // 输出详细信息
    av_dump_format(pOutputFormatCtx, 0, outputFileName.toStdString().c_str(), 1);
    // 新建数据包
    packet = av_packet_alloc();
    if(NULL == packet)
    {
        qDebug() <<"新建数据包失败 !";
        return;
    }
    // yuvFrame 初始化
    yuvFrame = av_frame_alloc();
    if(NULL == yuvFrame)
    {
        qDebug() <<"开辟AVFrame失败 !";
        return;
    }
    yuvFrame->width = pCodecCtx->width;
    yuvFrame->height = pCodecCtx->height;
    yuvFrame->format = pCodecCtx->pix_fmt;
    // 初始化 image 空间
    av_image_alloc(yuvFrame->data, yuvFrame->linesize, yuvFrame->width, yuvFrame->height,
                   pCodecCtx->pix_fmt, 32);
    // 转换上下文
    image_convert_ctx = sws_getContext(pCodecCtx->width, pCodecCtx->height, AV_PIX_FMT_RGB32, pCodecCtx->width,
                                       pCodecCtx->height, AV_PIX_FMT_YUV420P,
                                       SWS_BICUBIC, NULL, NULL, NULL);
    if(NULL == image_convert_ctx)
    {
        qDebug() <<"转换上下文失败 !";
        return;
    }
    // 写封装头
    if(avformat_write_header(pOutputFormatCtx, NULL) < 0)
    {
        qDebug() <<"视频封装头写失败 !";
        return;
    }
}

// 编码为 h.264
void CameraVideoSurface::Encode(AVFrame *frame)
{
    static int index = 0;
    frame->pts = index++;

    int ret = 0;
    if((ret = avcodec_send_frame(pCodecCtx, frame)) < 0)
    {
        qDebug() <<"avcodec_send_frame 失败 !";
        return;
    }

    while(ret >= 0)
    {
        ret = avcodec_receive_packet(pCodecCtx, packet);
        if (ret == AVERROR(EAGAIN) || ret == AVERROR_EOF)
        {
            return;
        }
        else if (ret < 0)
        {
            qDebug() <<  "编码时出错";
            return;
        }
        packet->stream_index = 0;
        av_interleaved_write_frame(pOutputFormatCtx, packet); // write frame
        av_packet_unref(packet);
    }
}

void CameraVideoSurface::cameraStopSlot()
{
    qDebug()<<"关闭摄像头";
    av_write_trailer(pOutputFormatCtx);
}
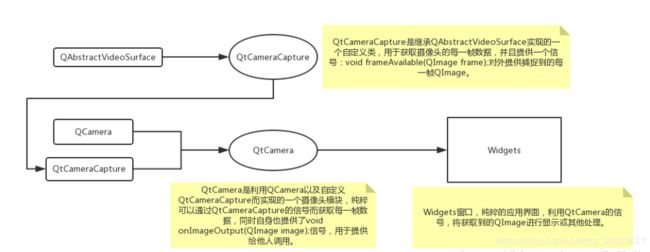
自定义QtCameraCapture类重写了QAbstractVideoSurface的supportedPixelFormats和present函数,只要获取到每一帧,present函数便会执行一次。
使用方法:
大致的使用思路为:
    m_Camera = new QCamera(cameraInfo);
    m_Camera->setViewfinder(m_CameraViewfinder);//类型 CameraVideoSurface *m_CameraViewfinder;
    m_CameraImageCapture = new QCameraImageCapture(m_Camera);
    m_Camera->start();
    connect(m_CameraImageCapture, SIGNAL(imageCaptured(int,QImage)), this, SLOT(captureSlot(int, QImage)));
connect(m_CameraViewfinder, SIGNAL(showFrame(QImage)), m_VideoWidget, SLOT(showCameraFrameSlot(QImage)));尤其要注意m_Camera->setViewfinder(m_CameraViewfinder);
必须要进行这一步是设置才能生效,由此当QCamera调用start()函数后,便会获取到图像帧数据
使用例程:
环境:win10 + Qt5.10.1 + mingw530 + USB摄像头
如上文所提到的,利用Qt提供的QCamera等类,如果仅仅为了实现摄像头画面的显示,那么几句代码就可以实现了。但是如果希望有一个Camera模块,同时有提供数据帧的接口,则需要去获取每一帧数据的方法,这样的获取不是利用定时器去实现,而应该是摄像头有数据时,则获取到每一帧。本人做了一个简单的例子,大概思路如下: 
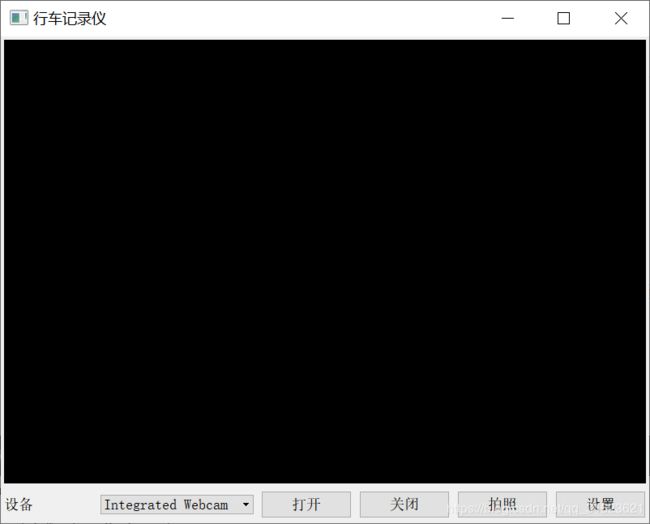
效果图
