tensorflow运行object_detection_tutorial.ipynb文件步骤及遇到问题解决方法
文章目录
- 1 win10成功运行object_detection_tutorial.ipynb步骤
- 1.1 环境说明
- 1.2 下载代码库
- 1.3 下载和安装protoc
- 1.4 proto文件转py文件
- 1.5 终端下运行程序
- 1.6 下载模型
- 1.7 运行notebook程序
- 2 问题汇总
- 问题1:ERROR: Failed building wheel for pycocotools
- 解决方法
- 问题2:ModuleNotFoundError: No module named 'object_detection'
- 解决方法
- 问题3:ModuleNotFoundError: No module named 'pycocotools'
- 解决方法
- 问题4:ImportError: No module named 'nets'
- 解决方法
- 问题5:运行Loading label map第一步总是kernel dead
- 解决办法
- 3 主要参考链接
1 win10成功运行object_detection_tutorial.ipynb步骤
1.1 环境说明
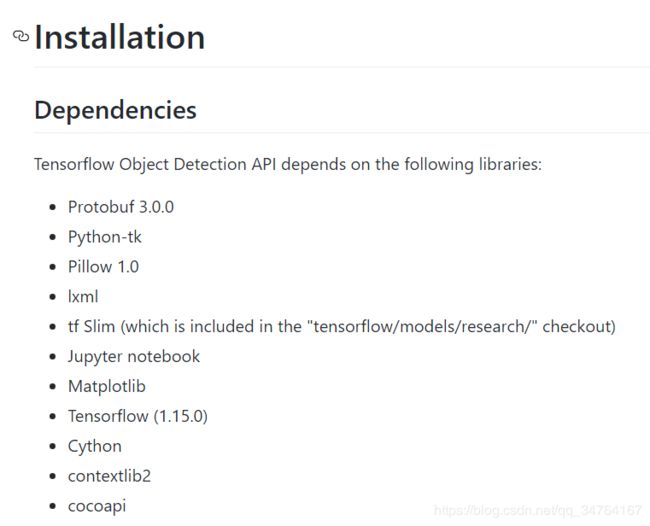
Protobuf-3.0.0
python-3.7
tensorflow-1.15.0
Pillow-1.0
其他安装说明参考https://github.com/tensorflow/models/blob/master/research/object_detection/g3doc/installation.md
1.2 下载代码库
百度云盘地址:
https://pan.baidu.com/s/1TnHvqNLT0JEZlugrdyABhQ 提取码: fnp3
是整个models_master文件,下载后请把文件名修改为models。
1.3 下载和安装protoc
安装正确的protocbuf版本,我安装的是3.0.0,在此奉上链接:
Protocol Buffers v3.0.0
下载protobuf-python-3.0.0.zip和protoc-3.0.0-win32.zip即可,这里我把protobuf-python-3.0.0.zip和protoc-3.0.0-win32.zip都放在了models文件夹下。
接下来的步骤参考“Windows 环境下的 protoc 安装”这篇文章,下载protoc3.3.0win32版本,将bin中的protoc.exe拷贝到c:\windows\system32中。
如果在其他目录下使用protoc --version命令发现版本不是3.0.0,说明本机还有另一个版本的protoc.exe文件,那么Windows下下载everything这个软件可以然后本机搜索protoc.exe文件位置,
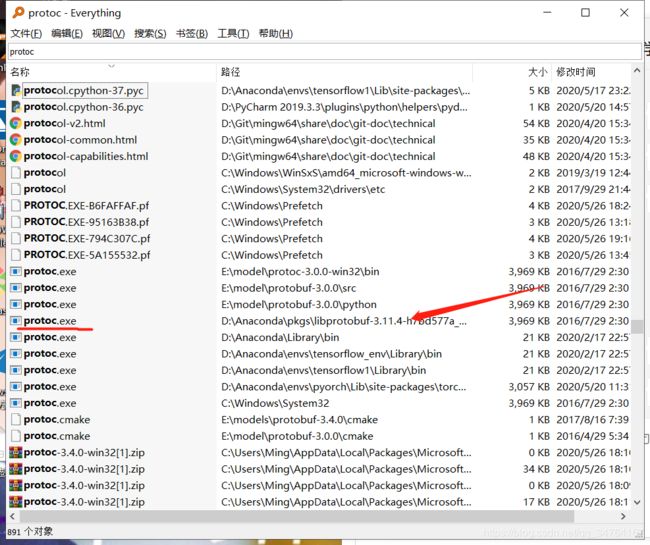
右键可打开该程序所在文件,
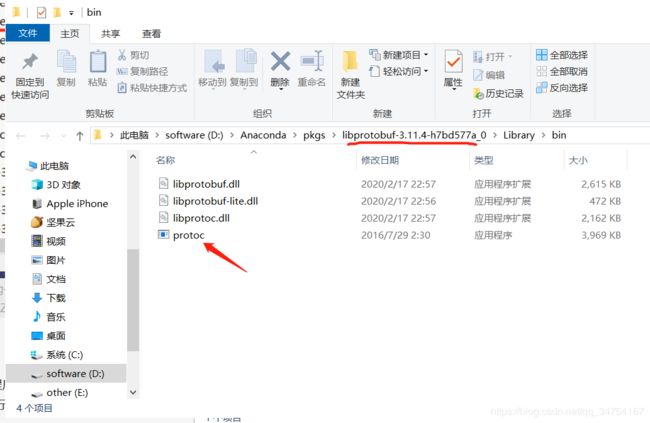
在该文件夹中的protoc.exe应用程序替换成现在新下载好的(目录为models\protoc-3.0.0-win32\bin)protoc.exe,
然后这样无论在哪个文件夹下的终端运行protoc --version出现的结果就都是3.0.0了。测试效果:
(tensorflow1) E:\>protoc --version
libprotoc 3.0.0
1.4 proto文件转py文件
如果直接运行protoc object_detection/protos/*.proto --python_out=.失败,可以终端执行下列程序:
## 进入我的tf环境和notebook文件所在路径,可忽略
activate tensorflow1
E:
cd models/research
Protoc object_detection/protos/anchor_generator.proto --python_out=.
 protoc object_detection/protos/bipartite_matcher.proto --python_out=.
 protoc object_detection/protos/box_coder.proto --python_out=.
 protoc object_detection/protos/*.proto --python_out=.
 protoc object_detection/protos/box_predictor.proto --python_out=.
 protoc object_detection/protos/eval.proto --python_out=.
 protoc object_detection/protos/faster_rcnn.proto --python_out=.
 protoc object_detection/protos/faster_rcnn_box_coder.proto --python_out=.
 protoc object_detection/protos/graph_rewriter.proto --python_out=.
 protoc object_detection/protos/grid_anchor_generator.proto --python_out=.
 protoc object_detection/protos/hyperparams.proto --python_out=.
 protoc object_detection/protos/image_resizer.proto --python_out=.
 protoc object_detection/protos/input_reader.proto --python_out=.
 protoc object_detection/protos/keypoint_box_coder.proto --python_out=.
 protoc object_detection/protos/losses.proto --python_out=.
 protoc object_detection/protos/matcher.proto --python_out=.
 protoc object_detection/protos/mean_stddev_box_coder.proto --python_out=.
 protoc object_detection/protos/model.proto --python_out=.
 protoc object_detection/protos/multiscale_anchor_generator.proto --python_out=.
 protoc object_detection/protos/optimizer.proto --python_out=.
 protoc object_detection/protos/pipeline.proto --python_out=.
 protoc object_detection/protos/post_processing.proto --python_out=.
 protoc object_detection/protos/preprocessor.proto --python_out=.
 protoc object_detection/protos/region_similarity_calculator.proto --python_out=.
 protoc object_detection/protos/square_box_coder.proto --python_out=.
 protoc object_detection/protos/ssd.proto --python_out=.
 protoc object_detection/protos/ssd_anchor_generator.proto --python_out=.
 protoc object_detection/protos/string_int_label_map.proto --python_out=.
 protoc object_detection/protos/train.proto --python_out=.
 protoc object_detection/protos/preprocessor.proto --python_out=.
 protoc object_detection/protos/preprocessor.proto --python_out=.
 protoc object_detection/protos/argmax_matcher.proto --python_out=.
即一句一句将其变为.py文件,亲测有效。
参考来源
1.5 终端下运行程序
cd models/research/
pip install .
这一步很重要,不运行的话会出现第二章中问题2。
1.6 下载模型
下载已经训练好的模型。
在文件object_detection_tutorial.ipynb中有下载模型的代码语句。
代码可以运行,但是无法得到结果,因为代码中的下载链接是国外的网址。除非科学上网。这里介绍不科学上网的方法:
ssd_mobilenet_v1_coco_2017_11_17.zip百度云盘链接:
链接: https://pan.baidu.com/s/1ywlp46lK-WYZ_11sUXqftw 提取码: yv5i
文件下载好放入object_detection目录下,选择解压到文件夹 ssd_mobilenet_v1_coco_2017_11_17中。
参考来源
1.7 运行notebook程序
- 我使用的是jupyter lab,在E盘下的tf环境中进入jupyter lab,然后开始逐步运行程序,其中很重要的是在jupyter lab或者notebook中要记住换为你现在运行的环境的内核,由于我一开始内核不对所以运行过程中就会产生Restarting kernel的现象,切换内核在如图所示的地方:
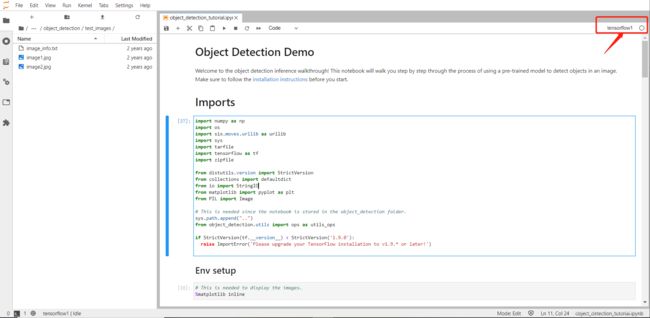
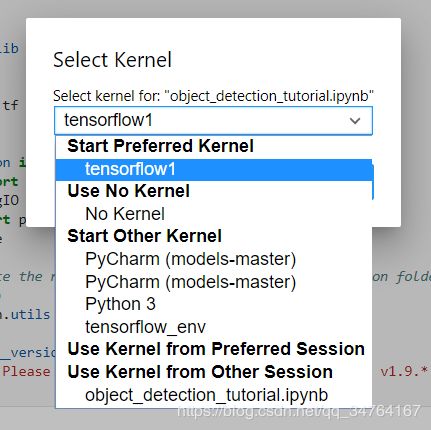
如果这里没有你要选择的环境,那请在当前环境的终端下运行:
python -m ipykernel install --name tensorflow1
这句话中tensorflow1是我自己起的名字,表示tf1.15.0的环境,读者可以更换为自己的名字。这样就有内核了。
- 其中需要注释掉从网上下载程序的代码块,如下图所示:
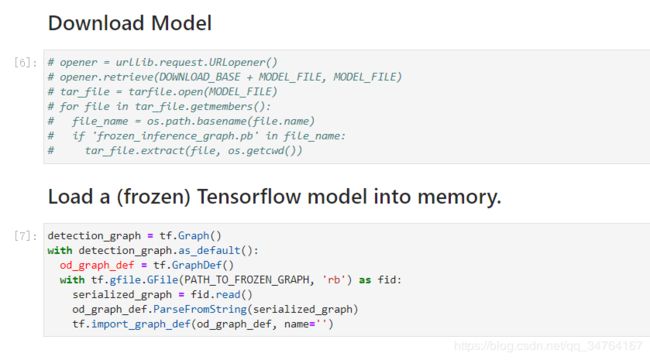
同时由于我显示不出来图片,故对图片显示的程序做了如下改变:
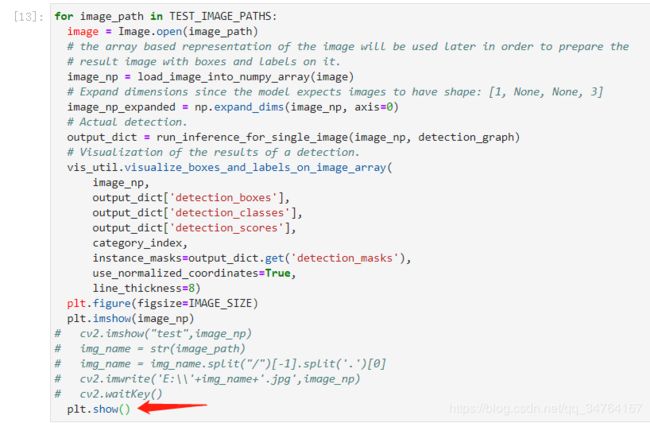
加了plt.show()后即可以运行成功,结果如下:
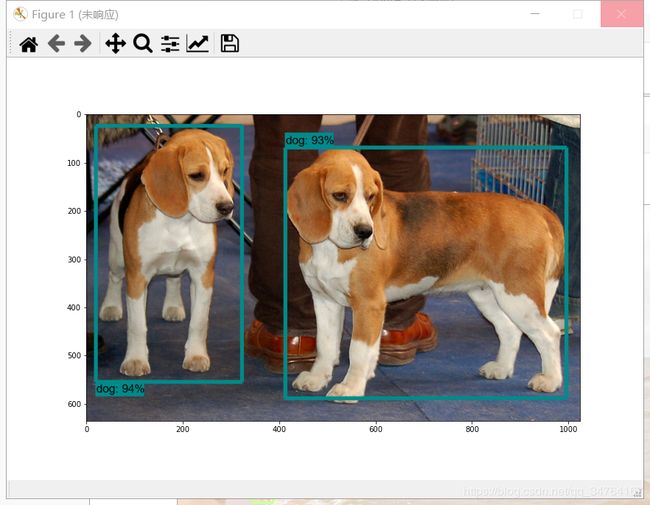
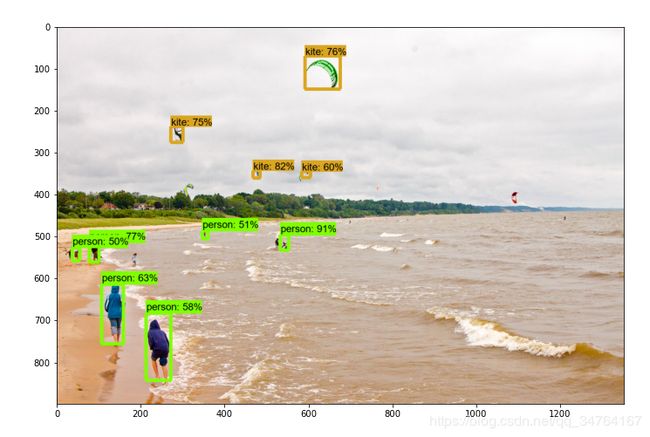
就是在jupyter中显示图片略慢,也可能是我电脑太卡了,这个反应了好一会才出来,也试过在pycharm中运行,大同小异,只要环境配置好就可以。
如果plt.imshow()可以正常显示图片,那就无需这部操作。
下面是在运行过程中尝试的一些过程的问题汇总,如果你有遇到,那么可参考下面我的处理方法,亲测有效。
2 问题汇总
问题1:ERROR: Failed building wheel for pycocotools
(CV202001) PS C:\Users\niu> pip install pycocotools
Collecting pycocotools
  Using cached https://files.pythonhosted.org/packages/96/84/9a07b1095fd8555ba3f3d519517c8743c2554a245f9476e5e39869f948d2/pycocotools-2.0.0.tar.gz
Building wheels for collected packages: pycocotools
  Building wheel for pycocotools (setup.py) ... error
  ERROR: Command errored out with exit status 1:
   command: 'D:\ProgramData\Anaconda3\envs\CV202001\python.exe' -u -c 'import sys, setuptools, tokenize; sys.argv[0] = '"'"'C:\\Users\\niu\\AppData\\Local\\Temp\\pip-install-f24aas2b\\pycocotools\\setup.py'"'"'; __file__='"'"'C:\\Users\\niu\\AppData\\Local\\Temp\\pip-install-f24aas2b\\pycocotools\\setup.py'"'"';f=getattr(tokenize, '"'"'open'"'"', open)(__file__);code=f.read().replace('"'"'\r\n'"'"', '"'"'\n'"'"');f.close();exec(compile(code, __file__, '"'"'exec'"'"'))' bdist_wheel -d 'C:\Users\niu\AppData\Local\Temp\pip-wheel-_fwfwnii' --python-tag cp36
       cwd: C:\Users\niu\AppData\Local\Temp\pip-install-f24aas2b\pycocotools\
  Complete output (19 lines):
  running bdist_wheel
  running build
  running build_py
  creating build
  creating build\lib.win-amd64-3.6
  creating build\lib.win-amd64-3.6\pycocotools
  copying pycocotools\coco.py -> build\lib.win-amd64-3.6\pycocotools
  copying pycocotools\cocoeval.py -> build\lib.win-amd64-3.6\pycocotools
  copying pycocotools\mask.py -> build\lib.win-amd64-3.6\pycocotools
  copying pycocotools\__init__.py -> build\lib.win-amd64-3.6\pycocotools
  running build_ext
  building 'pycocotools._mask' extension
  creating build\temp.win-amd64-3.6
  creating build\temp.win-amd64-3.6\Release
  creating build\temp.win-amd64-3.6\Release\pycocotools
  creating build\temp.win-amd64-3.6\Release\common
  D:\Program Files (x86)\Microsoft Visual Studio 14.0\VC\BIN\x86_amd64\cl.exe /c /nologo /Ox /W3 /GL /DNDEBUG /MD -ID:\ProgramData\Anaconda3\envs\CV202001\lib\site-packages\numpy\core\include -Icommon -ID:\ProgramData\Anaconda3\envs\CV202001\include -ID:\ProgramData\Anaconda3\envs\CV202001\include "-ID:\Program Files (x86)\Microsoft Visual Studio 14.0\VC\INCLUDE" "-ID:\Program Files (x86)\Microsoft Visual Studio 14.0\VC\ATLMFC\INCLUDE" "-IC:\Program Files (x86)\Windows Kits\10\include\10.0.10240.0\ucrt" "-IC:\Program Files (x86)\Windows Kits\NETFXSDK\4.6.1\include\um" "-IC:\Program Files (x86)\Windows Kits\8.1\include\\shared" "-IC:\Program Files (x86)\Windows Kits\8.1\include\\um" "-IC:\Program Files (x86)\Windows Kits\8.1\include\\winrt" /Tcpycocotools/_mask.c /Fobuild\temp.win-amd64-3.6\Release\pycocotools/_mask.obj -Wno-cpp -Wno-unused-function -std=c99
  cl: 命令行 error D8021 :无效的数值参数“/Wno-cpp”
  error: command 'D:\\Program Files (x86)\\Microsoft Visual Studio 14.0\\VC\\BIN\\x86_amd64\\cl.exe' failed with exit status 2
  ----------------------------------------
  ERROR: Failed building wheel for pycocotools
  Running setup.py clean for pycocotools
Failed to build pycocotools
Installing collected packages: pycocotools
    Running setup.py install for pycocotools ... error
    ERROR: Command errored out with exit status 1:
     command: 'D:\ProgramData\Anaconda3\envs\CV202001\python.exe' -u -c 'import sys, setuptools, tokenize; sys.argv[0] = '"'"'C:\\Users\\niu\\AppData\\Local\\Temp\\pip-install-f24aas2b\\pycocotools\\setup.py'"'"'; __file__='"'"'C:\\Users\\niu\\AppData\\Local\\Temp\\pip-install-f24aas2b\\pycocotools\\setup.py'"'"';f=getattr(tokenize, '"'"'open'"'"', open)(__file__);code=f.read().replace('"'"'\r\n'"'"', '"'"'\n'"'"');f.close();exec(compile(code, __file__, '"'"'exec'"'"'))' install --record 'C:\Users\niu\AppData\Local\Temp\pip-record-8f1bp3n2\install-record.txt' --single-version-externally-managed --compile
         cwd: C:\Users\niu\AppData\Local\Temp\pip-install-f24aas2b\pycocotools\
    Complete output (19 lines):
    running install
    running build
    running build_py
    creating build
    creating build\lib.win-amd64-3.6
    creating build\lib.win-amd64-3.6\pycocotools
    copying pycocotools\coco.py -> build\lib.win-amd64-3.6\pycocotools
    copying pycocotools\cocoeval.py -> build\lib.win-amd64-3.6\pycocotools
    copying pycocotools\mask.py -> build\lib.win-amd64-3.6\pycocotools
    copying pycocotools\__init__.py -> build\lib.win-amd64-3.6\pycocotools
    running build_ext
    building 'pycocotools._mask' extension
    creating build\temp.win-amd64-3.6
    creating build\temp.win-amd64-3.6\Release
    creating build\temp.win-amd64-3.6\Release\pycocotools
    creating build\temp.win-amd64-3.6\Release\common
    D:\Program Files (x86)\Microsoft Visual Studio 14.0\VC\BIN\x86_amd64\cl.exe /c /nologo /Ox /W3 /GL /DNDEBUG /MD -ID:\ProgramData\Anaconda3\envs\CV202001\lib\site-packages\numpy\core\include -Icommon -ID:\ProgramData\Anaconda3\envs\CV202001\include -ID:\ProgramData\Anaconda3\envs\CV202001\include "-ID:\Program Files (x86)\Microsoft Visual Studio 14.0\VC\INCLUDE" "-ID:\Program Files (x86)\Microsoft Visual Studio 14.0\VC\ATLMFC\INCLUDE" "-IC:\Program Files (x86)\Windows Kits\10\include\10.0.10240.0\ucrt" "-IC:\Program Files (x86)\Windows Kits\NETFXSDK\4.6.1\include\um" "-IC:\Program Files (x86)\Windows Kits\8.1\include\\shared" "-IC:\Program Files (x86)\Windows Kits\8.1\include\\um" "-IC:\Program Files (x86)\Windows Kits\8.1\include\\winrt" /Tcpycocotools/_mask.c /Fobuild\temp.win-amd64-3.6\Release\pycocotools/_mask.obj -Wno-cpp -Wno-unused-function -std=c99
    cl: 命令行 error D8021 :无效的数值参数“/Wno-cpp”
    error: command 'D:\\Program Files (x86)\\Microsoft Visual Studio 14.0\\VC\\BIN\\x86_amd64\\cl.exe' failed with exit status 2
    ----------------------------------------
ERROR: Command errored out with exit status 1: 'D:\ProgramData\Anaconda3\envs\CV202001\python.exe' -u -c 'import sys, setuptools, tokenize; sys.argv[0] = '"'"'C:\\Users\\niu\\AppData\\Local\\Temp\\pip-install-f24aas2b\\pycocotools\\setup.py'"'"'; __file__='"'"'C:\\Users\\niu\\AppData\\Local\\Temp\\pip-install-f24aas2b\\pycocotools\\setup.py'"'"';f=getattr(tokenize, '"'"'open'"'"', open)(__file__);code=f.read().replace('"'"'\r\n'"'"', '"'"'\n'"'"');f.close();exec(compile(code, __file__, '"'"'exec'"'"'))' install --record 'C:\User
解决方法
先编译后下载
git clone https://github.com/pdollar/coco.git
cd coco/PythonAPI
python setup.py build_ext --inplace # install pycocotools locally
python setup.py build_ext install # install pycocotools to the Python site-packages
运行python setup.py build_ext --inplace其中遇到问题:
cl : Command line error D8021 : invalid numeric argument '/Wno-cpp' error: command 'C:\\Program Files (x86)\\Microsoft Visual Studio 14.0\\VC\\BIN\\x86_amd64\\cl.exe' failed with exit status 2
解决办法:
在C:\Users\Ming\coco\PythonAPI路径下中setup.py中的第12行:
extra_compile_args=['-Wno-cpp', '-Wno-unused-function', '-std=c99']
改为extra_compile_args={'gcc': ['/Qstd=c99']}
然后执行python setup.py build_ext --inplace
参考链接
最后就可以运行成功啦!
参考链接
问题2:ModuleNotFoundError: No module named ‘object_detection’
解决方法
对于https://github.com/tensorflow/models,如果在运行models/research/object_detection/目录下的.py文件时出现:ModuleNotFoundError: No module named 'object_detection'
需要在models/research/目录下执行:
python setup.py install
如果还是不行,就是没有添加环境变量,请参考在这个文章:
https://www.cnblogs.com/tangmiao/p/11358674.html
就可以解决这个问题
问题3:ModuleNotFoundError: No module named ‘pycocotools’
解决方法
conda install pycocotools
问题4:ImportError: No module named ‘nets’
解决方法
在models/research/slim目录下执行:
python setup.py install
但是又出现这个错误:error: could not create ‘build’: 当文件已存在时,无法创建该文件。
解决方法:
Windows下:
在research/slim目录中运行下列程序:
python setup.py build
python setup.py install
在此操作前要先看一下slim目录中有没有BUILD文件有的话就新建一个oldlbuild文件夹然后把它放进去,不然会有所冲突
然后再运行这两步,就成功了。
参考链接
问题5:运行Loading label map第一步总是kernel dead
解决办法
最后发现是没有按照步骤来,没有在终端下运行这两步,一定要运行!
cd models/research/
protoc object_detection/protos/*.proto --python_out=.
cd models/research
pip install .
同时要切记安装正确的protocbuf版本,是3.0.0,在此奉上链接:
Protocol Buffers v3.0.0
下载protobuf-python-3.0.0.zip和protoc-3.0.0-win32.zip即可。
接下来的步骤参考“Windows 环境下的 protoc 安装”这篇文章,下载protoc3.3.0win32版本,将bin中的protoc.exe拷贝到c:\windows\system32中。
如果本机还有另一个版本的protoc.exe文件,那么Windows下下载everything这个软件可以然后本机搜索protoc.exe文件,在有另外版本后缀的文件夹中的protoc.exe应用程序替换成现在新下载好的protoc.exe,然后这样无论在哪个文件夹下的终端运行protoc --version出现的结果就都是3.0.0了。
接下来我把程序改成了:
# List of the strings that is used to add correct label for each box.
# PATH_TO_LABELS = 'models/research/object_detection/data/mscoco_label_map.pbtxt'
# category_index = label_map_util.create_category_index_from_labelmap(PATH_TO_LABELS, use_display_name=True)
PATH_TO_LABELS = 'data/mscoco_label_map.pbtxt'
category_index = label_map_util.create_category_index_from_labelmap(PATH_TO_LABELS, use_display_name=True)
这样,这一步就很容易运行好了,不报错也不崩溃,#号注释掉的是原来的程序
,其实就是改了一下路径,这个操作有点迷,我就这样运行反正没错了。
3 主要参考链接
- 目标检测实践_tensorflow版SSD运行示例
- 目标检测实战4-运行object_detection_tutorial demo