先电版Openstack-Iaas搭建(虚拟机版)
文章目录
- 实验环境
- 实验准备
- 查看网络配置
- 添加外网卡
- 网络分配
- 实验步骤
- 修改主机名
- 修改网卡信息
- 关闭防火墙
- 上传镜像
- 配置源
- 安装vsftp服务
- Iaas-xiandian安装和配置
- 脚本安装
- dashboard云主机申请
- 创建网络
- 外部网络
- 内部网络
- 添加路由
- 访问安全
- 申请云主机
- 验证云主机
实验环境
- Centos7-1511
- Xiandian-Iaas-v2.2
- 两个虚拟机(分别两个网卡)
注:因虚拟环境,受限于主机配置,不分区。
实验准备
查看网络配置
查看VM自动分配的网段(下面双网卡,一个NAT模式,一个仅主机模式)。
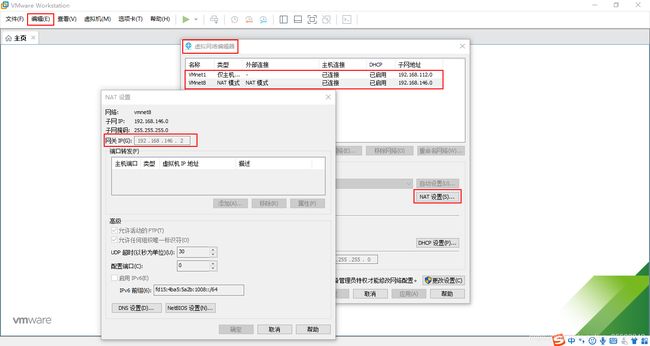
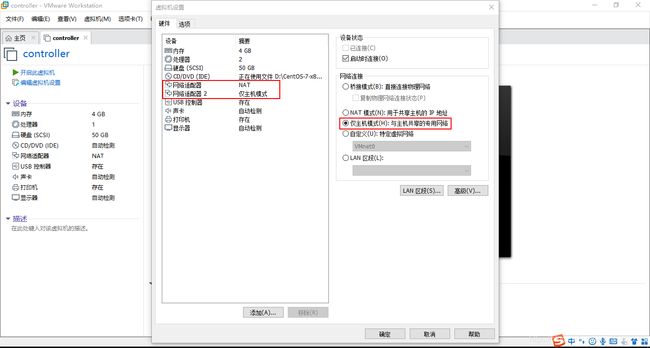
添加外网卡
添加一个网络适配器,并修改网络连接模式为仅主机模式。
网络分配
根据上面的网段分配两个节点的网络信息。
controller
内网卡:192.168.146.10,网关:192.168.146.2
外网卡:192.168.112.10
compute
内网卡:192.168.146.20,网关:192.168.146.2
外网卡:192.168.112.20
注:内网卡务必不要配置网关,否则会发生网络风暴
实验步骤
修改主机名
hostnamectl set-hostname hostname
Ctrl + d:重新登陆
修改网卡信息
controller和compute
镜像不同,网卡名称不同。
[root@controller ~]# vi /etc/sysconfig/network-scripts/ifcfg-eno16777736
TYPE=Ethernet
BOOTPROTO=static // 改为静态
DEFROUTE=yes
PEERDNS=yes
PEERROUTES=yes
IPV4_FAILURE_FATAL=no
IPV6INIT=yes
IPV6_AUTOCONF=yes
IPV6_DEFROUTE=yes
IPV6_PEERDNS=yes
IPV6_PEERROUTES=yes
IPV6_FAILURE_FATAL=no
NAME=eno16777736
UUID=a148aca6-54f6-4f14-945e-ac0fb4bb52bb
DEVICE=eno16777736
ONBOOT=yes // 设置开机自启
NM_CONTROOLED=no // 设置不立即生效
IPADDR=192.168.146.10 // 设置IP地址
NETMASK=255.255.255.0 // 设置子网掩码
GATEWAY=192.168.146.2 // 设置网关
[root@controller ~]# vi /etc/sysconfig/network-scripts/ifcfg-eno33554960
TYPE=Ethernet
BOOTPROTO=static // 修改为静态
DEFROUTE=yes
PEERDNS=yes
PEERROUTES=yes
IPV4_FAILURE_FATAL=no
IPV6INIT=yes
IPV6_AUTOCONF=yes
IPV6_DEFROUTE=yes
IPV6_PEERDNS=yes
IPV6_PEERROUTES=yes
IPV6_FAILURE_FATAL=no
NAME=eno33554960
UUID=666714c1-826c-47d7-8c67-7180404268bf
DEVICE=eno33554960
ONBOOT=yes // 设置开机自启
NM_CONTROLLED=no // 设置不立即生效
IPADDR=192.168.112.10 // 设置IP地址
NETMASK=255.255.255.0 // 设置子网掩码(没有网关)
重启网卡
[root@controller ~]# systemctl restart network

[root@compute ~]# systemctl restart network
注:compute同理,IP地址不同。修改完成之后,一定要重新启动网卡。
关闭防火墙
controller和compute
systemctl stop firewalld // 关闭防火墙
systemctl disable firewalld // 移除开机自启
setenforce 0 // 设置为permissive模式
修改防火墙配置文件
vi /etc/selinux/config // 修改配置文件
# This file controls the state of SELinux on the system.
# SELINUX= can take one of these three values:
#     enforcing - SELinux security policy is enforced.
#     permissive - SELinux prints warnings instead of enforcing.
#     disabled - No SELinux policy is loaded.
SELINUX=permissive // 此处改为permissive
# SELINUXTYPE= can take one of three two values:
#     targeted - Targeted processes are protected,
#     minimum - Modification of targeted policy. Only selected processes are protected.
#     mls - Multi Level Security protection.
SELINUXTYPE=targeted
上传镜像
先在/opt/目录下面创建两个文件夹
mkdir /opt/{centos,iaas}
镜像上传到/opt/目录下,并挂载
[root@controller ~]# cd /opt/
[root@controller opt]# mount -o loop CentOS-7-x86_64-DVD-1511.iso /opt/centos/
mount: /dev/loop0 is write-protected, mounting read-only
[root@controller opt]# mount -o loop XianDian-IaaS-v2.2.iso /opt/iaas/
mount: /dev/loop1 is write-protected, mounting read-only
[root@controller opt]#
配置源
controller
[root@controller ~]# rm -rf /etc/yum.repos.d/*
[root@controller ~]# vi /etc/yum.repos.d/centos.repo
// 添加下面内容
[centos]
name=centos
baseurl=file:///opt/centos
gpgcheck=0
enabled=1
[iaas]
name=iaas
baseurl=file:///opt/iaas/iaas-repo
gpgcheck=0
enabled=1
compute
注:compute节点需要等controller节点开启vsftp服务之后,才能验证。
[root@compute ~]# rm -rf /etc/yum.repos.d/*
[root@compute ~]# vi /etc/yum.repos.d/ftp.repo
// 添加下面内容
[centos]
name=centos
baseurl=ftp://192.168.146.10/centos
gpgcheck=0
enabled=1
[iaas]
name=iaas
baseurl=ftp://192.168.146.10/iaas/iaas-repo
gpgcheck=0
enabled=1
检查yum源是否配置正确
controller
[root@controller opt]# yum clean all
[root@controller opt]# yum list
注:不报错说明配置没问题。
安装vsftp服务
controller
[root@controller opt]# yum -y install vsftpd
[root@controller opt]# vi /etc/vsftpd/vsftpd.conf //修改改文件,只需添加一行anon_root=/opt/
[root@controller opt]# systemctl restart vsftpd // 重启vsftpd服务
[root@controller opt]# chkconfig vsftpd on // 加入开机自启
Note: Forwarding request to 'systemctl enable vsftpd.service'.
Created symlink from /etc/systemd/system/multi-user.target.wants/vsftpd.service to /usr/lib/systemd/system/vsftpd.service.
compute
检查yum源是否正确
[root@compute ~]# yum clean all
[root@compute ~]# yum list
Iaas-xiandian安装和配置
controller和compute
[root@controller opt]# yum install -y iaas-xiandian
[root@controller opt]# cd /etc/xiandian/
[root@controller xiandian]# sed -i 's/^#//g' openrc.sh // 正则表达式,除去每一行的#
[root@controller xiandian]# vi openrc.sh // 编辑环境
// 命令模式---> :%s/PASS=/PASS=000000/g
#--------------------system Config--------------------##
#Controller Server Manager IP. example:x.x.x.x
HOST_IP=192.168.146.10 // 控制节点的IP

#Controller Server hostname. example:controller
HOST_NAME=controller // 控制节点主机名

#Compute Node Manager IP. example:x.x.x.x
HOST_IP_NODE=192.168.146.20 // 计算节点IP

#Compute Node hostname. example:compute
HOST_NAME_NODE=compute // 计算节点主机名

#--------------------Rabbit Config ------------------##
#user for rabbit. example:openstack
RABBIT_USER=openstack // openstack

#Password for rabbit user .example:000000
RABBIT_PASS=000000

#--------------------MySQL Config---------------------##
#Password for MySQL root user . exmaple:000000
DB_PASS=000000

#--------------------Keystone Config------------------##
#Password for Keystore admin user. exmaple:000000
DOMAIN_NAME=demo // 随意
ADMIN_PASS=000000
DEMO_PASS=000000

#Password for Mysql keystore user. exmaple:000000
KEYSTONE_DBPASS=000000

#--------------------Glance Config--------------------##
#Password for Mysql glance user. exmaple:000000
GLANCE_DBPASS=000000

#Password for Keystore glance user. exmaple:000000
GLANCE_PASS=000000

#--------------------Nova Config----------------------##
#Password for Mysql nova user. exmaple:000000
NOVA_DBPASS=000000

#Password for Keystore nova user. exmaple:000000
NOVA_PASS=000000

#--------------------Neturon Config-------------------##
#Password for Mysql neutron user. exmaple:000000
NEUTRON_DBPASS=000000

#Password for Keystore neutron user. exmaple:000000
NEUTRON_PASS=000000

#metadata secret for neutron. exmaple:000000
METADATA_SECRET=000000

#External Network Interface. example:eth1
INTERFACE_NAME=eno33554960 // 外网卡名字

#First Vlan ID in VLAN RANGE for VLAN Network. exmaple:101
minvlan=

#Last Vlan ID in VLAN RANGE for VLAN Network. example:200
maxvlan=

#--------------------Cinder Config--------------------##
#Password for Mysql cinder user. exmaple:000000
CINDER_DBPASS=000000

#Password for Keystore cinder user. exmaple:000000
CINDER_PASS=000000

#Cinder Block Disk. example:md126p3
BLOCK_DISK=md126p4 // 空白分区

#--------------------Trove Config--------------------##
#Password for Mysql Trove User. exmaple:000000
TROVE_DBPASS=000000

#Password for Keystore Trove User. exmaple:000000
TROVE_PASS=000000

#--------------------Swift Config---------------------##
#Password for Keystore swift user. exmaple:000000
SWIFT_PASS=000000

#The NODE Object Disk for Swift. example:md126p4.
OBJECT_DISK=md126p5 // 空白分区

#The NODE IP for Swift Storage Network. example:x.x.x.x.
STORAGE_LOCAL_NET_IP=192.168.146.20 // compute

#--------------------Heat Config----------------------##
#Password for Mysql heat user. exmaple:000000
HEAT_DBPASS=000000

#Password for Keystore heat user. exmaple:000000
HEAT_PASS=000000

#--------------------Ceilometer Config----------------##
#Password for Mysql ceilometer user. exmaple:000000
CEILOMETER_DBPASS=000000

#Password for Keystore ceilometer user. exmaple:000000
CEILOMETER_PASS=000000

#--------------------AODH Config----------------##
#Password for Mysql AODH user. exmaple:000000
AODH_DBPASS=000000

#Password for Keystore AODH user. exmaple:000000
AODH_PASS=000000
脚本安装
controller
iaas-pre-host.sh // 重启,还需重新挂载镜像文件
iaas-install-mysql.sh
iaas-install-keystone.sh
iaas-install-glance.sh
iaas-install-nova-controller.sh
iaas-install-neutron-controller.sh
iaas-install-neutron-controller-gre.sh
iaas-install-dashboard.sh

// 创建镜像
[root@controller opt]# source /etc/keystone/admin-openrc.sh
[root@controller opt]# glance image-create --name centos7.2 --disk-format qcow2 --container-format bare --progress < /opt/iaas/images/CentOS_7.2_x86_64_XD.qcow2
[=============================>] 100%
+------------------+--------------------------------------+
| Property         | Value                                |
+------------------+--------------------------------------+
| checksum         | ea197f4c679b8e1ce34c0aa70ae2a94a     |
| container_format | bare                                 |
| created_at       | 2019-12-10T20:02:05Z                 |
| disk_format      | qcow2                                |
| id               | 0904f43b-d997-4099-8b12-eb544632c7ae |
| min_disk         | 0                                    |
| min_ram          | 0                                    |
| name             | centos7.2                            |
| owner            | 97abddf4a9e94c909709d35201aa46a4     |
| protected        | False                                |
| size             | 400752640                            |
| status           | active                               |
| tags             | []                                   |
| updated_at       | 2019-12-10T20:02:14Z                 |
| virtual_size     | None                                 |
| visibility       | private                              |
+------------------+--------------------------------------+
[root@controller opt]#
compute
iaas-pre-host.sh // 重启,还需重新挂载镜像文件
iaas-install-nova-compute.sh
iaas-install-neutron-compute.sh
iaas-install-neutron-compute-gre.sh
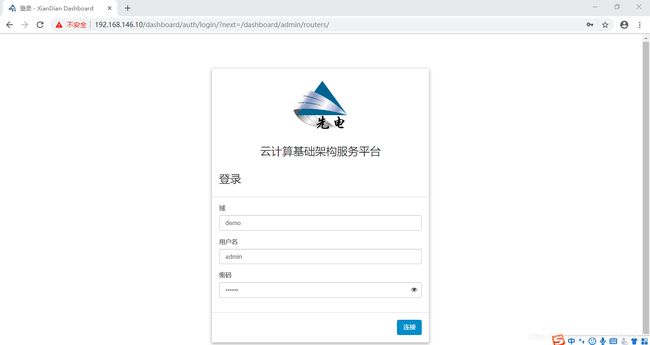
注:脚本安装完成之后,可以打开http://192.168.146.10/dashboard界面时,说明没问题。不考虑效率时,可以先将controller脚本安装后,再进行compute脚本的安装。反之,controller和compute在安装neutron之前,可以并行,安装neutron时,须先让controller先行,后者是compute。
dashboard云主机申请
进入后台管理界面
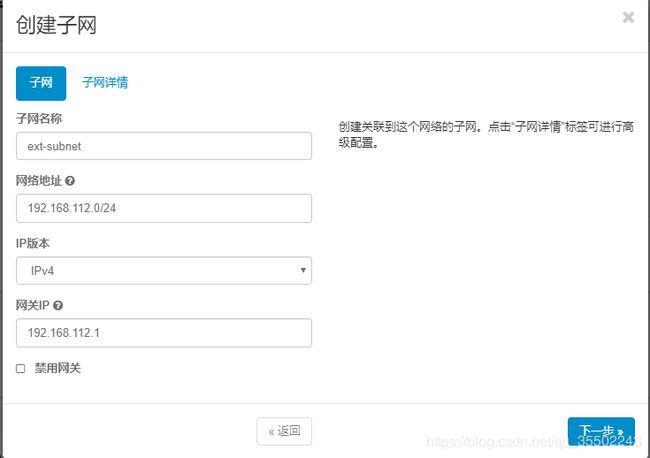
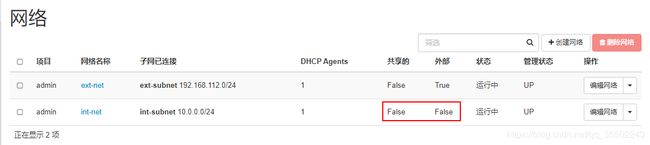
创建网络
管理员—>系统—>网络—>创建网络
外部网络
创建外网络(勾选外部网络选项)并添加子网


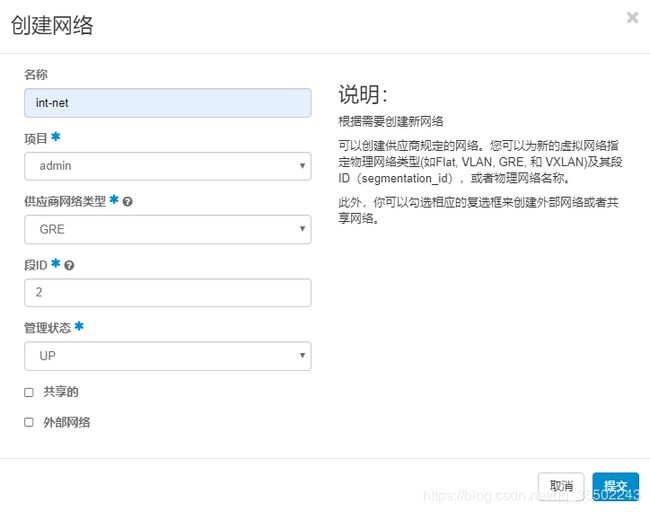
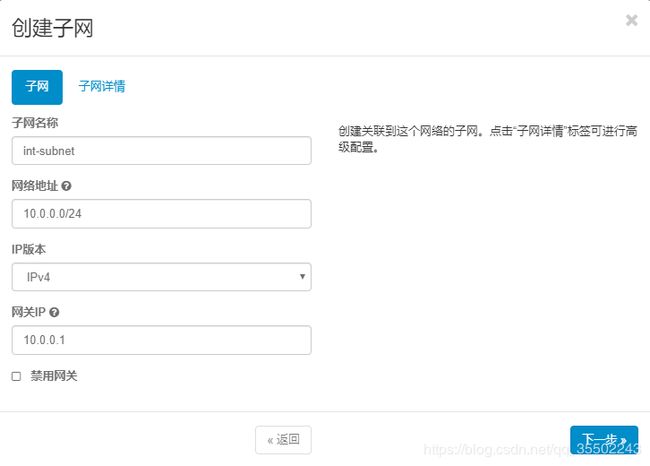
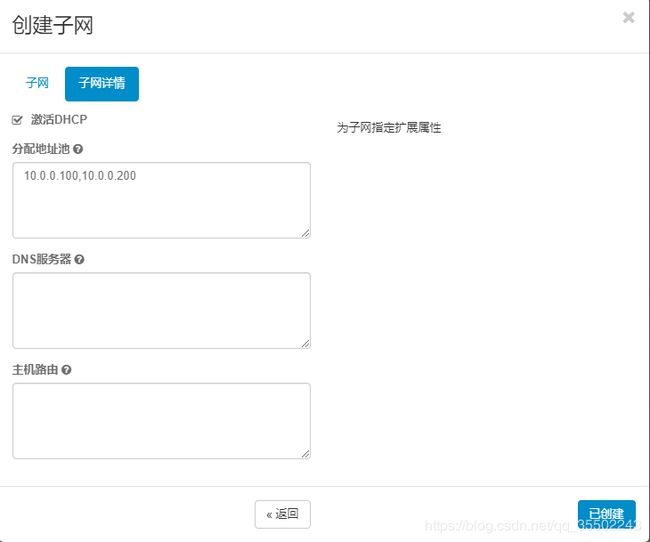
内部网络
创建内网络(不用勾选外部网络选项)并添加子网
网络创建完成
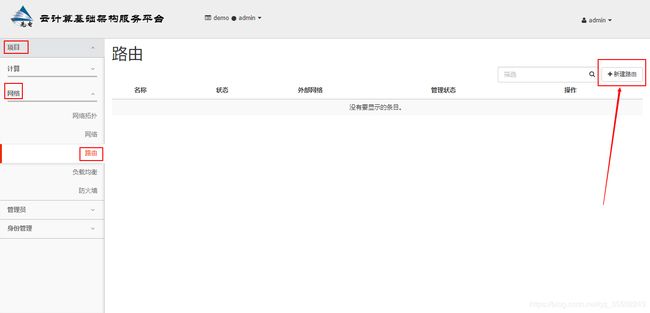
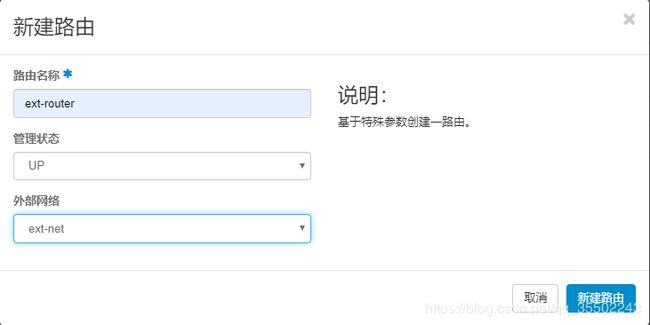
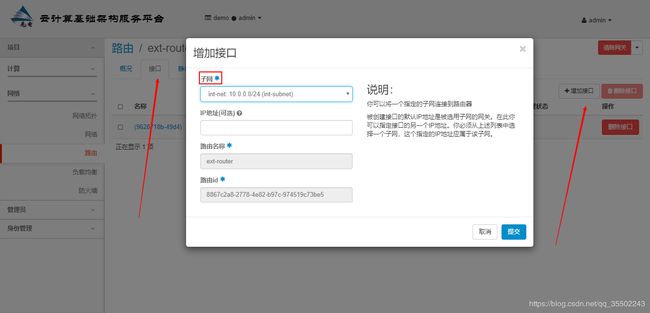
添加路由
项目—>网络—>路由

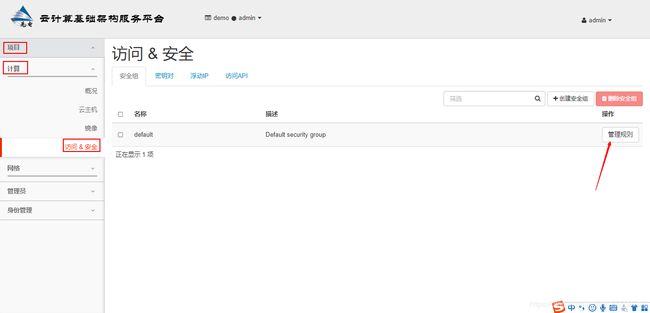
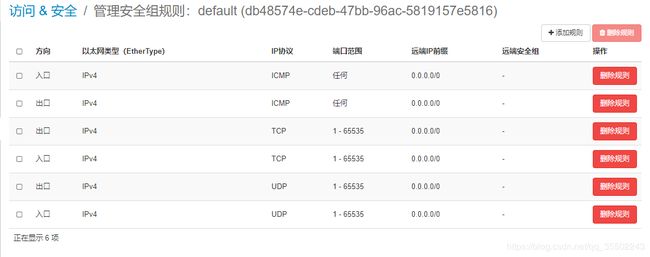
访问安全
项目—>计算—>访问&安全


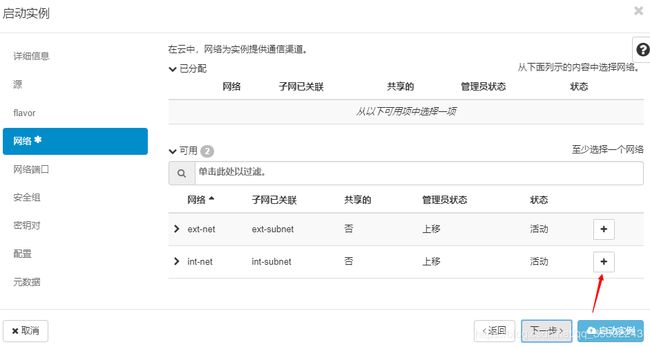
申请云主机
项目—>计算—>云主机


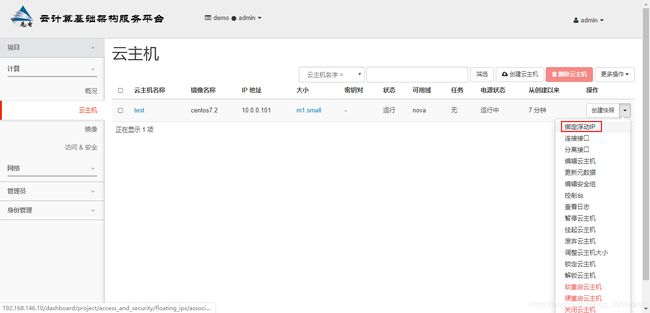

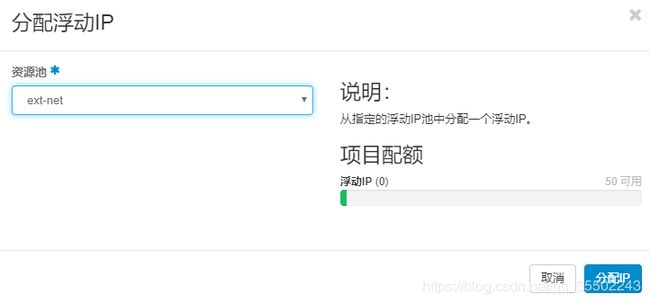
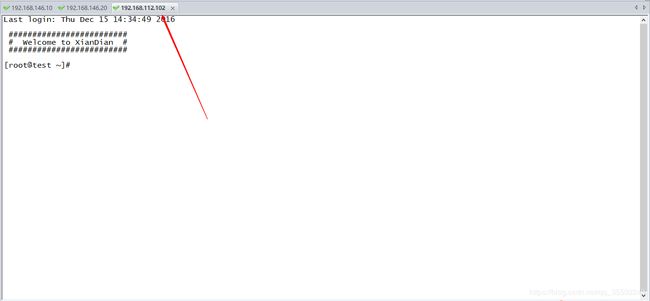
验证云主机
使用CRT远程连接云主机
注:连接的IP是上面关联的浮动IP
Openstack平台搭建完毕(基础插件)
如有不足,还请各位兄长们,多多指教,不喜勿喷。