GraphSAGE_Inductive Representation Learning on Large Graphs详细笔记
tf代码实现
pytorch代码实现,该实现中缺少了无监督部分。
1 摘要
GraphSAGE使用归纳式的方法解决了之前GCN和其他图学习网络中的直推式方法的问题。(因为在实际使用中经常会出现未知的节点,这样归纳式是比较方便和有效的)
归纳式和直推式的区别:
- 归纳式:测试样本不会出现在训练集中,例如训练某些单词的embedding时,单词a只在测试集中出现而训练集中没有单词a
- 直推式:测试样本出现在了训练集中,例如普通的word2vec,要训练的词向量都是已经出现在训练集中的
2 简介
GraphSAGE就是为了解决给图中节点embedding的问题,不同于传统的直推式GCN方法,GraphSAGE方法可以为训练中完全不可见的节点形成embedding。
GraphSAGE的实现方式是学习到几个聚合函数,通过将邻近节点(邻居)的特征聚合起来作为该节点的表示。
文中提出了无具体任务的无监督损失函数,类似于word2vec,只是为后期接其他任务给节点一个embedding。同时,文中也表明了GraphSAGE可以在监督学习下训练。
文章最后进行了相关的实验来验证GraphSAGE的性能。分别有:
- 预测论文和推文的类别
- 预测蛋白质的功能
在两个实验中,表现的都比baseline好很多,同时,还提出了不同于GCN的聚合函数,表现比GCN的聚合函数好7.4%左右。
论文还理论分析证明了GraphSAGE尽管是基于feature的方法,但是同样可以学习到图的结构信息。
3 GraphSAGE方法
3.1 embedding生成算法
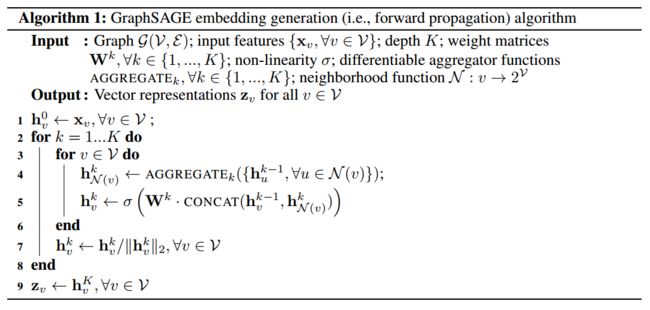
算法的基本思路就是在每一次迭代(即搜索深度),节点不停聚集来自周围邻居的信息,随着迭代的进行,节点递增的从更远的节点获取信息。
为了将训练放到batch上进行,对每一个节点的邻居进行采样,而不是计算所有邻居节点。
- 和WL检验的关系
WL检验是用来检验两个图是不是同构图的方法。具体描述见这里
WL算代在大多数图上都能得到一个独一无二的表示结果,即对于每一个节点都有着独一无二角色,因此,论文认为这种方法得到的节点表示是有效的。同时,这种相似性也为GraphSAGE学习图拓扑结构提供了理论基础。
- 邻居定义
在生成算法中,始终对邻居节点进行固定大小的均匀采样(sample a fixed-size set of neighbors),而不是使用所有邻居。该做法是为了保证每一个batch数据所进行的计算复杂度是相同的。如果不进行采样,最差的情况下复杂度是
O ( ∣ V ∣ ) O(|V|) O(∣V∣),而在fixed-size情况下,每一个batch的计算复杂度都是 O ( ∏ i = 1 K S i ) , w h e r e i ∈ { 1 , 2 , . . . , K } O(\prod^K_{i=1}S_i),where\quad i \in \{1,2,...,K\} O(∏i=1KSi),wherei∈{1,2,...,K}。在论文中,实际操作中发现K=2,S1*S2不大于500时可以获得比较好的表现。
3.2 参数学习
为了在无监督环境下训练有效的表达,提出的损失函数如下:(该损失的意义是相邻的节点有相似的表达但是不相干的节点表达差异性明显)
J G ( z u ) = − log ( σ ( z u ⊤ z v ) ) − Q ⋅ E v n P n ( v ) log ( σ ( − z u ⊤ z v n ) ) J_{\mathcal{G}}(z_u)=-\log \big(\sigma(z_u\top z_v)\big)-Q \cdot \mathbb{E}_{v_n~P_n(v)} \log \big( \sigma (-z_u \top z_{v_n}) \big) JG(zu)=−log(σ(zu⊤zv))−Q⋅Evn Pn(v)log(σ(−zu⊤zvn))
公式中的v是u在固定长度的random walk中同时出现的一个节点, σ \sigma σ 是sigmoid函数, P n P_n Pn是负采样分布,Q定义了负样本的数目。其中输入 z u z_u zu是通过邻居节点生成的,而不是通过embedding look-up的方式训练好之后查找的。
这种无监督损失的训练为下游机器学习任务提供服务,同时在特定任务下,这种损失函数可以被特定的任务目标所替换或者增强(例如交叉熵)。在实验结果中我们可以看到,监督学习的方式得到的结果性能要比无监督要好一些。
3.3 聚合器结构(Aggregator Architectures)
不像对句子、图像的操作,聚合器中的几个邻居节点是无序的,因此,生成过程中的聚合算法需要对无序的向量进行操作。理想来说,聚合器应当是对称的(对输入顺序无要求的)并且可以训练和拥有较好的表达能力的。因此论文提出了三个候选的聚合器。
- 均值聚合器
h v k = σ ( W ⋅ M E A N ( { h v k − 1 } ∪ { h u k − 1 , ∀ u ∈ N ( v ) } ) ) h^k_v=\sigma \big(W \cdot MEAN(\{h^{k-1}_v \} \cup \{ h^{k-1}_u , \forall u \in \mathcal{N}(v) \}) \big) hvk=σ(W⋅MEAN({hvk−1}∪{huk−1,∀u∈N(v)}))
均值聚合器有类似卷积的过程,其中的求均值也可以看成是跨层的skip connection(在不同深度上)
- LSTM聚合器
LSTM并不是对称的,为了解决这个问题,论文将输入先随机然后再输入。
- 池化聚合器
A G G R E G A T E k p o o l = max ( { σ ( W p o o l h u i k + b ) , ∀ u i ∈ N ( v ) } ) AGGREGATE^{pool}_k=\max \big( \{ \sigma(W_{pool}h^k_{u_i}+b),\forall u_i \in \mathcal{N}(v) \} \big) AGGREGATEkpool=max({σ(Wpoolhuik+b),∀ui∈N(v)})
在max pooling之前理论上可以进行任意次的全连接,不过文中只进行了一次。而且对于max操作,其他任意对称的向量操作都可以用来替换(例如mean),在测试中发现max pooling和mean pooling的差别不大,所以文中重点关注max pooling。
- 三种聚合器的代码
简单看一下三种聚合器的代码,对其中的过程进行简单的解释。每个聚合器中的全连接的output实际是真实需要的全连接的一半,因为最后有一层cat将两个连接起来。同时,父类AggregatorMixin的output_dim(是一个property)也说明了是cat过后的dim。
邻居都可以看成是 [batch_size, num_of_neibs, emb_dim] 。
class AggregatorMixin(object):
    @property
    def output_dim(self):
        tmp = torch.zeros((1, self.output_dim_))
        return self.combine_fn([tmp, tmp]).size(1)
- 均值聚合
class MeanAggregator(nn.Module, AggregatorMixin):
    def __init__(self, input_dim, output_dim, activation, combine_fn=lambda x: torch.cat(x, dim=1)):
        super(MeanAggregator, self).__init__()

        self.fc_x = nn.Linear(input_dim, output_dim, bias=False)
        self.fc_neib = nn.Linear(input_dim, output_dim, bias=False)

        self.output_dim_ = output_dim
        self.activation = activation
        self.combine_fn = combine_fn

    def forward(self, x, neibs):
        agg_neib = neibs.view(x.size(0), -1, neibs.size(1)) # !! Careful
        agg_neib = agg_neib.mean(dim=1) # Careful

        out = self.combine_fn([self.fc_x(x), self.fc_neib(agg_neib)])
        if self.activation:
            out = self.activation(out)

        return out
均值聚合再极端一点连带着本来的节点一起聚合的话就与GCN很相似了。
- 池化聚合
池化聚合的池化层是在每一维都找出max或者pool(根据max_pooling或者mean_pooling决定)。例如2个batch,每个batch有3个邻居,每个邻居表示用5维向量,tensor表示如下。
tensor([[[0.1950, 0.5397, 0.3345, 0.2660, 0.1003],
         [0.5881, 0.1832, 0.4886, 0.6777, 0.5668],
         [0.4004, 0.4422, 0.0874, 0.0581, 0.2404]],

        [[0.3545, 0.3430, 0.2549, 0.2214, 0.6208],
         [0.2679, 0.0386, 0.1341, 0.0790, 0.1455],
         [0.2180, 0.4433, 0.0158, 0.6341, 0.6979]]])
选择池化后,为:
tensor([[0.5881, 0.5397, 0.4886, 0.6777, 0.5668],
        [0.3545, 0.4433, 0.2549, 0.6341, 0.6979]])
可见结果的output[0][0]就是三个邻居的第一维池化来的,同样后面的也是。MeanPooling同理。
class PoolAggregator(nn.Module, AggregatorMixin):
    def __init__(self, input_dim, output_dim, pool_fn, activation, hidden_dim=512, combine_fn=lambda x: torch.cat(x, dim=1)):
        super(PoolAggregator, self).__init__()

        self.mlp = nn.Sequential(*[
            nn.Linear(input_dim, hidden_dim, bias=True),
            nn.ReLU()
        ])
        self.fc_x = nn.Linear(input_dim, output_dim, bias=False)
        self.fc_neib = nn.Linear(hidden_dim, output_dim, bias=False)

        self.output_dim_ = output_dim
        self.activation = activation
        self.pool_fn = pool_fn
        self.combine_fn = combine_fn

    def forward(self, x, neibs):
        h_neibs = self.mlp(neibs)
        agg_neib = h_neibs.view(x.size(0), -1, h_neibs.size(1))
        agg_neib = self.pool_fn(agg_neib)

        out = self.combine_fn([self.fc_x(x), self.fc_neib(agg_neib)])
        if self.activation:
            out = self.activation(out)

        return out


class MaxPoolAggregator(PoolAggregator):
    def __init__(self, input_dim, output_dim, activation, hidden_dim=512, combine_fn=lambda x: torch.cat(x, dim=1)):
        super(MaxPoolAggregator, self).__init__(**{
            "input_dim" : input_dim,
            "output_dim" : output_dim,
            "pool_fn" : lambda x: x.max(dim=1)[0],
            "activation" : activation,
            "hidden_dim" : hidden_dim,
            "combine_fn" : combine_fn,
        })


class MeanPoolAggregator(PoolAggregator):
    def __init__(self, input_dim, output_dim, activation, hidden_dim=512, combine_fn=lambda x: torch.cat(x, dim=1)):
        super(MeanPoolAggregator, self).__init__(**{
            "input_dim" : input_dim,
            "output_dim" : output_dim,
            "pool_fn" : lambda x: x.mean(dim=1),
            "activation" : activation,
            "hidden_dim" : hidden_dim,
            "combine_fn" : combine_fn,
        })
- LSTM聚合
输入LSTM聚合器之前的neibs需要先随机打乱顺序。
class LSTMAggregator(nn.Module, AggregatorMixin):
    def __init__(self, input_dim, output_dim, activation,
        hidden_dim=512, bidirectional=False, combine_fn=lambda x: torch.cat(x, dim=1)):

        super(LSTMAggregator, self).__init__()
        assert not hidden_dim % 2, "LSTMAggregator: hiddem_dim % 2 != 0"

        self.lstm = nn.LSTM(input_dim, hidden_dim // (1 + bidirectional), bidirectional=bidirectional, batch_first=True)
        self.fc_x = nn.Linear(input_dim, output_dim, bias=False)
        self.fc_neib = nn.Linear(hidden_dim, output_dim, bias=False)

        self.output_dim_ = output_dim
        self.activation = activation
        self.combine_fn = combine_fn

    def forward(self, x, neibs):
        x_emb = self.fc_x(x)

        agg_neib = neibs.view(x.size(0), -1, neibs.size(1))
        agg_neib, _ = self.lstm(agg_neib)
        agg_neib = agg_neib[:,-1,:] # !! Taking final state, but could do something better (eg attention)
        neib_emb = self.fc_neib(agg_neib)

        out = self.combine_fn([x_emb, neib_emb])
        if self.activation:
            out = self.activation(out)

        return out
3.4 数据的预处理
针对每一个节点,都有自己的节点idx和自己已有的特征feats(在代码中维度为input_dim),要把这些变成需要的输出维度output_dim(或者是不变)。代码中给出了三种方案,分别是什么都不做、embedding(在embedding中,使用采样得到的子图分为好几层,只有layer0的embedding表示直接用embedding_look_up,其他层数的embedding都需要经过计算得到,代码中的原因是只使用embedding容易overfit)和Linear,但是并不局限于这三种。
class IdentityPrep(nn.Module):
    def __init__(self, input_dim, n_nodes=None):
        """ Example of preprocessor -- doesn't do anything """
        super(IdentityPrep, self).__init__()
        self.input_dim = input_dim

    @property
    def output_dim(self):
        return self.input_dim

    def forward(self, ids, feats, layer_idx=0):
        return feats


class NodeEmbeddingPrep(nn.Module):
    def __init__(self, input_dim, n_nodes, embedding_dim=64):
        """ adds node embedding """
        super(NodeEmbeddingPrep, self).__init__()

        self.n_nodes = n_nodes
        self.input_dim = input_dim
        self.embedding_dim = embedding_dim
        self.embedding = nn.Embedding(num_embeddings=n_nodes + 1, embedding_dim=embedding_dim)
        self.fc = nn.Linear(embedding_dim, embedding_dim) # Affine transform, for changing scale + location

    @property
    def output_dim(self):
        if self.input_dim:
            return self.input_dim + self.embedding_dim
        else:
            return self.embedding_dim

    def forward(self, ids, feats, layer_idx=0):
        if layer_idx > 0:
            embs = self.embedding(ids)
        else:
            # Don't look at node's own embedding for prediction, or you'll probably overfit a lot
            embs = self.embedding(Variable(ids.clone().data.zero_() + self.n_nodes))

        embs = self.fc(embs)
        if self.input_dim:
            return torch.cat([feats, embs], dim=1)
        else:
            return embs


class LinearPrep(nn.Module):
    def __init__(self, input_dim, n_nodes, output_dim=32):
        """ adds node embedding """
        super(LinearPrep, self).__init__()
        self.fc = nn.Linear(input_dim, output_dim, bias=False)
        self.output_dim = output_dim

    def forward(self, ids, feats, layer_idx=0):
        return self.fc(feats)
3.5 采样
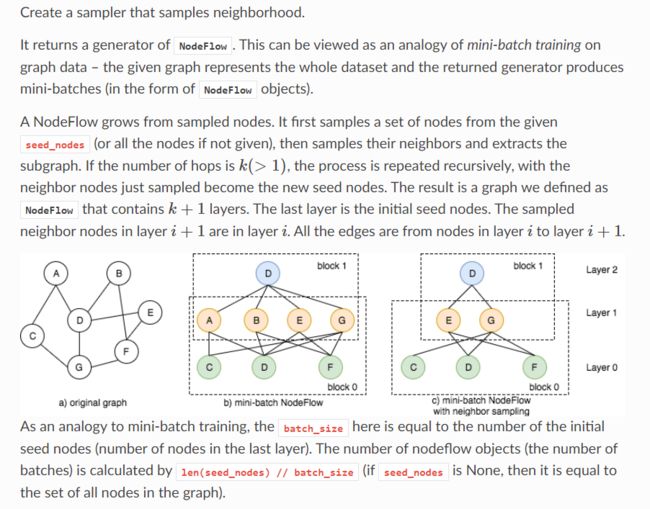
采样的过程是获得多个mini-batch用来计算的过程。
- 有一些seed nodes(如果不指定就是all nodes)
- 得到这些seed nodes的neighbors,这就是其中的一层邻居
- 将刚得到的neighbors作为新的seed nodes,抽取其neighbors作为下一层,循环下去直到需要的层数
- 随机采样固定的个数得到sub graph
4 BATCH操作
BATCH上的操作的核心是采样和计算。计算过程其实和算法1中是一样的,而对于采样过程,论文中使用的是随机均匀采样,这个采样是无关于迭代层数K的。当某一次采样的size大于节点的度(即需要采样的邻居个数超过了实际拥有的邻居个数)时,使用有放回的采样(We use a uniform sampling function in this work and sample with replacement in cases where the sample size is larger than the node’s degree.)。整个采样过程可以用一下代码简单演示,每一层的扩充和集合中的代码增加顺序相关。
def sample():
    def get_neighbors(set, idx):
        left = idx-1 if idx>0 else 0
        right = idx+1 if idx<9 else 9
        return [set[left],set[right]]

    nodes = [0, 1, 2, 3, 4, 5, 6, 7, 8, 9]
    print('假定相邻节点之间有边。')
    print('original nodes: ', nodes)
    print('**********采样到batch**********')
    B = [[], [], []]
    B[2] = [4, 9]       # 初始的seed nodes
    layer = [2, 1]   # 总共要进行采样几层/次
    for k in layer:
        B[k-1] = B[k]
        for u in B[k]:
            neibs = get_neighbors(nodes, u)
            B[k-1] = B[k-1] + neibs
    for idx, lst in enumerate(B):
        formatlist = list(set(lst))     # 去重
        formatlist.sort(key=lst.index)      # 原顺序排列
        print('set/layer', idx, ':', formatlist)
    return B
结果如下(本例中每个节点最多只有两个邻居节点,在对边界的节点采样邻居节点时,把自身当成邻居):
假定相邻节点之间有边。
original nodes:  [0, 1, 2, 3, 4, 5, 6, 7, 8, 9]
**********采样到batch**********
set/layer 0 : [4, 9, 3, 5, 8, 2, 6, 7]
set/layer 1 : [4, 9, 3, 5, 8]
set/layer 2 : [4, 9]
在tf的实现中,对于sample这一步出现在数据构造器里(minibatch.py文件下),其中开始的neighbors即为所有邻居节点,需要把邻居个数和指定的最大的度比较来进行不同的操作,前面已经提到,这样做的目的是为了每一个batch的计算消耗都是相同的,也方便了后续的训练,因为数据的格式进行了统一。
    if len(neighbors) > self.max_degree:
        neighbors = np.random.choice(neighbors, self.max_degree, replace=False)
    elif len(neighbors) < self.max_degree:
        neighbors = np.random.choice(neighbors, self.max_degree, replace=True)
    adj[self.id2idx[nodeid], :] = neighbors

