Centos7 LVM分区之VG扩容、LV扩容、LV缩减、LVM快照
本文多数是根据该篇文件来写的:https://www.dwhd.org/20150521_225146.html
先对前辈表示感谢
一、简介
LVM是 Logical Volume Manager(逻辑卷管理)的简写,它是Linux环境下对磁盘分区进行管理的一种机制,它由Heinz Mauelshagen在Linux 2.4内核上实现,于1998年发布到Linux社区中,它允许你在Linux系统上用简单的命令行管理一个完整的逻辑卷管理环境。
二、版本
LVM1 最初的LVM与1998年发布,只在Linux内核2.4版本上可用,它提供最基本的逻辑卷管理。
LVM2 LVM-1的更新版本,在Linux内核2.6中才可用,它在标准的LVM-1功能外还提供了额外的功能。
查看本地基本情况:

三、LVM 模块
Physical volume (PV)、Volume group (VG)、Logical volume(LV)、 Physical extent (PE),下面我们用一个简单的图来说明下物理卷、卷组、逻辑卷他们之间的关系(此图只是个人理解,仅供参考)
LVM 详解
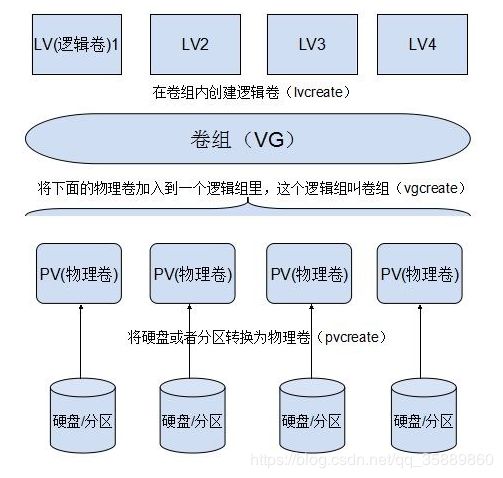
简而言之:
逻辑卷的创建,就是将多块硬盘创建物理卷,而将这些物理卷以逻辑的形式总成一个容器,然后从这个容器里面创建大小不同的分区文件,而这个容器就是所谓的逻辑卷,而从这个容器里创建大小不同的分区文件,这个分区文件就叫做逻辑卷。嘿嘿,你懂了吗?
_ ……
四、 具体操作
1. 先查看机器的磁盘情况。 (图中的展示的解读:看我这边博文:https://blog.csdn.net/qq_35889860/article/details/102399250)
2. 把/dev/sdb 分区,并改变这些分区的类型,具体操作过程如下: (里面操作具体的解释见本文一开始连接中)
root@sz2-201-5-centos213:~#fdisk /dev/sdb
Welcome to fdisk (util-linux 2.23.2).

Changes will remain in memory only, until you decide to write them.
Be careful before using the write command.

Device does not contain a recognized partition table
Building a new DOS disklabel with disk identifier 0x48c38c1a.

Command (m for help): p

Disk /dev/sdb: 375.8 GB, 375809638400 bytes, 734003200 sectors
Units = sectors of 1 * 512 = 512 bytes
Sector size (logical/physical): 512 bytes / 512 bytes
I/O size (minimum/optimal): 512 bytes / 512 bytes
Disk label type: dos
Disk identifier: 0x48c38c1a

   Device Boot      Start         End      Blocks   Id  System

Command (m for help): n
Partition type:
   p   primary (0 primary, 0 extended, 4 free)
   e   extended
Select (default p): p
Partition number (1-4, default 1): 1
First sector (2048-734003199, default 2048):
Using default value 2048
Last sector, +sectors or +size{K,M,G} (2048-734003199, default 734003199): +50G
Partition 1 of type Linux and of size 50 GiB is set

Command (m for help): n
Partition type:
   p   primary (1 primary, 0 extended, 3 free)
   e   extended
Select (default p): p
Partition number (2-4, default 2): 2
First sector (104859648-734003199, default 104859648):
Using default value 104859648
Last sector, +sectors or +size{K,M,G} (104859648-734003199, default 734003199): +60G
Partition 2 of type Linux and of size 60 GiB is set

Command (m for help): n
Partition type:
   p   primary (2 primary, 0 extended, 2 free)
   e   extended
Select (default p): p
Partition number (3,4, default 3): 3
First sector (230688768-734003199, default 230688768):
Using default value 230688768
Last sector, +sectors or +size{K,M,G} (230688768-734003199, default 734003199): +70G
Partition 3 of type Linux and of size 70 GiB is set

Command (m for help): p

Disk /dev/sdb: 375.8 GB, 375809638400 bytes, 734003200 sectors
Units = sectors of 1 * 512 = 512 bytes
Sector size (logical/physical): 512 bytes / 512 bytes
I/O size (minimum/optimal): 512 bytes / 512 bytes
Disk label type: dos
Disk identifier: 0x48c38c1a

   Device Boot      Start         End      Blocks   Id  System
/dev/sdb1            2048   104859647    52428800   83  Linux
/dev/sdb2       104859648   230688767    62914560   83  Linux
/dev/sdb3       230688768   377489407    73400320   83  Linux

Command (m for help): t
Partition number (1-3, default 3): 1
Hex code (type L to list all codes): 8e
Changed type of partition 'Linux' to 'Linux LVM'

Command (m for help): t
Partition number (1-3, default 3): 2
Hex code (type L to list all codes): 8e
Changed type of partition 'Linux' to 'Linux LVM'

Command (m for help): t
Partition number (1-3, default 3): 3
Hex code (type L to list all codes): 8e
Changed type of partition 'Linux' to 'Linux LVM'

Command (m for help): p

Disk /dev/sdb: 375.8 GB, 375809638400 bytes, 734003200 sectors
Units = sectors of 1 * 512 = 512 bytes
Sector size (logical/physical): 512 bytes / 512 bytes
I/O size (minimum/optimal): 512 bytes / 512 bytes
Disk label type: dos
Disk identifier: 0x48c38c1a

   Device Boot      Start         End      Blocks   Id  System
/dev/sdb1            2048   104859647    52428800   8e  Linux LVM
/dev/sdb2       104859648   230688767    62914560   8e  Linux LVM
/dev/sdb3       230688768   377489407    73400320   8e  Linux LVM

Command (m for help): w
The partition table has been altered!

Calling ioctl() to re-read partition table.
Syncing disks.
root@sz2-201-5-centos213:~#
执行 partx -a /dev/sdb #重新读取磁盘分区表

多执行几次,报错不影响后面的操作。
3. 将物理分区设置为物理卷
pvcreate /dev/sdb{1,2,3}

用pvs来查看当前系统上所有的pv (可以查看到当前系统上已经有一个VG了【centos】,是之前公司模板里面就弄好的。)

4. 创建卷组VG
因为之前就有个卷组,所以我打算吧物理卷/dev/sdb3 分给之前的卷组centos,用作以后扩容,故下图只用sdb1,2来创建新的卷组

可以使用vgs查看到 当前有几个卷组

详细信息可以使用vgdisplay来展示
root@sz2-201-5-centos213:~#vgdisplay
  --- Volume group ---
  VG Name               VGtest  #卷组名是VGtest
  System ID
  Format                lvm2
  Metadata Areas        2
  Metadata Sequence No  1
  VG Access             read/write
  VG Status             resizable
  MAX LV                0
  Cur LV                0
  Open LV               0
  Max PV                0
  Cur PV                2
  Act PV                2
  VG Size               109.99 GiB  #新的VG大小是109.99G 是1个50G+1个60G分区组成的
  PE Size               4.00 MiB  #物理盘的基本单位:默认4MB
  Total PE              28158
  Alloc PE / Size       0 / 0
  Free  PE / Size       28158 / 109.99 GiB
  VG UUID               ee6qFL-d1ki-qIvM-Y9Cj-OQw0-kL8F-Cx2aTX

  --- Volume group ---
  VG Name               centos
  System ID
  Format                lvm2
  Metadata Areas        1
  Metadata Sequence No  3
  VG Access             read/write
  VG Status             resizable
  MAX LV                0
  Cur LV                2
  Open LV               2
  Max PV                0
  Cur PV                1
  Act PV                1
  VG Size               <299.51 GiB
  PE Size               4.00 MiB
  Total PE              76674
  Alloc PE / Size       76674 / <299.51 GiB
  Free  PE / Size       0 / 0
  VG UUID               fSstjW-t6P2-znOq-zb5b-YPKk-JNu7-C3zuOb

root@sz2-201-5-centos213:~#
5. 在卷组里创建逻辑卷并格式化、用作挂载使用

如果创建错了,可以通过如下命名进行删除重建

创建完以后可以使用fdisk -l 查看到多了一块虚拟机磁盘如下
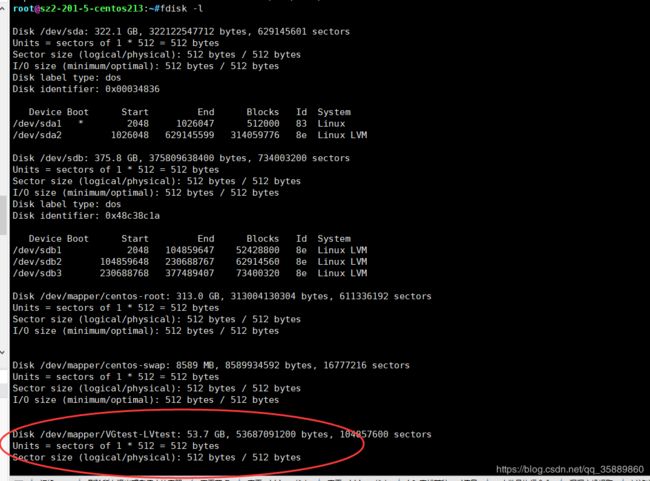
格式化新建的LVtest1逻辑卷为ext4格式
6. 挂载目录
把刚刚创建的逻辑卷挂载到一个新创建的目录,如下图,这样就可以使用了
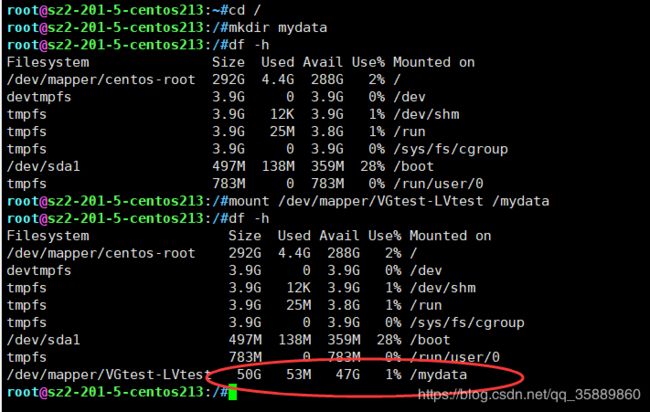
7. 发现逻辑卷lv空间不够,我们需要扩容lv(支持在线扩容)
如下图所示,我们以扩centos卷组下面的逻辑卷/dev/mapper/centos-root 为例进行实验
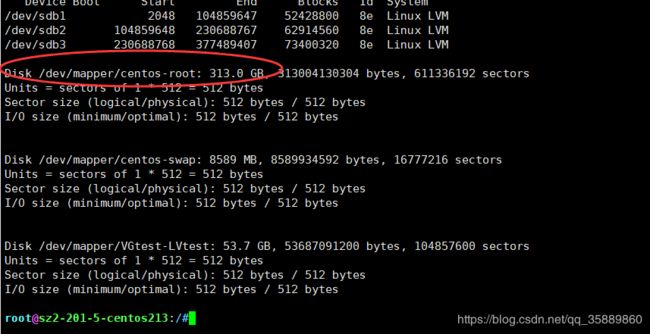
还记得前面操作我们把硬盘 /dev/sdb 分成了 /dev/sdb{1,2,3} 三个分区,并且改分区格式为8e(LVM)。前面只使用了其中的两个分区来作为物理卷创建了卷组,还剩一个物理卷(/dev/sdb3)没有使用,我们用它来扩大我们的centos卷组容量。并扩容centos卷组下面的LV(/dev/mapper/centos-root)
先查看pv (可以看到sdb3是没有分有卷组的)

vgextend centos /dev/sdb3 #扩展卷组

可以看到扩展以后,vg(卷组)的大小增加了70G,并且sdb3物理卷也绑定到了centos卷组中去了
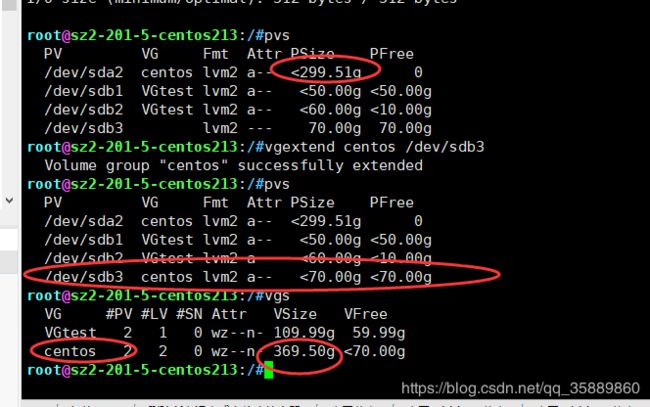
通过上面的步骤,我们扩展了卷组,现在我们准备扩展逻辑卷
先通过lvs查看之前的逻辑卷情况,可以看到centos卷组只用了291.5+8=300G,但是上面我们又扩展了70G,所以我们准备把这70G分给centos-root。同样的对比上面图和下图,可以发现VGtest卷组的容量是109.99G 下面才用了50G,还有60G没有分配。

如下图给lv(逻辑卷/dev/mapper/centos-root已经扩容了69G了),容量增加到了360.51了。


通过下面命令查看到,虽然逻辑卷扩容了,但是并没有真正增加到实际空间上面去。
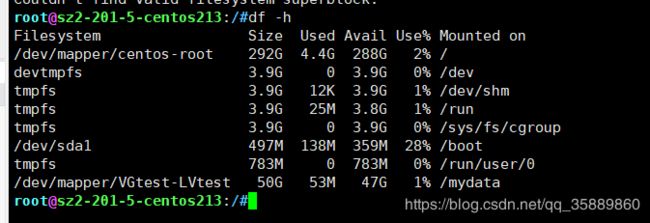
xfs_info /dev/mapper/centos-root
xfs_growfs /dev/mapper/centos-root(如果是centos6的话,需要换成这句:resize2fs -p /dev/mapper/centos-root),需要通过这句命令使实际空间增加,如下图
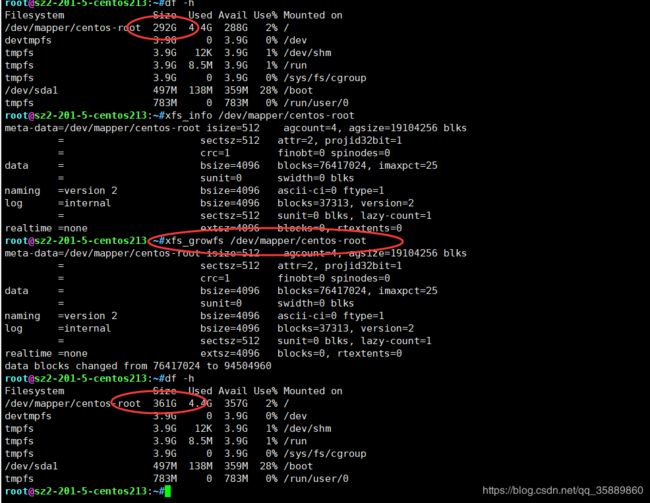
这样差不多整体就结束了。
如果还涉及到缩容等操作的,参考文章开头中的提供的链接
