SpringSecurity安全框架快速入门及进阶
SpringSecurity安全框架快速入门及进阶
1. 快速入门小demo
1.1 创建maven的web项目(过程略)
1.2 引入springsecurity的框架依赖
<project xmlns="http://maven.apache.org/POM/4.0.0"
         xmlns:xsi="http://www.w3.org/2001/XMLSchema-instance"
         xsi:schemaLocation="http://maven.apache.org/POM/4.0.0 http://maven.apache.org/xsd/maven-4.0.0.xsd">
    <modelVersion>4.0.0modelVersion>

    <groupId>com.itheimagroupId>
    <artifactId>spring-security-demoartifactId>
    <version>1.0-SNAPSHOTversion>

    <packaging>warpackaging>
    <properties>
        <spring.version>5.0.5.RELEASEspring.version>
    properties>
    <dependencies>
        <dependency>
            <groupId>org.springframework.securitygroupId>
            <artifactId>spring-security-webartifactId>
            <version>${spring.version}version>
        dependency>
        <dependency>
            <groupId>org.springframework.securitygroupId>
            <artifactId>spring-security-configartifactId>
            <version>${spring.version}version>
        dependency>
        <dependency>
            <groupId>javax.servletgroupId>
            <artifactId>servlet-apiartifactId>
            <version>2.5version>
            <scope>providedscope>
        dependency>
    dependencies>
    <build>
        <plugins>
            <plugin>
                <groupId>org.apache.tomcat.mavengroupId>
                <artifactId>tomcat7-maven-pluginartifactId>
                <configuration>

                    <port>9090port>

                    <path>/path>
                configuration>
            plugin>
        plugins>
    build>

project>
1.3 在webapp/WEB-INF文件夹下创建web.xml
<web-app xmlns:xsi="http://www.w3.org/2001/XMLSchema-instance"
         xmlns="http://java.sun.com/xml/ns/javaee"
         xsi:schemaLocation="http://java.sun.com/xml/ns/javaee
        http://java.sun.com/xml/ns/javaee/web-app_2_5.xsd"
         version="2.5">

    <context-param>
        <param-name>contextConfigLocationparam-name>
        <param-value>classpath:spring-security.xmlparam-value>
    context-param>

    <listener>
        <listener-class>
            org.springframework.web.context.ContextLoaderListener
        listener-class>
    listener>

    <filter>
        <filter-name>springSecurityFilterChainfilter-name>

        <filter-class>org.springframework.web.filter.DelegatingFilterProxyfilter-class>
    filter>
    <filter-mapping>
        <filter-name>springSecurityFilterChainfilter-name>
        <url-pattern>/*url-pattern>
    filter-mapping>
web-app>
1.4 在resources文件夹下建立spring-security.xml文件
<beans:beans xmlns="http://www.springframework.org/schema/security"
             xmlns:beans="http://www.springframework.org/schema/beans"
             xmlns:xsi="http://www.w3.org/2001/XMLSchema-instance"
             xsi:schemaLocation="http://www.springframework.org/schema/beans
            http://www.springframework.org/schema/beans/spring-beans.xsd
            http://www.springframework.org/schema/security
            http://www.springframework.org/schema/security/spring-security.xsd">

    <http>

        <intercept-url pattern="/**" access="hasRole('ROLE_ADMIN')"/>

        <form-login/>

        <logout/>
    http>


    <authentication-manager>
        <authentication-provider>
            <user-service>

                <user name="admin" password="{noop}123456"
                      authorities="ROLE_ADMIN"/>
            user-service>
        authentication-provider>
    authentication-manager>
beans:beans>
上面的案例为{noop}密码明文方式的代码,我们还有另一种bcrypt加密配置方式,来指定策略,同时,也可以将noop的位置 — bcrypt
    <authentication-manager>
        <authentication-provider>
            <user-service>
                <user name="admin"
                      password="$2a$10$EPtdfwSJ0ABj5JsCyLqhFe1g503DgA4lQvOxyZF/3usoyje5/q/Dy"
                      authorities="ROLE_ADMIN">user>
            user-service>
            <password-encoder ref="bcryptEncoder">password-encoder>
        authentication-provider>
    authentication-manager>
    <beans:bean id="bcryptEncoder" class="org.springframework.security.crypto.bcrypt.BCryptPasswordEncoder"/>
1.5 在webapp文件夹下创建index.html进行拦截测试
<html lang="en">
<head>
    <meta charset="UTF-8">
    <title>spring-security demotitle>
head>
<body>
	欢迎来到神奇的spring security世界!
body>
html>
1.6 打开浏览器,进行测试

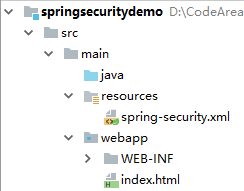
1.7 最终目录结构
2. 实际生产环境中,springsecurity整合配置
2.1 创建自己指定的login页面,取代springsecurity自动生成的登录页面
<html lang="en">
<head>
    <meta charset="UTF-8">
    <title>logintitle>
head>
<body>
<form action="/login" method="post">
    <table>
        <tr>
            <td>用户名:td>
            <td><input name="username">td>
        tr>
        <tr>
            <td>密码:td>
            <td><input type="password" name="password">td>
        tr>
    table>
    <button>登录button>
form>
body>
html>
2.2 创建login-error页面,用户登录失败后的跳转页面
<html lang="en">
<head>
    <meta charset="UTF-8">
    <title>log-errortitle>
head>
<body>
用户名或密码错误!
body>
html>
2.3 修改spirng-security.xml文件
主要修改配置:
- :
login-page:指定指定的登录页面
default-target-url:登录后默认进入的页面
authentication-failure-url:用户名密码错误后跳转的页面1. - 解决spring-security – 关闭csrf验证,跨站请求伪造 token:
使用条件:当我们自己指定登录页面,并且该登录页面为xx.html时需将csrf进行关闭
当使用系统自定义的时,其表单中携带token验证码,所以不需进行csrf关闭操作

<csrf disabled="true">csrf>
- 由于设定pattern="/**", 所以会对我们指定的login-page/default-target-url/authentication-failure-url进行页面拦截的排除过滤:
<http pattern="/login.html" security="none">http>
<http pattern="/log_error.html" security="none">http>
修改后spring-security.xml:
<beans:beans xmlns="http://www.springframework.org/schema/security"
             xmlns:beans="http://www.springframework.org/schema/beans"
             xmlns:xsi="http://www.w3.org/2001/XMLSchema-instance"
             xsi:schemaLocation="http://www.springframework.org/schema/beans
            http://www.springframework.org/schema/beans/spring-beans.xsd
            http://www.springframework.org/schema/security
            http://www.springframework.org/schema/security/spring-security.xsd">


    <http pattern="/login.html" security="none">http>
    <http pattern="/log_error.html" security="none">http>


    <http>

        <intercept-url pattern="/**" access="hasRole('ROLE_ADMIN')"/>


        <form-login  login-page="/login.html" default-target-url="/index.html" authentication-failure-url="/log_error.html" />

        <logout/>

        <csrf disabled="true">csrf>
    http>

    <authentication-manager>
        <authentication-provider>
            <user-service>
                <user name="admin"
                      password="$2a$10$EPtdfwSJ0ABj5JsCyLqhFe1g503DgA4lQvOxyZF/3usoyje5/q/Dy"
                      authorities="ROLE_ADMIN">user>
            user-service>
            <password-encoder ref="bcryptEncoder">password-encoder>
        authentication-provider>
    authentication-manager>
    <beans:bean id="bcryptEncoder" class="org.springframework.security.crypto.bcrypt.BCryptPasswordEncoder"/>
beans:beans>
2.4 测试
- 输入localhost:9090后,我们会发现进入了自己刚才自定义的登录页面
- 输入错误的登录名,密码
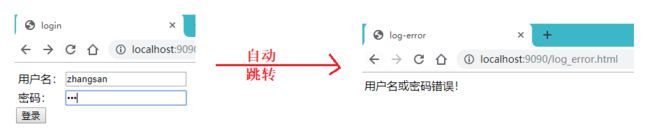 3. 输入正确的登录名,密码

2.5 最终目录结构

3. 实际生产环境中,springsecurity整合配置2
3.1 实际生产环境中都是从数据库中进行数据的读取,如何解决?
替换xml配置
<user-service>
     <user name="admin"
           password="$2a$10$EPtdfwSJ0ABj5JsCyLqhFe1g503DgA4lQvOxyZF/3usoyje5/q/Dy"
           authorities="ROLE_ADMIN">user>
 user-service>
替换为:可进行更加灵活的进行用户的权限认证&权限赋予操作(如:后续进行数据库的查询认证以及权限授予),由于查询数据需要进行MyBatis及spring的配置,故在此略
**
* UserDetailService封装了:
*          1.权限认证
*          2.权限赋予
*/
public class UserDetailServiceImpl implements UserDetailsService {

   @Override
   public UserDetails loadUserByUsername(String username) throws UsernameNotFoundException {
       //实际项目中应该从数据库中提取用户列表
       List<GrantedAuthority> grantedAuthorities = new ArrayList<GrantedAuthority>();
       //写死的权限授予,直接授予该用户ROLE_ADMIN权限
       grantedAuthorities.add(new SimpleGrantedAuthority("ROLE_ADMIN"));
       return new User(username,"$10$61ogZY7EXsMDWeVGQpDq3OBF1.phaUu7.xrwLyWFTOu8woE08zMIW",grantedAuthorities );
   }
}
同时修改spring-security.xml配置
    <authentication-manager>

        <authentication-provider user-service-ref="userDetailService">

            <password-encoder ref="bcryptEncoder">password-encoder>
        authentication-provider>
    authentication-manager>

    <beans:bean id="userDetailService" class="com.springsecurity.demo.UserDetailServiceImpl">beans:bean>
    <beans:bean id="bcryptEncoder" class="org.springframework.security.crypto.bcrypt.BCryptPasswordEncoder"/>
3.2 测试后,验证无误
 出现了控制台输入乱码:解决方案,settings – build – build tools – maven – runner 补充添加:-Dfile.encoding=GB2312

从图片中可以看出,再次测试后乱码问题得到解决

3.4 完成数据库密码查询(模板)
public class UserDetailServiceImpl implements UserDetailsService {


    @Reference
    private AdminService adminService;

    public UserDetails loadUserByUsername(String s) throws UsernameNotFoundException {
        System.out.println("经过了UserDetailServiceImpl");
        //1. 权限认证
        Map map=new HashMap<>();
        map.put("loginName",s);
        map.put("status","1");
        List<Admin> list = adminService.findList(map);
        if(list.size()==0){
            return null;
        }
        //2.权限赋予
        //实际项目中应该从数据库中提取用户的角色列表   通过角色    通过权限
        List<GrantedAuthority> grantedAuthorities=new ArrayList<GrantedAuthority>();
        //
        grantedAuthorities.add( new SimpleGrantedAuthority("ROLE_ADMIN"));
        return new User(s,list.get(0).getPassword(),grantedAuthorities);
    }
}
最后补充:
SpringSecurity有个同源策略问题:
可以在spring-security.xml中标签体中配置
<headers>
	<frame-options policy="SAMEORIGIN">frame-options>
headers>