linux 内核编译驱动模块ko的配置以及加载模块卸载模块实例测试
linux 内核编译驱动模块ko的配置以及加载模块、卸载模块实例测试
一、要让linux系统支持动态加载驱动模块必须先对linux 内核进行相关的配置,不然编译不过,加载模块也会加载失败甚至导致设备重启。
1、勾选内核Enable loadable module support选项
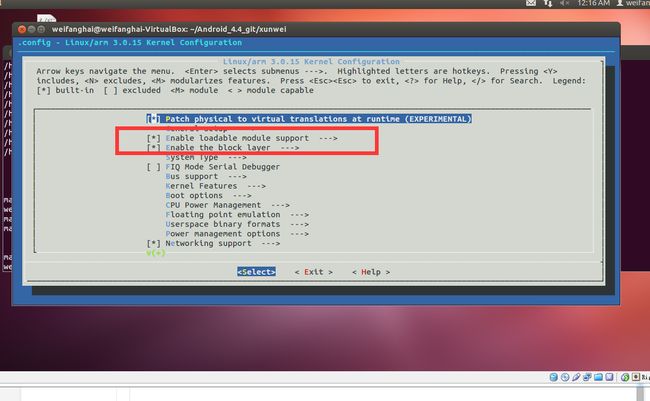
2、按回车进入到Enable loadable module support选项子目录,如下图勾选对应选项。

简单的解释一下各选项:
Enable loadable module support
打开可加载模块支持,如果打开它则必须通过”make modules_install”把内核模块安装在/lib/modules/中Forced module loading
允许模块强制加载
Module unloading
允许卸载已经加载的模块
Forced module unloading
允许强制卸载正在使用中的模块(比较危险)
Module versioning support
允许使用其他内核版本的模块(可能会出问题)
Source checksum for all modules
为所有的模块校验源码,如果你不是自己编写内核模块就不需要它
Module signature verification
模块签名认证
Require modules to be validly signed
要求模块有效签名
Automatically sign all modules
自动签署所有模块
Which hash algorithm should modules be signed with? (Sign m
哪个散列算法应该与模块签署? (Sign m
Compress modules on installation
在安装时压缩模块
Trim unused exported kernel symbols
修剪未使用的导出的内核符号
3、然后编译内核一下,一定要编译。

二、完成的上面的一步,现在可以编译驱动模块文件,生成ko文件了。
1、新建一个Makefile文件。KDIR是内核代码的路径,我这里的路径是
/home/weifanghai/Android_4.4_git/xunwei/kernel/iTop4412_Kernel_3.0,修改到你放内核代码的路径。
Makefile
obj-m += schedule_work.o

KDIR := /home/weifanghai/Android_4.4_git/xunwei/kernel/iTop4412_Kernel_3.0
PWD ?= $(shell pwd)


all:
	make -C $(KDIR) M=$(PWD) modules

clean:
	rm -rf *.o

2、在同一个目录下新建一个c文件,比如schedule_work.c
我的测试文件schedule_work.c 这是一个简单的测试代码。
/*
* LEDs driver for GPIOs
*
* Copyright (C) 2007 8D Technologies inc.
* Raphael Assenat
* Copyright (C) 2008 Freescale Semiconductor, Inc.
*
* This program is free software; you can redistribute it and/or modify
* it under the terms of the GNU General Public License version 2 as
* published by the Free Software Foundation.
*
*/
#include
#include
#include
#include
#include
#include
#include
#include
#include
#include
#include
#include
#include

static int steping_motor_probe(struct platform_device *pdev)
{

   printk("steping_motor_probe 20180415\n");

}
static int steping_motor_remove(struct platform_device *pdev)
	{
	   printk("steping_motor_probe remove 20180415\n");
	   return 0;
	}


static struct platform_driver steping_motor_driver = {
	.probe		= steping_motor_probe,
	.remove		= steping_motor_remove,
	.driver		= {
	          .name	= "love_tanghanyue",
	          .owner	= THIS_MODULE,
	},
	};

static int motor_init(void)
{
int DriverState;
printk(KERN_EMERG "HELLO WORLD enter! hanyue\n");
DriverState = platform_driver_register(&steping_motor_driver);
printk(KERN_EMERG "\tDriverState is %d\n",DriverState);
return 0;
}

static void motor_exit(void)
{
printk(KERN_EMERG "HELLO WORLD exit!\n");
platform_driver_unregister(&steping_motor_driver);
}

module_init(motor_init);
module_exit(motor_exit);


MODULE_AUTHOR("[email protected]  ## tanghanyue.cc");
MODULE_DESCRIPTION("2-Phase Steping motor driver");
MODULE_LICENSE("GPL");
MODULE_ALIAS("platform:setping-motor");
3、编译,直接在该路径下make就可以了,就生成了ko文件了。

三、做了前面的准备工作,已经得到模块ko文件,现在可以开始测试加载和卸载驱动模块。
1、insmod加载模块命令 ;lsmod查看模块命令;rmmod卸载模块命令。
2、把模块文件(例如schedule_work.ko)放到设备里面,我这里是在android系统上测试,内核都是linux,都一样,我直接push到system/bin目录下面。
3、加载内核、查看模块命令、rmmod卸载模块命令

4、看打印log,测试ok,加载和卸载模块都ok。
