消息中间件-ActiveMq
一:准备ActiveMq的运行环境
1.1 下载安装包
下载地址:
链接:https://pan.baidu.com/s/1xpDMGdWaTKCtM9_-6xI2Nw
提取码:5dds
1.2 将下载的安装包上传到服务器并且解压
#解压命令:
tar zxvf apache-activemq-5.12.0-bin.tar.gz
1.3 运行activemq命令
cd /apache-activemq-5.12.0/bin
./activemq start

#如果看到如下信息,说明启动成功
INFO: Loading '/home/xiuxiang/apache-activemq-5.12.0//bin/env'
INFO: Using java '/usr/local/java/jdk1.8.0_11/bin/java'
INFO: Starting - inspect logfiles specified in logging.properties and log4j.properties to get details
INFO: pidfile created : '/home/xiuxiang/apache-activemq-5.12.0//data/activemq.pid' (pid '13946')
1.4 通过浏览器访问,验证是否成功
根据服务器IP地址,访问默认端口号是 6161
浏览器输入 http://192.168.25.128:6161
如果看到如下页面,说明安装并且运行成功

点击 Manage ActiveMQ Broker 进入后台,默认的账号和密码都是admin
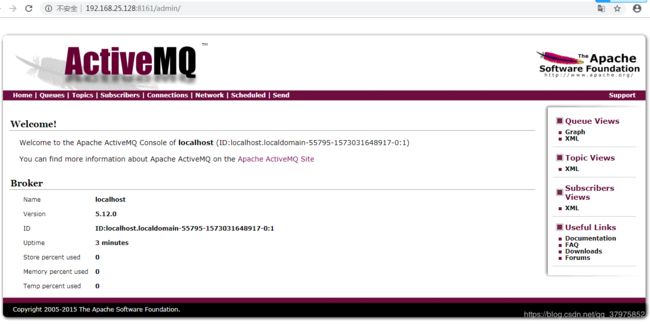
恭喜,环境搭建成功!
二:开始使用ActiveMQ,实现消息的发送和接收
2.1:搭建java项目,配置开发环境
2.1.1:搭建普通的maven项目,配置pom文件
pom文件中只需要引入activeMq相关的依赖包以及jms依赖,Jms是官方提供的消息传输规范,activeMq对这个规范做了实现
pom文件内容如下:
<?xml version="1.0" encoding="UTF-8"?>
<project xmlns="http://maven.apache.org/POM/4.0.0"
         xmlns:xsi="http://www.w3.org/2001/XMLSchema-instance"
         xsi:schemaLocation="http://maven.apache.org/POM/4.0.0 http://maven.apache.org/xsd/maven-4.0.0.xsd">
    <modelVersion>4.0.0</modelVersion>

    <groupId>com.activemq.test</groupId>
    <artifactId>activemq</artifactId>
    <version>1.0-SNAPSHOT</version>
    <packaging>jar</packaging>

    <dependencies>
        <!--<dependency>
            <groupId>org.springframework</groupId>
            <artifactId>spring-jms</artifactId>
            <version>4.3.12.RELEASE</version>
        </dependency>
        <dependency>
            <groupId>org.apache.activemq</groupId>
            <artifactId>activemq-client</artifactId>
            <version>5.13.4</version>
        </dependency>
        <dependency>
            <groupId>org.springframework</groupId>
            <artifactId>spring-test</artifactId>
            <version>4.3.12.RELEASE</version>
        </dependency>
        <dependency>
            <groupId>junit</groupId>
            <artifactId>junit</artifactId>
            <version>4.12</version>
        </dependency>-->

    </dependencies>
    <build>
        <finalName>ShopPra1</finalName>
        <plugins>
            <plugin>
                <groupId>org.apache.maven.plugins</groupId>
                <artifactId>maven-compiler-plugin</artifactId>
                <version>3.6.0</version>
                <configuration>
                    <source>1.8</source>
                    <target>1.8</target>
                    <encoding>UTF-8</encoding>
                    <compilerArguments>
                        <verbose />
                        <bootclasspath>${java.home}/lib/rt.jar;${java.home}/lib/jce.jar</bootclasspath>
                    </compilerArguments>
                </configuration>
            </plugin>
        </plugins>
    </build>
</project>
2.1.2:编写和activeMq相关的配置文件spring-mq.xml
1.需要配置连接工厂对象 => 需要传入activeMq的地址,这里使用tcp协议连接,需要跟换成自己的地址
2.配置spring提供的JmsTemplate对象,用于操作ActiveMq的消息发送和接收
3.配置消息目的地对象Destination 支持两种类型的实现 Queue | Topic 其中Queue是点对点方式的目的地,Topic是订阅模式的目的地
4.配置消息监听器,用于接收消息并且消费消息逻辑处理
配置的bean class为com.activemq.listener.DemoMessageListener是自定义类,需要实现MessageListener接口, 重载onMessage方法
5.配置消息监听容器,这个对象是spring提供的DefaultMessageListenerContainer,被spring管理后,配置的监听器就会处于监听状态,需要通过property设置连接工厂对象,监听的目标地址,监听器,具体的配置如下:
<?xml version="1.0" encoding="UTF-8"?>
<beans xmlns="http://www.springframework.org/schema/beans"
       xmlns:xsi="http://www.w3.org/2001/XMLSchema-instance"
       xmlns:context="http://www.springframework.org/schema/context"
       xsi:schemaLocation="
        http://www.springframework.org/schema/beans
        http://www.springframework.org/schema/beans/spring-beans.xsd
        http://www.springframework.org/schema/context
        http://www.springframework.org/schema/context/spring-context.xsd">


    <!--包扫描-->
    <context:component-scan base-package="com.activemq" />

    <!-- 真正可以产生Connection的ConnectionFactory,由对应的 JMS服务厂商提供-->
    <bean id="targetConnectionFactory" class="org.apache.activemq.ActiveMQConnectionFactory">
        <property name="brokerURL" value="tcp://192.168.25.128:61616"/>
    </bean>

    <!-- Spring用于管理真正的ConnectionFactory的ConnectionFactory -->
    <bean id="connectionFactory" class="org.springframework.jms.connection.SingleConnectionFactory">
        <!-- 目标ConnectionFactory对应真实的可以产生JMS Connection的ConnectionFactory -->
        <property name="targetConnectionFactory" ref="targetConnectionFactory"/>
    </bean>

    <!-- Spring提供的JMS工具类,它可以进行消息发送、接收等 -->
    <bean id="jmsTemplate" class="org.springframework.jms.core.JmsTemplate">
        <!-- 这个connectionFactory对应的是我们定义的Spring提供的那个ConnectionFactory对象 -->
        <property name="connectionFactory" ref="connectionFactory"/>
    </bean>

    <!--这个是队列目的地,点对点的  文本信息-->
    <bean id="queueTextDestination" class="org.apache.activemq.command.ActiveMQQueue">
        <constructor-arg value="queue_text"/>
    </bean>

    <!--这是队列的目的地,订阅模式的-->
    <bean id="topicDestination" class="org.apache.activemq.command.ActiveMQTopic">
        <constructor-arg value="topic_text"/>
    </bean>

    <!--配置消息监听器,用于接收消息-->
    <bean id="messageListener" class="com.activemq.listener.DemoMessageListener" />

    <!--配置消息监听容器-->
    <bean class="org.springframework.jms.listener.DefaultMessageListenerContainer">
        <property name="connectionFactory" ref="connectionFactory"></property>
        <property name="destination" ref="queueTextDestination"></property>
        <property name="messageListener" ref="messageListener"></property>
    </bean>
</beans>
2.2: 使用传统的方式进行消息发送和接收
JMS规范中有五种消息类型:前三种是常用的消息类型
TextMessage: 文本类型的消息 字符串
MapMassage: Map类型的消息 可以传输Map数据
ObjectMessage:JavaBean类型的消息,可以传输一个JavaBean对象
BytesMessage: 不常用 字节消息
StreamMessage:不常用 流消息
2.2.1:创建一个spring的测试类,TestSendMessage
package com.activemq.test;

import org.apache.activemq.ActiveMQConnectionFactory;
import org.junit.Test;
import org.junit.runner.RunWith;
import org.springframework.beans.factory.annotation.Autowired;
import org.springframework.jms.core.JmsTemplate;
import org.springframework.test.context.ContextConfiguration;
import org.springframework.test.context.junit4.SpringJUnit4ClassRunner;

import javax.jms.*;
import java.io.IOException;

/**
 * 测试消息发送和接收
 */

@RunWith(SpringJUnit4ClassRunner.class)
@ContextConfiguration(locations = {"classpath:spring-mq.xml"})
public class TestSendMessage {

}
提示:以下方法将会在上面的测试类中执行
2.2.2:传统方式实现文本消息发送
/**
     * 发送消息流程测试 点对点发送
     * @throws JMSException
     */
    @Test
    public void testSendMessage() throws JMSException {
        // 创建会话工厂对象
        // 使用TCP协议
        ConnectionFactory connectionFactory = new ActiveMQConnectionFactory("tcp://192.168.25.128:61616") ;
        //创建连接对象
        Connection connection = connectionFactory.createConnection();
        //开启连接
        connection.start();
        //创建会话session
        // 参数一:是否开启事务  参数二:客户端应答模式
        /**
         *  Session.AUTO_ACKNOWLEDGE => 1 自动应答: 当客户端消费了消息后,不需要执行任何操作,服务端会自动记录消息被消费
         *  Session.CLIENT_ACKNOWLEDGE => 2 客户端手动应答: 客户端消费消息后,需要手动执行
         *  Session.DUPS_OK_ACKNOWLEDGE => 3 自动批量确认
         *  Session.SESSION_TRANSACTED => 0 事务提交并确认
         */
        Session session = connection.createSession(false, Session.AUTO_ACKNOWLEDGE);
        //创建消息对象
        TextMessage textMessage = session.createTextMessage();
        //设置消息内容
        textMessage.setText("发送的第一个消息..." + Math.random()*10000);
        //指定消息的目的地(理解为存放的容器(队列)名称)
        Destination destination = session.createQueue("first-queue") ;
        //创建消息发送对象
        MessageProducer producer = session.createProducer(destination);
        // 执行发送
        producer.send(textMessage);
        // 关闭资源
        session.close();
        connection.close();

    }
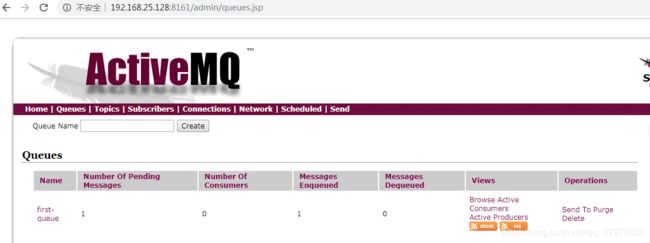
运行后:从后台可以看到有一条消息没有被消费
2.2.3: 传统方式接受消息
/**
     * 测试消息接收 点对点接收 直接使用session创建的消费者进行接收消息
     */
    @Test
    public void testRecieveMessage() throws JMSException {
        // 创建连接工厂对象
        ConnectionFactory connectionFactory = new ActiveMQConnectionFactory("tcp://192.168.25.128:61616") ;
        //创建连接
        Connection connection = connectionFactory.createConnection();
        //开启连接
        connection.start();
        //创建会话
        Session session = connection.createSession(false, Session.AUTO_ACKNOWLEDGE) ;

        //创建需要获取的消息容器Destination
        Queue queue = session.createQueue("first-queue");
        //创建消费者对象
        MessageConsumer consumer = session.createConsumer(queue);
        //消费消息
        while(true) {
            // 等待十秒钟,一直会处于待接收状态
            Message message = consumer.receive(10000L);
            if(message != null) {
                if(message instanceof TextMessage) {
                    TextMessage textMessage = (TextMessage) message ;
                    System.out.println(textMessage.getText());
                    break ;
                }
            }
        }
        //关闭资源
        session.close();
        connection.close();

    }
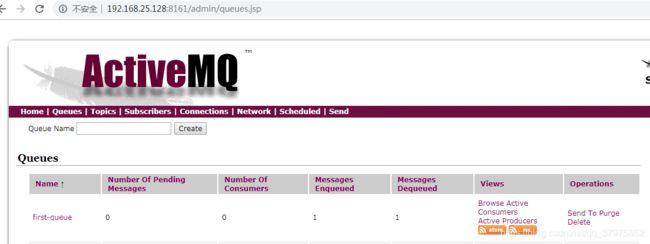
执行后,后台查看,发现消息被消费
2.2.4:给消费者对象设置消息监听实现消息接收
获取到消费者对象后,给消费者对象设置消息监听器,接收消息
/**
     * 测试消息接收 点对点接收 通过消息监听器实现消息接收
     */
    @Test
    public void testRecieveMessageByListener() throws JMSException, IOException {
        // 创建连接工厂对象
        ConnectionFactory connectionFactory = new ActiveMQConnectionFactory("tcp://192.168.25.128:61616") ;
        //创建连接
        Connection connection = connectionFactory.createConnection();
        //开启连接
        connection.start();
        //创建会话
        Session session = connection.createSession(false, Session.AUTO_ACKNOWLEDGE) ;

        //创建需要获取的消息容器Destination
        Queue queue = session.createQueue("first-queue");
        //创建消费者对象
        MessageConsumer consumer = session.createConsumer(queue);
        // 给消息消费者对象设置监听器 新开启线程进行监听,需要确保主线程不会挂掉
        consumer.setMessageListener(message -> {
            if (message instanceof TextMessage) {
                TextMessage textMessage = (TextMessage) message;
                try {
                    System.out.println(textMessage.getText());
                } catch (JMSException e) {
                    e.printStackTrace();
                }
            }
        });
        // 主线程等待
        System.in.read() ;
        //关闭资源
        session.close();
        connection.close();

    }
2.2.5:传统方式发送Topic类型的消息(订阅模式)
/**
     * 订阅模式消息发送
     */
    @Test
    public void testTopicMessageSend() throws JMSException {
        // 创建连接工厂对象
        ConnectionFactory connectionFactory = new ActiveMQConnectionFactory("tcp://192.168.25.128:61616") ;
        //创建连接对象
        Connection connection = connectionFactory.createConnection();
        //开启连接
        connection.start();
        //创建会话
        Session session = connection.createSession(false, Session.AUTO_ACKNOWLEDGE);
        //创建消息目的地
        Topic topic = session.createTopic("first-topic");
        //创建消息发送者
        MessageProducer producer = session.createProducer(topic);
        //创建消息对象
        TextMessage textMessage = session.createTextMessage() ;
        //设置消息内容
        textMessage.setText("第一个订阅消息");
        //发送
        producer.send(textMessage);
        //关闭资源
        session.close();
        connection.close();
    }
2.2.6: 传统方式接受订阅模式消息
/**
     * 订阅模式消息接收 通过手动receive
     */
    @Test
    public void testTopicMessageRecieve() throws JMSException {
        // 创建连接工厂对象
        ConnectionFactory connectionFactory = new ActiveMQConnectionFactory("tcp://192.168.25.128:61616") ;
        //创建连接对象
        Connection connection = connectionFactory.createConnection();
        //开启连接
        connection.start();
        //创建会话
        Session session = connection.createSession(false, Session.AUTO_ACKNOWLEDGE);
        //创建消息订阅的目的地
        Topic topic = session.createTopic("first-topic");
        //创建消息接收者
        MessageConsumer consumer = session.createConsumer(topic);
        while(true) {
            Message receive = consumer.receive(10000);
            if(receive != null) {
                if(receive instanceof TextMessage) {
                    TextMessage textMessage = (TextMessage) receive ;
                    System.out.println(textMessage.getText());
                    break ;
                }
            }
        }
        //关闭资源
        session.close();
        connection.close();

        //关闭资源
        session.close();
        connection.close();
    }
2.2.7: 使用监听模式接收订阅模式的消息
/**
     * 订阅模式消息接收 通过 设置监听器
     */
    @Test
    public void testTopicMessageRecieveByListener() throws JMSException, IOException {
        // 创建连接工厂对象
        ConnectionFactory connectionFactory = new ActiveMQConnectionFactory("tcp://192.168.25.128:61616") ;
        //创建连接对象
        Connection connection = connectionFactory.createConnection();
        //开启连接
        connection.start();
        //创建会话
        Session session = connection.createSession(false, Session.AUTO_ACKNOWLEDGE);
        //创建消息订阅的目的地
        Topic topic = session.createTopic("first-topic");
        //创建消息接收者
        MessageConsumer consumer = session.createConsumer(topic);
        /*while(true) {
            Message receive = consumer.receive(10000);
            if(receive != null) {
                if(receive instanceof TextMessage) {
                    TextMessage textMessage = (TextMessage) receive ;
                    System.out.println(textMessage.getText());
                    break ;
                }
            }
        }*/
        consumer.setMessageListener(message -> {
            if(message instanceof  TextMessage) {
                TextMessage textMessage = (TextMessage) message ;
                try {
                    System.out.println(textMessage.getText());
                } catch (JMSException e) {
                    e.printStackTrace();
                }
            }
        });
        // 监听模式需要主线程不挂掉的状态,这里使用System.in.read()挂起主线程
        System.in.read() ;

        //关闭资源
        session.close();
        connection.close();
    }
2.3:使用spring集成activeMq的方式进行消息的发送和接收
在spring的配置文件中配置连接工厂,消息目标地址,消息操作模板对象JmsTemplate,消息监听器,消息监听容器即可
提示:spring-mq.xml配置文件参照2.1.2步骤的内容
2.3.1:自定义监听器,DemoMessageListener.java
将自定义监听器交给spring管理,项目运行后,这个监听器就一直处于监听状态,当监听到了消息后会进行相应的处理。
package com.activemq.listener;

import org.springframework.stereotype.Component;

import javax.jms.*;

@Component
public class DemoMessageListener implements MessageListener {
    @Override
    public void onMessage(Message message) {
        //文本消息类型
        if(message instanceof TextMessage){
            //将消息转成文本消息
            TextMessage textMessage = (TextMessage) message;
            //获取消息
            try {
                System.out.println("读取到的消息:"+textMessage.getText());
            } catch (JMSException e) {
                e.printStackTrace();
            }
        }
        // MapMasessage类型
        if(message instanceof MapMessage) {
            MapMessage mapMessage = (MapMessage) message ;
            try {
                while(mapMessage.getPropertyNames().hasMoreElements()) {
                    String key = (String) mapMessage.getPropertyNames().nextElement();
                    System.out.println(key + "===" + mapMessage.getString(key));
                }
            } catch (JMSException e) {
                e.printStackTrace();
            }
        }
        // 如需要接收其他类型的,依次判断处理即可
        /// ...
    }
}
2.3.2: 使用spring提供的JmsTemplate实现消息的发送和接收
// 整合spring测试
    // 注入相应的对象
    @Autowired
    private JmsTemplate jmsTemplate ;
    //注入目的地
    @Autowired
    private ActiveMQQueue destination ;

    /**
     * 测试发送消息 点对点
     */
    @Test
    public void testSpringSendMessage() throws IOException {
        jmsTemplate.send(destination, session -> {
            TextMessage textMessage = session.createTextMessage();
            //设置消息内容
            textMessage.setText("spring整合发送的点对点消息" + Math.random()*1000);
            return textMessage ;
        });
        System.in.read() ;
    }

     /**
     * 测试接收,只需要保证主线程不挂,spring的上下文环境被执行,就能启动自定义监听器进行监听消息并且接收
     * @throws IOException
     */
    @Test
    public void testSpringRecieveMessage() throws IOException {
        System.in.read() ;
    }
2.4:使用springBoot集成ActiveMq实现消息的发送和接收
2.4.1: 项目的pom.xml文件中添加springboot相关的依赖
添加父工程依赖
<parent>
    <groupId>org.springframework.boot</groupId>
    <artifactId>spring-boot-starter-parent</artifactId>
    <version>1.5.10.RELEASE</version>
</parent>
添加spring-web启动器、热部署启动器、activeMq的启动器依赖
<dependency>
    <groupId>org.springframework.boot</groupId>
    <artifactId>spring-boot-starter-web</artifactId>
</dependency>
<dependency>
    <groupId>org.springframework.boot</groupId>
    <artifactId>spring-boot-devtools</artifactId>
</dependency>
<!--ActiveMQ-->
<dependency>
    <groupId>org.springframework.boot</groupId>
    <artifactId>spring-boot-starter-activemq</artifactId>
</dependency>
2.4.2: 在springboot的默认配置文件中添加相应的信息
resources路径下新建application.properties文件,新增如下内容
#springboot项目启动的端口号
server.port=9001
#springboot集成的activemq的链接地址
spring.activemq.broker-url=tcp://192.168.25.128:61616
#配置自定义的消息容器地址(队列的名字)
message.textMessage.destination=queue-text-message
2.4.3:定义消息发送和消息接收的接口和实现类
消息发送的接口
package com.activemq.service;

import org.springframework.stereotype.Service;

/**
 * 消息发送的service
 */

@Service
public interface SendMessage {

    /**
     * 发送TextMessage类型的消息
     * @param text 需要发送的文本消息
     * @param destinationName 文本消息发送的目标地址(队列名称)
     * @return
     */
    public String sendTextMessage(String destinationName  , String text) ;

}
消息发送的接口实现类
package com.activemq.service.impl;

import com.activemq.service.SendMessage;
import org.springframework.beans.factory.annotation.Autowired;
import org.springframework.jms.core.JmsMessagingTemplate;
import org.springframework.stereotype.Service;

@Service
public class SendMessageImpl implements SendMessage {

    // 注入springboot提供的消息发送对象
    @Autowired
    private JmsMessagingTemplate template ;
     /**
     *
     * @param destinationName 文本消息发送的目标地址(队列名称)
     * @param text 需要发送的文本消息
     * @return
     */
    @Override
    public String sendTextMessage(String destinationName , String text) {
        try {
            template.convertAndSend(destinationName,text);
        }catch (Exception e) {
            e.printStackTrace();
            return "faile" ;
        }
        return "success";
    }
}
消息接收的接口
package com.activemq.service;

import org.springframework.stereotype.Service;

/**
 * 消息接收服务
 */
@Service
public interface ReceieveMessage {

    public void recieveTextMessage(String destinationName) ;

}
消息接收的接口实现类
package com.activemq.service.impl;

import com.activemq.service.ReceieveMessage;
import org.springframework.beans.factory.annotation.Autowired;
import org.springframework.core.env.Environment;
import org.springframework.jms.annotation.JmsListener;
import org.springframework.stereotype.Service;

@Service
public class ReceieveMessageImpl implements ReceieveMessage {

    @Autowired
    private Environment environment ;

    /**
     * 使用注解@JmsListener(destination = "queue-text-message")表明当前方法需要进行消息监听,监听到了后会自动将消息内容作为参数传递到当前方法中
     * 方法内部实现消息的消费逻辑
     * destination:是监听的消息地址
     * @param message
     */
    @Override
    @JmsListener(destination = "queue-text-message")
    public void recieveTextMessage(String message) {
        System.out.println("接收到信息:" + message);
    }
}
2.4.5:编写控制器,实现消息的发送
package com.activemq.controller;

import com.activemq.service.SendMessage;
import org.springframework.beans.factory.annotation.Autowired;
import org.springframework.core.env.Environment;
import org.springframework.web.bind.annotation.RequestMapping;
import org.springframework.web.bind.annotation.RestController;

@RestController
@RequestMapping("/message")
public class MessageController {

    @Autowired
    private SendMessage sendMessage ;
	/**
     * springboot提供了一个Environment对象用来对配置文件中的信息进行读取
     */
    @Autowired
    private Environment environment ;

    @RequestMapping("/sendMessage/text")
    public String sendTextMessage(String text){
        String retStr = sendMessage.sendTextMessage(environment.getProperty("message.textMessage.destination"), text);
        return retStr ;
    }

}