在Android studio中调用python代码
在Android studio中调用python代码
由于最近需要在Android中调用python的算法,所以查阅了许多资料,终于选择使用cle来调用python代码。直接上干货,不讲理论知识!
CLE(Common Language Extension)公共语言拓展
官网:http://www.srplab.com/cn/index.html 来自官网的简介:
CLE中间件支持多脚本语言混合编程。c/c++, lua, python, c#, ruby,
java等语言可以通过CLE中间件直接使用其它语言中的类,函数,变量或者模块,
使得现有的功能库或者模块可以很容易的应用到其它编程语言中。开发者可以使用熟悉的语言编写功能库,然后在其它语言开发的应用中使用。CLE非常简单,其执行体仅为一个核心共享库和对应于每个脚本语言接口的共享库.
1.首先去CLE的官网下载最新的文件

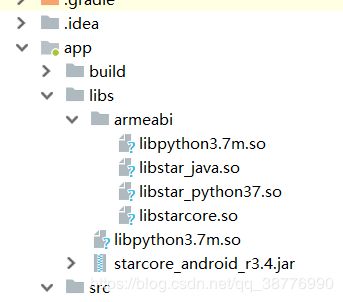
在官网下载最新的CLE for Android 开发包,其中包含示例工程和API文档。解压开发包,拷贝如下文件
- 拷贝 starcore_android_rX.X.jar到工程的libs目录
- 拷贝 libstar_java.so、libstarcore.so、libpython3.7m.so和libstar_python37.so到libs目录
这里需要注意的是这些**.so**的文件拷贝的时候要确保他们在同一个目录下,例如我使用的是armeabiv7a里面的.so文件,不要一些.so文件来自于armeabi,一些.so文件来自armeabiv7a。如果拷贝的不同文件夹下的.so文件,虽然名称都一样,但在运行编译时会出现No module named encodings。或者是 StarCoreFactory starcore = StarCoreFactory.GetFactory();(后续介绍)这句代码报错。

拷贝文件到Android studio中后如下图所示:
2.编写python代码
这里我就只编写一个简单的代码做例子。
test.py
def add(x,y) :
    return x+y
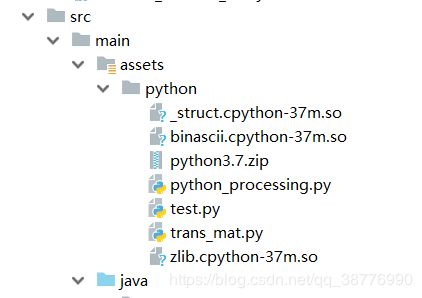
在工程的assets目录创建python文件夹,将所有包复制进该目录,在app启动的适当时候,调用以下代码拷贝assets中的所有文件到手机存储
还有重要的一步,在工程app目录下的build.gradle中对jni进行配置
android {
    compileSdkVersion 26
    defaultConfig {
        applicationId "com.example.a1.footaccgyr"
        minSdkVersion 15
        targetSdkVersion 26
        versionCode 1
        versionName "1.0"
        testInstrumentationRunner "android.support.test.runner.AndroidJUnitRunner"
    }
    buildTypes {
        release {
            minifyEnabled false
            proguardFiles getDefaultProguardFile('proguard-android.txt'), 'proguard-rules.pro'
        }
    }
    // jni配置
    sourceSets {
        main {
            jniLibs.srcDirs = ['libs']
        }
    }
}
以上我们就把需要的所有的环境配置成功了,接下来直接编写java代码。
3、编写Android相关代码,初始化CLE并调用Python
AssetExtractor.java
/**
 * Utilities for extracting assets from an APK file.
 *
 * It assumes that the assets are going to be extracted and manipulated
 * in the application data dir. By default, the extracted assets will be
 * located in the '/assets/' folder.
 *
 */
import android.content.Context;
import android.content.SharedPreferences;
import android.content.res.AssetManager;
import android.preference.PreferenceManager;
import android.util.Log;

import java.io.File;
import java.io.FileOutputStream;
import java.io.IOException;
import java.io.InputStream;
import java.io.OutputStream;
import java.util.ArrayList;
import java.util.List;


public class AssetExtractor {

    private final static String LOGTAG = "AssetExtractor";
    private Context mContext;
    private AssetManager mAssetManager;

    public AssetExtractor(Context context) {
        mContext = context;
        mAssetManager = context.getAssets();
    }

    /**
     * Sets a version for the extracted assets version.
     *
     * @param version: int
     */
    public void setAssetsVersion(int version) {
        SharedPreferences preferences = PreferenceManager.getDefaultSharedPreferences(mContext);
        SharedPreferences.Editor editor = preferences.edit();

        editor.putInt("assetsVersion", version);
        editor.apply();
    }

    /**
     * Returns the version for the extracted assets.
     *
     * @return int
     */
    public int getAssetsVersion() {
        SharedPreferences preferences = PreferenceManager.getDefaultSharedPreferences(mContext);
        return preferences.getInt("assetsVersion", 0);
    }

    /**
     * Returns a list of assets in the APK.
     *
     * @param path: the path in the assets folder.
     * @return the list of assets.
     */
    public List listAssets(String path) {
        List assets = new ArrayList<>();

        try {
            String assetList[] = mAssetManager.list(path);

            if (assetList.length > 0) {
                for (String asset : assetList) {
                    List subAssets = listAssets(path + '/' + asset);
                    assets.addAll(subAssets);
                }
            } else {
                assets.add(path);
            }

        } catch (IOException e) {
            e.printStackTrace();
        }
        return assets;
    }

    /**
     * Returns the path to the assets data dir on the device.
     *
     * @return String with the data dir path.
     */
    public String getAssetsDataDir() {
        String appDataDir = mContext.getApplicationInfo().dataDir;
        return appDataDir + "/assets/";
    }

    /**
     * Copies an asset from the APK to the device.
     *
     * @param src: the source path in the APK.
     * @param dst: the destination path in the device.
     */
    private void copyAssetFile(String src, String dst) {
        File file = new File(dst);
        Log.i(LOGTAG, String.format("Copying %s -> %s", src, dst));

        try {
            File dir = file.getParentFile();
            if (!dir.exists()) {
                dir.mkdirs();
            }

            InputStream in = mAssetManager.open(src);
            OutputStream out = new FileOutputStream(file);
            byte[] buffer = new byte[1024];
            int read = in.read(buffer);
            while (read != -1) {
                out.write(buffer, 0, read);
                read = in.read(buffer);
            }
            out.close();
            in.close();

        } catch (IOException e) {
            e.printStackTrace();
        }
    }

    /**
     * Copies the assets from the APK to the device.
     *
     * @param path: the source path
     */
    public void copyAssets(String path) {
        for (String asset : listAssets(path)) {
            copyAssetFile(asset, getAssetsDataDir() + asset);
        }
    }

    /**
     * Recursively deletes the contents of a folder.
     *
     * @param file: the File object.
     */
    private void recursiveDelete(File file) {
        if (file.isDirectory()) {
            for (File f : file.listFiles())
                recursiveDelete(f);
        }

        Log.i(LOGTAG, "Removing " + file.getAbsolutePath());
        file.delete();
    }

    /**
     * Removes recursively the assets from the device.
     *
     * @param path: the path to the assets folder
     */
    public void removeAssets(String path) {
        File file = new File(getAssetsDataDir() + path);
        recursiveDelete(file);
    }

    /**
     * Returns if the path exists in the device assets.
     *
     * @param path: the path to the assets folder
     * @return Boolean
     */
    public Boolean existsAssets(String path) {
        File file = new File(getAssetsDataDir() + path);
        return file.exists();
    }
}
MainActivity.java
public class MainActivity extends Activity {

	public StarSrvGroupClass SrvGroup;

	@Override
	protected void onCreate(Bundle savedInstanceState) {
		super.onCreate(savedInstanceState);
		setContentView(R.layout.activity_main);
		final File appFile = getFilesDir();  /*-- /data/data/packageName/files --*/
		final String appLib = getApplicationInfo().nativeLibraryDir;

		AsyncTask.execute(new Runnable() {

			@Override
            public void run() {
                loadPy(appLib);
            }
        });
	}


 //cle调用python代码
    void loadPy(String appLib){
        // Extract python files from assets
        AssetExtractor assetExtractor = new AssetExtractor(this);
        assetExtractor.removeAssets("python");
        assetExtractor.copyAssets("python");

        // Get the extracted assets directory
        String pyPath = assetExtractor.getAssetsDataDir() + "python";

        try {
            // 加载Python解释器
            System.load(appLib + File.separator + "libpython3.7m.so");
        } catch (Exception e) {
            e.printStackTrace();
        }

        /*----init starcore----*/
        StarCoreFactoryPath.StarCoreCoreLibraryPath = appLib;
        StarCoreFactoryPath.StarCoreShareLibraryPath = appLib;
        StarCoreFactoryPath.StarCoreOperationPath = pyPath;

        StarCoreFactory starcore = StarCoreFactory.GetFactory();
        //用户名、密码 test , 123
        StarServiceClass service = starcore._InitSimple("test", "123", 0, 0);
        StarSrvGroupClass mSrvGroup = (StarSrvGroupClass) service._Get("_ServiceGroup");
        service._CheckPassword(false);

        /*----run python code----*/
        mSrvGroup._InitRaw("python37", service);
        StarObjectClass python = service._ImportRawContext("python", "", false, "");
        /* 设置Python模块加载路径 即sys.path.insert() */
        python._Call("import", "sys");
        StarObjectClass pythonSys = python._GetObject("sys");
        StarObjectClass pythonPath = (StarObjectClass) pythonSys._Get("path");
        pythonPath._Call("insert", 0, pyPath+ File.separator +"python3.7.zip");
        pythonPath._Call("insert", 0, appLib);
        pythonPath._Call("insert", 0, pyPath);


        //调用Python代码
        service._DoFile("python", pyPath + "/test.py", "");
        int result = python._Callint("add", 5, 2);
        TextView tv1 = (TextView) findViewById(R.id.at_1);
        tv1.setText("python中计算5+2:   " + result + "");
    }
    }
以上代码即完成了Java与Python的互相调用,关于CLE的相关原理,可进入官网了解,更多详细用法,见CLE文档。互相学习,共同进步!