Spring框架之定时任务调度与邮件发送
一.Spring框架自带的task调度
实现一个小任务:每隔两秒在控制台输出一句Hello World !
task实现定时调度的方法有两种,一种为基于xml配置的方式,另一种是基于注解的方式:
1.基于xml配置实现task任务调度
首先创建一个idea的maven项目啦!实现类我放在src/main/java/com/jobs目录,配置文件spring-task.xml放在src/main/resources中,好了我们先来配置一下spring-task.xml:
//扫描器,扫描你的类
紧接着写你的实现类JonService啦:
package com.jobs;

import org.springframework.stereotype.Service;

import java.text.SimpleDateFormat;
import java.util.Date;

@Service
public class JobService {

    public  void job01(){

        //格式化输出的
       System.out.println("现在是北京时间:"+new SimpleDateFormat("yyyy-MM-dd HH:mm:ss").format(new Date()) + "---Hello World 1");

    }


    public  void job02(){

       System.out.println("现在是北京时间:"+new SimpleDateFormat("yyyy-MM-dd HH:mm:ss").format(new Date()) + "---Hello World 2");

    }
}
测试类Test的编写:
package com;

import org.springframework.context.support.ClassPathXmlApplicationContext;

public class Test {
    public static void main(String[] args) {
        new ClassPathXmlApplicationContext("spring-task.xml");
    }
}
输出结果为:
2.基于注解的方式实现
用注解的方式实现首先要改变xml配置文件,这里我新建了一个spring-task_02.xml,代码如下:
然后改变的就是实现类了,新建一个JobService02的实现类,原来的配置换成了注解,直接在方法上面配置与加注解,详情看下面的代码:
package com.jobs;

import org.springframework.scheduling.annotation.Scheduled;
import org.springframework.stereotype.Service;

import java.text.SimpleDateFormat;
import java.util.Date;

@Service
public class JobService02 {

    @Scheduled(cron = "0/2 * * * * ?")
    public  void job01(){
         System.out.println("现在是北京时间:"+new SimpleDateFormat("yyyy-MM-dd HH:mm:ss").format(new Date()) + "---Hello World 1");
    }


    @Scheduled(cron = "0/5 * * * * ?")
    public  void job02(){
         System.out.println("现在是北京时间:"+new SimpleDateFormat("yyyy-MM-dd HH:mm:ss").format(new Date()) + "---Hello World 2");
    }
}
测试类Test代码如下:
package com;

        import org.springframework.context.support.ClassPathXmlApplicationContext;

public class Test {
    public static void main(String[] args) {
        new ClassPathXmlApplicationContext("spring-task_02.xml");
    }
}
运行结果与上面的一样.
二.小型框架Quartz实现任务调度
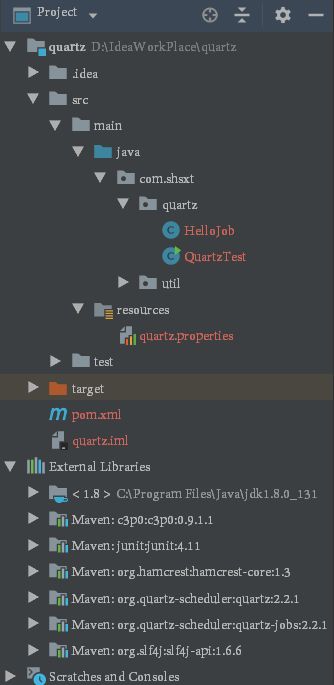
首先也是建个idea的maven项目啦!项目结构如下:
Quartz是一个完全由java编写的开源作业调度框架。不要让作业调度这个术语吓着你。尽管Quartz框架整合了许多额外功能, 但就其简易形式看,你会发现它易用得简直让人受不了!。简单地创建一个实现org.quartz.Job接口的java类。Job接口包含唯一的方法:
public void execute(JobExecutionContext context)
throws JobExecutionException;
在你的Job接口实现类里面,添加一些逻辑到execute()方法。一旦你配置好Job实现类并设定好调度时间表,Quartz将密切注意剩余时间。当调度程序确定该是通知你的作业的时候,Quartz框架将调用你Job实现类(作业类)上的execute()方法并允许做它该做的事情。无需报告任何东西给调度器或调用任何特定的东西。仅仅执行任务和结束任务即可。如果配置你的作业在随后再次被调用,Quartz框架将在恰当的时间再次调用它。具体介绍去官网吧,现在开始上代码:
第一步在pom.xml中引入quartz的依赖:
       org.quartz-scheduler
       quartz
       2.2.1


       org.quartz-scheduler
       quartz-jobs
       2.2.1
然后开始大显身手啦!等等还得配置一个quartz.properties文件,代码如下:
#实例化scheduler对象,把名字命名为MyScheduler
org.quartz.scheduler.instanceName = MyScheduler

#规定最大的线程数为3
org.quartz.threadPool.threadCount = 3

#存储类
org.quartz.jobStore.class = org.quartz.simpl.RAMJobStore
先定义个工具类,用来格式化时间的DateUtil
package com.shsxt.util;

import java.text.SimpleDateFormat;
import java.util.Date;

/**
 * Created on 2018/9/28 1:06
 * Author: Mr Tong
 */

public class DateUtil {

    private static SimpleDateFormat officerSdf = new SimpleDateFormat("yyyy-MM-dd HH:mm:ss");

    public static String getCurrDateTime(){
        return officerSdf.format(new Date());
    }

}
真正的实现类HelloJob来了:
package com.shsxt.quartz;

import com.shsxt.util.DateUtil;
import org.quartz.Job;
import org.quartz.JobExecutionContext;
import org.quartz.JobExecutionException;

/**
 * Created on 2018/9/28 1:00
 * Author: Mr Tong
 */

public class HelloJob implements Job {

    @Override
    public void execute(JobExecutionContext context) throws JobExecutionException {
        System.out.println("现在是北京时间:" + DateUtil.getCurrDateTime() + " - Hello World");
    }

}
但是下面看似测试类QuartzTest却是那么的突出,来看看吧:
package com.shsxt.quartz;

import org.quartz.JobDetail;
import org.quartz.Scheduler;
import org.quartz.SchedulerException;
import org.quartz.Trigger;
import org.quartz.impl.StdSchedulerFactory;

//静态引入,引入了3个静态方法
import static org.quartz.JobBuilder.newJob;
import static org.quartz.SimpleScheduleBuilder.simpleSchedule;
import static org.quartz.TriggerBuilder.newTrigger;

/**
 * Created on 2018/9/28 1:08
 * Author: Mr Tong
 */

public class QuartzTest {

    public static void main(String[] args) {

        try {

            //从调度程序工厂获取一个调度程序的实例
            Scheduler scheduler  = StdSchedulerFactory.getDefaultScheduler();

            //显示调度程序的名称(这里会展示我们在quartz.properties文件中的名称)
            System.out.println("scheduleName = " + scheduler.getSchedulerName());


            /** 重要:
             *  定义一个job,并绑定到我们自定义的HelloJob的class对象
             *  这里并不会马上创建一个HelloJob实例,实例创建是在scheduler安排任务触发执行时创建的
             *  这种机制也为后面使用Spring集成提供了便利
             */
            JobDetail job = newJob(HelloJob.class)
                    .withIdentity("job1", "group1")
                    .build();

            // 声明一个触发器,现在就执行(schedule.start()方法开始调用的时候执行);并且每间隔2秒就执行一次
            Trigger trigger = newTrigger()
                    .withIdentity("trigger1", "group1")
                    .startNow()
                    .withSchedule(simpleSchedule()
                            .withIntervalInSeconds(2)
                            .repeatForever())
                    .build();

            // 告诉quartz使用定义的触发器trigger安排执行任务job
            scheduler.scheduleJob(job, trigger);

            //启动任务调度程序,内部机制是线程的启动
            scheduler.start();

            //关闭任务调度程序,如果不关闭,调度程序schedule会一直运行着
            //scheduler.shutdown();

        } catch (SchedulerException e) {

            e.printStackTrace();
        }
    }

}
代码的结晶如下:
来个小小的总结吧:像spring集成的task,当然功能没有quartz强大啦,task的功力只有quartz的六七成吧,好歹quartz也是个小框架吧,定时调度仅仅是其中的一个功能,好像还有集群什么的吧,反正看你的需求吧.
三.基于spring的邮件发送之qq邮箱
要实现邮件发送首先的跑到qq邮箱的主页设置里面把POP3/IMAP/SMTP/Exchange/CardDAV/CalDAV服务打开,只有只有才能授权客户端实现发送等权限的,如下图:
其次要明白登录到邮箱后 获取邮箱客户端授权码这里需要根据注册时输入的手机发送信息到指定号码才能获取来开通,开通成功 记住个人授权访问码会以短信通知到对应手机,该授权码是后面通过 Java mail 发送邮件的认证密码 非常重要 不要记错;
通过 java mail 发送邮件,首先需要下载对应 Java mail jar 包 下载地址:
http://www.oracle.com/technetwork/java/javasebusiness/downloads/java-archivedownloads-eeplat-419426.html#javamail-1.4.5-oth-JPR
然后发现不能再pom.xml中引入依赖啊,得到一个.jar 文件,怎么办呢,教你一招利用cmd命令将jar包文件安装到你的本地的repository仓库中,准备一下的命令:mvn install:install-file -Dfile=C:\Users\威威\Desktop\mail.jar -DgroupId=mymail -DartifactId=javamail -Dversion=1.0 -Dpackaging=jar
参数介绍一下-Dfile后面为你的jar文件的所在路径,-DgroupId为依赖中的groupId,后面的参数对应即可,最后一个参数为打包的类型,注意粘贴上去会有乱码的乱码的现象,删掉即可,maven的环境得配好呢!
然后在你的本地repository仓库中就会生成一个可以与的文件啦,然后在pom.xml中引入依赖即可:
       mymail
       javamail
       1.0
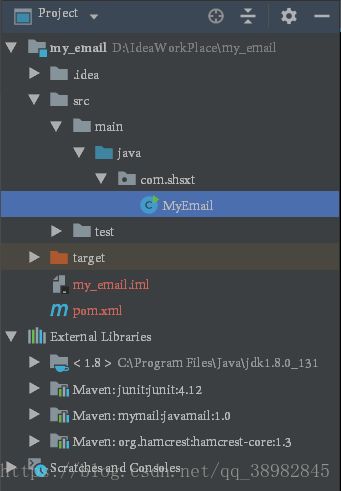
目录结构
发送邮件的实现类:
package com.shsxt;

import javax.mail.*;
import javax.mail.internet.InternetAddress;
import javax.mail.internet.MimeMessage;
import java.util.Properties;

/**
 * Created on 2018/9/28 11:51
 * Author: Mr Tong
 */

public class MyEmail {

    public static void main(String[] args) throws MessagingException {

        /**
         * 简单邮件发送实现
         *   发送邮件的过程类似于火箭送卫星上天
         */
        //装载数据
        Message message = null;
        Properties properties = new Properties();

        //邮箱服务器端的配置
        properties.put("mail.smtp.host","smtp.qq.com");//qq邮箱的主机域名地址
        //是否授权的设置
        properties.put("mail.smtp.auth", "true");
        //是否进行SSL认证加密的操作
        properties.put("mail.smtp.ssl.enable", true);
        //QQ邮箱的默认端口号
        properties.put("mail.smtp.port", 465);

        Session session = Session.getDefaultInstance(properties, new Authenticator() {

            //匿名内部方法
            @Override
            protected PasswordAuthentication getPasswordAuthentication() {
                //准备邮箱账号和授权的密码
                return new  PasswordAuthentication("[email protected]","xyqomzbwdvdmieac");
            }
        });

        message = new MimeMessage(session);

        /**
         *设置邮件
         *   发送人
         *   接收人
         *   发送内容
         *   主题
         */
        //准备自己的发送地址
        Address from = new InternetAddress("[email protected]");
        message.setFrom(from);

        //准备发送人的地址
        Address[] addresses = new InternetAddress[3];
        addresses[0] = new InternetAddress("[email protected]");
        addresses[1] = new InternetAddress("[email protected]");
        addresses[2] = new InternetAddress("[email protected]");

        //设置邮件的接收人
        message.setRecipients(Message.RecipientType.TO, addresses);

        // 设置邮件的主题
        message.setSubject("Java Mail");

        //设置邮件的内容
        message.setText("hello qq email, ni hao 啊!");

        // 送卫星上天,发送邮件
        Transport.send(message);

    }
}
运行没错的话就去qq邮箱找找看看有没有收到吧!!!
四.spring之163邮箱的发送
步骤与qq邮箱的发送方法一样,就是改几个端口什么的,看实现类的代码:
package com.shsxt;

import javax.mail.*;
import javax.mail.internet.InternetAddress;
import javax.mail.internet.MimeMessage;
import java.util.Properties;

public class Mail {
    public static void main(String[] args) throws MessagingException {
        /**
         * 简单邮件发送实现
         *   发送邮件的过程类似于火箭送卫星上天
         */
        // 卫星
        Message message = null;
        Properties properties = new Properties();
        // 邮箱服务器主机  以163 邮箱为例
        properties.put("mail.smtp.host", "smtp.163.com");
        properties.put("mail.smtp.auth", "true");
        properties.put("mail.smtp.port", 25);
        Session session = Session.getDefaultInstance(properties, new Authenticator() {
            @Override
            protected PasswordAuthentication getPasswordAuthentication() {
                return new PasswordAuthentication("[email protected]", "1qaz2wsx");
            }
        });
        message = new MimeMessage(session);
        /**
         * 设置邮件
         *   发送人
         *   接收人
         *   发送内容
         *   主题
         */
        Address from = new InternetAddress("[email protected]");
        message.setFrom(from);// 发送人
      /*  Address receiver=new InternetAddress("[email protected]");


        message.setRecipient(Message.RecipientType.TO,receiver);// 接收人*/

        Address[] addresses = new InternetAddress[4];
        addresses[0] = new InternetAddress("[email protected]");
        addresses[1] = new InternetAddress("[email protected]");
        addresses[2] = new InternetAddress("[email protected]");
        addresses[3] = new InternetAddress("[email protected]");
        message.setRecipients(Message.RecipientType.TO,addresses);
        // 主题
        message.setSubject("Java Mail");
        //内容
        message.setText("hello boys ,mail is so easy!!!,are you ready!!!");
        // 送卫星上天
        Transport.send(message);
    }
}
五.使用 Spring api 实现邮件发送
pom.xml的配置:
       org.springframework
       spring-test
       4.3.9.RELEASE


       org.springframework
       spring-context
       4.3.9.RELEASE


       org.springframework
       spring-context-support
       4.3.2.RELEASE


       mymail
       javamail
       1.0
准备个接口类OrderManagerService:
package com.mail.service;


public interface OrderManagerService {

    void placeOrder();
}
封装的方法(就是上面代码的简单封装)类MailService
package com.mail.service.impl;


import org.springframework.stereotype.*;

import javax.activation.DataHandler;
import javax.activation.FileDataSource;
import javax.mail.*;
import javax.mail.internet.*;
import java.io.File;
import java.io.UnsupportedEncodingException;
import java.util.Properties;

@org.springframework.stereotype.Service
public class MailService {

    public  void sendMail(String fromUser, String[] receivers, String subject,String contnet, String[] files) {
       // checkParams(fromUser,receivers,contnet,subject);
        /**
         * 简单邮件发送实现
         *   发送邮件的过程类似于火箭送卫星上天
         */
        // 卫星
        try {
            Message message = null;
            Properties properties = new Properties();
            // 邮箱服务器主机  以163 邮箱为例
            properties.put("mail.smtp.host", "smtp.163.com");
            properties.put("mail.smtp.auth", "true");
            properties.put("mail.smtp.port", 25);
            Session session = Session.getDefaultInstance(properties, new Authenticator() {
                @Override
                protected PasswordAuthentication getPasswordAuthentication() {
                    return new PasswordAuthentication("[email protected]", "1qaz2wsx");
                }
            });
            message = new MimeMessage(session);
            /**
             * 设置邮件
             *   发送人
             *   接收人
             *   发送内容
             *   主题
             */
            Address from = new InternetAddress(fromUser);
            message.setFrom(from);// 发送人
            Address[] addresses = new InternetAddress[receivers.length];
            for(int i=0;i0){
                for(String filePath:files){
                    BodyPart file=new MimeBodyPart();
                    File temp=new File(filePath);
                    // 设置附件
                    file.setDataHandler(new DataHandler(new FileDataSource(new File(filePath))));
                    file.setFileName(MimeUtility.encodeText(temp.getName()+filePath.substring(filePath.lastIndexOf("."))));
                    multipart.addBodyPart(file);
                }
            }
            message.setContent(multipart);
            // 送卫星上天
            Transport.send(message);
        } catch (MessagingException e) {
            e.printStackTrace();
        } catch (UnsupportedEncodingException e) {
            e.printStackTrace();
        }
    }
}
实现类OrderManagerServiceImpl
package com.mail.service.impl;

import com.mail.service.OrderManagerService;
import org.springframework.mail.MailException;
import org.springframework.mail.MailSender;
import org.springframework.mail.SimpleMailMessage;
import org.springframework.stereotype.Service;

import javax.annotation.Resource;

@Service
public class OrderManagerServiceImpl implements OrderManagerService {
    @Resource
    private MailSender mailSender;

    @Resource
    private SimpleMailMessage templateMessage;
    @Override
    public void placeOrder() {
        SimpleMailMessage msg = new SimpleMailMessage(this.templateMessage);
        msg.setTo("[email protected]");
        msg.setText("hello spring java mail");
        try{
            this.mailSender.send(msg);
        }
        catch (MailException ex) {
            System.err.println(ex.getMessage());
        }
    }
}
测试类Test
package com.shsxt_02;

import org.springframework.context.support.ClassPathXmlApplicationContext;

public class Test {
    public static void main(String[] args) {
        new ClassPathXmlApplicationContext("spring-task_02.xml");
    }
}
ps正常运行啦~~~~


