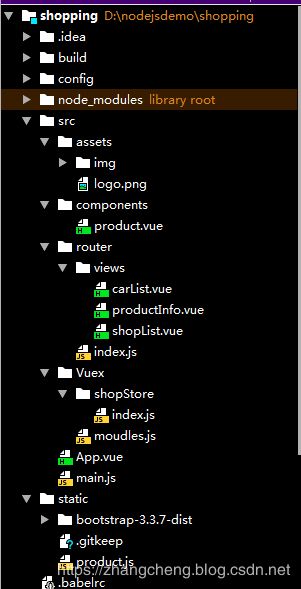
vue.js实战,最后一个项目(电商系统),总结
二、基础配置:
(1)、项目全局引入jq和bootstrap
<1>、npm/cnpm install jQuery 安装jq
<2>、修改webpack.base.conf.js文件:
在头部加上var webpack = require('webpack');
在node属性的plugins属性里加上
plugins: [
    new webpack.optimize.CommonsChunkPlugin('common.js'),
    new webpack.ProvidePlugin({
      jQuery: "jquery",
      $: "jquery",
      "windows.jQuery": "jquery"
    })
  ]
<3>、main.js里面导入:
import $ from ‘jquery’
import ‘…/static/bootstrap-3.3.7-dist/css/bootstrap.css’;
import ‘…/static/bootstrap-3.3.7-dist/js/bootstrap.min’;
(2)、配置路由:
<1>、router/index.js文件:
1、先引入Vue和VueRouter
2、再使用VueRouter:Vue.use(VueRouter);
3、然后配置路由列表:
path是路径,meta是路由的一些信息(用于路由跳转前或者后的时候钩子函数做一些处理)
component:(resolve)=>require(['./views/shopList.vue'],resolve):
代表懒加载,路由跳转后再加之目标文件

const RoutersPath=[
  {
    path:'/shopList',
    meta:{
      title:'商品列表'
    },
    component:(resolve)=>require(['./views/shopList.vue'],resolve)
  },{
    path:'/carList',
    name:'carList',
    meta:{
      title:'购物车'
    },
    component:(resolve)=>require(['./views/carList.vue'],resolve)
  },{
    path:'/productInfo',
    name:'productInfo',
    meta:{
      title:'详细信息'
    },
    component:(resolve)=>require(['./views/productInfo.vue'],resolve)
  }
]
4、配置路由属性:
routes:是路由列表属性
mode:路由路径方式,mode:'history’代表路由路径将以"/"的形式展现,根贴近习惯
base:根路径:base:__dirname代表路由根路径是当前文件所在的目录,
const routerConfig={
  routes:RoutersPath,
  mode:'history',
  base:__dirname
}
5、实例化一个router对象
const router=new VueRouter(routerConfig);
6、声明钩子函数
路由前将路由模板的meta信息赋值给title
路由后滚动条跳转到初始化状态
router.beforeEach((to,from,next)=>{
  window.document.title=to.meta.title;
  next();
});

router.afterEach((to,from,next)=>{
  window.scroll(0,0);
});
7、export default router;
导出路由(其他js文件可以导入)
8、main.js里面:
(1)、import router from ‘./router’:
引入路由配置文件
(2)、给vue实例配置路由属性:router
new Vue({
el: '#app',
router,
store,
components: { App },
template: '9、项目中的路由跳转方式:
this.$router.push({
    name:'productInfo',
    params:{
      id:id
    }
 })
(3)、VUEX配置:
1、按模块创建vuex仓库
Vuex/shopStore/index文件:
声明数据(state)\数据赋值操作(mutations)\数据逻辑操作(actions)\数据视图(getters)
import productData from '../../../static/product.js';

//声明取出重复方法
function getFilterArray(array) {
  const res= [];
  const json = {};
  array.forEach((item,index)=>{
    const _self=item;
    if (!json[_self]) {
      res.push(_self);
      json[_self]=1
    }
  })
  return res;
};


//声明数据
const state={
  productList:[],
  carList:[]
}

//声明赋值方法
const mutations={
    setProduct(state,data){
      state.productList=data;
    },
    setCar(state,id){
      const nowCar=state.carList.find((item)=>item.id===id);
      if (nowCar) {
        nowCar.count++;
      }else {
        state.carList.push({
          id:id,
          count:1
        })
      }
    },
    editCar(state,obj){
      let car=state.carList.find((item)=>item.id==obj.id);
      car.count+=obj.count;
    },
    deleteItems(state,obj){
      let index=state.carList.findIndex((item)=>item.id==obj.id);
      state.carList.splice(index,1);
    }
}

//有关于逻辑的方法
const actions={
  getProductList(concent){
    setTimeout(()=>{
      concent.commit('setProduct',productData)
    },300)
  }
}


const getters={
  colors:(state)=>{
    const colors=state.productList.map((item)=>{
      return item.color;
    });
    return getFilterArray(colors);
  },
  brands:(state)=>{
    const brands=state.productList.map(item=>item.brand);
    return getFilterArray(brands);
  }
}


export default {
  state,
  mutations,
  actions,
  getters
}
2、按模块创建vuex仓库
Vuex/moudle.js文件:vuex的总配置文件
用于集中所有分模块的vuex仓库
import Vue from 'vue';
import Vuex from 'Vuex';
Vue.use(Vuex);

import shopStore from './shopStore/index.js';

export default new Vuex.Store({
  modules:{
    shopStore:shopStore
  }
});
3、main.js文件
引入vuex总配置:import store from ‘./Vuex/moudles.js’;
设置vue实例的store属性:
new Vue({
el: '#app',
router,
store,
components: { App },
template: '4、其他文件里面调用vuex数据和方法
<1>数据:
this.$store.state.shopStore.productList
<2>数据赋值方法:
this.$store.commit('setCar',id);
<3>含逻辑的方法:
this.$store.dispatch('getProductList');
<4>数据视图:
this.$store.getters.colors;
三、其他文件:
(1)、组件:components/product.vue
![]() {{info.name}}
{{info.cost}}
¥{{info.sales}}
加入购物车
{{info.name}}
{{info.cost}}
¥{{info.sales}}
加入购物车
(2)、路由视图:router/shopList.vue
排序:
按销量
↑
↓
按价格
↑
↓
按颜色筛选:
{{item}}
按品牌筛选:
{{item}}
(3)、路由视图:router/productInfo.vue
![]() {{productInfo.name}}
{{productInfo.cost}}
加入购物车
{{productInfo.name}}
{{productInfo.cost}}
加入购物车
(4)、路由视图:router/carList.vue
商品信息
单价
数量
小计
删除
![]() {{productDic[item.id].name}}
{{productDic[item.id].name}}
{{productDic[item.id].sales}}
{{item.count}}
{{productDic[item.id].sales*item.count}}
x
优惠码:
总数量:{{costAll}}
原价:{{salesAll}}
优惠价:{{yousalesAll}}
(5)、主组件:App.vue
(6)、main.js程序入口
// The Vue build version to load with the `import` command
// (runtime-only or standalone) has been set in webpack.base.conf with an alias.
import Vue from 'vue'
import App from './App'
import router from './router'
import $ from 'jquery'
import '../static/bootstrap-3.3.7-dist/css/bootstrap.css';
import '../static/bootstrap-3.3.7-dist/js/bootstrap.min';
import store from './Vuex/moudles.js';
Vue.config.productionTip = false
/* eslint-disable no-new */
new Vue({
el: '#app',
router,
store,
components: { App },
template: '7、图片放在src\assets\img目录下,所有请求图片需要:
![]()
8、bootstrap和product.js等静态资源放在static文件下
9、product.js文件(静态数据)
export default [
  {
    id: 1,
    name: 'AirPods',
    brand: 'Apple',
    image: '1.png',
    sales: 10000,
    cost: 1288,
    color: '粉色'
  },
  {
    id: 2,
    name: 'BeatsX 入耳式耳机',
    brand: 'Beats',
    image: '2.png',
    sales: 11000,
    cost: 1188,
    color: '粉色'
  },
  {
    id: 3,
    name: 'Beats Solo3 Wireless 头戴式式耳机',
    brand: 'Beats',
    image: '3.png',
    sales: 5000,
    cost: 2288,
    color: '粉色'
  },
  {
    id: 4,
    name: 'Beats Pill+ 便携式扬声器',
    brand: 'Beats',
    image: '4.png',
    sales: 3000,
    cost: 1888,
    color: '红色'
  },
  {
    id: 5,
    name: 'Sonos PLAY:1 无线扬声器',
    brand: 'Sonos',
    image: '5.png',
    sales: 8000,
    cost: 1578,
    color: '红色'
  },
  {
    id: 6,
    name: 'Powerbeats3 by Dr. Dre Wireless 入耳式耳机',
    brand: 'Beats',
    image: '6.png',
    sales: 12000,
    cost: 1488,
    color: '红色'
  },
  {
    id: 7,
    name: 'Beats EP 头戴式耳机',
    brand: 'Beats',
    image: '7.png',
    sales: 25000,
    cost: 788,
    color: '金色'
  },
  {
    id: 8,
    name: 'B&O PLAY BeoPlay A1 便携式蓝牙扬声器',
    brand: 'B&O',
    image: '8.png',
    sales: 15000,
    cost: 1898,
    color: '金色'
  },
  {
    id: 9,
    name: 'Bose® QuietComfort® 35 无线耳机',
    brand: 'Bose',
    image: '9.png',
    sales: 14000,
    cost: 2878,
    color: '青色'
  },
  {
    id: 10,
    name: 'B&O PLAY Beoplay H4 无线头戴式耳机',
    brand: 'B&O',
    image: '10.png',
    sales: 9000,
    cost: 2298,
    color: '绿色'
  }
]
