初步研究gatling脚本(5)
Session
gatling通过session来实现数据的传递,可以在session中新增属性和值并取出,设置或更改session中属性的方法有三种:
- session.set()
- feeder
- check(xxx.saveAs())
在exec使用函数有两种写法:
1.
.exec { session =>
xxx
}
2.
.exec { session =>
xxx
session }
第1种写法会将session里的操作保存下来,而第2种则不会,仅用于调试查看结果,因此设置session值写第一种,而打印则写第二种
通过session.set()方法来设置session的属性
import io.gatling.core.Predef._
import io.gatling.http.Predef._

class test_1 extends Simulation {
  val httpProtocol = http.baseUrl("http://localhost:8009")
  val scn = scenario("request")
    .repeat(10) {
      exec(http("post").post("/dologin")
        .body(StringBody("{\"username\":\"AAAA\",\"password\":\"A\"}")).asJson
      )
        .exec { session =>
          session.set("returnCode", "text")		// 向session里设置"returnCode",值为"text"
          // 若想要传参数给session 则不能在下面再写session(如下面注释)  同时 这种写法里面不能打印session
        }
    }

    /*
       exec { session =>
         session.set("returnCode","text")
         session
        }
    */
    .exec(_.set("returnCode", "text")) // 也可以这样来直接设置session值 效果和上面一样

    .exec { session =>
      // 如果不带 as[String] 会带上session多余的信息
      println(session("returnCode").as[String]) // 这种写法用于打印session调试 不能在里面设置 session.set
      session
    }


  setUp(scn.inject(atOnceUsers(1)).protocols(httpProtocol))

}
feeder的设置如下面代码展示
import io.gatling.core.Predef._
import io.gatling.http.Predef._

class test_session extends Simulation {
  val httpProtocol = http.baseUrl("http://localhost:4311")

  /// 自定义列表  列表和从csv导入
  val mapNameFeeder = Array(
    Map("name" -> "test_1"),
    Map("name" -> "test_2"),
    Map("name" -> "test_3")).circular


  val scn = scenario("blog request").feed(mapNameFeeder)
    .repeat(10) {
      exec(http("post login").post("/login").formParam("name", "${name}").formParam("password", 1234))
    }

    .exec{session =>
         println(session("name").as[String])
      	 session
    }
  setUp(scn.inject(atOnceUsers(10)).protocols(httpProtocol))
脚本中设置了10个并发用户,每个用户执行10次用户执行脚本,其运行结果打印的session信息如下:
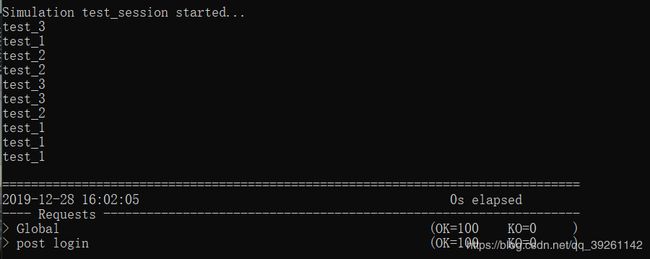
将用户数量改成1个并运行:
setUp(scn.inject(atOnceUsers(1)).protocols(httpProtocol))
结果:

由对比结果可以看出:
①每个用户拥有自己独立的session
②每个用户都运行了10次脚本,但只打印一次,说明打印的是最后执行的那一个name的值,即是执行完用户脚本才打印的session,无法做到每次用户执行一次脚本,就打印出当前用户的session的name值
通过check()来设置session,与前两种不同的是,这里是通过获取请求响应的结果并保存来设置其属性的
import io.gatling.core.Predef._
import io.gatling.http.Predef._

class test_3 extends Simulation{

  val httpProtocol = http.baseUrl("http://localhost:8009")
  val scn = scenario("request")
    .repeat(1){
      exec(http("post")
      .post("/dologin").body(StringBody("{\"username\":\"AAAA\",\"password\":\"A\"}")).asJson
      .check(bodyString.saveAs("returnBody")))
    }
  	.exec { session =>
      println("returnBody : " + session("returnBody").as[String])
      session
    }

  setUp(scn.inject(atOnceUsers(1)).protocols(httpProtocol))
}
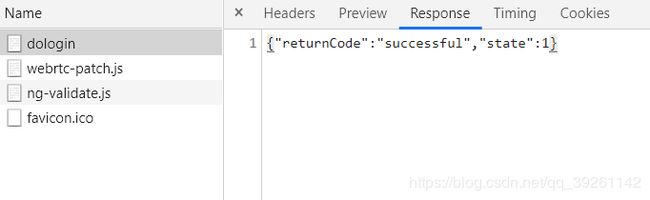
请求响应报文:
gatling运行结果:

gatling提供的以下cheack()的常用API
获取特定响应值:
check(responseTimeInMillis):返回此请求的响应时间(以毫秒为单位)=开始发送请求到完成接收响应之间的时间
check(bodyString):返回完整的响应主体String
check(bodyBytes):返回完整的响应主体字节数组
check(bodyStream):返回完整的响应主体字节的InputStream
check(substring(expression)):扫描正文字符串中给定子字符串的索引,通常用于确认返回报文是否存在该字符串,如check(substring(“returnCode”))
check(jsonpJsonPath(expression)):直接获取返回报文中JSON中的特定属性值,如 check(jsonPath("$. returnCode")),$代表整个返回body体,$.returnCode代表body的returnCode字段(官网文档使用两个.即$..,意思差不多)
check(status):返回响应状态码
check(currentLocation):定位当前页面的绝对URL。在跟踪重定向时很有用,以检查目标网页是否确实是预期的目标网页
check(header(headerName)):定位给定名称的HTTP响应标头
check(regex(expression))定义左右边界截取指定字段,如.check(regex("\“returnCode”:\"(.*)\"\"").find.saveAs(“returnBody”)),若返回报文为{“returnCode”:“fail_2”,“state”:0},"(.*)“为要截取的目标字段,其左边为左边界,即"returnCode”:",右边为有边界,即",所有最终截取到fail_2(若"(.*)“不带双引号,即(.*),则截取结果为"fail_2”)
判断获取的响应值:
check(xxx.is(expected)):验证该值是否等于预期值,如check(status.is(200))
check(xxx.isNull)):验证提取的值是否为空,通常为JSON值,check(~.notNull))同理
check(xxx.not(expected)):验证提取的值与预期值不同
check(xxx.exists):验证提取的值是否存在,如check(jsonPath("$.returnCode").exists)
check(xxx.in(sequence)):验证提取的值属于给定的序列,如check(status.in(200 to 210)),验证状态码为200,201至210中的一个
注意:这里的判断并不是返回True或者False的意思,而是如果成立则……,如 .check(regex("\“returnCode\”:"(.*)\",\"").is(“successful”).saveAs(“returnBody”))) 如果截取到的结果为successful才将结果储存,否则不会执行saveAs操作(注意如果返回结果有双引号要写成"\“successful\”")
多个匹配结果筛选:
check(xxx.findAll):返回所有匹配结果的列表
check(xxx.find):返回第一次出现的匹配结果
check(xxx.find(occurrence)):返回指定序列的匹配结果,从0开始,如check(jsonPath("$.returnCode").find(3)),返回匹配的第四个结果,find(0)=find
check(xxx.findRandom):返回随机一个匹配结果
check(xxx.count):返回匹配结果出现的个数
储存最终session值
check(xxx.saveAs(String)):将获取到的值存储在指定的session属性中,如check(status.saveAs(“state”)),将获取到的状态码的值存在session的state属性里
代码演示常用用法及结果:
import io.gatling.core.Predef._
import io.gatling.http.Predef._

class test extends Simulation{

  val httpProtocol = http.baseUrl("http://localhost:8009")
  val scn = scenario("request")
    .repeat(1){
      exec(
        http("post").post("/dologin")
        .body(StringBody("{\"username\":\"AAAA\",\"password\":\"A\"}")).asJson
          .check(bodyString.saveAs("bodyString"))
          .check(bodyBytes.saveAs("bodyBytes"))
          .check(bodyStream.saveAs("bodyStream"))
          .check(substring("returnCode").saveAs("substring"))
          .check(jsonPath("$..returnCode").ofType[String].saveAs("jsonPath"))
          .check(status.saveAs("status"))
          .check(currentLocation.saveAs("currentLocation"))
          .check(header("Date").saveAs("header"))   // 有众多标头 这里用Date演示
          .check(regex("\"returnCode\":\"(.*)\",\"").saveAs("regex"))
      )
    }
    .exec { session =>
      println("各个API返回的结果如下————")
      println("bodyString : " + session("bodyString").as[String])
      println("bodyBytes : " + session("bodyBytes").as[String])
      println("bodyStream : " + session("bodyStream").as[String])
      println("substring : " + session("substring").as[String])
      println("jsonPath : " + session("jsonPath").as[String])
      println("status : " + session("status").as[String])
      println("currentLocation : " + session("currentLocation").as[String])
      println("header : " + session("header").as[String])
      println("regex : " + session("regex").as[String])
      session
    }

  setUp(scn.inject(atOnceUsers(1)).protocols(httpProtocol))
}
打印结果:

一个完整脚本实例
import io.gatling.core.Predef._
import io.gatling.http.Predef._
import java.util.concurrent.ThreadLocalRandom   // 引用java的随机数生成库

class test extends Simulation{

  def getRand(i: Int) : String = ThreadLocalRandom.current.nextInt(i).toString
  val httpProtocol = http.baseUrl("http://localhost:8009")

  val scn = scenario("request")

    .repeat(10){    // 用repeat括起来的内容会重复执行10遍

      // 注意第一个exec前面不能带. 但是跟在第一个exec后面的操作前面需要带.
      exec{ session => session.set("OrdrId",getRand(10000))}    // 生成10000以内的随机数
      .exec(
        http("post").post("/dologin")
        .body(StringBody("{\"username\":\"${OrdrId}\",\"password\":\"A\"}")).asJson
          .check(bodyString.saveAs("bodyString"))
          .check(jsonPath("$..returnCode").ofType[String].saveAs("jsonPath"))
      )
      .exec { session =>
        println("各个API返回的结果如下————")
        println("bodyString : " + session("bodyString").as[String])
        println("jsonPath : " + session("jsonPath").as[String])
        session
      }
      .doIfOrElse(session=>session("jsonPath").as[String].equals("successful")){  // if 目标值为 "successful" 则事务成功 否则失败
        exec{session =>
          println("事务成功")
        session}

      }{
        exec{session =>
          println("事务失败")
        session}
      }
    }

  setUp(scn.inject(atOnceUsers(1)).protocols(httpProtocol))
}