Android实战:利用SQLite实现简单的记事本(笔记本)
目录
- 新建工程(Android Studio)
- 添加、编辑资源文件
- 新建一个Activity,EditActivity作为笔记编辑、浏览界面
- 编辑、添加布局文件
- 新建NoteInfo类,用于封装一条笔记的信息
- 新建SQLite数据库辅助类NoteDataBaseHelper
- 新建Note类实现创建表以及对表的增删改查操作
- 新建适配器类ListAdapter
- 编辑主界面MainActivity
- 编辑浏览、更新界面EditActivity
- 测试、运行
新建工程(Android Studio)
略。
添加、编辑资源文件
- 编辑
res->values->strings.xml文件,内容如下:
<resources>
    <string name="app_name">MyNoteBookstring>
    <string name="title">记事本string>
    <string name="btn_confirm">确定string>
    <string name="btn_cancel">取消string>
    <string name="btn_add">添加string>
    <string name="btn_save">保存string>
    <string name="btn_return">返回string>
    <string name="save_succ">保存成功!string>
    <string name="save_fail">保存失败!标题或内容不能为空!string>
resources>
- 在
res->drawable目录下添加shape.xml文件用于实现按钮的圆角效果,内容如下:
<shape xmlns:android="http://schemas.android.com/apk/res/android"
    android:shape="rectangle" >
    <solid android:color="#1C82C4"/>

    <corners android:radius="8dip" />

    <padding
        android:bottom="2dp"
        android:left="2dp"
        android:right="2dp"
        android:top="2dp" />
shape>
- 编辑
res->values->style.xml文件,在其中定义全屏风格,美化界面。内容如下:
<resources>
<style name="AppTheme" parent="Theme.AppCompat.Light.DarkActionBar">
- "colorPrimary"
>@color/colorPrimary
- "colorPrimaryDark">@color/colorPrimaryDark
- "colorAccent">@color/colorAccent
style>
<style name="FullTheme" parent="Theme.AppCompat.Light.NoActionBar">
- "android:windowNoTitle"
>true
- "windowActionBar"
>false
- "android:windowFullscreen">true
- "android:windowContentOverlay">@null
style>
resources>
- 在
AndroidManifest.xml文件中应用全屏风格。更改application元素的android:theme属性即可。
<manifest xmlns:android="http://schemas.android.com/apk/res/android"
    package="com.zys.mynotebook">
    <application
        android:allowBackup="true"
        android:icon="@mipmap/ic_launcher"
        android:label="@string/app_name"
        android:roundIcon="@mipmap/ic_launcher_round"
        android:supportsRtl="true"
        android:theme="@style/FullTheme">
        <activity android:name=".EditActivity">activity>
        <activity android:name=".MainActivity">
            <intent-filter>
                <action android:name="android.intent.action.MAIN" />
                <category android:name="android.intent.category.LAUNCHER" />
            intent-filter>
        activity>
    application>
manifest>
- 更改程序图标。
略。
新建一个Activity,EditActivity作为笔记编辑、浏览界面
先保留自动生成的布局文件activity_edit.xml文件。
编辑、添加布局文件
- 编辑
res->layout路径下的主界面布局文件activity_main.xml,主要利用ListView来显示所有笔记的标题和事件,内容如下:
<LinearLayout xmlns:android="http://schemas.android.com/apk/res/android"
    xmlns:tools="http://schemas.android.com/tools"
    android:layout_width="match_parent"
    android:layout_height="match_parent"
    android:orientation="vertical"
    tools:context=".MainActivity">
    <LinearLayout
        android:layout_width="match_parent"
        android:layout_height="48dp"
        android:background="#03AEDA"
        android:orientation="horizontal">

        <ImageView
            android:src="@drawable/note_icon"
            android:layout_width="40dp"
            android:layout_height="40dp"
            android:layout_margin="2dp"/>
        <TextView
            android:id="@+id/music_list_title"
            android:layout_width="wrap_content"
            android:layout_height="40dp"
            android:layout_marginBottom="6dp"
            android:text="@string/title"
            android:textSize="16dp"
            android:textColor="#FFFFFF"
            android:paddingLeft="10dp"
            android:layout_marginLeft="8dp"
            android:layout_marginTop="3dp"
            android:gravity="center_vertical" />
        <LinearLayout
            android:layout_width="fill_parent"
            android:layout_height="fill_parent"
            android:orientation="vertical"
            android:padding="2dp">
            <Button
                android:id="@+id/btn_add"
                android:layout_width="50dp"
                android:layout_height="40dp"
                android:text="@string/btn_add"
                android:background="@drawable/shape"
                android:textColor="#B9E3FD"
                android:layout_gravity="right"
                android:layout_marginRight="8dp"
                android:layout_marginTop="2dp" />
        LinearLayout>
    LinearLayout>
    <ListView
        android:id="@+id/note_list"
        android:layout_width="match_parent"
        android:layout_height="0dp"
        android:layout_weight="1" />
LinearLayout>
- 添加在
res->layout目录下添加布局文件item_layout.xml文件,作为主界面中ListView的每个item的布局,内容如下:
<LinearLayout
    xmlns:android="http://schemas.android.com/apk/res/android"
    android:layout_width="match_parent"
    android:layout_height="70dp"
    android:padding="5dp"
    android:orientation="horizontal">
    <ImageView
        android:id="@+id/rand_icon"
        android:layout_width="50dp"
        android:layout_height="50dp"
        android:padding="2dp"
        android:layout_margin="4dp"/>
    <LinearLayout
        android:layout_width="match_parent"
        android:layout_height="60dp"
        android:layout_marginLeft="8dp"
        android:orientation="vertical">
        <TextView
            android:id="@+id/item_note_title"
            android:layout_width="match_parent"
            android:layout_height="0dp"
            android:layout_weight="1.5"
            android:textSize="22sp"
            android:textColor="#E3633A"
            android:gravity="center_vertical"
            android:singleLine="true"/>
        <TextView
            android:id="@+id/item_note_date"
            android:layout_width="match_parent"
            android:layout_height="0dp"
            android:layout_weight="1"
            android:textSize="16sp"
            android:gravity="center_vertical"
            android:singleLine="true"/>
    LinearLayout>
LinearLayout>
- 编辑EditActivity的布局文件
activity_edit.xml,内容如下:
<LinearLayout
    xmlns:android="http://schemas.android.com/apk/res/android"
    xmlns:tools="http://schemas.android.com/tools"
    android:layout_width="match_parent"
    android:layout_height="match_parent"
    android:orientation="vertical"
    tools:context=".EditActivity">
    <LinearLayout
        android:layout_width="match_parent"
        android:layout_height="48dp"
        android:background="#03AEDA"
        android:orientation="horizontal">

        <ImageView
            android:src="@drawable/note_icon"
            android:layout_width="40dp"
            android:layout_height="40dp"
            android:layout_margin="2dp"/>
        <TextView
            android:id="@+id/music_list_title"
            android:layout_width="wrap_content"
            android:layout_height="40dp"
            android:layout_marginBottom="6dp"
            android:text="@string/title"
            android:textSize="16dp"
            android:textColor="#FFFFFF"
            android:paddingLeft="10dp"
            android:layout_marginLeft="8dp"
            android:layout_marginTop="3dp"
            android:gravity="center_vertical" />
        <LinearLayout
            android:layout_width="fill_parent"
            android:layout_height="fill_parent"
            android:orientation="vertical">
            <LinearLayout
                android:layout_width="wrap_content"
                android:layout_height="match_parent"
                android:orientation="horizontal"
                android:padding="2dp"
                android:layout_gravity="right">
                <Button
                    android:id="@+id/btn_save"
                    android:layout_width="50dp"
                    android:layout_height="40dp"
                    android:text="@string/btn_save"
                    android:background="@drawable/shape"
                    android:textColor="#B9E3FD"
                    android:layout_marginRight="8dp"
                    android:layout_marginTop="2dp"/>
                <Button
                    android:id="@+id/btn_return"
                    android:layout_width="50dp"
                    android:layout_height="40dp"
                    android:text="@string/btn_return"
                    android:background="@drawable/shape"
                    android:textColor="#B9E3FD"
                    android:layout_marginRight="8dp"
                    android:layout_marginTop="2dp"/>
            LinearLayout>
        LinearLayout>
    LinearLayout>
    <TextView
        android:id="@+id/tv_now"
        android:layout_width="match_parent"
        android:layout_height="30dp"
        android:background="#A5BECE"
        android:textAlignment="textEnd"
        android:gravity="end|center_vertical"
        android:paddingRight="8dp"/>
    <EditText
        android:id="@+id/edit_title"
        android:layout_width="match_parent"
        android:layout_height="50dp"
        android:hint="请输入标题"
        android:paddingLeft="4dp"
        android:textColor="#E3633A">
        <requestFocus/>
    EditText>
    <EditText
        android:id="@+id/edit_content"
        android:layout_width="match_parent"
        android:layout_height="match_parent"
        android:inputType="textMultiLine"
        android:minLines="6"
        android:hint="请输入内容"
        android:gravity="left|top"
        android:paddingLeft="4dp"
        android:shadowColor="#209B90"/>
LinearLayout>
新建NoteInfo类,用于封装一条笔记的信息
NoteInfo需要实现Serializable接口,因为会使用Intent、Bundle来传输此类的实例。内容如下:
package com.zys.mynotebook;
import java.io.Serializable;

public class NoteInfo implements Serializable {
    private String id;
    private String title;
    private String content;
    private String date;
	//getter and setter
}
新建SQLite数据库辅助类NoteDataBaseHelper
NoteDataBaseHelper类继承SQLiteOpenHelper(抽象)类,用来管理数据库的创建和版本的管理。内容如下:
package com.zys.mynotebook;

import android.content.Context;
import android.database.sqlite.SQLiteDatabase;
import android.database.sqlite.SQLiteOpenHelper;

public class NoteDataBaseHelper extends SQLiteOpenHelper {

    public NoteDataBaseHelper(Context context, String name, SQLiteDatabase.CursorFactory factory, int version) {
        super(context, name, factory, version);
    }
    //表创建接口 有多张表时 方便统一调用
    public static interface TableCreateInterface {
		//创建表
        public void onCreate( SQLiteDatabase db );
		//更新表
        public void onUpgrade( SQLiteDatabase db, int oldVersion, int newVersion );
    }

    @Override
    public void onCreate(SQLiteDatabase db) {
    	//具体表的创建
        Note.getInstance().onCreate(db);
    }

    @Override
    public void onUpgrade(SQLiteDatabase db, int oldVersion, int newVersion) {
    	//具体表的更新
        Note.getInstance().onUpgrade(db,oldVersion,newVersion);
    }
}
新建Note类实现创建表以及对表的增删改查操作
Note类实现了前面NoteDataBaseHelper中的TableCreateInterface接口。内容如下:
package com.zys.mynotebook;

import android.content.ContentValues;
import android.database.Cursor;
import android.database.sqlite.SQLiteDatabase;
import java.util.HashMap;

public class Note implements NoteDataBaseHelper.TableCreateInterface {
    // 定义表名
    public static String tableName = "Note";
    // 定义各字段名
    public static String _id = "_id"; // _id是SQLite中自动生成的主键,用语标识唯一的记录,为了方便使用,此处定义对应字段名
    public static String title = "title"; // 标题
    public static String content = "content"; // 内容
    public static String time = "date"; // 时间
    //私有化构造方法
    private Note(){}
    //初始化实例
    private static Note note = new Note();
    //只提供一个实例
    public static Note getInstance(){
        return note;
    }
	//实现表的创建
    @Override
    public void onCreate(SQLiteDatabase db) {
        String sql = "CREATE TABLE "
                + Note.tableName
                + " (  "
                + "_id integer primary key autoincrement, "
                + Note.title + " TEXT, "
                + Note.content + " TEXT, "
                + Note.time + " TEXT "
                + ");";
        db.execSQL( sql );
    }
	//实现表的更新
    @Override
    public void onUpgrade(SQLiteDatabase db, int oldVersion, int newVersion) {
        if ( oldVersion < newVersion ) {
            String sql = "DROP TABLE IF EXISTS " + Note.tableName;
            db.execSQL( sql );
            this.onCreate( db );
        }
    }


    // 插入
    public static void insertNote( NoteDataBaseHelper dbHelper, ContentValues userValues ) {

        SQLiteDatabase db = dbHelper.getWritableDatabase();
        db.insert( Note.tableName, null, userValues );
        db.close();
    }

    // 删除一条笔记
    public static void deleteNote( NoteDataBaseHelper dbHelper, int _id ) {

        SQLiteDatabase db = dbHelper.getWritableDatabase();
        db.delete(  Note.tableName, Note._id + "=?",new String[] { _id + "" }  );
        db.close();

    }

    // 删除所有笔记
    public static void deleteAllNote( NoteDataBaseHelper dbHelper ) {

        SQLiteDatabase db = dbHelper.getWritableDatabase();

        db.delete(  Note.tableName, null, null  );
        db.close();
    }

    // 修改
    public static void updateNote( NoteDataBaseHelper dbHelper,  int _id, ContentValues infoValues ) {

        SQLiteDatabase db = dbHelper.getWritableDatabase();
        db.update(Note.tableName, infoValues, Note._id + " =? ", new String[]{ _id + "" });
        db.close();
    }

    // 以HashMap键值对的形式获取一条信息
    public static HashMap<String, Object> getNote(NoteDataBaseHelper dbHelper, int _id ){

        SQLiteDatabase db = dbHelper.getReadableDatabase();

        HashMap<String, Object> NoteMap = new HashMap<String, Object>();
        // 此处要求查询Note._id为传入参数_id的对应记录,使游标指向此记录
        Cursor cursor = db.query( Note.tableName, null, Note._id + " =? ", new String[]{ _id + "" }, null, null, null);
        cursor.moveToFirst();
        NoteMap.put(Note.title, cursor.getLong(cursor.getColumnIndex(Note.title)));
        NoteMap.put(Note.content, cursor.getString(cursor.getColumnIndex(Note.content)));
        NoteMap.put(Note.time, cursor.getString(cursor.getColumnIndex(Note.time)));

        return NoteMap;
    }

    // 获得查询指向Note表的游标
    public static Cursor getAllNotes(NoteDataBaseHelper dbHelper) {

        SQLiteDatabase db = dbHelper.getReadableDatabase();
        Cursor cursor = db.query(Note.tableName, null, null, null, null, null, null);
        cursor.moveToFirst();
        return cursor;
    }

}
新建适配器类ListAdapter
为主界面的ListView创建一个适配器类,实现自定义视图。内容如下:
package com.zys.mynotebook;

import android.content.Context;
import android.graphics.BitmapFactory;
import android.view.LayoutInflater;
import android.view.View;
import android.view.ViewGroup;
import android.widget.BaseAdapter;
import android.widget.ImageView;
import android.widget.TextView;
import java.util.List;
//item中所有的控件
class ViewHolder{
    public ImageView itemIcon;
    public TextView itemNoteTitle;
    public TextView itemNoteDate;

    View itemView;

    public ViewHolder(View itemView) {
        if (itemView == null){
            throw new IllegalArgumentException("item View can not be null!");
        }
        this.itemView = itemView;
        itemIcon = itemView.findViewById(R.id.rand_icon);
        itemNoteTitle = itemView.findViewById(R.id.item_note_title);
        itemNoteDate = itemView.findViewById(R.id.item_note_date);

    }
}

public class ListAdapter extends BaseAdapter {

    private List<NoteInfo> noteList;
    private LayoutInflater layoutInflater;
    private Context context;
    private ViewHolder holder = null;

    public ListAdapter(Context context,List<NoteInfo> noteList) {
        this.noteList = noteList;
        this.context = context;

        layoutInflater = LayoutInflater.from(context);
    }

    @Override
    public int getCount() {
        return noteList.size();
    }

    @Override
    public Object getItem(int position) {
        return noteList.get(position).getTitle();
    }

    @Override
    public long getItemId(int position) {
        return Long.parseLong(noteList.get(position).getId());
    }

    public void remove(int index){
        noteList.remove(index);
    }

    public void refreshDataSet(){
        notifyDataSetChanged();
    }

    @Override
    public View getView(int position, View convertView, ViewGroup parent) {
        if (convertView == null){
            convertView = layoutInflater.inflate(R.layout.item_layout,null);
            holder = new ViewHolder(convertView);
            convertView.setTag(holder);
        }
        else {
            holder = (ViewHolder)convertView.getTag();
        }
        //如果每个item的图片一样的话可以直接在布局文件中固定设置
        holder.itemIcon.setImageBitmap(BitmapFactory.decodeResource(
                context.getResources(),R.drawable.note));
        holder.itemNoteTitle.setText(noteList.get(position).getTitle());
        holder.itemNoteDate.setText(noteList.get(position).getDate());
        return convertView;
    }
}
编辑主界面MainActivity
在MainActivity的onCreate方法中实现初始化视图、设置监听器、为ListView设置适配器、创建数据库等操作。内容如下:
package com.zys.mynotebook;
import android.app.AlertDialog;
import android.content.ContentValues;
import android.content.DialogInterface;
import android.content.Intent;
import android.database.Cursor;
import android.support.v7.app.AppCompatActivity;
import android.os.Bundle;
import android.view.View;
import android.widget.AdapterView;
import android.widget.Button;
import android.widget.ListView;
import android.widget.Toast;
import java.io.Serializable;
import java.text.SimpleDateFormat;
import java.util.ArrayList;
import java.util.Date;
import java.util.List;
public class MainActivity extends AppCompatActivity {
private ListView noteListView;
private Button addBtn;
private List<NoteInfo> noteList = new ArrayList<>();
private ListAdapter mListAdapter;
private static NoteDataBaseHelper dbHelper;
@Override
protected void onCreate(Bundle savedInstanceState) {
super.onCreate(savedInstanceState);
setContentView(R.layout.activity_main);
dbHelper = new NoteDataBaseHelper(this,"MyNote.db",null,1);
//先测试添加一条数据
/*ContentValues values = new ContentValues();
values.put(Note.title,"测试笔记");
values.put(Note.content,"以下为测试内容!!!");
Date date = new Date();
SimpleDateFormat sdf = new SimpleDateFormat("yyyy-MM-dd hh:mm:ss");
values.put(Note.time,sdf.format(date));
Note.insertNote(dbHelper,values);*/
initView();
setListener();
//跳转回主界面 刷新列表
Intent intent = getIntent();
if (intent != null){
getNoteList();
mListAdapter.refreshDataSet();
}
}
//初始化视图
private void initView(){
noteListView = findViewById(R.id.note_list);
addBtn = findViewById(R.id.btn_add);
//获取noteList
getNoteList();
mListAdapter = new ListAdapter(MainActivity.this,noteList);
noteListView.setAdapter(mListAdapter);
}
//设置监听器
private void setListener(){
addBtn.setOnClickListener(new View.OnClickListener() {
@Override
public void onClick(View v) {
Intent intent = new Intent(MainActivity.this,EditActivity.class);
startActivity(intent);
}
});
noteListView.setOnItemClickListener(new AdapterView.OnItemClickListener() {
@Override
public void onItemClick(AdapterView<?> parent, View view, int position, long id) {
NoteInfo noteInfo = noteList.get(position);
Intent intent = new Intent();
Bundle bundle = new Bundle();
bundle.putSerializable("noteInfo",(Serializable)noteInfo);
intent.putExtras(bundle);
intent.setClass(MainActivity.this, EditActivity.class);
startActivity(intent);
}
});
noteListView.setOnItemLongClickListener(new AdapterView.OnItemLongClickListener() {
@Override
public boolean onItemLongClick(AdapterView<?> parent, View view, final int position, long id) {
final NoteInfo noteInfo = noteList.get(position);
String title = "警告";
new AlertDialog.Builder(MainActivity.this)
.setIcon(R.drawable.note)
.setTitle(title)
.setMessage("确定要删除吗?")
.setPositiveButton(R.string.btn_confirm, new DialogInterface.OnClickListener() {
@Override
public void onClick(DialogInterface dialog, int which) {
Note.deleteNote(dbHelper,Integer.parseInt(noteInfo.getId()));
noteList.remove(position);
mListAdapter.refreshDataSet();
Toast.makeText(MainActivity.this,"删除成功!",Toast.LENGTH_LONG).show();
}
})
.setNegativeButton(R.string.btn_cancel, new DialogInterface.OnClickListener() {
@Override
public void onClick(DialogInterface dialog, int which) {
}
}).create().show();
return true;
}
});
}
//从数据库中读取所有笔记 封装成List编辑浏览、更新界面EditActivity
在浏览、更新界面中需要区分是处于插入(添加)状态还是更新状态。可以通过在onCreate方法中获取当前上下文中的Intent和Bundle对象,若Bundle为空,则说明处于插入(添加)状态,否则处于更新状态。内容如下:
package com.zys.mynotebook;

import android.app.AlertDialog;
import android.content.ContentValues;
import android.content.DialogInterface;
import android.content.Intent;
import android.support.v7.app.AppCompatActivity;
import android.os.Bundle;
import android.view.View;
import android.widget.Button;
import android.widget.EditText;
import android.widget.TextView;
import android.widget.Toast;
import java.text.SimpleDateFormat;
import java.util.Date;

public class EditActivity extends AppCompatActivity {

    private Button btn_save;
    private Button btn_return;
    private TextView tv_now;
    private EditText et_title;
    private EditText et_content;
    //记录当前编辑的笔记对象(用于比对是否改变)
    private NoteInfo currentNote;
    //记录是否是插入状态 (因为也可能是更新(编辑)状态)
    private boolean insertFlag = true;

    @Override
    protected void onCreate(Bundle savedInstanceState) {
        super.onCreate(savedInstanceState);
        setContentView(R.layout.activity_edit);
        initView();
        setListener();

        Intent intent = getIntent();
        Bundle bundle = intent.getExtras();
        //主界面点击ListView中的一个Item跳转时
        if(bundle != null){
            currentNote = (NoteInfo) bundle.getSerializable("noteInfo");
            et_title.setText(currentNote.getTitle());
            et_content.setText(currentNote.getContent());
            insertFlag = false;
        }
    }
    //初始化视图
    private void initView(){
        btn_save = findViewById(R.id.btn_save);
        btn_return = findViewById(R.id.btn_return);
        tv_now = findViewById(R.id.tv_now);
        et_content = findViewById(R.id.edit_content);
        et_title = findViewById(R.id.edit_title);

        Date date = new Date();
        SimpleDateFormat sdf = new SimpleDateFormat("yyyy-MM-dd hh:mm:ss");
        tv_now.setText(sdf.format(date));

    }
    //设置监听器
    private void setListener(){
        btn_return.setOnClickListener(new View.OnClickListener() {
            @Override
            public void onClick(View v) {
                onBackPressed();
            }
        });

        btn_save.setOnClickListener(new View.OnClickListener() {
            @Override
            public void onClick(View v) {
                if ( et_title.getText().toString().equals("") ||
                        et_content.getText().toString().equals("")){
                    Toast.makeText(EditActivity.this,R.string.save_fail,Toast.LENGTH_LONG).show();
                }else {
                    saveNote();
                    Intent intent = new Intent(EditActivity.this,MainActivity.class);
                    startActivity(intent);
                }
            }
        });
    }
    //保存笔记到数据库 判断是新建还是更新
    private void saveNote(){
        NoteDataBaseHelper dbHelper = MainActivity.getDbHelper();

        ContentValues values = new ContentValues();
        values.put(Note.title,et_title.getText().toString());
        values.put(Note.content,et_content.getText().toString());
        values.put(Note.time,tv_now.getText().toString());
        if (insertFlag){
            Note.insertNote(dbHelper,values);
        }else{
            Note.updateNote(dbHelper,Integer.parseInt(currentNote.getId()),values);
        }
    }
    //重写手机上返回按键处理函数,如果更改了提示保存 否则直接返回主界面
    @Override
    public void onBackPressed() {
        boolean display = false;
        if (insertFlag){
            if( !et_title.getText().toString().equals("") &&
                    !et_content.getText().toString().equals("")){
                display = true;
            }
        }else{
            if( !et_title.getText().toString().equals(currentNote.getTitle()) ||
                    !et_content.getText().toString().equals(currentNote.getContent())){
                display = true;
            }
        }
        if (display){
            String title = "警告";
            new AlertDialog.Builder(EditActivity.this)
                    .setIcon(R.drawable.note)
                    .setTitle(title)
                    .setMessage("是否保存当前内容?")
                    .setPositiveButton(R.string.btn_confirm, new DialogInterface.OnClickListener() {
                        @Override
                        public void onClick(DialogInterface dialog, int which) {
                            saveNote();
                            Toast.makeText(EditActivity.this,R.string.save_succ,Toast.LENGTH_LONG).show();
                            //更新当前Note对象的值 防止选择保存后按返回仍显示此警告对话框
                            currentNote.setTitle(et_title.getText().toString());
                            currentNote.setContent(et_content.getText().toString());
                        }
                    })
                    .setNegativeButton(R.string.btn_cancel, new DialogInterface.OnClickListener() {
                        @Override
                        public void onClick(DialogInterface dialog, int which) {
                            Intent intent = new Intent(EditActivity.this,MainActivity.class);
                            startActivity(intent);
                        }
                    }).create().show();
        }else{
            Intent intent = new Intent(EditActivity.this,MainActivity.class);
            startActivity(intent);
        }
    }
}
测试、运行
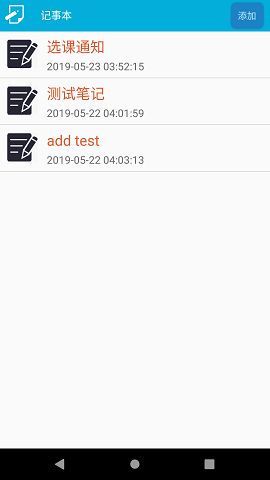
运行程序后,可以在Android Studio中的Device File Explorer中的data->data->com.zys.mynotebook->databases目录下看到创建的数据库相关文件MyNote.db、MyNote.db-shm、MyNote.db-wal。
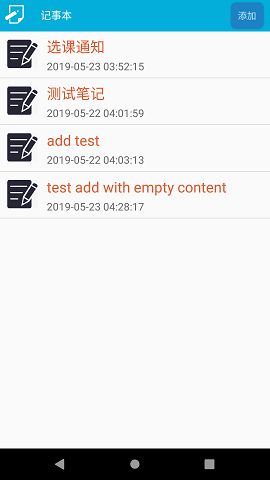
- 主界面(实现插入了测试数据)
- 点击列表项浏览

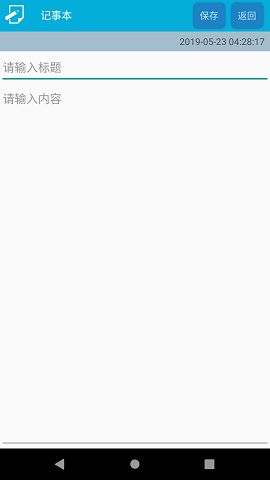
- 主界面点击添加按钮
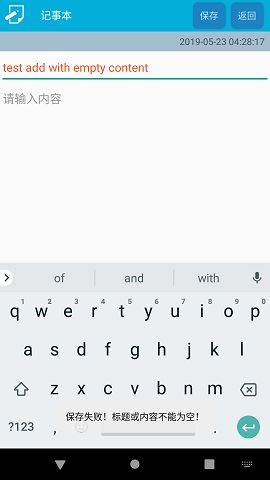
- 输入内容,当标题或内容为空时,点击保存或返回(点击返回按钮、手机上的返回键)并选择保存时
- 补全内容,点击返回(点击返回按钮、手机上的返回键),提示保存
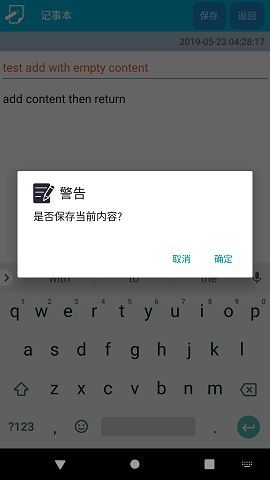
- 选择确定。也有
Toast提示,没有成功截下…选择取消时会放弃保存并跳转到主界面
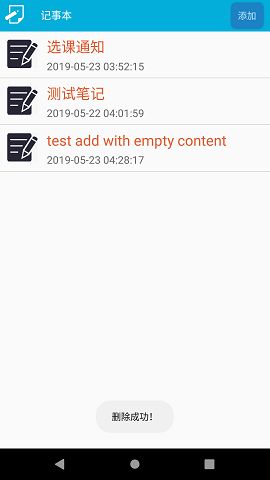
- 主界面长按列表项
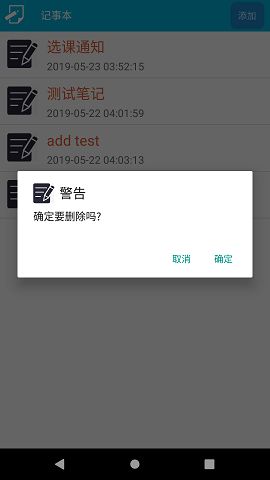
- 选择删除,提示删除成功
我的其他文章:Android实战:利用service实现简单的音乐播放器