SpringBoot自定义starter启动器(以整合腾讯云短信发送功能为例)
项目示例已上传至GitHub,可见github项目地址。
如果你还不了解SpringBoot的自动配置原理可以参考另一篇博文SpringBoot源码解析-自动配置原理
1.项目配置
- 创建一个名为sms-send-spring-boot-starter的空项目,在空项目内创建两个Module。

- Module1:新建一个名为sms-send-spring-boot-starter的Maven模块,作为启动器。
- Module2:新建一个名为sms-send-spring-boot-starter-autoconfigurer的SpringBoot模块,作为自动配置类。
命名规范:
-
官方命名空间
- 以前缀方式:springb-boot-starter-
- 模式:spring-boot-starter-模块名
- 举例:spring-boot-starter-web

-
自定义命名空间
- 以后缀方式:-spring-boot-starter
- 模式:模块名-spring-boot-starter
- 举例:mybatis-spring-boot-starter

- 在sms-send-spring-boot-starter模块的pom.xml文件内引入对sms-send-spring-boot-starter-autoconfigurer模块的依赖。
<project xmlns="http://maven.apache.org/POM/4.0.0"
         xmlns:xsi="http://www.w3.org/2001/XMLSchema-instance"
         xsi:schemaLocation="http://maven.apache.org/POM/4.0.0 http://maven.apache.org/xsd/maven-4.0.0.xsd">

    <modelVersion>4.0.0modelVersion>
    <groupId>com.kellen5l.toolgroupId>
    <artifactId>sms-send-spring-boot-starterartifactId>
    <version>1.0-SNAPSHOTversion>

    <dependencies>
        <dependency>
            <groupId>com.kellen5l.toolgroupId>
            <artifactId>sms-send-spring-boot-starter-autoconfigurerartifactId>
            <version>0.0.1-SNAPSHOTversion>
        dependency>
    dependencies>
project>
- 在sms-send-spring-boot-starter-autoconfigurer模块的pom.xml文件内删除不需要的spring-boot-starter-test依赖和spring-boot-maven-plugin插件。
<project xmlns="http://maven.apache.org/POM/4.0.0" xmlns:xsi="http://www.w3.org/2001/XMLSchema-instance"
         xsi:schemaLocation="http://maven.apache.org/POM/4.0.0 http://maven.apache.org/xsd/maven-4.0.0.xsd">

    <modelVersion>4.0.0modelVersion>
    <parent>
        <groupId>org.springframework.bootgroupId>
        <artifactId>spring-boot-starter-parentartifactId>
        <version>1.5.20.RELEASEversion>
        <relativePath/>
    parent>
    <groupId>com.kellen5l.toolgroupId>
    <artifactId>sms-send-spring-boot-starter-autoconfigurerartifactId>
    <version>0.0.1-SNAPSHOTversion>
    <name>sms-send-spring-boot-starter-autoconfigurername>
    <description>Demo project for Spring Bootdescription>

    <properties>
        <java.version>1.8java.version>
    properties>

    <dependencies>
        <dependency>
            <groupId>org.springframework.bootgroupId>
            <artifactId>spring-boot-starterartifactId>
        dependency>

        <dependency>
            <groupId>com.github.qcloudsmsgroupId>
            <artifactId>qcloudsmsartifactId>
            <version>1.0.6version>
        dependency>
    dependencies>
project>
- 删除不需要的Spingboot主启动类,resources下的application.properties文件和test文件夹(测试目录)。完成后的项目结构如下:

2.功能实现
- 编写SmsSendService类来实现短信发送的功能。
public class SmsSendService {
    SmsSendProperties smsSendeProperties;

    public SmsSendProperties getSmsSendeProperties() {
        return smsSendeProperties;
    }

    public void setSmsSendeProperties(SmsSendProperties smsSendeProperties) {
        this.smsSendeProperties = smsSendeProperties;
    }

    public void smSingleSend(String phoneNumber, String[] params) {
        try {
            SmsSingleSender ssender = new SmsSingleSender(smsSendeProperties.getAppid(), smsSendeProperties.getAppkey());
            SmsSingleSenderResult result = ssender.sendWithParam("86", phoneNumber,
                    smsSendeProperties.getTemplateId(), params, smsSendeProperties.getSmsSign(), "", "");
            System.out.println(result);
        } catch (HTTPException e) {
            e.printStackTrace();
        } catch (JSONException e) {
            e.printStackTrace();
        } catch (IOException e) {
            e.printStackTrace();
        }
    }
}
- 编写SmsSendProperties类来实现依赖注入。
@ConfigurationProperties("kellen5l.sms")	//将配置与这个前缀绑定
public class SmsSendProperties {
    private int templateId;
    private int appid;
    private String appkey;
    private String smsSign;

	...
	Getter and Setter
}
- 编写SmsSendServiceAutoConfiguration类来实现对SmsSendService类的自动配置。
@Configuration
@ConditionalOnWebApplication    //仅当项目为web项目是生效
@EnableConfigurationProperties(SmsSendProperties.class)     //使配置类生效
public class SmsSendServiceAutoConfiguration {
    @Autowired
    SmsSendProperties smsSendProperties;

    @Bean
    public SmsSendService smsSendService(){
        SmsSendService smsSendService=new SmsSendService();
        smsSendService.setSmsSendeProperties(smsSendProperties);
        return smsSendService;
    }
}
- 编写spring.factories配置文件。
# Auto Configure
org.springframework.boot.autoconfigure.EnableAutoConfiguration=\
com.kellen5l.tool.SmsSendServiceAutoConfiguration
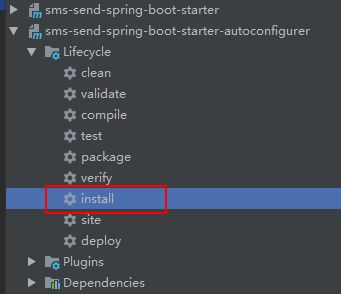
- 使用Maven将两个模块安装到仓库中。注意:先安装autoconfigurer模块,后安装starter模块。
启动器测试
- 新建一个名为spring-boot-starter-test的SpringBoot的Web项目,这里就不赘述了,创建完的项目结构如下:

- 编写SmsController类来实现测试用的短信发送接口。
@RestController
public class SmsController {
    @Autowired
    SmsSendService smsSendService;

    @PostMapping("/sms")
    public void sendSms(@RequestParam("phoneNumber") String phoneNumber){
        String[] params={String.valueOf((int) (Math.random() * 9000 + 1000))};	//4位数字验证码
        smsSendService.smSingleSend(phoneNumber,params);
    }
}
- 编写application.properties配置文件。如果你还不了解下面的属性,可参考腾讯云短信平台官网,来申请获得你的短信应用。
kellen5l.sms.templateId=
kellen5l.sms.appid=
kellen5l.sms.appkey=
kellen5l.sms.smsSign=
- 使用Postman对接口进行测试。

