移植Qt5.5到arm开发板(全世界的问题我一个人碰完了)
前面安装Qt的步骤就不说了,下载好一路next就可以了,接下来
一、首先要移植Qt必须要用到Qt的源码,在这里也是用Qt5的源码来移植。源码可以在http://download.qt.io/archive/qt/下载,选择文件qt-everywhere-opensource-src-5.5.0.tar.gz下载。
2、把下载好的文件放在ubutun的/myTools/Qt/目录下,执行命令 tar zxvf qt-everywhere-opensource-src-5.5.0.tar.gz 来解压,解压完成后就会看到 qt-everywhere-opensource-src-5.5.0 目录。
3、接着就是开始进行编译的工作了。首先进去目录/myTools/Qt/qt-everywhere-opensource-src-5.5.0/qtbase/mkspecs/linux-arm-gnueabi-g++ ,在这个目录下回看到qmake.conf文件,我们需要修改这个文件。
vim qmake.conf
#
qmake configuration for building with arm-linux-gnueabi-g++
#
MAKEFILE_GENERATOR = UNIX
CONFIG += incremental
QMAKE_INCREMENTAL_STYLE = sublib
QT_QPA_DEFAULT_PLATFORM = linux
QMAKE_CFLAGS_RELEASE += -O2 -march=armv7-a // march是处理器架构,我的是armv7-a
QMAKE_CXXFLAGS_RELEASE += -O2 -march=armv7-a
include(../common/linux.conf)
include(../common/gcc-base-unix.conf)
include(../common/g++-unix.conf)
#modifications to g++.conf
QMAKE_CC = arm-none-linux-gnueabi-gcc
QMAKE_CXX = arm-none-linux-gnueabi-g++
QMAKE_LINK = arm-none-linux-gnueabi-g++
QMAKE_LINK_SHLIB =arm-none-linux-gnueabi-g++
# modifications to linux.conf
QMAKE_AR = arm-none-linux-gnueabi-ar cqs
QMAKE_OBJCOPY =arm-none-linux-gnueabi-objcopy
QMAKE_NM = arm-none-linux-gnueabi-nm -P
QMAKE_STRIP = arm-none-linux-gnueabi-strip
load(qt_config)
如果这里.对芯片的指令集没有选择好
QT_QPA_DEFAULT_PLATFORM = linux
QMAKE_CFLAGS_RELEASE += -O2 -march=armv7-a
QMAKE_CXXFLAGS_RELEASE += -O2 -march=armv7-a
在开发板运行过程中,运行有提示:
Illegal instruction (非法指令)
这里要注意,每个人的交叉编译器的前缀都是不一样的,我 的就是arm-none-linux-gnueabi-,需要注意
还有就是如果你有多个交叉编译器,那么这里你要设置为绝对路径
然后去解压目录下,即是/myTools/Qt/qt-everywhere-opensource-src-5.5.0/,每个人存放的目录都不要,这里我是直接运行./configure -prefix /opt/qt-5.5 -release -opensource -xplatform linux-arm-gnueabi-g++ -no-opengl
这里你会发现,在运行结束后,会提示你需要你添加一句qreal float的意思,
./configure -prefix /opt/qt-5.5 -release -opensource -xplatform linux-arm-gnueabi-g++ -no-opengl -qreal float
我加上了之后,重新运行,提示我们make和make install,我make了之后
Project ERROR: Unknown module(s) in QT: quick
Makefile:47: recipe for target 'sub-textureandlight-make_first' failed
make[4]: *** [sub-textureandlight-make_first] Error 3
make[4]: Leaving directory '/home/jay/qt-x11/qtcanvas3d/examples/canvas3d/canvas3d'
Makefile:42: recipe for target 'sub-canvas3d-make_first' failed
make[3]: *** [sub-canvas3d-make_first] Error 2
make[3]: Leaving directory '/home/jay/qt-x11/qtcanvas3d/examples/canvas3d'
Makefile:42: recipe for target 'sub-canvas3d-make_first' failed
make[2]: *** [sub-canvas3d-make_first] Error 2
make[2]: Leaving directory '/home/jay/qt-x11/qtcanvas3d/examples'
Makefile:69: recipe for target 'sub-examples-make_first' failed
make[1]: *** [sub-examples-make_first] Error 2
make[1]: Leaving directory '/home/jay/qt-x11/qtcanvas3d'
Makefile:349: recipe for target 'module-qtcanvas3d-make_first' failed
make: *** [module-qtcanvas3d-make_first] Error 2
这里的错误现象是百度复制过来的的,因为我编译成功了,不想卸了重装,但是问题大概就是这样,这个解决方法:你可以忽略它所找不到的,在后面加上
./configure -prefix /opt/qt-5.7 -release -opensource -xplatform linux-arm-gnueabi-g++ -no-opengl -skip qt3d -skip qtcanvas3d -nomake examples -skip qtdeclarative -no-icon
看到这个 -no-iconv,如果没有设置它,当你运行qt程序的时候,会出现
QIconvCodec::convertFromUnicode: using Latin-1 for conversion, iconv_open failed
QIconvCodec::convertToUnicode: using Latin-1 for conversion, iconv_open failed
所以一定要加上,如果你忘了添加,就
(1) 下载链接:
https://ftp.gnu.org/gnu/libiconv/
(2) 配置并安装安装
./configure --prefix=/home/chy/out --host=arm-none-linux-gnueabi-gcc
make
make install
(3) 复制preloadable_libiconv.so到开发板的/lib目录,并配置在/etc/profile添加export LD_PRELOAD=/lib/preloadable_libiconv.so
先make clean,清除之前生成的,再make,后面会出现
就会出现../../include/QtCore/../../src/corelib/tools/qbytearray.h:98:19: note: the mangling of 'va_list' has changed in GCC 4.4
make[3]: *** [.obj/qpdf.o] 错误 1
make[3]: *** 正在等待未完成的任务....
make[3]:正在离开目录 `/myTools/Qt/qt-everywhere-opensource-src-5.5.1/qtbase/src/gui'
make[2]: *** [sub-gui-make_first] 错误 2
make[2]:正在离开目录 `/myTools/Qt/qt-everywhere-opensource-src-5.5.1/qtbase/src'
make[1]: *** [sub-src-make_first] 错误 2
make[1]:正在离开目录 `/myTools/Qt/qt-everywhere-opensource-src-5.5.1/qtbase'
make: *** [module-qtbase-make_first] 错误 2
这里是因为前面提示我们添加-qreal float,而添加了之后就出现了这个问题
相对文件是Qt源代码。有对QT官方网站的一些说明:
typedef qreal Typedef for double unless Qt is configured with the -qreal float option.
我推断的原因是,当与参数-qreal float,错误跑make:ambiguous overload for 'operator<<'发生。
最后,我去除了 -qreal float并再次运行,没有错误!
然后就make install
最后将生成的目录移动到开发板,
export QT_ROOT=/opt/qt-5.5
export LD_LIBRARY_PATH=/lib:/usr/lib:/usr/local/lib:$QT_ROOT/lib:$TSLIB_ROOT/lib/
export QT_QPA_PLATFORM_PLUGIN_PATH=$QT_ROOT/plugins/
export QT_QWS_FONTDIR=$QT_ROOT/lib/fonts
export QT_QPA_PLATFORM=linuxfb:fb=/dev/fb0:size=800x480:offset=0x0:tty=/dev/tty1
export QT_QPA_EVDEV_TOUCHSCREEN_PARAMETERS=/dev/input/event0:inverty
配置开发板/etc/profile的Qt环境变量,每个人的都不一样,仅供参考
这样开发板的就完成了。
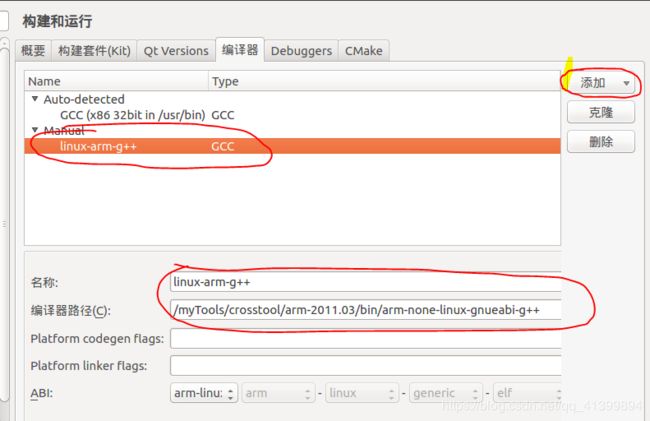
二、设置Qt Creator的环境变量
①:工具->选项->构建和运行->编译器里面点击添加,选择自己交叉编译器的arm-none-linux-gnueabi-g++的路径
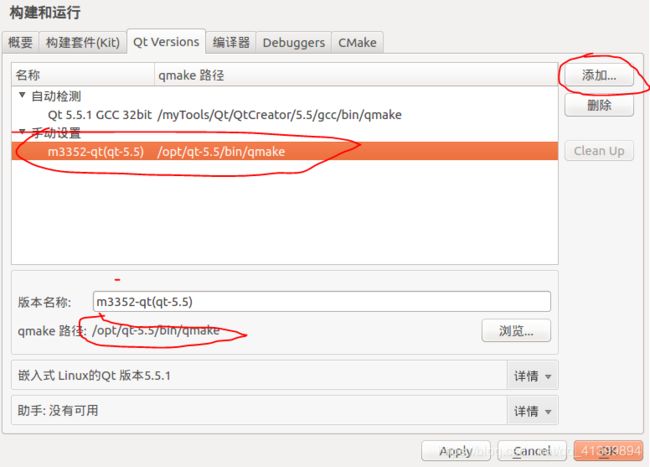
②、Qt Version里添加,选择之前源文件生成的目录的bin下的qmake
③、Kit里添加,然后编辑自己想要的名称,编译器选择交叉编译,Qt版本选择自己刚才设置的

这样就配置完成了,编辑程序去arm开发板运行就可以了
但是这样你是不支持中文的,如果你需要支持中文
我的版本是qt5.5,网上大部分的教程都是qt4的,而且说得不明朗,
我用的是文泉驿,你们需要先下载文泉驿的ttf,http://wenq.org/wqy2/index.cgi
然后将.ttf文件放置开发板的指定目录,我的是/opt/fonts/wqy/wqy-microhei.ttf,然后在Qt程序里面指定这个目录,
int id = QFontDatabase::addApplicationFont("/opt/fonts/wqy/wqy-microhei.ttf");
QString msyh = QFontDatabase::applicationFontFamilies(id).at(0);
QFont font(msyh, 10);
font.setPointSize(20);
a.setFont(font);
这样就可以显示中文字体啦