【小王的安卓之路】自定义控件开发(二)之“蛋黄的长裙,蓬松的头发,你想要的样子我都有”
自定义控件开发
想象一下这样一个场景,在电视剧中:
- 男主:“亲爱的,我不在乎你的外貌,也不在乎你的高矮胖瘦,我只在乎你这个人,我爱你”。
- 话音一落,漂亮的女主妹子被感动的稀里哗啦。
- 女主:“555,好感动,我也爱你”
然而在现实生活中:
- 男生:“亲爱的,我不在乎你的外貌,也不在乎你的高矮胖瘦,我只在乎你这个人,我爱你”
- 女生勃然大怒,一巴掌呼了上去
- 女生:“你是觉得老娘长得不好看了?你不爱我了,555”
- 男生:“听我解释,@#¥%#@¥……@#¥@”
又或者是:
- 男生(妹子):“小哥哥(小姐姐),你长得真好看,我能做你男(女)朋友吗?”
- 女生(男生):“哈哈哈谢谢,你是个好人,我要去洗澡了,以后再聊”
你看看,外观无疑是现在人们最先从另外一个人的身上看到的东西,也是最容易给别人留下好感的东西,手机APP也是。比如某音,如果功能照旧,按钮什么别的东西都是不加修饰的原生按钮,那相比用的人也 不会很多。然而,谷歌提供给我们的控件就那么多,终究会遇到找不到合适的控件的情况。在上篇文章里我提到了用组合的方式创造了一个新的控件,这次我来和大家分析新的一招:
无中生有
-----摘自《郭语·第一章》
想要自定义控件,首先我们得明确一点,我的需求是什么:
我想要一个会渐变色的按钮?还是能感应手机壳颜色的的背景色?还是五彩斑斓的黑色头像?
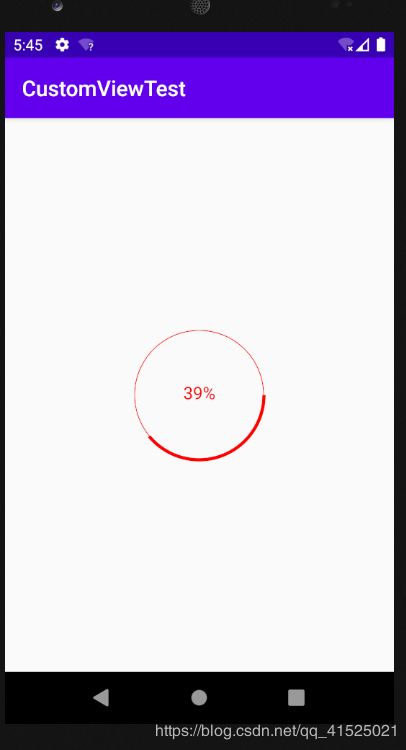
那么假设现在有这样一个需求:安卓原生的进度条太难看了,我想要自定义一个,圆形的,会动的,能显示百分比的。
好的我们先分析一下,得出以下几点要素:
- 是一个进度条
- 圆的
- 能显示百分比
- 会动的
安排!!!
首先要明确自定义控件的开发步骤:
- 自定义属性的声明和获取
- 测量
- 绘制
- 状态的存储和恢复
.
.
.
步骤一:定义属性
我们在新建一个类,叫做:RoundProgressBar,并让他继承自View类,然后重写它的构造方法
public class RoundProgressBar1 extends View {

    //一般情况下重写两个参数的构造函数就行
    public RoundProgressBar1(Context context, @Nullable AttributeSet attrs) {
        super(context, attrs);
    }
}
然后我们在values文件夹中新建一个叫做attrs.xml文件(如果有就直接用就行)
开始定义这个控件的属性:
<?xml version="1.0" encoding="utf-8"?>
<resources>
    <declare-styleable name="RoundProgressBar"> //name要和我们的类名对应
        <attr name="color" format="color"/> //进度条的颜色
        <attr name="line_width" format="dimension"/>//进度条的宽度
        <attr name="radius" format="dimension"/>//圆形的半径
        <attr name="android:progress" />//进度(这里我们用了原生的属性)
        <attr name="android:textSize" />//显示百分比的字体大小
    </declare-styleable>
</resources>
然后我们在类中定义属性来记录这些变量
    private int mColor;
    private int mRadius;
    private int mLineWidth;
    private int mTextSize;
    private int mProgress ;
然后在构造方法中,我们获取这些属性:
 public RoundProgressBar(Context context, @Nullable AttributeSet attrs) {
        super(context, attrs);
        //获取TypedArray 对象
        TypedArray ta  = context.obtainStyledAttributes(attrs,R.styleable.RoundProgressBar);
        //获取半径,默认值为dp2px(30)
        mRadius = (int) ta.getDimension(R.styleable.RoundProgressBar_radius,dp2px(30));
        //获取颜色,默认值为红色
        mColor = ta.getColor(R.styleable.RoundProgressBar_color,0xffff0000);
        //获取线的宽度
        mLineWidth = (int) ta.getDimension(R.styleable.RoundProgressBar_line_width,dp2px(3));
        //获取字体大小
        mTextSize = (int)ta.getDimension(R.styleable.RoundProgressBar_android_textSize,dp2px(16));
        //获取进度
        mProgress = ta.getInt(R.styleable.RoundProgressBar_android_progress,0);
        //回收TypedArray 对象
        ta.recycle();
    }
其中dp2px()方法长这样:
 private float dp2px(int i) {
        return TypedValue.applyDimension(TypedValue.COMPLEX_UNIT_DIP,i,getResources().getDisplayMetrics());
    }
然后再布局文件里我们就可以使用这个控件的属性了:
<?xml version="1.0" encoding="utf-8"?>
<RelativeLayout
    xmlns:android="http://schemas.android.com/apk/res/android"
    xmlns:wang="http://schemas.android.com/apk/res-auto" ///这个命名控件是一定要写的,前面的wang可以随意替换
    xmlns:tools="http://schemas.android.com/tools"
    android:layout_width="match_parent"
    android:layout_height="match_parent"
    tools:context=".MainActivity">

<com.example.customviewtest.RoundProgressBar
    android:id="@+id/progressbar"
    android:layout_width="wrap_content"
    android:layout_height="wrap_content"
    android:layout_centerInParent="true"
    wang:radius="60dp"
    android:progress="10"
    wang:line_width="3dp"
    android:padding="10dp"/>

</RelativeLayout>
我们可以尝试在构造方法中打一个log,看看是否能正常获取到我们赋值的属性。
步骤二:测量
这里直接开始写测量,不知道View绘制流程的可以看看我之前的一片文章:安卓View绘制的相关知识点
我们直接在RoundProgressBar这个类中重写onMeasure()这个方法
    @Override
    protected void onMeasure(int widthMeasureSpec, int heightMeasureSpec) {
        int with_mode = MeasureSpec.getMode(widthMeasureSpec);//获取测量模式
        int width_size = MeasureSpec.getSize(widthMeasureSpec);//获取父控件测量出来的宽度值

        //测量宽度
        int width = 0;
        if(with_mode == MeasureSpec.EXACTLY)
        {
        //如果测量模式是EXACTLY,那宽度就取决于xml里写的值
            width = width_size;
        }
        else
        {
            int width_measure = meaasureWidth() + getPaddingLeft() + getPaddingRight();

            if (width == MeasureSpec.AT_MOST)
            {
            //如果测量模式是AT_MOST,就选取较小的
                width = Math.min(width_size,width_measure);
            }
            else
            {
            //如果测量模式是UNSPECIFICED,则是需要你自己测量
                width = width_measure;
            }

        }

        //测量高度

        int height_mode = MeasureSpec.getMode(heightMeasureSpec);
        int height_size = MeasureSpec.getSize(heightMeasureSpec);

        int height = 0;
        if(height_mode == MeasureSpec.EXACTLY)
        {
            height = height_size;
        }
        else
        {
            int height_measure = meaasureHeight() +getPaddingTop() + getPaddingBottom();

            if (height_mode == MeasureSpec.AT_MOST)
            {
                height = Math.min(height_size,height_measure);
            }
            else
            {
                height  = height_measure;
            }
        }

        setMeasuredDimension(width,height);
    }

//因为我们测量的是一个圆,所以宽度和高度都是圆的半径*2
    private int meaasureHeight() {

        return mRadius*2;
    }
      private int meaasureWidth() {
        return mRadius*2;
    }
大多数控件的测量方式就是这样,一般情况下我们只需改动meaasureHeight()和meaasureWidth()方法即可。
步骤三:绘制
首先我们需要一支笔,
private Paint mPaint;
然后在构造方法中,在对ra进行回收后,对笔进行初始化:
    private void initPaint() {
        mPaint = new Paint();
        mPaint.setColor(mColor);
        mPaint.setAntiAlias(true);//设置抗锯齿
    }
重写onDraw()方法:
  @Override
    protected void onDraw(Canvas canvas) {

        mPaint.setStyle(Paint.Style.STROKE);//设置笔的空心/实心
        mPaint.setStrokeWidth(mLineWidth/4);//设置笔的宽度

        int width = getWidth();//获取控件宽度
        int height = getHeight();//获取控件高度

//先画一个比较细的圆
        canvas.drawCircle(width/2,height/2,width/2-getPaddingLeft()-mPaint.getStrokeWidth()/2,mPaint);

//画一个粗一些的圆
        mPaint.setStrokeWidth(mLineWidth);
        canvas.save();
        //移动画笔的中心点
        canvas.translate(getPaddingLeft(),getPaddingTop());

        float angle =  mProgress*1.0f/100*360;//计算绘制的弧度
        //绘制弧线
        canvas.drawArc(new RectF(0,0,width-getPaddingLeft()*2,height-getPaddingLeft()*2),0,angle,false,mPaint);
        canvas.restore();


        mPaint.setStrokeWidth(0);
        mPaint.setStyle(Paint.Style.FILL);
        mPaint.setTextSize(mTextSize);
        String text = mProgress+"%";
        mPaint.setTextAlign(Paint.Align.CENTER);
        int y = getHeight()/2;
        Rect bound = new Rect();
        mPaint.getTextBounds(text,0,text.length(),bound);
        int textHeight = bound.height();
        //绘制字体
        canvas.drawText(text,0,text.length(),getWidth()/2,y+textHeight/2-mPaint.descent()/2,mPaint);
    }
在onDraw()方法中,最重要的就是canvas对象和paint对象的相关API,不管绘制什么控件都是一样的步骤。
步骤四:状态的存储和恢复
重写这两个方法就行:
    public static final String KEY_PROGRESS = "progress";
    public static final String KEY_INSTANCE = "instance";

 @Nullable
    @Override
    protected Parcelable onSaveInstanceState() {
        Bundle bundle = new Bundle();
        bundle.putInt(KEY_PROGRESS,mProgress);
        bundle.putParcelable(KEY_INSTANCE,super.onSaveInstanceState());
        return bundle;
    }

    @Override
    protected void onRestoreInstanceState(Parcelable state) {
        if (state instanceof Bundle)
        {
            Bundle bundle = (Bundle) state;
            mProgress = bundle.getInt(KEY_PROGRESS);
            Parcelable parcelable = bundle.getParcelable(KEY_INSTANCE);
            super.onRestoreInstanceState(parcelable);
            return;
        }

        super.onRestoreInstanceState(state);
    }
最后给这个控件加上获取和设置进度的方法:
 public void setProgress(int progress)
    {
        mProgress = progress;
        invalidate();//重新绘制
    }
    public int getProgress()
    {
        return mProgress;
    }
然后再Activity中,我们只需获取这个控件,然后给他设置属性动画即可:
 final View progress = findViewById(R.id.progressbar);
 ObjectAnimator.ofInt(progress,"progress",0,100).setDuration(3000).start();
