openstack 制作linux镜像+centos官方镜像使用教程
openstack 制作linux镜像+centos官方镜像使用教程
工具:VMware Workstation (虚拟机)、CentOS-7-x86_64-Minimal-1511.iso(Minimal是官方最小的centos镜像文件,也可以使用其他镜像正常大小的iso文件)。
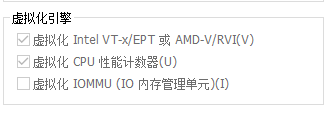
1.创建一台VMware虚拟机(桌面版), 开启VT和CPU性能计数器。

2.安装kvm,并启动libvirtd并设置开机启动
# yum install epel* -y
# yum -y install qemu-kvm libvirt virt-install bridge-utils virt-manager libguestfs-tools-c
# systemctl start libvirtd
# systemctl enable libvirtd

如果libvirtd 启动失败请执行:yum update librbd1  然后再次启动libvirtd
如果字体乱码请执行: yum install dejavu-lgc-sans-fonts -y
3.创建qcow2文件
# qume-img creaet -f qcow2 /mnt/centos.qcow2 5G
4.启动KVM虚拟机(有两种启动方法)
方法1:

# virt-install --virt-type kvm --name centos --ram 1024\
--disk /mnt/centos.qcow2,format=qcow2\
--network network=default   --graphics vnc,listen=0.0.0.0 --noautoconsole\
 --os-type=linux --os-variant=centos7.0 \
 --location=/root/CentOS-7-x86_64-Minimal-1511.iso

执行完成后再执行:

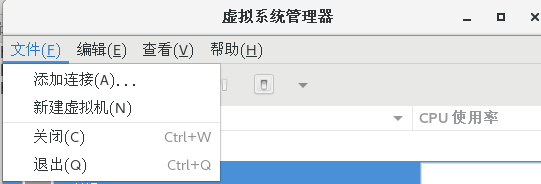
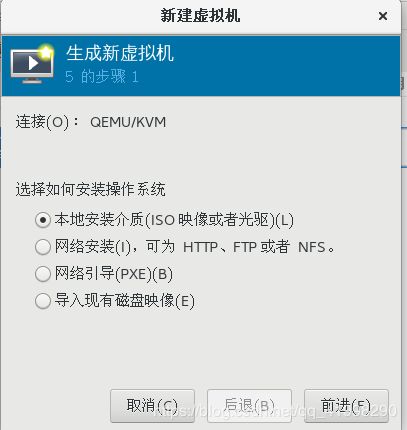
# virt-manager
方法2:

直接输入命令:
# virt-manager
5.操作系统安装完成后,再vmware虚拟机中使用命令 virsh dumpxml [虚拟机名] 来查询安装介质盘的名字,查询到介质后将介质弹出,否者重启后又将会进入系统安装界面。
# virsh dumpxml centos
......
在反馈信息中,找到如下内容。
......
弹出介质:
# virsh attach-disk --type cdrom --mode readonly centos "" hda
重启KVM虚拟机:
# virsh reboot centos
6.配置KVM虚拟机
给KVM虚拟机安装电源管理工具:
# yum install acpid
# systemctl enable acpid

#systemctl  stop firewalld
# systemctl disable firewalld
[root@test centos]# vi /etc/selinux/config
SELINUX=disabled
安装cloud-init :
# yum install epel-release.noarch
# yum install cloud-init

编辑/etc/cloud/cloud.cfg文件,在末尾加入:   user: admin
安装cloud-utils-growpart以允许分区调整大小:
# yum install cloud-utils-growpart
要访问元数据服务的实例,必须禁用默认的zeroconf路由:

# echo "NOZEROCONF=yes" >> /etc/sysconfig/network
编辑/etc/default/grub文件并配置 GRUB_CMDLINE_LINUX选项:
GRUB_CMDLINE_LINUX="crashkernel=auto rd.lvm.lv=cl/root rd.lvm.lv=cl/swap console=tty0 console=ttyS0,115200n8"

# grub2-mkconfig -o /boot/grub2/grub.cfg      //保存配置
Generating grub configuration file ...
Found linux image: /boot/vmlinuz-3.10.0-229.14.1.el7.x86_64
Found initrd image: /boot/initramfs-3.10.0-229.14.1.el7.x86_64.img
Found linux image: /boot/vmlinuz-3.10.0-229.4.2.el7.x86_64
Found initrd image: /boot/initramfs-3.10.0-229.4.2.el7.x86_64.img
Found linux image: /boot/vmlinuz-3.10.0-229.el7.x86_64
Found initrd image: /boot/initramfs-3.10.0-229.el7.x86_64.img
Found linux image: /boot/vmlinuz-0-rescue-605f01abef434fb98dd1309e774b72ba
Found initrd image: /boot/initramfs-0-rescue-605f01abef434fb98dd1309e774b72ba.img
done

关闭KVM实例
# poweroff         //这条命令不懂的可以百度下
6配置完成后,进行后期文件处理。
删除实例的MAC地址(在VMware中执行):
# virt-sysprep -d centos

取消定义libvirt域:
# virsh undefine centos
到这里qcow2 镜像制作完成。
我们上传到openstack中。
以下为centos官方镜像和制作的镜像使用教程
# openstack image create --disk-format qcow2 --file centos.qcow2 --tag LVM --container-format bare CentOS-7.2
创建openstack密匙对:
# ssh-keygen -q -N ""              //生成私匙
# openstack keypair create --public-key ~/.ssh/id_rsa.pub mykey                        //创建名为mykey的密匙对

查看密匙对:
#openstack keypair list
[root@controller ~]# openstack keypair list
+----------+-------------------------------------------------+
| Name     | Fingerprint                                     |
+----------+-------------------------------------------------+
| mykey    | 23:c8:0a:75:32:43:d9:ab:e4:46:61:d7:92:23:8d:03 |
+----------+-------------------------------------------------+
创建云主机:
# openstack server create --image 123456 --flavor 3 --key-name  mykey --nic net-id=456789  test

绑定浮动IP:
# nova floating-ip-associate 14556564  192.168.10.151
连接测试(注意:连接必须使用centos用户):
[root@controller ~]# ssh [email protected]
Last login: Mon Feb 18 14:33:26 2019 from 30.0.0.20
[centos@test ~]$

   连接成功!!!!!!
# sudo su root               //切换到root用户
[centos@test ~]$ vi /etc/ssh/sshd_config
PasswordAuthentication yes                      //配置为yes代表允许ssh连接时使用密码登陆。
保存退出


#systemctl restart sshd
到此结束,谢谢观看。


