使用TensorFlow-Slim进行自己图像数据集分类
前提说明:注意本文没有介绍tensorflow的安装,是在tensorflow-models扩张包的下进行的改造,让其可以训练预测自己想要的分类
目录
1.下载tensorflow-models扩展包
2.准备自己的训练数据
3.将数据转换为tfrecord格式数据
4.下载与训练模型
5.训练模型
6.导出推理图(导出推理图)
7.冻结导出图(冻结导出的图形)
8.预测图片
1.下载tensorflow-models扩展包
到tensorflow-models的GitHub下载research下面的slim这个包到本地


2.准备自己的训练数据
自己创建一个image_data文件夹,在文件夹下创建每一个分类的文件夹,里面放入自己预先分好类的图片

3.将数据转换为tfrecord格式数据
   对于大数据,TensorFlow中都需要转换成TFRecord格式的文件,TFRecord文件同样是以二进制进行存储数据的,适合以串行的方式读取大批量数据。其优势是能更好的利用内存,更方便地复制和移动,这更符合TensorFlow执行引擎的处理方式。通常数据转换成tfrecord格式需要写个小程序将每一个样本组装成protocol buffer定义的Example的对象,序列化成字符串,再由tf.python_io.TFRecordWriter写入文件即可。
   这里为了方便快捷我更改了一部分代码直接调用datasets下的flowers模型文件来生成我们的tfrecord格式和labels文件,我们进入我们下载好的slim文件夹下,然后再进入datasets文件夹下

打开download_and_convert_flowers.py
*修改第43行,这个值的意思的测试数据集的数量,我们一般2,8分数据集,这里只用填写测试集的数据代码会自动吧总数据集分成2部分![]()
*修改第48行这个的意思是生成几个tfrecord文件,这个数量是根据你数据量来划分,1024左右张图片一个tfrecord

下面就是更改图片路径使用自己的路径
第83行,先注释了然后添加自己的路径
flower_root = 你数据集的路径/image_data

还要分别注释两个代码,第190行,第210行
这两行都注释了,这两行的意思就是下载TensorFlow的分类图片和删除下载的压缩包,因为我们不用他们的
![]()
![]()
代码就修改完了可以运行文件把图片转为 tfrecord
到 slim文件夹下
python download_and_convert_data.py\
 --dataset_name=flowers\
 --dataset_dir=你自己的路径/data/
参数解释:
--dataset_name==指定模板类型分类
--dataset_dir ==tfrecord保存路径
运行以后你就可以去到你设置的data文件夹下看生成的东西了

4.下载与训练模型
https://github.com/tensorflow/models/tree/master/research/slim

我选择Inception V4模型,为什么呢
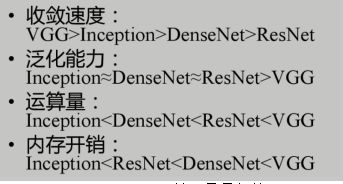
从总体表现上看Inception效果是最好的
下载后的模型我存放在: 你自己的路径/pre_trained/
pre_trained自己建的文件夹
5.训练模型
进入slim\datasets文件夹下
打开flowers.py
修改34和36行
34行是训练集和测试集的图片数量
36行是分多少类

进入到slim文件夹下
python -u train_image_classifier.py \
  --dataset_name=flowers \
  --dataset_dir=/data \
  --checkpoint_path=/pre_trained/inception_v4.ckpt \
  --model_name=inception_v4 \
  --checkpoint_exclude_scopes=InceptionV4/Logits,InceptionV4/AuxLogits/Aux_logits \
  --trainable_scopes=InceptionV4/Logits,InceptionV4/AuxLogits/Aux_logits \
  --train_dir=./result \
  --learning_rate=0.001 \
  --learning_rate_decay_factor=0.76\
  --num_epochs_per_decay=50 \
  --moving_average_decay=0.9999 \
  --optimizer=rmsprop \
  --ignore_missing_vars=True \
  --batch_size=32 \
  --max_number_of_steps=100000 \
  --weight_decay=0.0004
参数详解
--dataset_name=指定模板
--dataset_dir=指定训练集目录
--model_name=指定预训练模板
--checkpoint_exclude_scopes=指定忘记那几层的参数,不带进训练里面,记住提取特征的部分
--trainable_scopes=设定只对那几层变量进行调整,其他层都不进行调整,不设定就会对所有层训练(所以是必须要给定的)
--train_dir=训练参数存放地址
--learning_rate=学习率
--learning_rate_decay_factor=学习率衰减因子
--num_epochs_per_decay=每多少次衰减一次(衰减呈阶梯函数,控制衰减周期(阶梯宽度))
通过使用指数衰减,来维护变量的滑动均值,当训练模型时,维护训练参数的滑动均值是有好处的,在测试过程中使用滑动参数比最终训练的数值本身会提高模型的实际性能(准确率)。apply()方法会添加trained variables和shadow copies,并添加操作来维护变量的滑动平均值到shadow copies
average #方法可以访问shadow variables,在创建evaluation model时非常有用。 滑动均值是通过指数衰减计算得到的。shadow variable的初始化值和trained variables相同,其更新公式为 shadow_variable = decay * shadow_variable + (1 - decay) * variable
--moving_average_decay=移动平均衰减
--optimizer=优化器
--ignore_missing_vars=忽略那些在定义的模型结构中可能存在的而在预训练模型中没有的变量,因为如果自己定义的模型结构中存在一个参数,而这些参数在预训练模型文件 xxx.ckpt 中没有,那么如果不忽略的话,就会导入失败(这样的变量很多,比如卷积层的偏置项 bias,一般预训练模型中没有,所以需要忽略,即使用默认的零初始化)
--batch_size=一次训练所选取的样本数。 (Batch Size的大小影响模型的优化程度和速度。同时其直接影响到GPU内存的使用情况,假如你GPU内存不大,该数值最好设置小一点。)
--max_number_of_steps=训练步数
--weight_decay=即模型中所有参数的二次正则化超参数(这个的加入就是为了防止过拟合加入正则项,weight_decay 是乘在正则项的前面,控制正则化项在损失函数中所占权重的)
6.导出推理图(导出推理图)
保存包含模型体系结构的GraphDef。
这里我修改了tensorflow自带的写了一个图片解码,和修改shape
from __future__ import absolute_import
from __future__ import division
from __future__ import print_function

import tensorflow as tf

from tensorflow.python.platform import gfile
from datasets import dataset_factory
from preprocessing import preprocessing_factory
from nets import nets_factory


slim = tf.contrib.slim

tf.app.flags.DEFINE_string(
    'model_name', 'inception_v3', 'The name of the architecture to save.')

tf.app.flags.DEFINE_boolean(
    'is_training', False,
    'Whether to save out a training-focused version of the model.')

tf.app.flags.DEFINE_integer(
    'default_image_size', 224,
    'The image size to use if the model does not define it.')

tf.app.flags.DEFINE_string('dataset_name', 'imagenet',
                           'The name of the dataset to use with the model.')

tf.app.flags.DEFINE_integer(
    'labels_offset', 0,
    'An offset for the labels in the dataset. This flag is primarily used to '
    'evaluate the VGG and ResNet architectures which do not use a background '
    'class for the ImageNet dataset.')

tf.app.flags.DEFINE_string(
    'output_file', '', 'Where to save the resulting file to.')

tf.app.flags.DEFINE_string(
    'dataset_dir', '', 'Directory to save intermediate dataset files to')

FLAGS = tf.app.flags.FLAGS


def main(_):
  if not FLAGS.output_file:
    raise ValueError('You must supply the path to save to with --output_file')
  tf.logging.set_verbosity(tf.logging.INFO)
  with tf.Graph().as_default() as graph:
    dataset = dataset_factory.get_dataset(FLAGS.dataset_name, 'validation',
                                          FLAGS.dataset_dir)

    preprocessing_name = FLAGS.model_name
    image_preprocessing_fn = preprocessing_factory.get_preprocessing(
        preprocessing_name,
        is_training=False)

    network_fn = nets_factory.get_network_fn(
        FLAGS.model_name,
        num_classes=(dataset.num_classes - FLAGS.labels_offset),
        is_training=FLAGS.is_training)
    if hasattr(network_fn, 'default_image_size'):
      image_size = network_fn.default_image_size
    else:
      image_size = FLAGS.default_image_size
    placeholder = tf.placeholder(name='input', dtype=tf.string)
    image = tf.image.decode_jpeg(placeholder, channels=3)
    image = image_preprocessing_fn(image, image_size, image_size)
    image = tf.expand_dims(image, 0)
    network_fn(image)
    graph_def = graph.as_graph_def()
    with gfile.GFile(FLAGS.output_file, 'wb') as f:
      f.write(graph_def.SerializeToString())


if __name__ == '__main__':
  tf.app.run()
名字就保存为export_inference_graph.py,可以把他自带的替换了
保存在slim目录下,必须的
进入slim目录下运行
python -u export_inference_graph.py \
  --model_name=inception_v4 \
  --output_file=./my_inception_v4.pb \
  --dataset_name=flowers \
  --dataset_dir=/data
参数详解
--dataset_name=指定模板
--output_file=指定导出目录和文件名字
--model_name=指定预训练模板
--dataset_dir=tfrecord数据集的文件夹
7.冻结导出图(冻结导出的图形)
my_inception_v4.pb 文件中只保存了 Inception V4 的网络结构,并不包含训练得到的模型参数,需要将 checkpoint 中的模型参数保存进来。方法是使用 freeze_graph.py 脚本
freeze_graph.py 脚本是tensorflow自带的pip安装了tensorflow就有
如果您想将生成的模型与您自己的或预先训练过的检查点一起使用作为移动模型的一部分,则可以使用以下方法运行From_Graph以获得一个将变量内联为常量的图def:
如果您希望将自己或预训练检查点的结果模型用作移动模型的一部分,则可以使用以下命令运行冷冻图以获取图形def,并将变量内联为常量:
python -u /usr/local/lib/python3.6/site-packages/tensorflow/python/tools/freeze_graph.py \
  --input_graph=./my_inception_v4.pb \
  --input_checkpoint=./result/model.ckpt-44647 \
  --output_graph=./my_inception_v4_freeze.pb \
  --input_binary=True \
  --output_node_name=InceptionV4/Logits/Predictions
参数详解
/usr/local/lib/python3.6/site-packages/tensorflow/python/tools/freeze_graph.py \
--input_graph=推理图路径(6导出的那个文件)
--input_checkpoint=训练好的模型路径
--output_graph=.导出的目录
--output_node_name=指定输出节点
8.预测图片
classify_image.py 脚本来完成这件事 。先来看这个脚本的使用方法
python classify_image.py \
  --model_file=./my_inception_v4_freeze.pb \
  --image_file=./39757.jpg \
  --label_file=./data/labels.txt \
  --num_top_predictions=2
参数详解
--model_file=冻结模型位置(7.导出来的模型)
--image_file=你要测试的图片
--label_file=tfrecord数据集的文件夹下labels文件
--num_top_predictions=分类数量