CDH环境部署Elasticsearch集群
1.环境说明
1.1、linux系统(我这里是centos6.8)
1.2、jdk(我这里安装的Java1.8版本)
1.3、hadoop平台(我这里使用的cdh搭建的,hive版本为1.1.0)
2.安装单节点ES
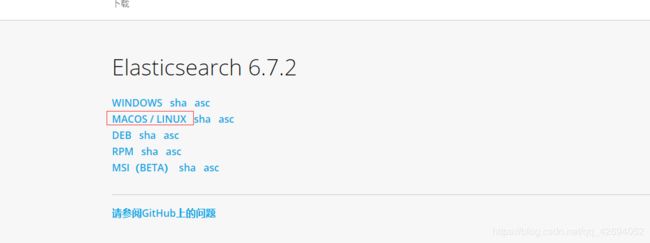
2.1、下载es安装包,去https://www.elastic.co/cn官网下载,因为最新更新到7X版本,所以这里选择6X最后一个版本Elasticsearch 6.7.2下载,选择tar格式

2.2、上传安装包到toolnode2节点的/opt 目录使用 tar zxvf 命令解压
2.3、创建ES用户和组(创建elsearch用户组及elsearch用户),因为使用root用户执行ES程序,将会出现错误;所以这里需要创建单独的用户去执行ES 文件;命令如下:
命令一:
groupadd elsearch
命令二:
useradd elsearch -g elsearch
给ES目录授权
chown -R elsearch:elsearch /opt/elasticsearch-6.7.2
2.4、创建ES数据文件和日志文件,使用root用户
命令一:
mkdir /data
命令二:
chown -R elsearch:elsearch /data/
命令三:
su - elsearch 切换用户
命令四:
mkdir -p /data/es/data
命令五:
mkdir -p /data/es/logs
2.5、修改ES配置文件,使用cd命令进入到config 文件下,执行 vi elasticsearch.yml 命令
设置es集群名称:
![]()
设置节点名称:
![]()
设置数据和日志路径:

再设置以下两个:
bootstrap.memory_lock: false
bootstrap.system_call_filter: false
在最后增加(貌似配置了这个head插件才能获取到es的状态):
http.cors.enabled: true
http.cors.allow-origin: "*"
2.6、使用elsearch用户执行ES文件,su - elsearch。进入到bin 目录下执行 ./elasticsearch 命令就可以了,执行 ./elasticesrarch -d 是后台运行
可能遇到的错误:
max virtual memory areas vm.max_map_count [65530] is too low, increase to at least [262144]
需要修改系统变量的最大值,使用root用户执行以下几条命令:
打开系统配置文档:
vi /etc/sysctl.conf
尾部增加并保存:
vm.max_map_count=655360
最后执行:
sysctl -p
再次执行es文件,报错解决!
max file descriptors [4096] for elasticsearch process is too low, increase to at least [65536]
每个进程最大同时打开文件数太小,可通过下面2个命令查看当前数量:
ulimit -Hn
ulimit -Sn
修改/etc/security/limits.conf文件,增加配置,用户退出后重新登录生效
*               soft    nofile          65536
*               hard    nofile          65536
max number of threads [3818] for user [es] is too low, increase to at least [4096]
问题同上,最大线程个数太低。修改配置文件/etc/security/limits.conf,增加配置:
*          soft    nproc     2048
root       soft    nproc     unlimited
但是没有生效,有的机器上limits文件会被覆盖,这时候就需要执行如下内容
修改/etc/security/limits.d/90-nproc.conf配置文件,修改内容如下:
# vim /etc/security/limits.d/90-nproc.conf
* soft nproc 1024
修改为
* soft nproc 2048
可通过命令查看
ulimit -Hu
ulimit -Su
解决成功,重新切换elsearch用户登录并启动ES,成功运行
2.7、浏览器打开或者使用curl, http://自己配置的IP地址:9200/ ,出现json格式的一串信息,表示es配置好了并且启动成功!
3. 安装head
3.1、下载head安装包,下载地址:https://github.com/mobz/elasticsearch-head/archive/master.zip
3.2、解压 ,并上传到ES节点/opt 目录
3.3、执行head 插件,需要node.js 的支持,所以,下面先安装node.js
3.4、地址: https://npm.taobao.org/mirrors/node/latest-v4.x/node-v4.4.7-linux-x64.tar.gz
3.5、解压 node.js安装包
3.6、配置node.js的环境变量:vi /etc/profile :
export JAVA_HOME=/opt/jdk1.8
export NODE_HOME=/opt/node
export PATH=$JAVA_HOME/bin:$NODE_HOME/bin:$PATH
3.7、查看node版本和npm版本:node -v
3.8、安装grunt(grunt是基于Node.js的项目构建工具,可以进行打包压缩、测试、执行等等工作,elasticsearch-head插件就是通过grunt启动的)。
在项目目录执行npm install grunt --save-dev安装
出现以下提示,为Gruntfile.js引用的,缺少以下包
>> Local Npm module "grunt-contrib-clean" not found. Is it installed?
>> Local Npm module "grunt-contrib-concat" not found. Is it installed?
>> Local Npm module "grunt-contrib-watch" not found. Is it installed?
>> Local Npm module "grunt-contrib-connect" not found. Is it installed?
>> Local Npm module "grunt-contrib-copy" not found. Is it installed?
>> Local Npm module "grunt-contrib-jasmine" not found. Is it installed?
Warning: Task "connect:server" not found. Use --force to continue.
Aborted due to warnings.
安装
npm install grunt-contrib-clean --registry=https://registry.npm.taobao.org
npm install grunt-contrib-concat --registry=https://registry.npm.taobao.org
npm install grunt-contrib-watch --registry=https://registry.npm.taobao.org
npm install grunt-contrib-connect --registry=https://registry.npm.taobao.org
npm install grunt-contrib-copy --registry=https://registry.npm.taobao.org
npm install grunt-contrib-jasmine --registry=https://registry.npm.taobao.org
查看版本:grunt -version
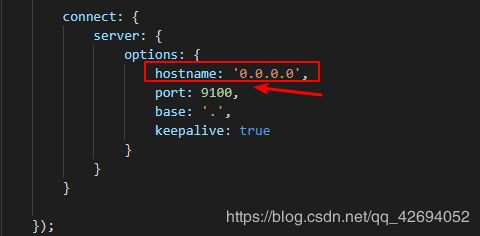
3.9、修改elasticsearch-head-master文件下的Gruntfile.js文件中,添加一行”hostname: ‘0.0.0.0’,”配置后所有ip都能访问,生产环境有需求的就指定ip

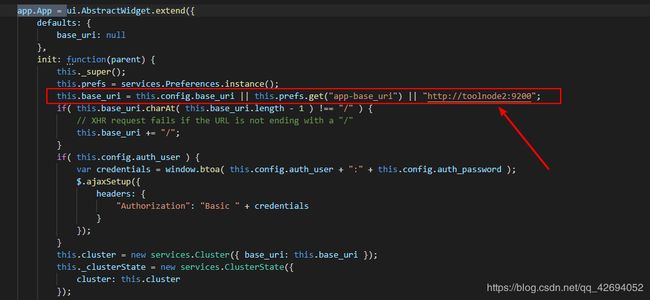
3.10、 修改 vim _site/app.js 文件:修改head的连接地址,改为安装head插件的主机ip,如图所示

修改完成后后执行:grunt server &
回到elasticsearch-5.6.3/bin目录再重新执行:./elasticsearch
使用浏览器访问:当前主机ip地址:9100

此图是我配置了集群之后的,单节点的话就只显示一个主机,下面开始配置集群:
4. es集群配置
4.1、cd 进入 cd /opt/elasticsearch-6.7.2/config/
vi elasticsearch.yml
修改以下两个属性
 # --------------------------------- Discovery ------------------------
# Pass an initial list of hosts to perform discovery when new node is started:
# The default list of hosts is ["127.0.0.1", "[::1]"]
discovery.zen.ping.unicast.hosts: ["toolnode2", "worknode1","worknode2"]
# Prevent the "split brain" by configuring the majority of nodes (total number of master-eligible nodes / 2 + 1):
discovery.zen.minimum_master_nodes: 2
# For more information, consult the zen discovery module documentation.
第一个填所有节点的主机名,未配置host就填ip,第二个按提示 节点数/2 + 1
4.2然后将elasticsearch-6.7.2整个分发到其它各个节点,使用scp命令就行
依次登录其它节点,先创建es的用户以及创建数据和日志文件夹,和上面的操作一样
scp -r /opt/elasticsearch-6.7.2/ root@worknode2:/opt/
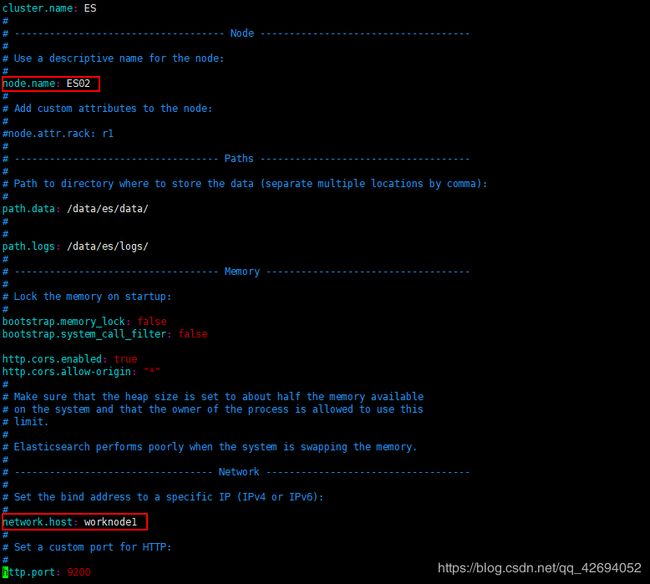
4.3、然后修改elasticsearch.yml中的node.name和network.host

4.4、然后依次运行各节点的es ./elasticsearch
最后浏览器进入安装了head_master的ip:9100,便能够看到各个节点都运行成功了 。


