FastDFS学习笔记
FastDFS学习笔记
文章目录
- FastDFS学习笔记
- 一、FastDFS引言
- 本地存储与分布式文件系统
- FastDFS概述
- FastDFS架构
- FastDFS环境搭建(虚拟机)
- 1. 创建虚拟机克隆机
- 2. 配置虚拟机
- 3. 下载安装gcc
- 4. 下载安装FastDFS
- 5. 下载安装FastDFS依赖
- 6. 解压缩依赖tar包
- 7. 解压缩FastDFS的tar包
- 8. 进入libfastcommon-1.0.36
- 9. 编译并安装libfastcommon
- 10. 进入fastdfs-5.11
- 11. 编译并安装FastDFS
- 12. 进入etc目录下的fdfs目录
- 13. 进行FastDFS的配置
- 14. 启动服务
- 15. 查看启动的服务
- FastDFS部分指令简介
- 1. 监控指令 --- fdfs_monitor
- 2. 上传指令 --- fdfs_upload_file
- 3. 下载指令 --- fdfs_download_file
- 4. 查看文件信息指令 --- fdfs_file_info
- 5. 删除指令 --- fdfs_delete_file
- 6. 文件追加上传及追加内容指令 --- fdfs_upload_appender & fdfs_append_file
- 二、通过javaAPI操作FastDFS
- 普通java环境下的javaAPI操作
- 1. 获取 fastdfs-client-java的源码
- 2. 安装到maven的本地仓库(源码安装)
- 3. 开发实战
- 1. 创建maven项目
- 2. 导入fastdfs-client-java的jar包
- 3. 创建配置文件.conf
- 4. 创建测试类
- SpringBoot环境下的javaAPI操作
- 1. 关于FastDFS-Client 1.26.5
- 2. 实战开发
- 1. 创建springboot的maven项目
- 2. 导入FastDFS-Client 1.26.5依赖jar
- 3. 配置springboot的入口类
- 4. 配置springboot的application.yml配置文件
- 5. 创建测试类
- 6. 多图片上传
- 三、FastDfS集成Nginx
- fastDFS集成Nginx的原因
- 环境搭建
- 1. 上传所需资源
- 2. 移动fastdfs-nginx-module至/usr/local/目录
- 3. 复制配置文件
- 4. 解压缩nginx-1.11.1.tar.gz
- 5. 进入nginx的解压缩目录
- 6. 配置nginx服务器
- 7. 编译安装nginx服务器
- 8. 进入nginx服务器的安装目录
- 9. 修改nginx.conf
- 10. 修改mod_fastdfs.conf
- 11. 启动nginx服务
- 12. 查看服务启动情况
- 13. 启动追踪服务与存储节点服务
- 测试
- 1. 测试访问图片
- 1. 上传图片
- 2. 通过浏览器远程访问
- 2. 测试在线访问视频
- 1. 上传视频
- 2. 创建MP4视频播放页面
- 3. 访问页面
- 四、FastDFS集成FastDHT(文件去重)
- 去重原理
- 环境搭建
- 1. 上传所需资源
- 2. 解压缩db-4.7.25.tar.gz
- 3. 进入db-4.7.25解压缩目录下的build_unix/目录
- 4. 进行db-4.7.25的初始化配置
- 5. 编译并安装db-4.7.25
- 6. 解压缩FastDHT_v2.01.tar.gz
- 7. 进入FastDHT_v2.01解压缩目录
- 8. 编译并安装FastDHT_v2.01
- 9. 进入FastDHT的配置文件存放目录
- 10. 修改fdhtd.conf
- 11. 创建目录
- 12. 修改fdht_servers.conf
- 13. 修改存储节点的配置文件
- 14. 启动服务
- 测试
- 五、FastDFS分布式文件系统集群搭建(虚拟机)
- 准备5台机器(克隆虚拟机)
- 环境搭建
- 1. 配置tracker server
- 2. 配置storage server
- 3. 检测集群环境是否搭建成功(storage server状态)
- 测试
- 六、FastDFS分布式文件系统集群环境集成FastDHT(虚拟机)
- 1. 在tracker server中安装FastDHT服务
- 2. 修改存储服务器的配置文件
- 3. 启动服务
- 1. 启动tracker server中的 dht服务
- 2. 重启tracker server中的tracker服务
- 3. 重启storage server中的storage服务
- 七、FastDFS分布式文件系统集群环境集成Nginx(虚拟机)
- 1. 修改各个storage server中的 mod_fastdfs.conf 文件
- 2. 进入Nginx安装目录
- 3. 启动Nginx服务
- 4. 重启storage server的tracker与storage服务
- 八. 在tracker server中搭建Nginx网关服务器
- 1. 进入nginx安装位置
- 2. 删除nginx
- 3. 进入nginx安装文件所在目录
- 4. 删除nginx安装文件
- 5. 重新解压缩 nginx-1.11.1.tar.gz
- 6. 进入 nginx-1.11.1进行配置
- 7. 编译并安装 nginx-1.11.1
- 8. 修改网关服务器Nginx的配置文件 nginx.conf
- Nginx服务的相关命令:
- 9. 启动网关服务器nginx服务
- 10. 查看服务启动状态
一、FastDFS引言
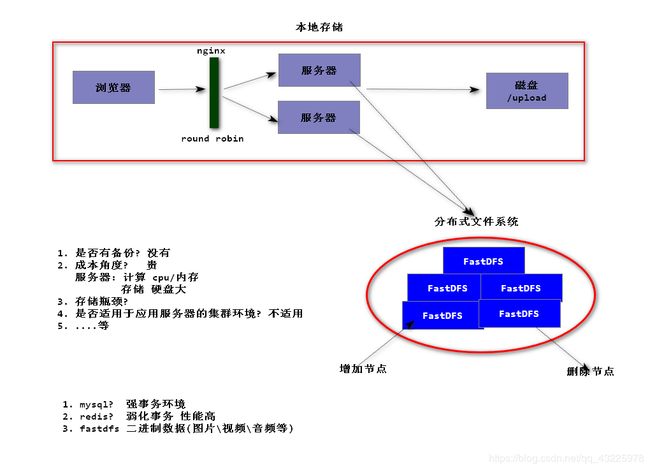
本地存储与分布式文件系统
-
是否有备份? 没有
-
成本角度? 贵
服务器 :用于计算 ---- cpu/内存
用于存储 ---- 硬盘大
-
存储瓶颈? 容量有限
-
是否使用于应用服务器的集群环境? 不适用
-
。。。等等
解决本地存储的缺点 : 使用分布式文件系统 — 引入存储服务的概念
支持冗余备份;可以增加节点,所以理论上没有瓶颈;支持集群环境;支持负载均衡特性,可以在一个存储节点压力大时,将请求分给其他存储节点。
数据存储的方式:
- 关系型数据库(mysql,oracle…):用于强事务环境
- 非关系型数据库(redis…):用于弱化事务环境,性能高
- 分布式文件系统(FastDFS…):用于存储二进制数据(图片/视频/音频)
FastDFS概述
FastDFS(Distributed File System (DFS))是一个开源的分布式文件系统,她对文件进行管理,功能包括:文件存储、文件同步(冗余备份)、文件访问(文件上传、文件下载)等,解决了大容量存储和负载均衡的问题。特别适合以文件为载体的在线服务,如相册网站、视频网站等等
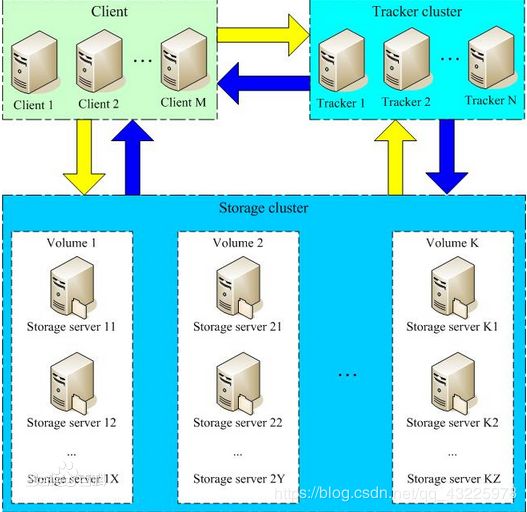
FastDFS服务端有两个角色:跟踪器(tracker)和存储节点(storage)。
跟踪器主要做调度工作,在访问上起负载均衡的作用。
存储节点存储文件,完成文件管理的所有功能:存储、同步和提供存取接口,FastDFS同时对文件的meta data(元数据)进行管理。所谓文件的meta data就是文件的相关属性,以键值对(key value pair)方式表示,如:width=1024,其中的key为width,value为1024。文件meta data是文件属性列表,可以包含多个键值对。
FastDFS架构
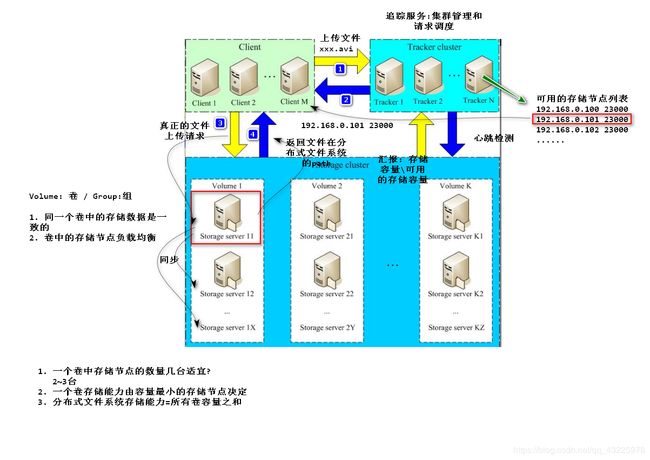
FastDFS架构图:
注:图中文件上传到存储节点后返回的文件在文件系统中的path,即为文件在FastDFS中的文件标识,分为两个部分:卷名和文件名,二者缺一不可。
跟踪器和存储节点都可以由一台至多台服务器构成。跟踪器和存储节点中的服务器均可以随时增加或下线而不会影响线上服务。其中跟踪器中的所有服务器都是对等的,可以根据服务器的压力情况随时增加或减少。
为了支持大容量,存储节点(服务器)采用了分卷(或分组)的组织方式。存储系统由一个或多个卷组成,卷与卷之间的文件是相互独立的,所有卷 的文件容量累加就是整个存储系统中的文件容量。一个卷可以由一台或多台存储服务器组成,一个卷下的存储服务器中的文件都是相同的,卷中的多台存储服务器起 到了冗余备份和负载均衡的作用。
在卷中增加服务器时,同步已有的文件由系统自动完成,同步完成后,系统自动将新增服务器切换到线上提供服务。
当存储空间不足或即将耗尽时,可以动态添加卷。只需要增加一台或多台服务器,并将它们配置为一个新的卷,这样就扩大了存储系统的容量。
以上内容来自:https://www.oschina.net/p/fastdfs
FastDFS环境搭建(虚拟机)
1. 创建虚拟机克隆机
2. 配置虚拟机
-
删除保存有原始虚拟机网卡初始化信息的文件:
# CentOS 6 中执行以下命令 [root@localhost ~]# rm -rf /etc/udev/rules.d/70-persistent-net.rules -
修改主机名:
-
CentOS 6 中修改主机名
# CentOS 6 中执行以下命令
[root@localhost ~]# vi /etc/hosts
# CentOS 6 中执行以下命令 [root@localhost ~]# vi /etc/sysconfig/network -
CentOS 7 中修改主机名(参考:https://www.itzgeek.com/how-tos/linux/centos-how-tos/change-hostname-in-centos-7-rhel-7.html)
-
查看当前主机名
[root@localhost ~]# hostname localhost.localdomain -
检查当前主机名
[root@localhost ~] #hostnamectl status Static hostname: localhost.localdomain Icon name: computer-vm Chassis: vm Machine ID: 565ea8b749544aca9d5563308f9e4bc2 Boot ID: 5c979d9b5f754df8b75a4e3aeabf2bad Virtualization: vmware Operating System: CentOS Linux 7 (Core) CPE OS Name: cpe:/o:centos:centos:7 Kernel: Linux 3.10.0-123.el7.x86_64 Architecture: x86_64 //==================翻译==================== 静态主机名:localhost.localdomain 图标名称:computer-vm 底盘:vm 机器ID:565ea8b749544aca9d5563308f9e4bc2 引导ID:5c979d9b5f754df8b75a4e3aeabf2bad 虚拟化:vmware 操作系统:CentOS Linux 7(核心) CPE操作系统名称:cpe:/ o:centos:centos:7 内核:Linux 3.10.0-123.el7.x86_64 架构:x86_64 //========================================== -
设置主机名
[root@localhost ~]# hostnamectl set-hostname tracker.fastdfs -
再次检查主机名
[root @ client~] #hostnamectl status
Static hostname: tracker.fastdfs
Icon name: computer-vm
Chassis: vm
Machine ID: 565ea8b749544aca9d5563308f9e4bc2
Boot ID: 5c979d9b5f754df8b75a4e3aeabf2bad
Virtualization: vmware
Operating System: CentOS Linux 7 (Core)
CPE OS Name: cpe:/o:centos:centos:7
Kernel: Linux 3.10.0-123.el7.x86_64
Architecture: x86_64
//==================翻译====================
静态主机名:tracker.fastdfs
图标名称:computer-vm
底盘:vm
机器ID:565ea8b749544aca9d5563308f9e4bc2
引导ID:5c979d9b5f754df8b75a4e3aeabf2bad
虚拟化:vmware
操作系统:CentOS Linux 7(核心)
CPE操作系统名称:cpe:/ o:centos:centos:7
内核:Linux 3.10.0-123.el7.x86_64
架构:x86_64
//==========================================
-
-
-
修改完毕,需要重启虚拟机
# CentOS 6 与 7 中执行以下命令 [root@localhost ~]# reboot -
网卡信息的配置
i. 进入到网卡信息编辑文件:
# CentOS 6 中执行以下命令
[root@fastdfs ~]# vi  /etc/sysconfig/network-scripts/ifcfg-eth0
# CentOS 7 中执行以下命令
[root@tracker ~]# vi  /etc/sysconfig/network-scripts/ifcfg-ens33
ii. 在当前窗口: 按 i 键,进入编辑 通过上下左右箭头按键,控制光标
编辑完成按 esc, 然后输入 冒号 :wq! 回车 ,进行保存

设置静态IP可参考博客:https://blog.csdn.net/u010452388/article/details/86481868iii. 重新加载网卡配置:
# CentOS 6与7 中执行以下命令 [root@fastdfs ~]# service network restart # CentOS 7 中执行以下命令 [root@tracker ~]# systemctl restart network -
检查防火墙状态
# CentOS 6 中执行以下命令 [root@fastdfs ~]# service iptables status # CentOS 7 中执行以下命令 [root@tracker ~]# systemctl status firewalld -
关闭防火墙
# CentOS 6 中执行以下命令 [root@fastdfs ~]# service iptables stop # CentOS 7 中执行以下命令 [root@tracker ~]# systemctl stop firewalld -
关闭防火墙开机自启功能
# CentOS 6 中执行以下命令
[root@fastdfs ~]# chkconfig iptables off
# CentOS 7 中执行以下命令
[root@tracker ~]# systemctl disable firewalld
-
查看防火墙状态
# CentOS 6 中执行以下命令
[root@fastdfs ~]# service iptables status
# CentOS 7 中执行以下命令
[root@tracker ~]# systemctl status firewalld
3. 下载安装gcc
安装方式为yum安装(需网络):
[root@tracker ~]# yum install gcc-c++ perl-devel pcre-devel openssl-devel zlib-devel wget
4. 下载安装FastDFS
[root@tracker ~]# wget https://github.com/happyfish100/fastdfs/archive/V5.11.tar.gz
5. 下载安装FastDFS依赖
[root@tracker ~]# wget https://github.com/happyfish100/libfastcommon/archive/V1.0.36.tar.gz
6. 解压缩依赖tar包
解压缩libfastcommon-1.0.36的依赖tar包到指定文件夹 /usr
[root@tracker ~]# tar -zxvf V1.0.36.tar.gz -C /usr
7. 解压缩FastDFS的tar包
解压缩fastdfs-5.11的依赖tar包到指定文件夹 /usr
[root@tracker ~]# tar -zxvf V5.11.tar.gz -C /usr
8. 进入libfastcommon-1.0.36
[root@tracker ~]# cd /usr/libfastcommon-1.0.36/
9. 编译并安装libfastcommon
[root@tracker libfastcommon-1.0.36]# ./make.sh && ./make.sh install
10. 进入fastdfs-5.11
[root@tracker libfastcommon-1.0.36]# cd ../fastdfs-5.11/
11. 编译并安装FastDFS
[root@tracker fastdfs-5.11]# ./make.sh && ./make.sh install
12. 进入etc目录下的fdfs目录
[root@tracker fastdfs-5.11]# cd /etc/fdfs/
13. 进行FastDFS的配置
#分别将配置文件复制一份
[root@tracker fdfs]# cp tracker.conf.sample tracker.conf
[root@tracker fdfs]# cp storage.conf.sample storage.conf
[root@tracker fdfs]# cp client.conf.sample client.conf

## ==============修改tracker.conf配置文件内容=============
[root@tracker fdfs]# vi tracker.conf
# 修改追踪服务的数据与日志文件的存储路径
base_path=/data/fastdfs/tracker
# 保存退出编辑
esc-->:wq!-->Enter
# -------创建追踪服务的数据与日志文件的存储目录-------
[root@tracker fdfs]# mkdir -p /data/fastdfs/tracker
## ==============修改storage.conf配置文件内容=============
[root@tracker fdfs]# vi storage.conf
# 修改存储节点的数据与日志文件的存储路径
base_path=/data/fastdfs/storage
# 修改上传文件在存储节点的存储路径
store_path0=/data/fastdfs/storage/store
# 修改为tracker服务器的ip(此处为本机ip)
tracker_server=192.168.:q43.136:22122
# 保存退出编辑
esc-->:wq!-->Enter
# -------创建存储节点的数据与日志文件及上传文件的存储目录-------
[root@tracker fdfs]# mkdir -p /data/fastdfs/storage/store
## ==============修改client.conf配置文件内容==============
[root@tracker fdfs]# vi client.conf
# 修改
base_path=/tmp
# 修改为tracker服务器的ip(此处为本机ip)
tracker_server=192.168.43.136:22122
# 保存退出编辑
esc键-->输入:wq!-->Enter键
14. 启动服务
-
启动 tracker server
[root@tracker fdfs]# fdfs_trackerd /etc/fdfs/tracker.conf start -
启动 storage server
[root@tracker fdfs]# fdfs_storaged /etc/fdfs/storage.conf start
15. 查看启动的服务
[root@tracker fdfs]# ps -ef | grep fdfs

++++++++++++++++++++++++++++ 环境搭建完成 ++++++++++++++++++++++++++++
FastDFS部分指令简介
输入fdfs_ —> 连按两下tab键 —> 显示所有FastDFS的fdfs_xxx指令

1. 监控指令 — fdfs_monitor
-
指令参数
fdfs_monitor[-h ] [list|delete|set_trunk_server [storage_id]] 注: 参数含义:
:配置文件路径 - [-h
] :(可选参数) - [list|delete|set_trunk_server [storage_id]] :(可选参数)
-
指令使用
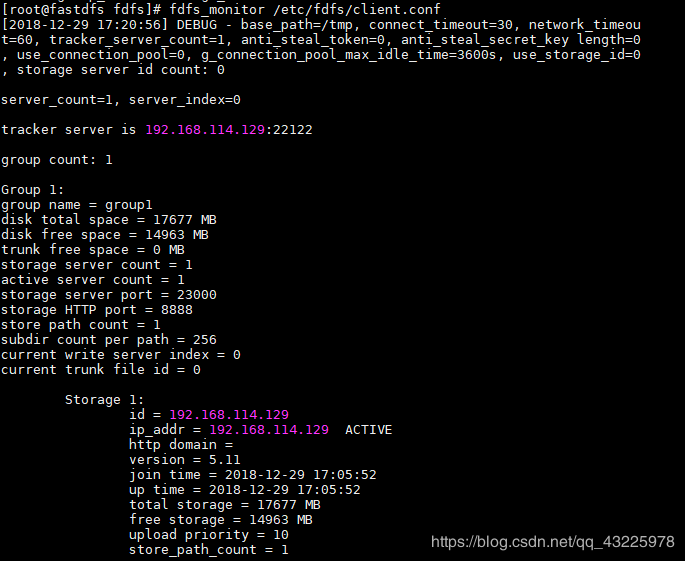
[root@tracker fdfs]# fdfs_monitor /etc/fdfs/client.conf
2. 上传指令 — fdfs_upload_file
-
指令参数
fdfs_upload_file[storage_ip:port] [store_path_index] 注: 参数含义:
:配置文件路径 :本地文件路径 - [storage_ip:port] :(可选参数)
- [store_path_index] :(可选参数)
-
指令使用
[root@tracker fdfs]# fdfs_upload_file /etc/fdfs/client.conf 上传的文件路径
注: 上传文件后会返回文件在FastDFS中的唯一文件标识,即卷名+文件名
3. 下载指令 — fdfs_download_file
-
指令参数
fdfs_download_file[local_filename] [ ] 注: 参数含义:
1.:配置文件路径 2. :文件在FastDFS中的唯一文件标识,即卷名+文件名 3. [local_filename] :文件下载地址 4. :(可选参数)文件下载开始时间 5. :(可选参数)文件下载的字节数 -
指令使用
[root@tracker fdfs]# fdfs_download_file /etc/fdfs/client.conf group1/M00/00/00/wKhygVwnUUOAcgYHCCZp2Ahsb3g964.rpm /root/java/xxx.rpm
4. 查看文件信息指令 — fdfs_file_info
-
指令参数
fdfs_file_info注: 参数含义:
:配置文件路径 :文件在FastDFS中的唯一文件标识,即卷名+文件名
-
指令使用
[root@tracker fdfs]# fdfs_file_info /etc/fdfs/client.conf group1/M00/00/00/wKhygVwnUUOAcgYHCCZp2Ahsb3g964.rpm
5. 删除指令 — fdfs_delete_file
-
指令参数
fdfs_delete_file注: 参数含义:
:配置文件路径 :文件在FastDFS中的唯一文件标识,即卷名+文件名
-
指令使用
[root@tracker fdfs]# fdfs_delete_file /etc/fdfs/client.conf group1/M00/00/00/wKhygVwnUUOAcgYHCCZp2Ahsb3g964.rpm注: 删除指令使用后,文件在该卷中的所有备份都会被删除,因为卷内的存储节点会相互同步,故慎用。
6. 文件追加上传及追加内容指令 — fdfs_upload_appender & fdfs_append_file
注意: 文件追加命令 fdfs_append_file 的使用前提是 要追加内容的文件是通过 文件追加上传命令 fdfs_upload_appender 上传的
-
指令参数
fdfs_upload_appender注: 参数含义:
:配置文件路径 :将要上传的可追加内容的文件的本地路径
fdfs_append_file注: 参数含义:
:配置文件路径 :需要追加内容的文件在FastDFS中的唯一文件标识,即卷名+文件名 :将要追加到其他文件的文件的本地路径
-
指令使用
# ====== 上传需要追加内容的文件 ======
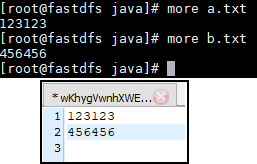
[root@tracker fdfs]# fdfs_upload_appender /etc/fdfs/client.conf /root/java/a.txt
# ====== 追加内容 ======
[root@tracker fdfs]# fdfs_append_file /etc/fdfs/client.conf group1/M00/00/00/wKhygVwnhXWEcq9VAAAAAJXO_uM135.txt /root/java/b.txt
二、通过javaAPI操作FastDFS
普通java环境下的javaAPI操作
FastDFS由ali的架构师yuqing开发的开源项目,并发布在GitHub上,他同时提供了操作FastDFS的 java client SDK—fastdfs-client-java 以及其他附加开源项目(https://github.com/happyfish100)。
1. 获取 fastdfs-client-java的源码
-
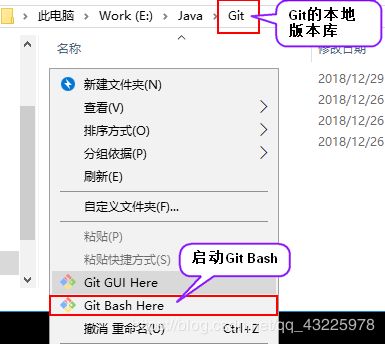
下载源码到Git的本地版本库
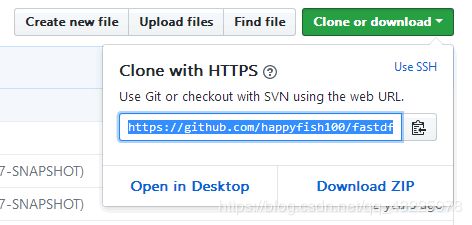
$ git clone https://github.com/happyfish100/fastdfs-client-java.git
2. 安装到maven的本地仓库(源码安装)
- 进入fastdfs-client-java目录
$ cd fastdfs-client-java/
- 将fastdfs-client-java安装到maven的本地仓库
mvn clean install
3. 开发实战
1. 创建maven项目
2. 导入fastdfs-client-java的jar包
	org.csource
	fastdfs-client-java
	1.27-SNAPSHOT
3. 创建配置文件.conf
配置文件名为:fdfs_client.conf(或使用其它文件名xxx_yyy.conf)
内容为:
# 设置追踪服务器ip
tracker_server = 192.168.114.129:22122
4. 创建测试类
package com.dome.test;

import org.csource.common.MyException;
import org.csource.common.NameValuePair;
import org.csource.fastdfs.*;
import org.junit.Before;
import org.junit.Test;

import java.io.FileOutputStream;
import java.io.IOException;
import java.util.Date;

/**
 * 通过java API操作分布式文件系统FastDFS
 */
public class FastDFSTest {
    /**
     * 单元测试之前执行
     */
    //存储节点客户端对象,通过此对象完成对分布式文件系统的种种操作
    private StorageClient storageClient = null;
    @Before
    public void before(){
        try {
            //加载配置文件
            ClientGlobal.init("fdfs_client.conf");
        } catch (IOException e) {
            e.printStackTrace();
        } catch (MyException e) {
            e.printStackTrace();
        }
        //创建一个追踪服务器的客户端对象
        TrackerClient tracker = new TrackerClient();
        TrackerServer trackerServer = null;
        try {
            //获取追踪服务器连接
            trackerServer = tracker.getConnection();
        } catch (IOException e) {
            e.printStackTrace();
        }
        //创建存储节点服务
        StorageServer storageServer = null;
        //由追踪服务与存储服务创建存储节点客户端对象
        storageClient = new StorageClient(trackerServer, storageServer);
    }

//=======================================================================================
    /**
     * 测试java API对分布式文件系统的上传操作
     * @throws IOException
     * @throws MyException
     */
    @Test
    public void testUpload() throws IOException, MyException {
        //上传文件:参数一:文件的本地绝对路径; 参数二:文件的后缀; 参数三:文件的元数据,即文件的描述信息; 返回值:上传文件在存储节点的唯一标识(卷名+文件名)
//        String[] result = storageClient.upload_file("F:\\图片\\myimg.png", "png", null);
        String[] result = storageClient.upload_file("F:\\图片\\myimg.png", "png", new NameValuePair[]{new NameValuePair("height","729"),new NameValuePair("widht","1366")});
        for (String s : result) {
            System.out.println(s);
        }
    }
//=======================================================================================
    /**
     * 测试java API对分布式文件系统的下载操作
     * @throws IOException
     * @throws MyException
     */
    @Test
    public void testDownload() throws IOException, MyException {
        //下载文件:参数一:文件处于存储节点中的所在卷卷名;参数二:文件处于存储节点中的文件名(包括部分路径);返回值:文件内容的字节数组
        byte[] bytes = storageClient.download_file("group1", "M00/00/00/wKhygVwn6fqAAPKFAAn1fNRE8_M902.png");
        //创建文件输出流,设置文件输出位置及文件名
        FileOutputStream outputStream = new FileOutputStream("F:\\xxx.png");
        //使用文件输出流输出文件内容对应的字节数组
        outputStream.write(bytes);
        //刷新输出流
        outputStream.flush();
        //关闭流
        outputStream.close();
    }
//=======================================================================================
    /**
     * 测试java API对分布式文件系统的删除操作
     * @throws IOException
     * @throws MyException
     */
    @Test
    public void testDelete() throws IOException, MyException {
        //删除文件:参数一:文件处于存储节点中的所在卷卷名;参数二:文件处于存储节点中的文件名(包括部分路径);返回值:当删除存在的文件时返回0,否则返回2
        int deleteFile = storageClient.delete_file("group1", "M00/00/00/wKhygVwn6fqAAPKFAAn1fNRE8_M902.png");
        System.out.println(deleteFile);
    }
//=======================================================================================
    /**
     * 测试java API对分布式文件系统的获取文件信息操作
     * @throws IOException
     * @throws MyException
     */
    @Test
    public void testGetFileInfo() throws IOException, MyException {
        //获取文件信息:参数一:文件处于存储节点中的所在卷卷名;参数二:文件处于存储节点中的文件名(包括部分路径);返回值:文件信息对象
//        FileInfo fileInfo = storageClient.get_file_info("group1", "M00/00/00/wKhygVwn7OWAZRH0AAn1fNRE8_M559.png");
        FileInfo fileInfo = storageClient.query_file_info("group1", "M00/00/00/wKhygVwn7OWAZRH0AAn1fNRE8_M559.png");
        //文件所在存储节点的IP地址
        String sourceIpAddr = fileInfo.getSourceIpAddr();
        //文件大小
        long fileSize = fileInfo.getFileSize();
        //文件创建时间
        Date createTimestamp = fileInfo.getCreateTimestamp();
        //文件签名
        long crc32 = fileInfo.getCrc32();

        System.out.println(sourceIpAddr);
        System.out.println(fileSize);
        System.out.println(createTimestamp);
        System.out.println(crc32);
    }
//=======================================================================================
    /**
     * 测试java API对分布式文件系统的获取文件元数据操作
     * @throws IOException
     * @throws MyException
     */
    @Test
    public void testGetMetaData() throws IOException, MyException {
        //获取文件元数据:参数一:文件处于存储节点中的所在卷卷名;参数二:文件处于存储节点中的文件名(包括部分路径);返回值:文件元数据对象数组
        NameValuePair[] metadatas = storageClient.get_metadata("group1", "M00/00/00/wKhygVwn7OWAZRH0AAn1fNRE8_M559.png");
        for (NameValuePair metadata : metadatas) {
            //输出元数据对象的 键 与 值
            System.out.println(metadata.getName()+"  |  "+metadata.getValue());
        }
    }
}
SpringBoot环境下的javaAPI操作
由GitHub大牛tobato在原作者YuQing与yuqih发布的java客户端基础上进行了大量重构工作,并于GitHub上发布了FastDFS-Client 1.26.5(https://github.com/tobato/FastDFS_Client)。
1. 关于FastDFS-Client 1.26.5
主要特性
- 对关键部分代码加入了单元测试,便于理解与服务端的接口交易,提高接口质量
- 将以前对byte硬解析风格重构为使用 对象+注解 的形式,尽量增强了代码的可读性
- 支持对服务端的连接池管理(commons-pool2)
- 支持上传图片时候检查图片格式,并且自动生成缩略图
- 在SpringBoot当中自动导入依赖
由于笔者主要工作环境是SpringBoot,因此目前客户端主要依赖于SpringBoot
- JDK环境要求 1.7
- FastDFS服务端 5.07 测试通过
2. 实战开发
1. 创建springboot的maven项目
2. 导入FastDFS-Client 1.26.5依赖jar
<dependency>
    <groupId>com.github.tobatogroupId>
    <artifactId>fastdfs-clientartifactId>
    <version>1.26.5version>
dependency>
3. 配置springboot的入口类
package com.demo;

import com.github.tobato.fastdfs.FdfsClientConfig;
import org.springframework.boot.SpringApplication;
import org.springframework.boot.autoconfigure.SpringBootApplication;
import org.springframework.context.annotation.EnableMBeanExport;
import org.springframework.context.annotation.Import;
import org.springframework.jmx.support.RegistrationPolicy;
//===================================================================
//获取带有连接池的FastDFS Java客户端
@Import(FdfsClientConfig.class)
// 解决jmx重复注册bean的问题
@EnableMBeanExport(registration = RegistrationPolicy.IGNORE_EXISTING)
//===================================================================
@SpringBootApplication
public class FastdfsSpringbootDriverApplication {
    public static void main(String[] args) {
        SpringApplication.run(FastdfsSpringbootDriverApplication.class, args);
    }
}
4. 配置springboot的application.yml配置文件
# ===================================================================
# 分布式文件系统FDFS配置
# ===================================================================
fdfs:
  so-timeout: 1501
  connect-timeout: 601
  thumb-image:             #缩略图生成参数
    width: 150
    height: 150
  tracker-list:            #TrackerList参数,支持多个
    - 192.168.114.129:22122
    - 192.168.114.130:22122
5. 创建测试类
使用接口服务对FDFS服务端进行操作,主要接口包括:
1. TrackerClient - TrackerServer接口
2. GenerateStorageClient - 一般文件存储接口(StorageServer接口)
3. FastFileStorageClient - 为方便项目开发集成的简单接口(StorageServer接口)
4. AppendFileStorageClient - 支持文件续传操作的接口(StorageServer接口)
package com.demo.test;

import com.github.tobato.fastdfs.domain.fdfs.FileInfo;
import com.github.tobato.fastdfs.domain.fdfs.MetaData;
import com.github.tobato.fastdfs.domain.fdfs.StorePath;
import com.github.tobato.fastdfs.domain.proto.storage.DownloadByteArray;
import com.github.tobato.fastdfs.service.FastFileStorageClient;
import org.junit.Test;
import org.junit.runner.RunWith;
import org.springframework.beans.factory.annotation.Autowired;
import org.springframework.boot.test.context.SpringBootTest;
import org.springframework.test.context.junit4.SpringRunner;

import java.io.*;
import java.util.HashSet;
import java.util.Set;

@RunWith(SpringRunner.class)
@SpringBootTest
public class FastdfsSpringbootDriverTests {

    //fastdfs存储节点的客户端对象
    @Autowired
    private FastFileStorageClient fastFileStorageClient;

//=======================================================================================
    /**
     * 测试springboot环境下的javaAPI对分布式文件系统的上传文件的操作
     * @throws FileNotFoundException
     */
    @Test
    public void testUpload() throws FileNotFoundException {
        //获取本地文件
        File file = new File("F:\\xxx.png");
        //创建传输文件的输入流
        FileInputStream fileInputStream = new FileInputStream(file);
        //文件上传:参数一:传输文件内容的输入流;参数二:文件的size;参数三:文件扩展名;参数四:描述文件的元数据;返回值:上传文件在存储节点的唯一标识(卷名+文件名)
        StorePath storePath = fastFileStorageClient.uploadFile(fileInputStream, file.length(), "png", null);
        //将卷名与文件名一起打印
        System.out.println(storePath.getFullPath());
        //将卷名与文件名分别打印
        System.out.println(storePath.getGroup()+" | "+storePath.getPath());
    }
//=======================================================================================
    /**
     * 测试springboot环境下的javaAPI对分布式文件系统的下载文件的操作
     * @throws IOException
     */
    @Test
    public void testDownload() throws IOException {
        //下载文件:参数一:文件处于存储节点的卷名;参数二:文件在存储节点的文件名;参数三:下载的回调函数;返回值:文件内容的字节数组
        byte[] bytes = fastFileStorageClient.downloadFile("group1", "M00/00/00/wKhygVwosu6AeZTMAAn1fNRE8_M388.png", new DownloadByteArray());
        //创建文件输出流,指定输出位置及文件名
        FileOutputStream fileOutputStream = new FileOutputStream("F:\\xxxx.png");
        //使用文件输出流将文件内容字节数组写出
        fileOutputStream.write(bytes);
        //刷新输出流
        fileOutputStream.flush();
        //关闭输出流
        fileOutputStream.close();
    }
//=======================================================================================
    /**
     * 测试springboot环境下的javaAPI对分布式文件系统的删除文件的操作
     */
    @Test
    public void testDelete(){
        //删除文件:参数一:文件处于存储节点的卷名;参数二:文件在存储节点的文件名
        fastFileStorageClient.deleteFile("group1","M00/00/00/wKhygVwosu6AeZTMAAn1fNRE8_M388.png");
    }
//=======================================================================================
    /**
     * 测试springboot环境下的javaAPI对分布式文件系统的获取文件元数据的操作
     */
    @Test
    public void testGetMetaData(){
        //获取文件的元数据:参数一:文件处于存储节点的卷名;参数二:文件在存储节点的文件名;返回值:文件的元数据对象集合
        Set<MetaData> metaDatas = fastFileStorageClient.getMetadata("group1", "M00/00/00/wKhygVwn7OWAZRH0AAn1fNRE8_M559.png");
        for (MetaData metaData : metaDatas) {
            //获取元数据内容(键+值)
            System.out.println(metaData.getName()+" | "+metaData.getValue());
        }
    }
//=======================================================================================
    /**
     * 测试springboot环境下的javaAPI对分布式文件系统的获取文件信息的操作
     */
    @Test
    public void testGetFileInfo(){
        //获取文件信息:参数一:文件处于存储节点的卷名;参数二:文件在存储节点的文件名;返回值:文件的信息对象
        FileInfo fileInfo = fastFileStorageClient.queryFileInfo("group1", "M00/00/00/wKhygVwn7OWAZRH0AAn1fNRE8_M559.png");
        //获取文件存储节点ip
        String sourceIpAddr = fileInfo.getSourceIpAddr();
        //获取文件大小
        long fileSize = fileInfo.getFileSize();
        //获取文件创建时间
        int createTime = fileInfo.getCreateTime();
        //获取文件签名
        int crc32 = fileInfo.getCrc32();
        System.out.println(sourceIpAddr);
        System.out.println(fileSize);
        System.out.println(createTime);
        System.out.println(crc32);
    }
//=======================================================================================
    /**
     * 测试springboot环境下的javaAPI对分布式文件系统的上传图片生产缩略图的操作
     * @throws FileNotFoundException
     */
    @Test
    public void testCreateThumbImage() throws FileNotFoundException {
        //获取文件
        File file = new File("F:\\xxx.png");
        //创建文件输入流
        FileInputStream fileInputStream = new FileInputStream(file);
        //创建set集合,放文件的元数据对象
        Set<MetaData> metaDataSet = new HashSet<MetaData>();
        metaDataSet.add(new MetaData("widht","150"));
        metaDataSet.add(new MetaData("height","150"));
        //上传文件并创建缩略图:参数一:传输文件内容的输入流;参数二:上传文件大小;参数三:上传文件后缀;参数四:上传文件的描述信息元数据;返回值:上传文件在存储节点的唯一标识对象(卷名+文件名)
        StorePath storePath = fastFileStorageClient.uploadImageAndCrtThumbImage(fileInputStream,file.length(),"png", metaDataSet);
        //将卷名与文件名一起打印
        System.out.println(storePath.getFullPath());
        //将卷名与文件名分别打印
        System.out.println(storePath.getGroup()+" | "+storePath.getPath());
    }
//=======================================================================================
    /**
     * 测试springboot环境下的javaAPI对分布式文件系统的下载图片缩略图的操作
     * @throws IOException
     */
    @Test
    public void testDownloadThumbImage() throws IOException {
        //下载文件:参数一:文件处于存储节点的卷名;参数二:文件在存储节点的文件名;参数三:下载的回调函数;返回值:文件内容的字节数组
        byte[] bytes = fastFileStorageClient.downloadFile("group1", "M00/00/00/wKhygVwo4emAKOFLAAn1fNRE8_M514_150x150.png", new DownloadByteArray());
        //创建文件输出流,指定输出位置及文件名
        FileOutputStream fileOutputStream = new FileOutputStream("F:\\xxxxx.png");
        //使用文件输出流将文件内容字节数组写出
        fileOutputStream.write(bytes);
        //刷新输出流
        fileOutputStream.flush();
        //关闭输出流
        fileOutputStream.close();
    }
}
注: 上传文件生成的缩略图大小可以在springboot的配置文件application.yml中自定义配置:
# ===================================================================
# 分布式文件系统FDFS配置
# ===================================================================
fdfs:
  ...
  thumb-image:             #缩略图生成参数
    width: 150
    height: 150
  ...
6. 多图片上传
-
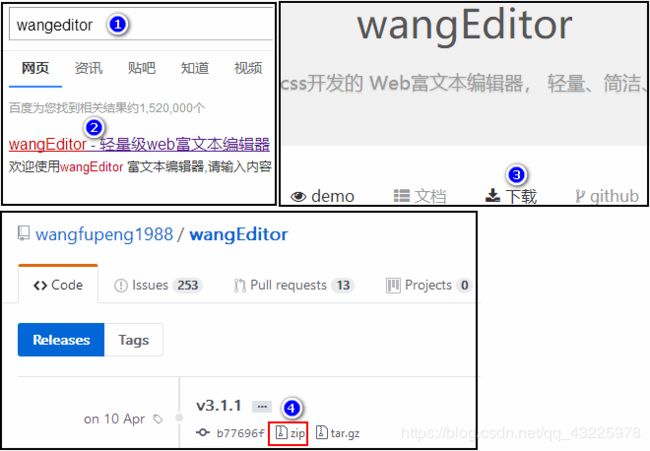
<html> <head> <meta charset="UTF-8"> <title>wangEditor demotitle> head> <body> <div id="editor"> <p>欢迎使用 <b>wangEditorb> 富文本编辑器p> div> <input type="button" onClick="append()" value="追加内容"/> <script type="text/javascript" src="wangEditor.min.js">script> <script type="text/javascript"> var E = window.wangEditor var editor = new E('#editor') // var editor = new E( document.getElementById('editor') ) // 配置表情 editor.customConfig.emotions = [ { // tab 的标题 title: '默认', // type -> 'emoji' / 'image' type: 'image', // content -> 数组 content: [ { alt: '[坏笑]', src: 'http://img.t.sinajs.cn/t4/appstyle/expression/ext/normal/50/pcmoren_huaixiao_org.png' }, { alt: '[舔屏]', src: 'http://img.t.sinajs.cn/t4/appstyle/expression/ext/normal/40/pcmoren_tian_org.png' }, { alt: '[害羞]', src: "http://img.t.sinajs.cn/t4/appstyle/expression/ext/normal/ef/2018new_landelini_org.png" } ] }, { // tab 的标题 title: 'emoji', // type -> 'emoji' / 'image' type: 'emoji', // content -> 数组 content: ['?', '?', '?', '?', '?'] } ] // 配置服务器端地址 editor.customConfig.uploadImgServer = '/upload/uploadMoreImage.do' editor.customConfig.uploadFileName = 'files' editor.create() editor.txt.append('圣诞节快乐!
') script> body> html> -
创建controllor
package com.demo.controller;

import com.github.tobato.fastdfs.domain.fdfs.StorePath;
import com.github.tobato.fastdfs.service.FastFileStorageClient;
import org.springframework.beans.factory.annotation.Autowired;
import org.springframework.web.bind.annotation.RequestMapping;
import org.springframework.web.bind.annotation.RestController;
import org.springframework.web.multipart.MultipartFile;

import java.io.IOException;

@RestController
@RequestMapping("/upload")
public class UoloadToFastDFSController {
    //fastdfs存储节点的客户端对象
    @Autowired
    private FastFileStorageClient fastFileStorageClient;

    @RequestMapping("/uploadMoreImage.do")
    public void uploadMoreImage(MultipartFile[] files){
        //判断是否上传图片
        if(files != null && files.length != 0 ){
            //遍历上传图片
            for (MultipartFile multipartFile : files) {
                //获取上传文件名
                String filename = multipartFile.getOriginalFilename();
                //获取最后一个“.”的下标,并获取从这个下标的下一个下标开始后的字符作为文件后缀
                String fileSuffix = filename.substring(filename.lastIndexOf(".") + 1);
                StorePath storePath = null;
                try {
                    //上传文件
                    storePath = fastFileStorageClient.uploadFile(multipartFile.getInputStream(), multipartFile.getSize(), fileSuffix, null);
                } catch (IOException e) {
                    e.printStackTrace();
                }
                //打印返回的文件在存储节点的唯一标识
                System.out.println(storePath.getFullPath());
            }
        }
    }
}
三、FastDfS集成Nginx
Nginx服务器是一个高性能的web服务器与反向代理服务器
fastDFS集成Nginx的原因
-
为分布式文件系统提供Http服务支持
通过Nginx的web服务代理访问分布式文件系统的存储节点,从而实现通过http请求访问存储节点资源。
-
解决复制延迟问题(重定向到文件存储的源存储服务器获取文件)
由于FastDFS的同卷的存储节点之间需要同步,当文件尚未同步完成时,访问请求到达改节点,获取的数据将是未同步完的不完整数据,即为复制延迟问题。通过Nginx检测请求的存储节点的数据,若该存储节点的数据尚未同步完成,则将请求转发至数据的原存储节点,从而解决复制延迟问题。
环境搭建
注意:FastDFS版本大于等于5.11
1. 上传所需资源
将fastdfs-nginx-module 和 nginx-1.11.1.tar.gz上传至Linux系统的任意目录下,如:root目录
下载链接:https://pan.baidu.com/s/1STYBBajiOBvtGBljDzyBiw 提取码:qwpi
2. 移动fastdfs-nginx-module至/usr/local/目录
[root@tracker ~]# mv fastdfs-nginx-module/ /usr/local/
3. 复制配置文件
- 将fastdfs-nginx-module的配置文件mod_fastdfs.conf复制到fastdfs的配置文件存放目录/etc/fdfs/中
[root@tracker ~]# cp /usr/local/fastdfs-nginx-module/src/mod_fastdfs.conf /etc/fdfs/
- 将fastdfs-5.11安装目录下的配置文件目录中的http.conf与mime.types两个配置文件复制到fastdfs的配置文件存放目录/etc/fdfs/中
[root@tracker ~]# cp fastdfs-5.11/conf/http.conf /etc/fdfs
[root@tracker ~]# cp fastdfs-5.11/conf/mime.types /etc/fdfs
4. 解压缩nginx-1.11.1.tar.gz
# 将nginx-1.11.1.tar.gz解压缩至/usr目录
[root@tracker ~]# tar -zxvf nginx-1.11.1.tar.gz -C /usr
5. 进入nginx的解压缩目录
[root@tracker ~]# cd /usr/nginx-1.11.1/
6. 配置nginx服务器
–add-module:为nginx添加一个fastdfs-nginx-module模块,值为该模块在当前系统的路径
–prefix:指定nginx安装位置
[root@tracker nginx-1.11.1]# ./configure --add-module=/usr/local/fastdfs-nginx-module/src/ --prefix=/usr/local/nginx
注意:–add-module的路径必须是fastdfs-nginx-module模块在当前系统的路径。
7. 编译安装nginx服务器
[root@tracker nginx-1.11.1]# make && make install
8. 进入nginx服务器的安装目录
[root@tracker nginx-1.11.1]# cd /usr/local/nginx/
9. 修改nginx.conf
[root@tracker nginx]# vi conf/nginx.conf
# 修改
	...
server {
	# ==============该端口为storage.conf中的http.server_port相同==============
	listen 8888;
	# =======================================================================
	server_name localhost;
	# ======当url中存在group[0-9]时将请求转发至ngx_fastdfs_module功能模块=======
	location ~/group[0-9]/ {
		ngx_fastdfs_module;
	}
	# ========================================================================
	error_page 500 502 503 504 /50x.html;
	location = /50x.html {
		root html;
	}
}
	...
# 保存退出编辑
esc键-->输入:wq!-->Enter键
10. 修改mod_fastdfs.conf
[root@tracker nginx]# vi /etc/fdfs/mod_fastdfs.conf
# 修改
...
tracker_server=192.168.128.141:22122
	...
url_have_group_name = true
	...
group_name=group1
	...
# 当前需要提供web支持的存储节点服务器的文件存储目录
store_path0=/data/fastdfs/storage/store
	...
# 保存退出编辑
esc键-->输入:wq!-->Enter键
11. 启动nginx服务
# 进入sbin目录
[root@tracker nginx]# cd sbin/
# 启动服务 -c:指定配置文件
[root@tracker sbin]# ./nginx -c /usr/local/nginx/conf/nginx.conf
12. 查看服务启动情况
[root@tracker sbin]# ps -ef | grep nginx
13. 启动追踪服务与存储节点服务
[root@tracker sbin]# fdfs_trackerd /etc/fdfs/tracker.conf start
[root@tracker sbin]# fdfs_storaged /etc/fdfs/storage.conf start
++++++++++++++++++++++++++++ 环境搭建完成 ++++++++++++++++++++++++++++
测试
1. 测试访问图片
1. 上传图片
将图片上传至linux系统后,使用指令上传至分布式文件系统
[root@tracker fdfs]# fdfs_upload_file /etc/fdfs/client.conf /root/xxxxx.png
group1/M00/00/00/wKhyj1wrIUWAL5ASAAAfA8PiO7Y493.png
2. 通过浏览器远程访问
http://192.168.114.143:8888/group1/M00/00/00/wKhyj1wrIfqAD3NFAAn1fNRE8_M976.png
2. 测试在线访问视频
1. 上传视频
将MP4格式视频上传至linux系统后,使用指令上传至分布式文件系统
[root@tracker fdfs]# fdfs_upload_file /etc/fdfs/client.conf /root/chuyin.mp4
group1/M00/00/00/wKhyj1wrJdmAAExcAihTAa_L3Xg763.mp4
[root@tracker fdfs]# fdfs_upload_file /etc/fdfs/client.conf /root/qiansixi.mp4
group1/M00/00/00/wKhyj1wrJeKAVOIrASVBTBPE_74318.mp4
2. 创建MP4视频播放页面
艾奇异
3. 访问页面
四、FastDFS集成FastDHT(文件去重)
去重原理
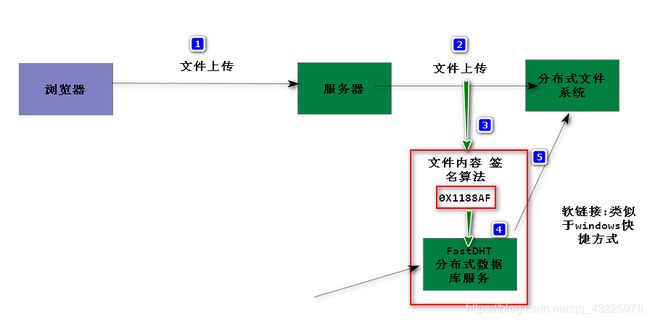
FastDFS本身支持文件的排重处理机制( fdfs_crc32 效率高于MD5),但需要FastDHT(Distributed Hash Table (DHT))作为文件 hash的索引存储。FastDHT是同一个作者的开源key-value数据库。
FastDFS的storage server每次上传均计算文件的hash值,然后从FastDHT服务器上进行查找比对,如果没有返回值,则写入hash,并将文件保存;如果有返回值,则建立一个新的文件链接(软连接 ln - s),不保存文件。
环境搭建
1. 上传所需资源
将 db-4.7.25.tar.gz 和 FastDHT_v2.01.tar.gz 上传至Linux系统的任意目录下,如:root目录
下载链接:https://pan.baidu.com/s/1o4WoDFq-kSshMoTRGlTYdg 提取码:584y
2. 解压缩db-4.7.25.tar.gz
[root@tracker ~]# tar -zxvf db-4.7.25.tar.gz -C /usr
3. 进入db-4.7.25解压缩目录下的build_unix/目录
[root@tracker db-4.7.25]# cd  /usr/db-4.7.25/
[root@tracker db-4.7.25]# cd build_unix/
# 或执行
[root@tracker db-4.7.25]# cd  /usr/db-4.7.25/build_unix/
4. 进行db-4.7.25的初始化配置
[root@tracker db-4.7.25]# ./../dist/configure
5. 编译并安装db-4.7.25
[root@tracker db-4.7.25]# make && make install
6. 解压缩FastDHT_v2.01.tar.gz
[root@tracker build_unix]# cd
[root@tracker ~]# tar -zxvf FastDHT_v2.01.tar.gz -C /usr
7. 进入FastDHT_v2.01解压缩目录
[root@tracker ~]# cd /usr/FastDHT/
8. 编译并安装FastDHT_v2.01
[root@tracker FastDHT]# ./make.sh && ./make.sh install
9. 进入FastDHT的配置文件存放目录
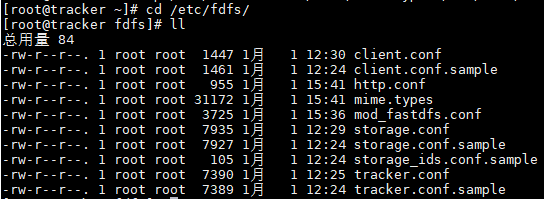
[root@tracker FastDHT]# cd /etc/fdht/
- fdht_client.conf 是fastdht数据库服务的客户端配置文件
- fdhtd.conf 是fastdht数据库服务的配置文件
- fdht_servers.conf 是fastdht数据库服务集群的配置文件
10. 修改fdhtd.conf
[root@tracker fdht]# vi fdhtd.conf
# 修改
	...
base_path=/data/fastdht
	...
# 保存退出编辑
esc键-->输入:wq!-->Enter键
11. 创建目录
# -p:创建多级目录
[root@tracker fdht]# mkdir -p /data/fastdht
12. 修改fdht_servers.conf
[root@tracker fdht]# vi fdht_servers.conf
# 修改
	...
group_count = 1
group0 = 192.168.145.150:11411
	...
# 保存退出编辑
esc键-->输入:wq!-->Enter键
13. 修改存储节点的配置文件
[root@tracker fdht]# vi /etc/fdfs/storage.conf
# 修改
	...
check_file_duplicate=1
	...
keep_alive=1
	...
#include /etc/fdht/fdht_servers.conf
	...
# 保存退出编辑
esc键-->输入:wq!-->Enter键
14. 启动服务
[root@tracker fdht]# fdhtd /etc/fdht/fdhtd.conf start
[root@tracker fdht]# fdfs_trackerd /etc/fdfs/tracker.conf restart
[root@tracker fdht]# fdfs_storaged /etc/fdfs/storage.conf restart
测试
上传相同文件,发现原始文件只会保留一份,相同文件上传都会变为快捷方式
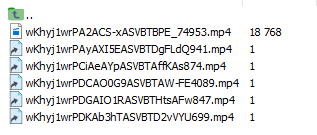
注: 删除时删除的是快捷方式,原始文件不会删除也不可轻易删除。
五、FastDFS分布式文件系统集群搭建(虚拟机)
准备5台机器(克隆虚拟机)
192.168.114.143 tracker server
192.168.114.144 storage1 server group1
192.168.114.145 storage2 server group1
192.168.114.146 storage3 server group2
192.168.114.147 storage4 server group2
环境搭建
1. 配置tracker server
由于搭建FastDFS分布式文件系统时已经配置过,故此时无需任何配置
-
清空tracker server中的历史数据
[root@tracker ~]# rm -rf /data/fastdfs/tracker/* -
启动追踪器服务
[root@tracker ~]# fdfs_trackerd /etc/fdfs/tracker.conf start
2. 配置storage server
-
删除各个存储节点服务器中的/etc/fdfs/storage.conf配置文件
[root@storage ~]# rm -rf /etc/fdfs/storage.conf -
重新拷贝一份新的storage.conf配置文件
[root@storage ~]# cp /etc/fdfs/storage.conf.sample /etc/fdfs/storage.conf -
修改storage.conf配置文件
# 修改 ... group_name=group1 ... base_path=/data/fastdfs/storage ... store_path0=/data/fastdfs/storage/store ... tracker_server=192.168.114.143:22122 ... # 保存退出编辑 esc键-->输入:wq!-->Enter键 -
删除storage server中的历史数据
[root@storage ~]# rm -rf /data/fastdfs/storage/data/ [root@storage ~]# rm -rf /data/fastdfs/storage/logs/ [root@storage ~]# rm -rf /data/fastdfs/storage/store/* -
启动storage server服务
[root@storage ~]# fdfs_storaged /etc/fdfs/storage.conf start
3. 检测集群环境是否搭建成功(storage server状态)
检测集群是否搭建成功需要在tracker server中使用fdfs_monitor命令查看storage server的状态。
[root@tracker ~]# fdfs_monitor /etc/fdfs/client.conf
若各个storage server 的节点状态皆是ACTIVE,则集群搭建成功
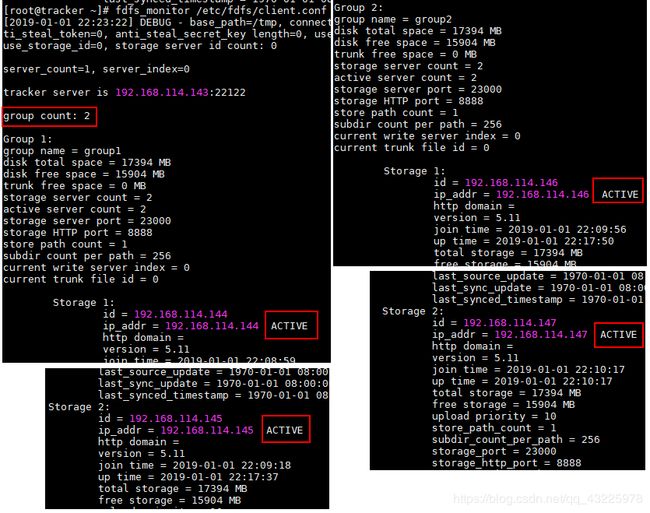
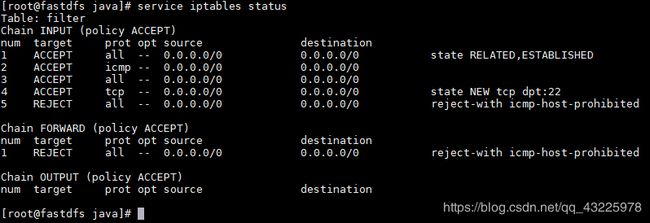
注: 服务器所处系统的防火墙需关闭,或者取消防火墙对FastDFS请求的拦截。若防火墙处于运行状态,则storage server可能会是以下不正常状态:

STORAGE SERVER的状态通常有七种:
# FDFS_STORAGE_STATUS:INIT      :初始化,尚未得到同步已有数据的源服务器
# FDFS_STORAGE_STATUS:WAIT_SYNC :等待同步,已得到同步已有数据的源服务器
# FDFS_STORAGE_STATUS:SYNCING   :同步中
# FDFS_STORAGE_STATUS:DELETED   :已删除,该服务器从本组中摘除
# FDFS_STORAGE_STATUS:OFFLINE   :离线
# FDFS_STORAGE_STATUS:ONLINE    :在线,尚不能提供服务
# FDFS_STORAGE_STATUS:ACTIVE    :在线,可以提供服务
---------------------
作者:酷酷的糖先森
来源:CSDN
原文:https://blog.csdn.net/u014723529/article/details/46048411
版权声明:本文为博主原创文章,转载请附上博文链接!
测试
通过上传文件测试各个卷下的存储节点是否能够同步
注: 集群的负载均衡策略:tracker server默认会将文件上传到空余容量最大的卷中存储
	...
# which group to upload file
# when store_lookup set to 1, must set store_group to the group name
# 选择空闲容量最大的存储节点存储数据
store_group=group2
	...
# 保存退出编辑
esc键-->输入:wq!-->Enter键
问题: 当快速上传文件时,会发现文件存储的卷没变,若下所示:

原因: 这是因为存储节点定时会将容量使用状态发送到追踪服务器,所以追踪服务器不会及时获取存储节点的状态,所以若短时间快速上传文件,文件会存储在同一卷中。
六、FastDFS分布式文件系统集群环境集成FastDHT(虚拟机)
1. 在tracker server中安装FastDHT服务
具体步骤安装详情参考第四部分
如果是已经搭建过的克隆机,可省略搭建步骤,只需清空FastDHT的历史数据即可。
[root@tracker ~]# rm -rf /data/fastdht/*
2. 修改存储服务器的配置文件
注意: 需要将tracker server中/etc/fdht/fdht_servers.conf 拷贝到storage server中的/etc/fdht目录中(若是tracker server的克隆机,则不用)
vi /etc/fdfs/storage.conf
# 修改
	...
check_file_duplicate=1
	...
keep_alive=1
	...
#include /etc/fdht/fdht_servers.conf
	...
# 保存退出编辑
esc键-->输入:wq!-->Enter键
3. 启动服务
1. 启动tracker server中的 dht服务
[root@tracker ~]# fdhtd /etc/fdht/fdhtd.conf
2. 重启tracker server中的tracker服务
[root@storage ~]# fdfs_trackerd /etc/fdfs/tracker.conf restart
3. 重启storage server中的storage服务
[root@storage ~]# fdfs_storaged /etc/fdfs/storage.conf restart
七、FastDFS分布式文件系统集群环境集成Nginx(虚拟机)
注: 需要在每一台存储服务器中集成:fastdfs-nginx-module
集成fastdfs-nginx-module的步骤可参考第三部分
如果是已经搭建过的克隆机,可以省略修改nginx配置文件之前的所有内容,修改以下配置即可 。
1. 修改各个storage server中的 mod_fastdfs.conf 文件
[root@storage ~]# vim /etc/fdfs/mod_fastdfs.conf
# 修改
	...
tracker_server=192.168.43.136:22122
	...
url_have_group_name = true
	...
# 修改为当前存储节点对应的卷名
group_name=group1
	...
# 当前需要提供web支持的存储服务器的文件存储目录
store_path0=/data/fastdfs/storage/store
	...
# 保存退出编辑
esc键-->输入:wq!-->Enter键
2. 进入Nginx安装目录
[root@storage ~]# cd /usr/local/nginx/
3. 启动Nginx服务
[root@storage nginx]# sbin/nginx -c conf/nginx.conf
4. 重启storage server的tracker与storage服务
[root@storage ~]# fdfs_trackerd /etc/fdfs/tracker.conf restart
[root@storage ~]# fdfs_storaged /etc/fdfs/storage.conf restart
以上分布式文件系统集成Nginx已经成功,不过尚存在问题:
 1. 访问文件的地址需要根据文件所在卷确定
  如:
	group1 --确定--> 192.168.114.144 / 192.168.114.145
	group2 --确定--> 192.168.114.146 / 192.168.114.147
	即:用户访问分布式文件系统数据的 IP入口不统一
 2. 由于存储节点的IP地址直接暴露,所以存在数据安全问题
以下方式通过Nginx服务器的反向代理功能反向代理各个存储节点,从而解决问题。
即:通过请求的URL将请求转发到对应的存储节点获取对应的数据。
八. 在tracker server中搭建Nginx网关服务器
1. 进入nginx安装位置
[root@tracker ~]# cd /usr/local/
2. 删除nginx
[root@tracker ~]# rm -rf nginx/
3. 进入nginx安装文件所在目录
[root@tracker ~]# cd /usr
4. 删除nginx安装文件
[root@tracker usr]# rm -rf nginx-1.11.1/
5. 重新解压缩 nginx-1.11.1.tar.gz
[root@tracker usr]# cd
[root@tracker ~]# tar -zxvf nginx-1.11.1.tar.gz
6. 进入 nginx-1.11.1进行配置
[root@tracker ~]# cd nginx-1.11.1
# 设置nginx安装位置
[root@tracker nginx-1.11.1]# ./configure --prefix=/usr/local/nginx
7. 编译并安装 nginx-1.11.1
[root@tracker nginx-1.11.1]# make && make install
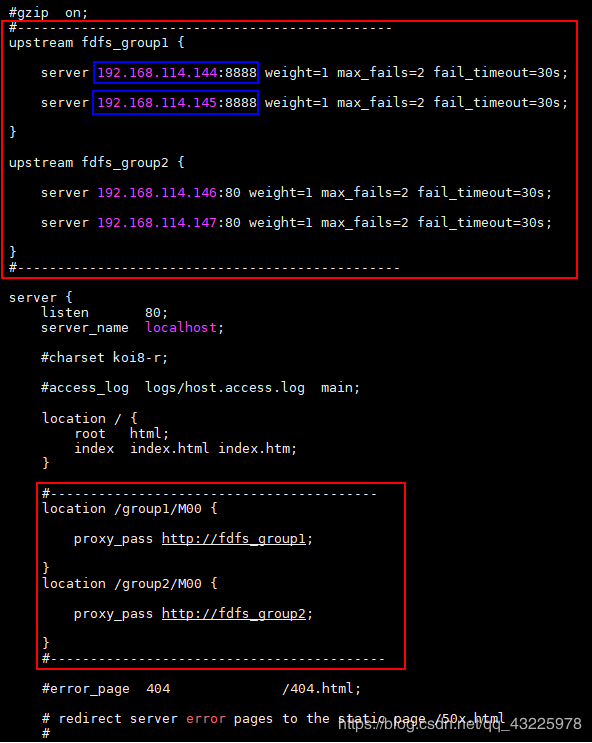
8. 修改网关服务器Nginx的配置文件 nginx.conf
vi /usr/local/nginx/conf/nginx.conf
 	...
 	#gzip  on;
    #--------------添加如下内容-------------------------
    upstream fdfs_group1 {
		# 需修改对应存储节点IP及端口
        server 192.168.114.144:8888 weight=1 max_fails=2 fail_timeout=30s;
        server 192.168.114.145:8888 weight=1 max_fails=2 fail_timeout=30s;
    }
    upstream fdfs_group2 {
		# 需修改对应存储节点IP及端口
        server 192.168.114.146:80 weight=1 max_fails=2 fail_timeout=30s;
        server 192.168.114.147:80 weight=1 max_fails=2 fail_timeout=30s;
    }
    #--------------添加内容结束---------------------------

    server {
        listen       80;
        server_name  localhost;

        #charset koi8-r;

        #access_log  logs/host.access.log  main;

        location / {
            root   html;
            index  index.html index.htm;
        }
        #--------------添加内容开始---------------------
        location /group1/M00 {
            proxy_pass http://fdfs_group1;
        }
        location /group2/M00 {
            proxy_pass http://fdfs_group2;
        }
        #--------------添加内容结束---------------------

        #error_page  404              /404.html;

        # redirect server error pages to the static page /50x.html
        #
        error_page   500 502 503 504  /50x.html;
	...
# 保存退出编辑
esc键-->输入:wq!-->Enter键
-
以上配置中转发至存储节点的端口必须与storage server 中nginx服务的访问端口一致,而storage server 中nginx服务的访问端口需要与storage.conf中的http.server_port相同,否则将出错无法请求数据,如:

-
修改nginx的配置文件后记得重新加载使其生效
[root@tracker ~]# /usr/local/nginx/sbin/nginx -s reload
Nginx服务的相关命令:
# 命令执行需要进入nginx的安装目录下的sbin目录中
./nginx -s reload  :修改配置后重新加载生效
./nginx -s reopen  :重新打开日志文件
./nginx -t -c /path/to/nginx.conf 测试nginx配置文件是否正确

# 关闭nginx:
./nginx -s stop  :快速停止nginx
./nginx -s quit  :完整有序的停止nginx

# 其他的停止nginx 方式:

ps -ef | grep nginx

kill -QUIT 主进程号     :从容停止Nginx
kill -TERM 主进程号     :快速停止Nginx
pkill -9 nginx         :强制停止Nginx

# 启动nginx:
nginx -c /path/to/nginx.conf

# 平滑重启nginx:
kill -HUP 主进程号
9. 启动网关服务器nginx服务
[root@tracker ~]# /usr/local/nginx/sbin/nginx -c /usr/local/nginx/conf/nginx.conf
10. 查看服务启动状态
[root@tracker ~]# ps -ef | grep nginx
