阿里Sophix热修复框架使用入门
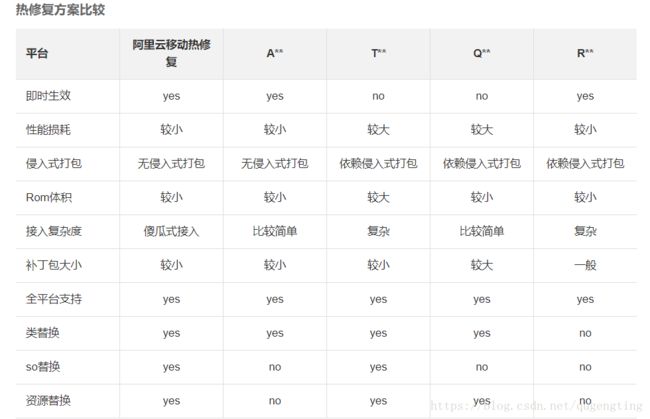
目前的热修复框架,最强大的当属阿里的Sophix了,虽然是收费,但对于小众的APP来说,很可能不会超过免费的阀值(每月5万台设备免费,每台设备每天20次免费查询补丁),再说也不妨碍我们研究下怎么用,听说用起来很方便,对程序员几乎是傻瓜式的,对我来说这点就是极大的诱惑了。事实证明,Sophix确实非常简单易用,根本不需要关心补丁怎么下载,怎么放置,怎么替换,整个流程只需要一个接口调用,补丁制作也为开发人员准备好了工具。Sophix对比其他框架的优势在哪里,上一张官网给出的图就很直观了:
真逗,还给别人家的打了**,我替它写出来好了,Amigo,Tinker,QQZone,Robust。接下来就看下怎么用吧(可能会有人奇怪为什么都有官网了,还要多此一举,知道的都知道,很多平台的技术文档详细是挺详细,就是经常会让你点击各种链接,跳来跳去的很烦)。
1、准备工作
1、注册、登录、新建产品等
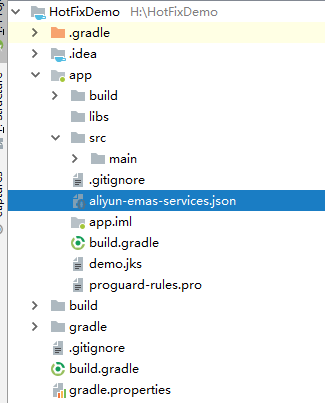
进入阿里云注册和登录等,然后进入移动研发平台新建产品,成功之后获取到appKey和appSecret和RSA等以及一个aliyun-emas-services.json的配置文件,该文件包含了appKey、appSecret以及阿里的emas服务类型、状态和版本号等信息,例如:
"services": {
      "httpdns_service": {
        "status": 0,
        "version":"1.2.1"
      },
      "cps_service": {
        "status": 0,
        "version":"3.1.4"
      },
      "hotfix_service": {
        "status": 1,
        "version":"3.2.6"
      },
      "man_service": {
        "status": 0,
        "version":"1.2.4"
      },
      "feedback_service": {
        "status": 0,
        "version":"3.1.8"
      }
  }
status表示是否开通此服务,0为关闭,1为开通,这里我只开通了hotfix_service,即热修复服务。将该文件放入项目的app模块根目录当中,接下来是对项目进行配置,其中会有插件对该文件进行解析。
2、项目配置
在项目根目录的build.gradle文件当中加入或合并如下内容:
buildscript {
    repositories {
        maven {
            url 'http://maven.aliyun.com/nexus/content/repositories/releases/'
        }
    }
    dependencies {
        // 添加emas-services插件
        classpath 'com.aliyun.ams:emas-services:1.0.1'
    }
}

allprojects {
    repositories {
        maven {
            url 'http://maven.aliyun.com/nexus/content/repositories/releases/'
        }
    }
}
在app模块的build.gradle文件当中加入或合并如下内容:
apply plugin: 'com.aliyun.ams.emas-services'
dependencies {
    implementation 'com.aliyun.ams:alicloud-android-hotfix:3.2.6'
}
repositories {
    maven {
        url "http://maven.aliyun.com/nexus/content/repositories/releases"
    }
}
在AndroidManifest.xml文件当中加入配置:
记住替换下相应的value。
2、接口接入
1、入口及回调接口
package com.qugengting.hotfixdemo;

import android.content.Context;
import android.support.annotation.Keep;
import android.util.Log;

import com.taobao.sophix.PatchStatus;
import com.taobao.sophix.SophixApplication;
import com.taobao.sophix.SophixEntry;
import com.taobao.sophix.SophixManager;
import com.taobao.sophix.listener.PatchLoadStatusListener;

/**
 * Sophix入口类,专门用于初始化Sophix,不应包含任何业务逻辑。
 * 此类必须继承自SophixApplication,onCreate方法不需要实现。
 * 此类不应与项目中的其他类有任何互相调用的逻辑,必须完全做到隔离。
 * AndroidManifest中设置application为此类,而SophixEntry中设为原先Application类。
 * 注意原先Application里不需要再重复初始化Sophix,并且需要避免混淆原先Application类。
 * 如有其它自定义改造,请咨询官方后妥善处理。
 */
public class SophixStubApplication extends SophixApplication {
    private final String TAG = "SophixStubApplication";
    public interface MsgDisplayListener {
        void handle(String msg);
    }

    public static MsgDisplayListener msgDisplayListener = null;
    public static StringBuilder cacheMsg = new StringBuilder();
    // 此处SophixEntry应指定真正的Application,并且保证RealApplicationStub类名不被混淆。
    @Keep
    @SophixEntry(MyApp.class)
    static class RealApplicationStub {
    }

    @Override
    protected void attachBaseContext(Context base) {
        super.attachBaseContext(base);
//         如果需要使用MultiDex,需要在此处调用。
//         MultiDex.install(this);
        initSophix();
    }

    private void initSophix() {
        String appVersion = "0.0.0";
        try {
            appVersion = this.getPackageManager()
                    .getPackageInfo(this.getPackageName(), 0)
                    .versionName;
        } catch (Exception e) {
        }
        final SophixManager instance = SophixManager.getInstance();
        instance.setContext(this)
                .setAppVersion(appVersion)
                .setSecretMetaData(null, null, null)
                .setEnableDebug(true)
                .setEnableFullLog()
                .setPatchLoadStatusStub(new PatchLoadStatusListener() {
                    @Override
                    public void onLoad(final int mode, final int code, final String info, final int handlePatchVersion) {
                        if (code == PatchStatus.CODE_LOAD_SUCCESS) {
                            Log.i(TAG, "sophix load patch success!");
                        } else if (code == PatchStatus.CODE_LOAD_RELAUNCH) {
                            // 如果需要在后台重启,建议此处用SharePreference保存状态。
                            Log.i(TAG, "sophix preload patch success. restart app to make effect.");
                        }

                        String msg = new StringBuilder("").append("Mode:").append(mode)
                                .append(" Code:").append(code)
                                .append(" Info:").append(info)
                                .append(" HandlePatchVersion:").append(handlePatchVersion).toString();
                        if (msgDisplayListener != null) {
                            msgDisplayListener.handle(msg);
                        } else {
                            cacheMsg.append("\n").append(msg);
                        }
                    }
                }).initialize();
    }
}
注释写的很详细了,再稍微描述一下,AndroidManifest.xml里面的application:name要指定该类即SophixStubApplication,原来的application类配置在这个类的@SophixEntry注解里面即可,PatchLoadStatusListener是回调接口,如果有补丁加载什么的,就会回调onLoad方法了,当然,补丁不会自动下发,需要主动去拉取。我这里参考了官方的DEMO,自定义一个接口MsgDisplayListener便于DEMO演示,当然这个接口不是必须的。
2、拉取补丁
拉取补丁是非常简单的,只有一行代码:
SophixManager.getInstance().queryAndLoadNewPatch();如果拉取成功(PatchLoadStatusListener接口回调,code参数值符合预期),那么恭喜,补丁已经补好了!只要重启APP就可以看到补丁的效果了。
顺便放上我的MainActivity代码好了:
package com.qugengting.hotfixdemo;

import android.Manifest;
import android.content.pm.PackageManager;
import android.os.Build;
import android.support.v4.app.ActivityCompat;
import android.support.v4.content.ContextCompat;
import android.support.v7.app.AppCompatActivity;
import android.os.Bundle;
import android.view.View;
import android.widget.TextView;

import com.taobao.sophix.SophixManager;

public class MainActivity extends AppCompatActivity {
    private static final int REQUEST_EXTERNAL_STORAGE_PERMISSION = 0;

    private TextView mStatusTv;
    private String mStatusStr = "";

    @Override
    protected void onCreate(Bundle savedInstanceState) {
        super.onCreate(savedInstanceState);
        setContentView(R.layout.activity_main);
        mStatusTv = findViewById(R.id.tv_status);
        updateConsole(SophixStubApplication.cacheMsg.toString());

        if (Build.VERSION.SDK_INT >= 23) {
            requestExternalStoragePermission();
        }
        SophixStubApplication.msgDisplayListener = new SophixStubApplication.MsgDisplayListener() {
            @Override
            public void handle(final String msg) {
                runOnUiThread(new Runnable() {
                    @Override
                    public void run() {
                        updateConsole(msg);
                    }
                });
            }
        };
    }

    /**
     * 如果本地补丁放在了外部存储卡中, 6.0以上需要申请读外部存储卡权限才能够使用. 应用内部存储则不受影响
     */

    private void requestExternalStoragePermission() {
        if (ContextCompat.checkSelfPermission(this, Manifest.permission.READ_EXTERNAL_STORAGE)
                != PackageManager.PERMISSION_GRANTED) {
            ActivityCompat.requestPermissions(this, new String[]{Manifest.permission.READ_EXTERNAL_STORAGE},
                    REQUEST_EXTERNAL_STORAGE_PERMISSION);
        }
    }

    @Override
    public void onRequestPermissionsResult(int requestCode, String[] permissions, int[] grantResults) {
        switch (requestCode) {
            case REQUEST_EXTERNAL_STORAGE_PERMISSION:
                if (grantResults.length <= 0 || grantResults[0] != PackageManager.PERMISSION_GRANTED) {
                    updateConsole("local external storage patch is invalid as not read external storage permission");
                }
                break;
            default:
        }
    }

    /**
     * 更新监控台的输出信息
     *
     * @param content 更新内容
     */
    private void updateConsole(String content) {
        mStatusStr += content + "\n";
        if (mStatusTv != null) {
            mStatusTv.setText(mStatusStr);
        }
    }

    public void onClick(View view) {
        SophixManager.getInstance().queryAndLoadNewPatch();
    }

}
这里也是参考了官方的DEMO写的,不想看的可直接看第三部分,如何制作、上传和发布补丁。
3、制作、上传和发布补丁
1、制作补丁
首先,准备好数字证书,编译release版本,安装到手机上,随便修改下代码表示修复的内容(我这里是替换了下资源文件)再编译一个新的release版本,从官网下载补丁工具:
Mac版本打包工具地址:http://ams-hotfix-repo.oss-cn-shanghai.aliyuncs.com/SophixPatchTool_macos.zip
Windows版本打包工具地址:http://ams-hotfix-repo.oss-cn-shanghai.aliyuncs.com/SophixPatchTool_windows.zip
Linux版本打包工具地址:http://ams-hotfix-repo.oss-cn-shanghai.aliyuncs.com/SophixPatchTool_linux.zip
解压运行,弹出框:
设置界面需要设置下,然后就可以GO了!然而,我这里遇到了问题,本地JDK版本有旧版本残留,虽然在DOS执行java -version是正常的显示1.8版本,但是该工具执行就是会报错,先是报了“has value '1.8', but '1.6' is required”,后来改了改又报了could not open jvm.cfg的错误,找了半天解决办法才找到,如果有同样遇到的可以参考该文章。补丁终于生成了:
接下来就是上传到后台了。
2、上传补丁
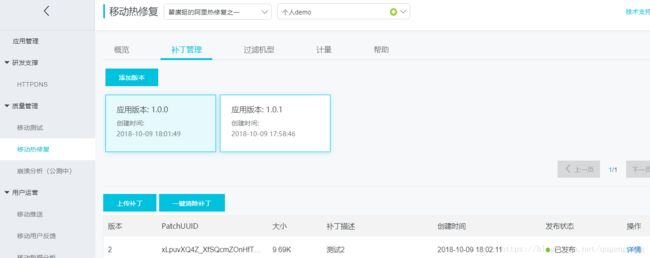
移步控制台,选择对应产品,选择移动热修复-补丁管理-添加版本(记住,补丁的版本设置跟你当前手机安装的APP版本一致,我手机安装的版本是1.0.0,刚开始我以为补丁版本号要加1,即1.0.1,结果发布后拉取补丁并没有拉取到,所以这里的版本只需设置1.0.0即可),然后上传补丁:
3、发布补丁
点击上图的详情进入下一界面,点击新建发布即可。这样,补丁就成功发布了!手机端拉取下就可以下载补丁了!
4、其他
少不了说下混淆了:
#基线包使用,生成mapping.txt
-printmapping mapping.txt
#生成的mapping.txt在app/build/outputs/mapping/release路径下,移动到/app路径下
#修复后的项目使用,保证混淆结果一致
#-applymapping mapping.txt
#hotfix
-keep class com.taobao.sophix.**{*;}
-keep class com.ta.utdid2.device.**{*;}
#防止inline
-dontoptimize
另外记得application类,避免混淆。
最后,再看看运行效果:
加载补丁前后(图一是初始状态,图二是加载补丁成功,图三是重启后效果):
我上传了代码到github,内容有所改动不过没关系,需要的可以去copy。
最后的最后,补上回调的code官方说明吧:
//兼容老版本的code说明
int CODE_LOAD_SUCCESS = 1;//加载阶段, 成功
int CODE_ERR_INBLACKLIST = 4;//加载阶段, 失败设备不支持
int CODE_REQ_NOUPDATE = 6;//查询阶段, 没有发布新补丁
int CODE_REQ_NOTNEWEST = 7;//查询阶段, 补丁不是最新的
int CODE_DOWNLOAD_SUCCESS = 9;//查询阶段, 补丁下载成功
int CODE_DOWNLOAD_BROKEN = 10;//查询阶段, 补丁文件损坏下载失败
int CODE_UNZIP_FAIL = 11;//查询阶段, 补丁解密失败
int CODE_LOAD_RELAUNCH = 12;//预加载阶段, 需要重启
int CODE_REQ_APPIDERR = 15;//查询阶段, appid异常
int CODE_REQ_SIGNERR = 16;//查询阶段, 签名异常
int CODE_REQ_UNAVAIABLE = 17;//查询阶段, 系统无效
int CODE_REQ_SYSTEMERR = 22;//查询阶段, 系统异常
int CODE_REQ_CLEARPATCH = 18;//查询阶段, 一键清除补丁
int CODE_PATCH_INVAILD = 20;//加载阶段, 补丁格式非法
//查询阶段的code说明
int CODE_QUERY_UNDEFINED = 31;//未定义异常
int CODE_QUERY_CONNECT = 32;//连接异常
int CODE_QUERY_STREAM = 33;//流异常
int CODE_QUERY_EMPTY = 34;//请求空异常
int CODE_QUERY_BROKEN = 35;//请求完整性校验失败异常
int CODE_QUERY_PARSE = 36;//请求解析异常
int CODE_QUERY_LACK = 37;//请求缺少必要参数异常
//预加载阶段的code说明
int CODE_PRELOAD_SUCCESS = 100;//预加载成功
int CODE_PRELOAD_UNDEFINED = 101;//未定义异常
int CODE_PRELOAD_HANDLE_DEX = 102;//dex加载异常
int CODE_PRELOAD_NOT_ZIP_FORMAT = 103;//基线dex非zip格式异常
int CODE_PRELOAD_REMOVE_BASEDEX = 105;//基线dex处理异常
//加载阶段的code说明 分三部分dex加载, resource加载, lib加载
//dex加载
int CODE_LOAD_UNDEFINED = 71;//未定义异常
int CODE_LOAD_AES_DECRYPT = 72;//aes对称解密异常
int CODE_LOAD_MFITEM = 73;//补丁SOPHIX.MF文件解析异常
int CODE_LOAD_COPY_FILE = 74;//补丁拷贝异常
int CODE_LOAD_SIGNATURE = 75;//补丁签名校验异常
int CODE_LOAD_SOPHIX_VERSION = 76;//补丁和补丁工具版本不一致异常
int CODE_LOAD_NOT_ZIP_FORMAT = 77;//补丁zip解析异常
int CODE_LOAD_DELETE_OPT = 80;//删除无效odex文件异常
int CODE_LOAD_HANDLE_DEX = 81;//加载dex异常
// 反射调用异常
int CODE_LOAD_FIND_CLASS = 82;
int CODE_LOAD_FIND_CONSTRUCTOR = 83;
int CODE_LOAD_FIND_METHOD = 84;
int CODE_LOAD_FIND_FIELD = 85;
int CODE_LOAD_ILLEGAL_ACCESS = 86;
//resource加载
public static final int CODE_LOAD_RES_ADDASSERTPATH = 123;//新增资源补丁包异常
//lib加载
int CODE_LOAD_LIB_UNDEFINED = 131;//未定义异常
int CODE_LOAD_LIB_CPUABIS = 132;//获取primaryCpuAbis异常
int CODE_LOAD_LIB_JSON = 133;//json格式异常
int CODE_LOAD_LIB_LOST = 134;//lib库不完整异常
int CODE_LOAD_LIB_UNZIP = 135;//解压异常
int CODE_LOAD_LIB_INJECT = 136;//注入异常
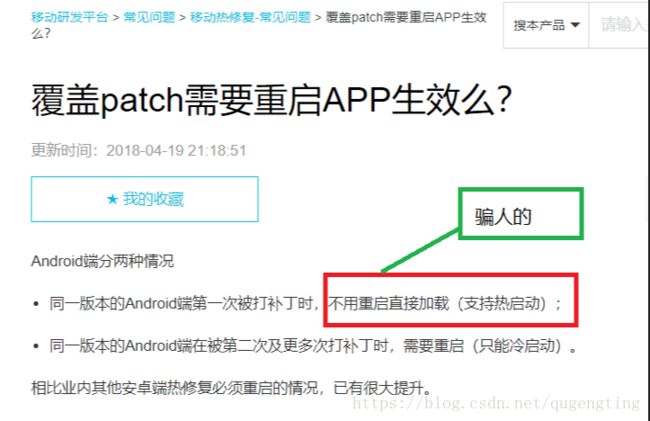
最后的最后的最后,经过我反复测试,发现官网所说的支持热启动并不是事实,覆盖补丁之后,不仅需要重启,而且是需要杀掉进程的那种重启,补丁才能生效。(后来遇到一次不需要重启的了,我凌乱了,还没抓住规律)


