将Qt Widgets嵌入到QML界面中的一种示范
*QML离屏渲染Qt Widgets
使用Qml中的控件QQuickPaintedItem来对Qt Widgets进行渲染以达到Wdigets可以很自然的显示在QML界面中.
先简单的讲述一下思路:
就是用QQuickPaintedItem 来将QWidget样子显示到QML页面中,并且把QQuickPaintedItem获得的事件合理的转发给QWidget让QWidget能处理对应的消息。类似于QQuickPaintedItem在QML页面中代理了QWidget
接下来直入主题,首先我们为这个例子建立一个类QmlOSRExpMainWindow:
.h
#ifndef QMLOSREXPMAINWINDOW_H
#define QMLOSREXPMAINWINDOW_H

#include
#include

class QmlOSRExpMainWindow : public QQuickWindow
{
public:
    QmlOSRExpMainWindow(QWindow *parent = 0);
    ~QmlOSRExpMainWindow();

    void load(QUrl src);
    QQuickItem* rootItem();

private:
    static QQmlEngine* gEngine;
    static int gWindowCount;
    QQmlComponent* mComponent;
    QQuickItem* mRootItem;

    static void checkInit();
    static void checkUnInit();
};

#endif // QMLOSREXPMAINWINDOW_H
.cpp
#include "QmlOSRExpMainWindow.h"
#include
#include
#include
#include
#include
#include

QQmlEngine* QmlOSRExpMainWindow::gEngine = 0;
int QmlOSRExpMainWindow::gWindowCount = 0;

QmlOSRExpMainWindow::QmlOSRExpMainWindow(QWindow *parent)
    :QQuickWindow(parent)
    ,mComponent(0)
    ,mRootItem(0)
{
    checkInit();

    mComponent = new QQmlComponent(gEngine);
}

QmlOSRExpMainWindow::~QmlOSRExpMainWindow()
{
    checkUnInit();
}

void QmlOSRExpMainWindow::load(QUrl src)
{
    if(mRootItem)
    {
        qDebug() << "release root item:" << mRootItem;
        delete mRootItem;
        mRootItem = NULL;
    }

    mComponent->loadUrl(src);
    if(mComponent->isReady()) //注意,这里可能没准备好,需要巡回检测状态通过才能继续,本例就不提供这个操作了。
    {
        QObject* root = mComponent->create();


        QQuickItem* rootItem = qobject_cast(root);
        if(rootItem)
        {
            rootItem->setParentItem(this->contentItem());
            mRootItem = rootItem;
        }
        else
        {
            qDebug() << "load error: dosen't suport " << root;
        }

    }
    else
    {
        qDebug() << "QmlComponent ERROR:" << mComponent->errorString();
    }
}

QQuickItem *QmlOSRExpMainWindow::rootItem()
{
    return mRootItem;
}

void QmlOSRExpMainWindow::checkInit()
{
    //_internal
    if(gWindowCount++ == 0)
    {
        qDebug() << "init qml engine";
        gEngine = new QQmlEngine;
    }
    //
}

void QmlOSRExpMainWindow::checkUnInit()
{
    //_internal
    if(--gWindowCount == 0)
    {
        qDebug() << "release qml engie";
        delete gEngine;
        gEngine = NULL;
    }
    //
}
以上代码实现了QmlOSRExpMainWindow作为我们本例子的主窗口.
接下来我们继承QQuickPaintedItem来实现一个可以在QML渲染Widgets的控件WidgetOSRItem:
.h
#ifndef WIDGETOSRITEM_H
#define WIDGETOSRITEM_H

#include

class WidgetOSRItem : public QQuickPaintedItem
{
    Q_OBJECT
    Q_PROPERTY(QVariant osrWidget WRITE setOSRWidget)
public:
    WidgetOSRItem();

    void setOSRWidget(QVariant w); //* 加入要渲染的widget,不维护这个weiget的生命周期, var -->> QWidget*

    virtual void paint(QPainter *painter) override; //重载paint函数

protected:
    virtual bool eventFilter(QObject* obj, QEvent* e) override;


    //当item改变大小位置的时候在这里同步改变OSRWidget的位置和大小
    virtual void geometryChanged(const QRectF & newGeometry, const QRectF & oldGeometry) override;

    virtual void	hoverEnterEvent(QHoverEvent * e) override;
    virtual void	hoverLeaveEvent(QHoverEvent * e) override;
    virtual void	hoverMoveEvent(QHoverEvent * e) override;
    virtual bool    event(QEvent *e) override; //*只有通过这个函数处理的才会转成对应的Event,在这里过滤消息

private:
    QWidget* mOSRWidget;
};

#endif // WIDGETOSRITEM_H
.cpp
#include "WidgetOSRItem.h"
#include
#include
#include

WidgetOSRItem::WidgetOSRItem()
    :mOSRWidget(0)
{
    this->setAcceptHoverEvents(true);
    this->setAcceptedMouseButtons(Qt::AllButtons);
    setFlag(ItemAcceptsInputMethod, true);
    setFlag(ItemIsFocusScope, true);
    setFlag(ItemHasContents, true);
}

void WidgetOSRItem::setOSRWidget(QVariant w)
{
    mOSRWidget = w.value();
    if(mOSRWidget)
    {
        mOSRWidget->installEventFilter(this);
        this->update();
    }
}

void WidgetOSRItem::paint(QPainter *painter)
{
    painter->save();
    if(mOSRWidget == NULL)
    {
        painter->drawText(this->boundingRect(), Qt::AlignCenter, "painted item");
    }
    else
    {
        mOSRWidget->render(painter);
    }

    painter->restore();
}

bool WidgetOSRItem::eventFilter(QObject *obj, QEvent *e)
{
    bool res = QQuickPaintedItem::eventFilter(obj, e);
    if(obj == mOSRWidget)
    {
        switch(e->type())
        {
        case QEvent::Paint: //当OsrWidget paint的时候也触发自己paint
        {
            this->update();
        }
            break;
        }
    }

    return res;
}

void WidgetOSRItem::geometryChanged(const QRectF &newGeometry, const QRectF &oldGeometry)
{
    QQuickPaintedItem::geometryChanged(newGeometry, oldGeometry);

    if(mOSRWidget)
    {
        mOSRWidget->setGeometry(newGeometry.toRect());
    }
}

void WidgetOSRItem::hoverEnterEvent(QHoverEvent *e)
{
   if(!mOSRWidget)
       return;
   QEnterEvent enterEvent(e->posF(), mapToScene(e->posF()), QCursor::pos());//QEnterEvent(const QPointF & localPos, const QPointF & windowPos, const QPointF & screenPos)
   qApp->sendEvent(mOSRWidget, &enterEvent);
}

void WidgetOSRItem::hoverLeaveEvent(QHoverEvent *e)
{
    if(!mOSRWidget)
        return;
    qApp->sendEvent(mOSRWidget, e);
}

void WidgetOSRItem::hoverMoveEvent(QHoverEvent *e)
{
    if(!mOSRWidget)
        return;
    QMouseEvent me(QEvent::MouseMove, e->posF(), mapToScene(e->posF()), QCursor::pos(), Qt::NoButton, Qt::NoButton, 0);
    qApp->sendEvent(mOSRWidget, &me);
}

bool WidgetOSRItem::event(QEvent *e)
{
    if(!mOSRWidget)
    {
        e->ignore();
        return false;
    }

    switch(e->type())
    {
    case QEvent::HoverEnter:
    case QEvent::HoverLeave:
    case QEvent::HoverMove:
    {
        return QQuickPaintedItem::event(e);
    }
        break;
    default:
        return qApp->sendEvent(mOSRWidget, e);
    }
}
以上代码实现了可以在QML中渲染Widget的控件WidgetOSRItem,只要注册到QML中就可以使用这个控件.
主要的部分弄好了,接下来让我们完成这个例子.
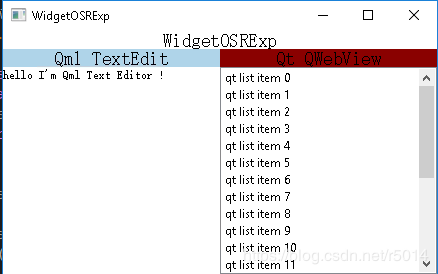
首先写一个qml界面文件WidgetOSRExp.qml,这个qml界面左边是一个TextEidt,右边是用来渲染Widgets的WidgetOSRItem控件,
我们可以通过设置osrItem_OSRWidget的值将要渲染的widget设置给WidgetOSRItem控件:
.qml
import QtQuick 2.3
import QtQuick.Window 2.2

import Diy.WidgetOSRItem 1.0

Item
{
    id: osrRoot
    anchors.fill: parent
    property alias osrItem_OSRWidget : osrItem.osrWidget

    Text
    {
        id: expName
        text: "WidgetOSRExp"
        anchors.left: parent.left
        anchors.top: parent.top
        anchors.right: parent.right
        height: 18
        font.pointSize: 14
        verticalAlignment: Text.AlignVCenter
        horizontalAlignment: Text.AlignHCenter
    }

    Rectangle
    {
        id: qmlTitle
        Text
        {
            text: "Qml TextEdit"
            anchors.fill: parent
            font.pointSize: 14
            verticalAlignment: Text.AlignVCenter
            horizontalAlignment: Text.AlignHCenter
        }

        anchors.left: parent.left
        anchors.top: expName.bottom
        width: parent.width/2
        height: 18
        color: "lightblue"
    }

    Rectangle
    {
        id: qtlTitle
        Text
        {
            text: "Qt QWebView"
            anchors.fill: parent
            font.pointSize: 14
            verticalAlignment: Text.AlignVCenter
            horizontalAlignment: Text.AlignHCenter
        }

        anchors.left: qmlTitle.right
        anchors.top: expName.bottom
        width: parent.width/2
        height: 18
        color: "darkred"
    }

    TextEdit
    {
        id: qmlTextEdit
        anchors.top: qmlTitle.bottom
        anchors.left: qmlTitle.left
        anchors.right: qmlTitle.right
        anchors.bottom: parent.bottom
        text:"hello I'm Qml Text Editor !"
    }


    WidgetOSRItem //OSR ITEM
    {
        id: osrItem
        anchors.top: qtlTitle.bottom
        anchors.left: qtlTitle.left
        anchors.right: qtlTitle.right
        anchors.bottom: parent.bottom

        MouseArea//控制osrItem的焦点
        {
            anchors.fill: parent;
            propagateComposedEvents: true

            onPressed:
            {
                mouse.accepted = false
                parent.focus = true
            }
            onReleased: mouse.accepted = false
            onMouseXChanged: mouse.accepted = false
            onMouseYChanged: mouse.accepted = false
        }
    }
}
在这个文件中import Diy.WidgetOSRItem 1.0 这句话的Diy.WidgetOSRItem 1.0是我注册进去的WidgetOSRItem控件的引用.
控件和qml都准备好了,让我们开始吧:
实现main函数:
main.cpp
#include "mainwindow.h"
#include
#include
#include "QmlOSRExpMainWindow.h"
#include "WidgetOSRItem.h"

int main(int argc, char *argv[])
{
    QApplication a(argc, argv);
    QApplication::setAttribute(Qt::AA_UseSoftwareOpenGL, true);

    //register diy qml tools
    qmlRegisterType("Diy.WidgetOSRItem",1,0, "WidgetOSRItem");

    QmlOSRExpMainWindow w;
    w.show();
    w.load(QUrl("qrc:/WidgetOSRExp.qml"));


    //新建一个QWebView放入qml osr item中
    QWebView osrWebView;
    osrWebView.setUrl(QUrl("http://www.baidu.com"));
    w.rootItem()->setProperty("osrItem_OSRWidget", QVariant::fromValue(&osrWebView));

    int res =  a.exec();
    return res;
}
这个main函数中我加载了qml界面,并为右边的渲染控件设置了一个QWebView进去.
运行结果(图片太大进行了缩放):

让我们试试渲染一个QListView,运行结果:
至此本例结束,这个方法各位可以尝试一下.