Ubuntu16.04安装cuckoo sandbox
一、官方文档
https://cuckoo.sh/docs/
二、沙盒简介
在计算机安全领域,沙盒(英语:sandbox,又译为沙箱)是一种安全机制,为运行中的程序提供的隔离环境。通常是作为一些来源不可信、具破坏力或无法判定程序意图的程序提供实验之用。
这个概念也适用于恶意软件分析的沙盒:我们的目标是在隔离环境中运行未知和不受信任的应用程序或文件,并获取有关它的功能的信息。简单的说,Cuckoo是一个允许执行沙盒恶意软件分析的工具。
三、Cuckoo简介
Cuckoo是一个开源的自动恶意软件分析系统。
它用于自动运行和分析文件,并收集所有的分析结果,输出恶意软件在隔离操作系统内运行时的情况。
它可以检索以下类型的结果:
- 由恶意软件生成的所有进程执行的调用跟踪。
- 恶意软件在执行期间创建,删除和下载的文件。
- 恶意软件进程的内存转储。
- PCAP格式的网络流量跟踪。
- 在执行恶意软件期间拍摄的屏幕截图。
- 机器的完整内存转储。
由于其极为模块化的设计,Cuckoo既可以作为独立应用程序使用,也可以集成到更大的框架中。
它可以用来分析:
- 通用Windows可执行文件
- DLL文件 PDF文件
- Microsoft Office文档
- 网址和HTML文件
- PHP脚本
- CPL文件
- Visual Basic(VB)脚本
- ZIP文件
- Java JAR
- Python文件
- 几乎其他任何东西
由于其模块化和强大的脚本功能,使用Cuckoo可以实现的目标没有限制。
四、Cuckoo架构
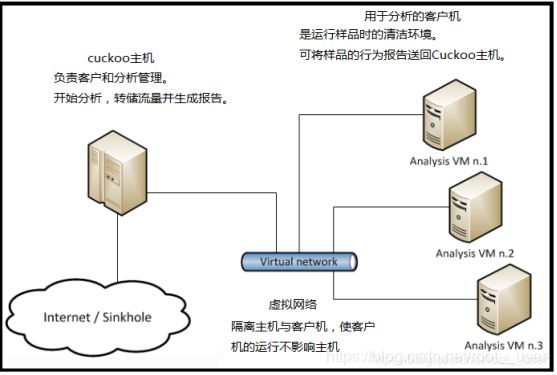
Cuckoo的每个分析 都在一个 全新的 隔离的 虚拟机或物理机 中启动。Cuckoo基础架构的主要组件是主机(管理软件)和许多客户机(用于分析的虚拟机或物理机)。
主机上的管理软件是 整个分析过程的核心组件,而客户机是实际安全执行和分析恶意软件样本的隔离环境。
下图解释了Cuckoo的主要架构:
五、cuckoo的安装
我安装的系统:
主机:Ubuntu16.04 LTS
虚拟机:VMware
客户机:win xp
1 准备主机
1.1 准备cuckoo需要的环境
1.1.1安装python库
Cuckoo主机组件完全用Python编写,因此需要安装适当版本的Python。此时我们只完全支持Python 2.7。需要以下来自apt存储库的软件包才能使Cuckoo正确安装和运行:
$ sudo apt-get install python python-pip python-dev libffi-dev libssl-dev
$ sudo apt-get install python-virtualenv python-setuptools
$ sudo apt-get install libjpeg-dev zlib1g-dev swig
1.1.2 安装MongoDB
为了使用基于Django的Web界面,需要使用MongoDB:
$ sudo apt-get install mongodb
1.1.3 安装PostgreSQL
为了使用PostgreSQL作为数据库(我们的推荐),还必须安装PostgreSQL:
$ sudo apt-get install postgresql libpq-dev
1.1.4 安装虚拟机
我装的是VMware。(也试过virtualBox,但是在virtualBox上装win xp的时候没装上xp,就选择了VMware)
1.1.5安装tcpdump
为了在执行期间转储恶意软件执行的网络活动,需要正确配置网络嗅探器以捕获流量并将其转储到文件中。
$ sudo apt-get install tcpdump apparmor-utils
$ sudo aa-disable /usr/sbin/tcpdump
请注意,只有在使用默认目录时才需要apparmor禁用配置文件(aa-disable命令),CWD因为apparmor会阻止创建实际的PCAP文件(另请参阅 tcpdump的权限被拒绝)。
对于禁用apparmor的Linux平台(例如,Debian),以下命令就足以安装tcpdump:
$ sudo apt-get install tcpdump
Tcpdump需要root权限,但由于不希望Cuckoo以root身份运行,因此必须为二进制文件设置特定的Linux功能:
$ sudo groupadd pcap
$ sudo usermod -a -G pcap cuckoo
$ sudo chgrp pcap /usr/sbin/tcpdump
$ sudo setcap cap_net_raw,cap_net_admin=eip /usr/sbin/tcpdump
可以使用以下命令验证上一个命令的结果:
$ getcap /usr/sbin/tcpdump
/usr/sbin/tcpdump = cap_net_admin,cap_net_raw+eip
如果没有安装setcap,可以使用:
$ sudo apt-get install libcap2-bin
或者以其他方式(不推荐)做:
$ sudo chmod +s /usr/sbin/tcpdump
1.1.6 安装Volatility(内存取证分析工具)
Volatility是一种可选工具,可对内存转储进行取证分析。与Cuckoo结合使用,它可以自动提供对操作系统深度修改的额外可视性,并检测逃脱Cuckoo分析器监控域的rootkit技术的存在。(本文未安装)可以从他们的官方存储库下载它。
1.1.7安装M2Crypto
目前M2Crypto只有在安装SWIG时才支持该库。在Ubuntu /类似Debian的系统上,可以按如下方式完成:
$ sudo apt-get install swig
如果SWIG系统中存在,可以M2Crypto按如下方式安装:
$ sudo pip install m2crypto==0.24.0
1.1.8安装guacd
guacd 是一项可选服务,为Cuckoo Web界面中的远程控制功能提供RDP,VNC和SSH转换层。没有它,遥控器将无法工作。0.9.9及更高版本可以使用,但我们建议安装最新版本。在Ubuntu 17.04机器上,以下命令将安装版本0.9.9-2:
$sudo apt install libguac-client-rdp0 libguac-client-vnc0 libguac-client-ssh0 guacd
如果只需要RDP支持,则可以跳过libguac-client-vnc0和libguac-client-ssh0软件包的安装 。
如果使用的是较旧的发行版,或者只是想使用最新版本(我们的推荐),则以下内容0.9.14将从源代码构建最新版本():
$ sudo apt -y install libcairo2-dev libjpeg-turbo8-dev libpng-dev libossp-uuid-dev libfreerdp-dev
$ mkdir /tmp/guac-build && cd /tmp/guac-build
$ wget https://www.apache.org/dist/guacamole/0.9.14/source/guacamole-server-0.9.14.tar.gz
$ tar xvf guacamole-server-0.9.14.tar.gz && cd guacamole-server-0.9.14
$ ./configure --with-init-dir=/etc/init.d
$ make && sudo make install && cd ..
$ sudo ldconfig
$ sudo /etc/init.d/guacd start
从源代码安装时,请确保没有libguac-从软件包管理器安装任何库的其他版本,否则您可能会遇到由于不兼容而导致guacd崩溃的问题。
请注意,还必须安装VirtualBox扩展包才能利用Guacamole公开的Cuckoo控制功能。
1.2 安装cuckoo
1.2.1 创建用户
我们可以从自己的用户运行Cuckoo,也可以创建一个专门用于沙箱设置的新Cuckoo。确保运行Cuckoo的用户与您将用于创建和运行虚拟机的用户相同(至少在VirtualBox的情况下),否则Cuckoo将无法识别和启动这些虚拟机。(我装的是vmware,没有创建这个用户,但创建cuckoo和虚拟机的用户是相同的)
1.2.2提高文件限制
由于cuckoo在运行的过程中会打开较多的文件,但操作系统会限制最多打开文件数,所以需要提高文件限制。如常见问题条目中所述:IOError:[Errno 24]打开文件太多。
1.2.3 安装cuckoo
建议首先升级pip和setuptools库
$ sudo pip install -U pip setuptools
$ sudo pip install -U cuckoo
如果上面操作没有安装上cuckoo,可以选择下载cuckoo文件安装:
$ pip download cuckoo
您最终会得到一个文件Cuckoo-2.0.0.tar.gz(或更高的数字,具体取决于最新发布的稳定版本)以及所有依赖项(例如alembic-0.8.8.tar.gz)。
安装:
$ pip install Cuckoo-2.0.0.tar.gz
1.2.4 cuckoo的目录
cuckoo默认安装在当前用户目录下,即:~/.cuckoo,我们可以看到这是个隐藏目录。我们可以使用$ cuckoo -d来启动cuckoo。
2 创建客户机
2.1创建虚拟机
我下载的是VMware Workstation 15,先在Ubuntu16.04LTS上安装VMware15。
然后在vmware上安装windows xp。
2.2安装软件和库
2.2.1在客户机上安装python
为了使Cuckoo在虚拟化Windows系统中正常运行,您必须安装一些必需的软件和库。
Python是对Cuckoo guest虚拟机组件(分析器)的严格要求,以便正常运行。
可以从官方网站下载正确的Windows安装程序。同样在这种情况下,Python 2.7是首选。
一些Python库是可选的,并为Cuckoo guest虚拟机组件提供了一些附加功能。他们包括:
Python Pillow:它用于在分析过程中截取Windows桌面的截图。
Cuckoo并不严格要求它们正常工作,但如果您想要访问所有可用功能,建议您安装它们。确保根据您的Python版本下载并安装正确的软件包。
2.2.2附加软件
此时应该已经安装了Cuckoo正常运行所需的一切。
根据要分析的文件类型以及要在其中运行恶意软件样本的沙盒类型Windows环境,可能需要安装其他软件,如浏览器,PDF阅读器,办公套件等。请记住禁用自动更新或检查任何其他软件的更新功能。
操作如下:开始->控制面板->安全中心

下拉找到防火墙和自动更新:

关闭防火墙和自动更新。如下图:

2.3网络配置
2.3.1Windows设置
最重要的事情之一是禁用Windows防火墙和自动更新。这背后的原因是它们可以在正常情况下影响恶意软件的行为,并且它们可以通过丢弃连接或包括不相关的请求来污染Cuckoo执行的网络分析。
2.3.2虚拟网络设置
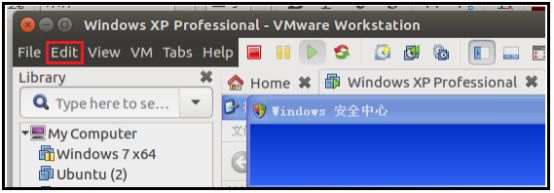
首先修改vmware的网络连接模式为host-only模式(仅主机模式):编辑(Edit)→虚拟网络编辑器(Virtual Network Editor)
弹出Virtual Network Editor, 然后选择步骤①,填写步骤②和③

在到windows xp中 : 控制面板 → 网络和Internet连接 → 网络连接 会得到下图,
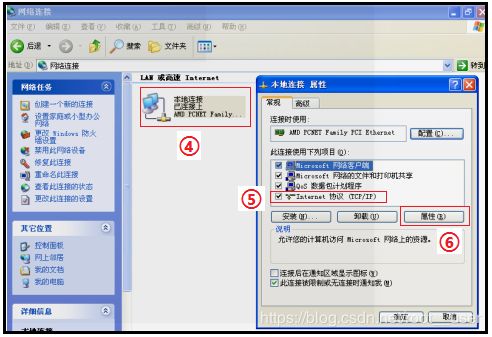
然后右击④,选择属性,选择⑤,按⑥,得到下图:
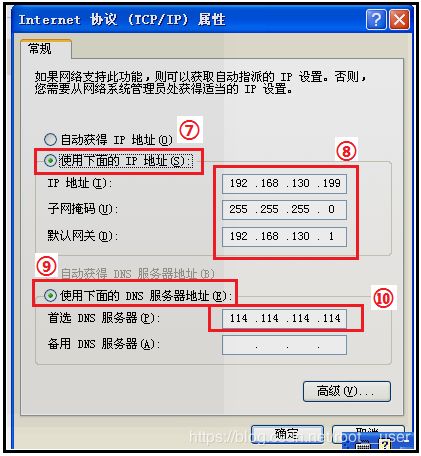
我们设置为静态ip,点击⑦,填写⑧⑨⑩,最后确定。到此网络配置完成。然后ping一下,看主机与客户机是否相通。
虽然主机与客户机可以互通,但这还无法满足正常的自动化恶意软件分析的要求,因为这种初级的Host-only模式里面虚拟机无法访问互联网,而很多恶意软件都需要访问网络才可以正常运行。所以我们还需要vwnet1这块网卡具有代理上网的功能,使这个小局域网里的虚拟客户机可以通过这块虚拟网卡访问互联网。如果要满足这个需求,需要在 Ubuntu Host 机上做两个操作:开启流量转发、用iptables做地址转换(NAT)规则。
开启 IP 转发,用下面两条命令之一皆可:
$sysctl -w net.ipv4.ip_forward=1
$echo 1 > /proc/sys/net/ipv4/ip_forward
但是上面的命令只能 临时开启 IP 转发功能,系统重启之后便失效。若想永久开启此功能,需要手动修改配置文件 /etc/sysctl.conf ,将里面 net.ipv4.ip_forward=1 前的注释取消,然后运行以下命令即可永久开启 IP 转发功能:
$sysctl -p /etc/sysctl.conf
Ubuntu 系统中用 iptables 设置地址转换规则,Cuckoo 官方资料给出了参考命令:
$ iptables -A FORWARD -o eth0 -i vboxnet0 -s 192.168.56.0/24 -m conntrack --ctstate NEW -j ACCEPT
$ iptables -A FORWARD -m conntrack --ctstate ESTABLISHED,RELATED -j ACCEPT
$ iptables -A POSTROUTING -t nat -j MASQUERADE
需将erh0 换成自己主机的网卡名enp4s0,vboxnet0换成vmnet1,192.168.56.0 换成自己的192.168.130.0。

操作如下:

这样一来,Ubuntu Host 主机每次关机前都会把已有的 iptables 规则备份到 /etc/iptables.rules 文件中、每次开机是都会从 /etc/iptables.rules 读取规则并启用。
配置好之后,Guest 虚拟机就可以通过vmnet1来访问互联网了。
2.4安装代理
从版本0.4开始,Cuckoo采用在Guest内部运行的自定义代理,它处理与主机的通信和数据交换。此代理程序设计为跨平台,因此您应该能够在Windows,Android,Linux和Mac OS X上使用它。为了使Cuckoo正常工作,必须安装并启动此代理程序。
在$CWD/agent/目录中(CWD:Cuckoo Working Directory ),您将找到该agent.py文件。将此文件复制到客户机操作系统(以您想要的任何方式,可能是临时共享文件夹,或者从主机上的Web服务器下载,我们建议使用后者)并运行它。代理将启动主机可以与之通信的小型API服务器。
在Windows上,只需启动脚本也会生成一个Python窗口,如果要隐藏它,可以将文件agent.py重命名为agent.pyw,这将阻止控制台窗口的生成。
如果希望在Windows’启动时启动脚本,只需将文件放在Startup文件夹中。
2.5保存虚拟机
现在,您应该已准备好将虚拟机保存到快照状态。
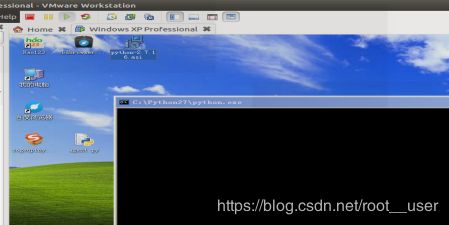
在执行此操作之前,请确保您已轻轻地重新启动它并且当前正在运行,Cuckoo的代理正在运行并且Windows已完全启动。如下图启动agent.py。然后对虚拟机建立快照,然后修改快照名,将Snapshot与1之间的空格去掉即可。
3 配置cuckoo
Cuckoo依赖于几个主要的配置文件:
- cuckoo.conf:用于配置常规行为和分析选项。
- auxiliary.conf:用于启用和配置辅助模块。
- < machinery > .conf:配置虚拟机的配置文件(如果用的是vmware虚拟机,就是vmware.conf)。
- memory.conf:内存取证分析工具 的 配置。
- processing.conf:用于启用和配置处理模块。
- reporting.conf:用于启用或禁用报告格式。
- 要让Cuckoo工作,你至少应该编辑cuckoo.conf和 < machinery > .conf。
3.1 cuckoo.conf
cuckoo.conf是主要的配置文件,最主要的是 machinery 用于指定我们使用的虚拟机配置文件,默认是 virtualbox,该文件同样位于 conf 目录下,名字是 virtualbox.conf。(我们用的虚拟软件是vmware,一会儿应该修改vmware.conf)另外一个比较重要的配置项是[resultserver] 的 ip和port,用于指定接收分析结果的服务器。该地址必须能够让虚拟机访问到,一般设置为虚拟网卡的地址,比如前面说过的 Host-only 虚拟网卡 vboxnet0 的 IP 地址192.168.130.1(也可以自己改成其他的,我写的是主机的地址),端口默认即可;下面是我的cuckoo.conf文件。
[cuckoo]
# Enable or disable startup version check. When enabled, Cuckoo will connect
# to a remote location to verify whether the running version is the latest
# one available.
version_check = yes

# If turned on, Cuckoo will delete the original file after its analysis
# has been completed.
delete_original = no

# If turned on, Cuckoo will delete the copy of the original file in the
# local binaries repository after the analysis has finished. (On *nix this
# will also invalidate the file called "binary" in each analysis directory,
# as this is a symlink.)
delete_bin_copy = no

# Specify the name of the machinery module to use, this module will
# define the interaction between Cuckoo and your virtualization software
# of choice.
#machinery = virtualbox
machinery = vmware #(修改这里)

# Enable creation of memory dump of the analysis machine before shutting
# down. Even if turned off, this functionality can also be enabled at
# submission. Currently available for: VirtualBox and libvirt modules (KVM).
memory_dump = no

# When the timeout of an analysis is hit, the VM is just killed by default.
# For some long-running setups it might be interesting to terminate the
# monitored processes before killing the VM so that connections are closed.
terminate_processes = no

# Enable automatically re-schedule of "broken" tasks each startup.
# Each task found in status "processing" is re-queued for analysis.
reschedule = no

# Enable processing of results within the main cuckoo process.
# This is the default behavior but can be switched off for setups that
# require high stability and process the results in a separate task.
process_results = yes

# Limit the amount of analysis jobs a Cuckoo process goes through.
# This can be used together with a watchdog to mitigate risk of memory leaks.
max_analysis_count = 0

# Limit the number of concurrently executing analysis machines.
# This may be useful on systems with limited resources.
# Set to 0 to disable any limits.
max_machines_count = 0

# Limit the amount of VMs that are allowed to start in parallel. Generally
# speaking starting the VMs is one of the more CPU intensive parts of the
# actual analysis. This option tries to avoid maxing out the CPU completely.
max_vmstartup_count = 10

# Minimum amount of free space (in MB) available before starting a new task.
# This tries to avoid failing an analysis because the reports can't be written
# due out-of-diskspace errors. Setting this value to 0 disables the check.
# (Note: this feature is currently not supported under Windows.)
freespace = 1024

# Temporary directory containing the files uploaded through Cuckoo interfaces
# (api.py and Django web interface). Defaults to the default temporary
# directory of the operating system (e.g., /tmp on Linux). Overwrite the value
# if you'd like to specify an alternative path.
tmppath =

# Path to the unix socket for running root commands.
rooter = /tmp/cuckoo-rooter

[feedback]
# Cuckoo is capable of sending "developer feedback" to the developers so that
# they can more easily improve the project. This functionality also allows the
# user to quickly request new features, report bugs, and get in touch with
# support in general, etc.
enabled = no
name =
company =
email =

[resultserver]
# The Result Server is used to receive in real time the behavioral logs
# produced by the analyzer.
# Specify the IP address of the host. The analysis machines should be able
# to contact the host through such address, so make sure it's valid.
# NOTE: if you set resultserver IP to 0.0.0.0 you have to set the option
# `resultserver_ip` for all your virtual machines in machinery configuration.
#ip = 192.168.130.0
ip = 172.30.xxx.xx#(修改这里)

# Specify a port number to bind the result server on.
port = 2042

# Force the port chosen above, don't try another one (we can select another
# port dynamically if we can not bind this one, but that is not an option
# in some setups)
force_port = no

# Maximum size of uploaded files from VM (screenshots, dropped files, log).
# The value is expressed in bytes, by default 128 MB.
upload_max_size = 134217728

[processing]
# Set the maximum size of analyses generated files to process. This is used
# to avoid the processing of big files which may take a lot of processing
# time. The value is expressed in bytes, by default 128 MB.
analysis_size_limit = 134217728

# Enable or disable DNS lookups.
resolve_dns = yes

# Enable PCAP sorting, needed for the connection content view in the web interface.
sort_pcap = yes

[database]
# Specify the database connection string.
# NOTE: If you are using a custom database (different from sqlite), you have to
# use utf-8 encoding when issuing the SQL database creation statement.
# Examples, see documentation for more:
# sqlite:///foo.db
# postgresql://foo:bar@localhost:5432/mydatabase
# mysql://foo:bar@localhost/mydatabase
# If empty, defaults to a SQLite3 database at $CWD/cuckoo.db.
connection =

# Database connection timeout in seconds.
# If empty, default is set to 60 seconds.
timeout = 60

[timeouts]
# Set the default analysis timeout expressed in seconds. This value will be
# used to define after how many seconds the analysis will terminate unless
# otherwise specified at submission.
default = 120

# Set the critical timeout expressed in (relative!) seconds. It will be added
# to the default timeout above and after this timeout is hit
# Cuckoo will consider the analysis failed and it will shutdown the machine
# no matter what. When this happens the analysis results will most likely
# be lost.
critical = 60

# Maximum time to wait for virtual machine status change. For example when
# shutting down a vm. Default is 60 seconds.
vm_state = 60

[remotecontrol]
# Enable for remote control of analysis machines inside the web interface.
enabled = no

# Set host of the running guacd service.
guacd_host = localhost

# Set port of the running guacd service.
guacd_port = 4822
3.2配置vmware.conf
虚拟化配置文件,包括 virtualbox/vmware/kvm/qume等。在实际的配置当中,根据自己试用的虚拟化环境,只需要配置其中一个即可,同时采用的这个配置文件也必须 在cuckoo.conf 的 machinery 字段指定。这里的配置选项都是针对特定虚拟化平台的,很多选项只适用于某些平台。前面我们用的是 vmware.conf,其中 mode 指定vmware的运行模式,path 指定VMwareManage的绝对路径,machines指定我们使用的虚拟机的名字(多个虚拟机需要用半角逗号隔开),platform 指定虚拟客户机的系统类型,ip 指定虚拟机的ip地址;下面是我的vmware.conf文件。
[vmware]
# Specify which Vmware Workstation mode you want to run your machines on.
# Can be "gui" or "nogui". Refer to VMware's official
# documentation to understand the differences.
mode = gui

# Path to the local installation of the vmrun utility.
path = /usr/bin/vmrun

# Specify a comma-separated list of available machines to be used. For each
# specified ID you have to define a dedicated section containing the details
# on the respective machine. (E.g. cuckoo1,cuckoo2,cuckoo3)
machines = Windows XP Professional #(这是我虚拟机的名字)

# Specify the name of the default network interface that should be used
# when dumping network traffic with tcpdump.
# Example (virbr0 is the interface name):
interface = vmnet1  #(用的是vmnet1这块网卡)


[Windows XP Professional]  #(这里一定要修改)
# Specify the path to vmx file of this virtual machine.虚拟机的位置
vmx_path = /home/zhy/xp/Windows XP Professional.vmx

# Specify the snapshot name to use.快照的名字
snapshot = Snapshot1

# Specify the operating system platform used by current machine
# [windows/darwin/linux].虚拟机是什么系统
platform = windows

# Specify the IP address of the current virtual machine. Make sure that the
# IP address is valid and that the host machine is able to reach it. If not,
# the analysis will fail.虚拟机上的IP地址
#ip = 192.168.54.111
ip = 192.168.130.199

# (Optional) Specify the name of the network interface that should be used
# when dumping network traffic from this machine with tcpdump.
# Example (virbr0 is the interface name):用的是那块虚拟网卡
interface = vmnet1

# (Optional) Specify the IP of the Result Server, as your virtual machine sees it.
# The Result Server will always bind to the address and port specified in cuckoo.conf,
# however you could set up your virtual network to use NAT/PAT, so you can specify here
# the IP address for the Result Server as your machine sees it. If you don't specify an
# address here, the machine will use the default value from cuckoo.conf.
# NOTE: if you set this option you have to set result server IP to 0.0.0.0 in cuckoo.conf.
# Example:
resultserver_ip =

# (Optional) Specify the port for the Result Server, as your virtual machine sees it.
# The Result Server will always bind to the address and port specified in cuckoo.conf,
# however you could set up your virtual network to use NAT/PAT, so you can specify here
# the port for the Result Server as your machine sees it. If you don't specify a port
# here, the machine will use the default value from cuckoo.conf.
# Example:
resultserver_port =

# (Optional) Set your own tags. These are comma separated and help to identify
# specific VMs. You can run samples on VMs with tag you require.
tags =

# (Optional) Specify the OS profile to be used by volatility for this
# virtual machine. This will override the guest_profile variable in
# memory.conf which solves the problem of having multiple types of VMs
# and properly determining which profile to use.
osprofile =
3.3配置reporting.conf
至此,Cuckoo 自动化恶意软件分析环境的配置工作算是基本完成,接下来就是启动 Cuckoo 服务、上传样本进行自动化分析了。
在启动 Cuckoo 服务之前,还需要开启 MongoDB 服务,并根据 reporting.conf 中的关于 MongoDB 的配置创建一个新的数据集。比如我的 reporting.conf 关于数据库的 配置如下所示,我就需要手动创建一个名为 cuckoo 的数据集:
[mongodb]
enabled = yes
host = 127.0.0.1
port = 27017
db = cuckoo
store_memdump = yes
paginate = 100
至此,cuckoo的配置就结束了。
六、使用cuckoo
cuckoo可以通过命令行来使用,也可以通过web界面来操作。进入~/.cuckoo/web/ 目录下,使用下面命令开启web服务:
$ cuckoo web runserver

可以通过浏览器访问 Ubuntu Host 机的 IP 地址和 Cuckoo Web 界面对应的端口了(127.0.0.1:8000),界面如下所示:

然后点击右上角的submit,进入文件上传模块:

接着在Ubuntu终端中启动cuckoo:
$ cuckoo
大致如下图所示,看到最后的信息:等待分析任务,说明安装没问题。

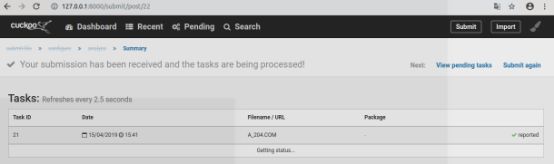
然后在wed的文件上传页面中上传文件:

点击右上角分析,分析结束,如下图:
点击查看分析结果,如下图:
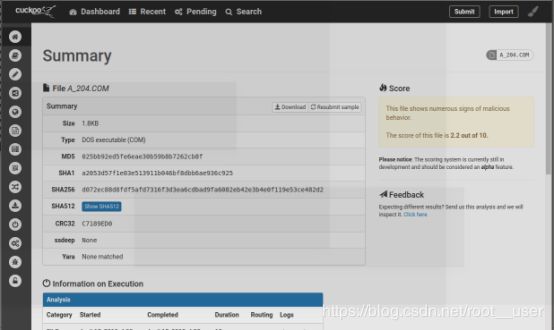
到这里cuckoo算是安装使用完毕了。
七、出现的错误
https://blog.csdn.net/root__user/article/details/89334926
八、参考文章
https://cuckoo.sh/docs/
https://www.freebuf.com/sectool/108533.html